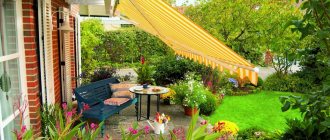
Despite the large amount of time and money that was spent on the house, during the summer season of barbecue and beer, guests spend most of their time at the gazebo. Conversations and meals al fresco are made even better. Thanks to the construction, you can spend time not only with adults, but also with your children, who will not sit still in a boring room at home.
A gazebo with a barbecue is an ideal solution for those who want quick results and minimal out-of-pocket expenses. There is no specific type of gazebo and no fixed price.
For example, a barbecue, the decor of which consists of bricks, has recently become an extremely popular solution in the country. The reason for this was the consumables, which are inexpensive compared to other options. The beautiful appearance and simple installation work also captivate customers.
A gazebo is a structure that is a canopy with supporting pillars made of metal or wood. The base can be a flooring made of boards, which is installed on a wooden frame, or a concrete screed.
The most difficult job in constructing a gazebo is installing the roof. When installing the frame, you will need materials made of metal or wood. The roof of the gazebo is covered with tiles; polycarbonate is also acceptable.
If the idea of building a gazebo yourself does not leave you, and you have little experience in laying roofs, then you can choose options for simple structures, such as a pitched roof or a gable roof, the basis for which will be pillars.
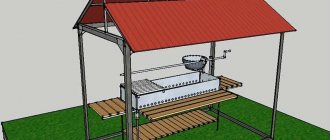
One of the options would be a gazebo with a barbecue - this is a beautiful gazebo with a barbecue, easy to make. It is made using metal pipes and metal tile covering. Construction of such rigidity does not require OSB boards and plywood.
A photo of a gazebo with a barbecue illustrates the absence of problems with the construction of a fence, because you can place it near the fence. The main thing is to make the gazebo in the same style. A simple flooring option would be paving slabs, which do not require preliminary floor preparation.
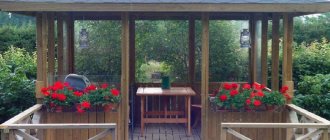
Another option would be a gazebo made of wood. The frame is formed by fixing the racks in the lower and upper frame. The roof is hipped, and the floor is made of boards located on joists. Since there is drainage material around the gazebo, and it is located above the ground, this design is resistant to heavy rainfall.
A metal tile roof for a gazebo is not a good option if you don't have a lot of money. Perhaps in this design the choice was based on the roofing material on the house.
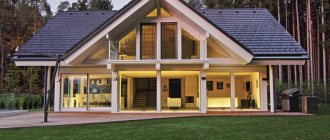
It is extremely important to make the right design of the gazebo, because it should harmoniously fit into the style of the house.
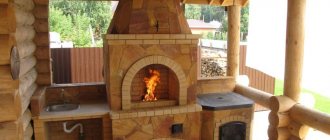
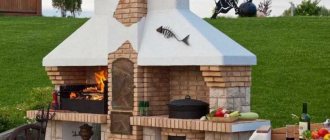
The solution for a gazebo for the courtyard of a house made in the form of logs will be a log house. A gazebo with log house elements will also fit perfectly into the log style of the house. To create the greatest comfort, you can use openwork grilles made of wood, and decorate the barbecue with stone. For such a composition, it is appropriate to make countertops from granite.
Beautiful gazebos with barbecues made using rounded logs look interesting. At the same time, it is advisable to design a gazebo with a barbecue with one solid wall so that there is no draft. If the gazebo has screens that are easy to install and dismantle yourself, then rain and wind can be prevented from entering.
An ideal option for any time of year is a closed gazebo. Thanks to its design, it can be used in hot summers and severe winters.
Brazier and its varieties
To shed light on these questions, it would be nice to find out what a barbecue is and what we know about it.
So, in the understanding of the average summer resident, a barbecue is a metal box with legs in which coals are lit, on which the dish is actually prepared.
At the same time, it is important to understand the cooking process itself, when the meat skewered on skewers is affected by:
- IR radiation emanating from hot coals
- Conversion heat - that is, heated air,
- And smoke, not from the coals, but from the meat juices accumulating on them.
You won’t get this effect in a frying pan, but as practice has shown, a barbecue in the classical sense can be slightly modified.
- For example, it can be made of brick, thereby integrating it into the work table of the summer kitchen. Then the grill will be called “Barbecue”.
- Well, or mold it into a kind of clay jug. In the east, such a roasting pan is called “Tandir”.
- As a last resort, cover the iron box with a lid, getting a real smokehouse. But in the latter option you will have to give up the kebab.
As you can see, when choosing a “stove” for a summer kitchen, the customer has some room for maneuver.
Expanding culinary possibilities
A basic oven for outdoor cooking usually includes a grill, a cooktop, and an oven. This allows you to fry kebabs, steaks and kupats, cook pilaf and shurpa, cook aromatic fish soup, bake bread and pies. But even this may not seem enough to an inveterate gastronome.
To diversify your menu, in addition to the stove, purchase a smokehouse for fish and homemade sausages or an oriental tandoor.
Foundation for a terrace with barbecue
It’s possible to lay out an ordinary terrace from garden parquet without using even an ounce of concrete, but a barbecue will immediately turn it into a permanent building and make you think about a reliable foundation; spruce trees are not under the entire area, then at least under the hearth. Well, what did you think? Airy fairy tales exist only in fairy tales, but everything that is built of brick in the real world requires a reliable foundation.
In most cases, this will be a monolithic slab, although if construction is taking place on a large scale, it makes sense to think about a strip foundation. In any case, this must be taken into account, because there are no bad reasons, only their irrational use.
The only exception is a terrace with a barbecue in a private house, because there you will use the foundation of the mother building.
What materials are they built from?
Before building a pavilion for year-round leisure, you must carefully draw up a plan, select and calculate the cost and quantity of materials.
It is advisable to choose the building material based on its thermal insulation properties. The lowest thermal conductivity coefficients are found in aerated concrete, wood concrete (sawdust concrete), wooden beams, log houses, and brick. All these materials vary in cost and have varying complexity and labor costs for construction from them.
The lower the heat loss coefficient, the longer our leisure house can be used without the use of additional heating.
Polycarbonate and removable double-glazed windows are used as materials for the construction of semi-closed gazebos.
The leader among building materials for a country pavilion with a barbecue is rightfully considered to be chopped or rounded logs. Log buildings look the most authentic, sending our associations to ancient Russian architecture. A rounded log looks very neat and less brutal than a chopped log, more reminiscent of Alpine mountain hunting lodges.
Wood is an environmentally friendly material that creates a special aroma indoors and is pleasant to touch. Wood stores the energy of pristine living nature.
Assembling a house from rounded logs is much simpler, and you can do it yourself, calling on two or three strong partners for help, or entrust it to professional builders.
Brick buildings are characterized by greater structural strength and a large number of variations in planning solutions. A building made of brick is much more durable than one made of wood.
There is also a disadvantage of building from this material - it is an increase in the estimate due to additional costs for strengthening the foundation; after all, brick is much heavier than a wooden frame.
In the construction of covered pavilions, metal can serve as a frame into which double-glazed windows are built. Heat loss in such a gazebo will be large and for the winter months the presence of a stove is mandatory.
Flooring
An open flame also leaves its mark on the floor covering used in the construction of the terrace. As you understand, wood, decking, rubber tiles, and even worse, linoleum will, of course, be possible, but undesirable options in places where sparks, or even whole coals, will fall on the floor from time to time.
At the same time, paving stones, concrete and ceramic tiles, wild and artificial stone, as well as clinker are ideal for the site.
But if you still want to build a deck from flammable materials, then at least plan a stone island near the barbecue itself. You can argue about tastes all you want, but safety comes first.
Construction of a gazebo
The first thing to do is to choose a favorable location for the future gazebo. It should not be located very far from the main building, but it must be taken into account that smoke from the fireplace does not enter it. The best option is a cleared area, near large trees or a small pond.
Next you need to decide on the size of the building. This depends primarily on the number of people in the family. In practice, the most common gazebo sizes are:
- Width - 2 meters.
- Length - 3 meters.
But all sizes are purely individual, you can either reduce them or increase them.
Requirements for finishing the terrace
Even stricter requirements are imposed on the finishing of the terrace. On the one hand, flammable materials cannot be used near the fire, and therefore if you are a fan of wood, you will have to take care of a protective apron.
On the other hand, cooking food over an open fire always results in soot and grease stains. That is, the finish must be easy to wash and poorly absorb dirt. And if you have already decided to use brick or porous ash as cladding, then you will have to open the whole thing with varnish, which will slightly spoil the natural texture, but will increase the service life of the materials and save you from unnecessary headaches.
How to build a gazebo with fireplaces: a step-by-step work plan
The implementation of the idea of arranging a site by building a cozy gazebo with a fireplace in the garden area involves the following standard algorithm of actions:
— development of a project that takes into account the general artistic concept; — project approval; — cost calculation and creation of a budget estimate indicating all materials necessary for construction; — purchase of materials; - construction works.
When drawing up a project, you need to understand that there are no formal norms or canons that would affect the design of the building. The owner can build a gazebo of any shape and decorate it to his liking with original decor
However, it is extremely important to comply with the requirements regarding the correct choice of foundation for the building and not to neglect the rules for using fireplaces
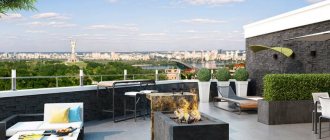
Terrace design with barbecue
And finally, we bring to your attention some illustrative examples of interior design for a terrace with a barbecue.
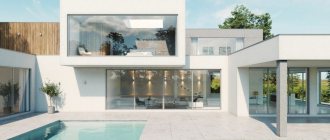
Terrace with swimming pool and barbecue
Fire and Water. If possible, we always recommend installing both a swimming pool and a barbecue area on the same terrace. After water treatments, as a rule, a good appetite awakens, and a skewer of well-fried meat will come in handy.
Terrace with tandoor
The real highlight of the terrace will be the legendary Asian tandoor. The jug-shaped roasting oven is used both for preparing barbecue and for baking bread. Please note that although with this design there is practically no source of open flame, the flooring on the site is still laid out with paving stones.
Creating a gazebo step by step - saving on builders
Most construction teams charge up to 50% of the cost of materials for work - taking into account rising prices, this entails a serious increase in costs. Isn't it better to think about how to build a gazebo with a barbecue without the participation of strangers? The time spent is worth it, and the help of friends will not hurt, especially if you decide to build a wooden frame structure. This option will cost less than stone, although it will require more careful maintenance in the future. You can settle on the golden mean, combining both materials.
For a wooden gazebo, we recommend a lightweight metal barbecue with a hood - in this case, it will be enough to make a standard columnar foundation. If you want to equip a permanent brick barbecue, you should make a high-quality strip base specifically for it, but the gazebo itself can be left on a columnar one. A strip foundation will definitely be required if your area has unstable soil or you decide to build a completely brick building. In all cases, we recommend that you read the article on foundations for gazebos - everything is described in detail there.
Standard column foundation
The construction of wooden gazebos with barbecues does not require much experience and special skills, which are indispensable when constructing permanent stone buildings. This is a definite plus - almost all the work can be done independently, except that when it comes to the top trim and construction of the roof, you will have to use someone’s help. First things first.
5b5cf1132285e2344cfb015a406394b5.jpe
5de1ebbcfd296753df5635932396dfc7.jpe 77c4ba9fa13ed2b62bc89de4353005fb.jpe 1fabd781bee81a1c6f8af59e01904f1c.jpe
47b316b65be28d2ea736b684157885d4.jpe
Step 1: Bottom Trim
When the foundation has gained strength (5-7 days in the case of reinforced concrete structures), it is time to begin assembling the frame. In all wooden structures, the frame can be divided into 5 main elements: lower frame, risers, joists, top frame, rafters. This is the skeleton of your future gazebo. The first to appear is the bottom trim - a rectangle or square made of 100*100 mm beams
It is important to isolate the beams from moisture and the development of fungus, for which they are treated with an antiseptic, and roofing felt or plastic film is placed on the foundation. If the area of the gazebo is large, the frame is reinforced from the inside with a cross made of the same timber
Assembling the frame of the structure
Step 2: Risers and joists
When the lower frame is completely ready and fastened, we install corner and intermediate risers, for which we take the same beam. Use temporary jibs to secure them in position. After the risers, logs are made - 100*50 mm bars, which are laid on the edge on top of the bottom frame. They will support the weight of the floor and people. They are installed at a distance of no less than 50 cm from each other. For the convenience of further work, boards are laid over the fixed logs - this will make it easier to install the bars of the upper trim.
Step 3: Top Trim
Fundamentally, there are no differences between the lower and upper frames - all the same timber, all the same fastening methods, which are described in detail in the article on the construction of wooden gazebos. True, it will be more difficult to work at heights - here you will need the help of a friend, as well as a good ladder or stepladder.
Attaching the top frame beam
Step 4: Rafters and Roof
To avoid troubles with the weather, try to complete the construction of the frame as early as possible, completing the first stage of construction by installing rafters and laying roofing material. The roof is made of 100*50 mm timber and boards. First, identical structures from prepared rafters are assembled on the ground, then the finished “cocked hats” are lifted onto the roof and secured. If you want to make the room warmer, we recommend laying a continuous plank sheathing on top of the rafters, which is covered with waterproofing and wind protection. A thinner counter-lattice is placed on top of these materials to install roofing sheets.
From this stage, a large number of variations begin with the decoration and area of the walls - you can make both a closed and open or semi-open structure, insulate it from the inside for a comfortable stay at any time of the year, or leave it as is. The construction of various gazebos with and without barbecue is covered in detail on our website, you just have to choose the right direction.
What is required for the extension
Project plan.
It is better to start developing a construction plan at the beginning of winter - at least six months before the start of construction. When developing a plan, you need to take into account all the little things: where the structure is located, how the door is located, on which side it is attached to the house, what the structure is made of, etc.
Location. It will not be possible to attach a closed veranda to a house just anywhere. The extension should be located so as to cover the entrance door to the house.
Territory. The veranda occupies a sufficient amount of square meters. It would be very good to take this into account when designing the house - in this case, you can immediately provide for the available dimensions of the veranda.
Collapsible gazebo for a summer residence
Portable collapsible gazebo for a summer residence for all occasions. The design folds easily and is suitable for any terrain. A good addition to any garden, it can be installed in a variety of locations, providing a new vantage point from which to enjoy your garden or landscape. They perfectly provide shade from the sun and shelter from the rain, which gives you more time to enjoy nature. The gazebo parts do not take up much space and can be easily stored in the garage or under a shed. This design eliminates the fancy carpentry that is usually associated with an octagonal roof and walls. Instead, the author used hinges on which the walls and umbrella for the roof are attached. The cost of the structure is approximately $200, plus an umbrella. The finished structure is divided into four hinged pairs of wall panels and eight sets of boards. The wall sections connect with twelve hinges, taking less than 30 minutes to assemble or disassemble the gazebo. However, the structure is very stable, even in strong winds. The author used a heavy umbrella base weighing about 40 kg, the ribs of the umbrella are attached to the sides with special hooks. With the manufacture of walls, everything is simple, because all eight sides have the same overall dimensions, and seven of them are identical. This means that for each piece, you only need to measure once - and then transfer the marks to other pieces. You can read detailed instructions for making a portable gazebo on the website.
Photo source www.rockler.com/how-to/build-portable-gazebo-summer-project