The appearance of the fence plays an important role in the aesthetic perception of a private house and the entire surrounding area. Particularly noteworthy are the gates and gates, which are the calling card of the owner of the site. If the owner approaches the design of the external appearance of his property with all responsibility, then he will try to make the structure of the fence, gate and gate not only durable, but also beautiful.
Wooden fence with gate
Despite the wide choice of modern materials for fences and gates, fences made of boards remain popular. They are distinguished by their special rustic charm, creating the impression of friendliness and cordiality of the owner, the material for their manufacture is inexpensive and accessible. And most importantly, the design options are endless. For every home craftsman, such a task as making a wooden gate with your own hands is an opportunity to realize creative potential and get a lot of pleasure from the process of work and its result.
Material for wooden gate
Before you make a wooden gate, you need to figure out which wood is best to use. Preferences for choosing wood for making a gate are determined by its operating conditions. In outdoor conditions, wood will be exposed to intense moisture, temperature changes, and sunlight. Not all wood can withstand such extreme loads for a long time. Therefore, if the owner expects that he will repair the gate in at least ten years, he needs to choose coniferous wood that has natural protection from moisture and putrefactive processes. Pine is the most common building material, so every owner probably has a small amount of boards needed to make a gate.
Lath and timber
You can buy larch or cedar, which have the same performance characteristics as pine, but they are more expensive. If pine is purchased in a store, it is better to take laminated planed (calibrated) timber and slats. In conditions of changes in humidity, such material will not move, and the sash will always be level.
Important! Glued laminated timber and slats will a priori be perfectly dried. But the moisture content of solid timber should always be checked, since wood with a moisture content of more than 15% is not suitable.
Having purchased a glued planed batten after drawing up the drawing, you can immediately begin assembling the gate, without the need to saw and plan the boards yourself. As a rule, gates made of laminated veneer lumber and slats are subsequently painted.
Wooden gate made of stained pine to resemble oak
Hardwoods (oak, walnut, ash) are much stronger than pine, but less resistant to moisture. These species are chosen when you need to get a gate with a beautiful wood texture, and the finishing will be done with stain and varnish. In this case, you will have to spend money not only on wood, but also on high-quality paints and varnishes. It makes no sense to choose expensive wood for painting.
Material selection
Many types of hardwood and softwood are suitable for gates:
- pine;
- cedar;
- larch;
- birch;
- aspen;
- poplar;
- oak.
The choice depends on the desire to spend a minimum of money, quickly get the job done, make a strong barrier, create fabulous beauty, as well as many other factors.
Breed selection is largely based on the owner's budget.
Oak is known for its hardness and durability. It is able to resist fire for a certain time. The disadvantage of oak is its cost and inflexibility.
A do-it-yourself gate made from an oak board looks beautiful against the background of a wrought-iron fence around a site with a permanent house within the city or a residential village. Forged elements against the background of oak look harmonious, the gate will be strong and impregnable.
Without experience working with hard wood, it will be difficult to make selections for hinges and tighten screws. Decorating a canvas with carvings will take a lot of time and effort. The oak board material makes the structure heavier and gives it a more impressive appearance. If oak slats are available, it is better to make a frame from them and cover it with lighter boards.
If you want to perform cutting, you should choose the optimal wood for this purpose.
Aspen is easy to process, it is also resistant to moisture and temperature changes and does not form cracks when dried in the sun. A large number of knots reduces the strength of wooden parts and the uniformity of the continuous sewn fabric.
When making a durable gate, cedar is chosen. Its dense wood resists the formation of fungi and mold. Cedar does not rot or crack. In the photo it is difficult to distinguish it from light oak. Cedar is used by those who like to make complex options with figured inserts, carvings, and arches.
A pine structure is suitable for a summer cottage. Resinous wood is resistant to moisture, has a golden color and a beautiful pattern. Pine boards and slats can be purchased freely at a budget price.
Coniferous trees are less susceptible to moisture due to the presence of resin
Cheap wood species include poplar and birch. The wood is easy to work with a chisel and is soft. You should choose well-dried boards and immediately after cutting they must be primed, covering the ends and filling the holes. After assembly, the entire structure should be coated again with a primer and 2-3 layers of varnish or paint. Surfaces swell and collapse when moisture enters through small unprotected areas, and also fade in the sun.
Larch is an ideal option for those who want to make a beautiful, durable gate and decorate it with carvings, as in the photo. The wood has a dense structure, is easy to cut with hand tools, and does not warp from rain. Externally, larch looks like bleached pine with a weakly expressed pattern.
When choosing boards, you should pay attention to the absence of sapwood and fragments of ingrown bark.
An example of the presence of bark beetle cuts and resin pockets
Wooden gate design options
The home craftsman has two options for how to design a new gate:
- Study all the slats and bars available to him and, on this basis, come up with a design.
- Create your own drawing and go to the store for the material or do your own sawing and jointing of workpieces.
The design of the gate always contains the following elements:
- Support pillars;
- Sash;
- Canopies and locking mechanisms.
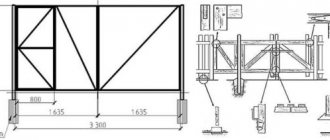
Basic design of a frame-and-rack gate
To install a wooden gate, you can use existing metal or brick posts, but it looks better with wooden posts. Depending on the quality of the soil and the size of the gate, wooden posts can be driven into the ground, backfilled or concreted. Concreting is the most reliable method in which the supports will be the most stable and last a long time.
Fundamentally, according to the method of assembly (and complexity of execution), gate leaves are of two types:
- Frame and rack.
- Frame.
Slatted door with figured top
Frame-and-slat is the simplest and most common type of garden gate, which can be assembled without complex carpentry procedures. Fundamentally, they consist of two horizontal bars, onto which sheathing slats are placed vertically. Such a sash in the form of a lattice will not be rigid, so usually a strut is installed in this design - a diagonal bar connecting the opposite ends of the horizontal bars. This design of a gate with a strut on a Z-shaped frame can have a different design due to the different lengths of the vertical battens of the sheathing and the density of their padding:
- A transparent sash is created when there is a gap between the vertical boards.
- If the packing is dense and there is no gap, the sash will be blank.
- If all the vertical slats are the same length, the sash will have a straight top. By cutting the slats to different sizes, you get a gate with a figured top.
Straight transparent sash
Important! The wicket casing of this design is made from a calibrated lath (passed through a surface planer).
Classic frame structures require milling operations, since the sash structure consists of a frame and internal filling. The frame is assembled using a tongue-and-groove connection, and to insert internal elements (slats, plywood) a groove must be made along the inner perimeter of the frame. Framed doors are stronger, more massive, reminiscent of real doors, so they look solid and have an unlimited number of design options. All starting materials must be calibrated.
Types of structures
Designers divide entrance gates according to the way they design the passage:
- Gates with an arch.
- Gates with pergola (with portal).
These are complex projects in which the design of the entire passage is developed as a whole (design of the gate, support pillars, framing style, selection of appropriate fittings).
Gate with pergola canopy
How to make a frame wooden gate with your own hands
Of the many options, we will focus on the simplest frame structure. We will analyze in detail the process of its manufacture and installation.
Preparation
They start with the implementation of the project. It is necessary to determine exactly what the door will be like. Measure the height and width of the passage. The swing structure should not be wider than 1,200 mm, otherwise it will pull out the fastenings with its weight. Reinforced loops or increasing their number do not always help. The optimal door width is 1,000 mm. This is enough for free passage in bulky warm clothes. For a garden or summer cottage, install a panel of 800 mm.
Theoretically the height can be any. For all-season models, a gap of about 300 mm must be left at the bottom. It is needed for free opening in winter. If there is a lot of snow in the region, the gap is increased. The standard door height is within 2,000 mm. It depends on the purpose of the product and the desires of the owners.
After the dimensions are determined, the type of frame is selected. They decide how many jibs need to be installed and how to arrange them. At this stage, you can make a drawing to make it easier to calculate the amount of material. After the calculations, they buy bars, fittings and boards. Lumber can be purchased with a small reserve in case of unexpected damage.
Preparation of tools, materials and workplace
The wooden gate is assembled on a flat surface. For a private yard, the best option would be to install two long beams on the trestles, and a sheet of chipboard on top of them.
To make a gate with your own hands you will need the following carpentry tools:
- Hand drill with adjustable speed, feather and regular drills;
- Jigsaw, passing hacksaw (with small teeth);
- Screwdriver;
- Hand router with shaped and quarter cutters;
- Planer (you will need both a regular and an electric one);
- Hand tools: set of chisels, hammer, clamps, square, pencil, tape measure;
- Hip (for assembling frame sashes) or strong rope;
carpenter's tool
For painting work you will need a brush, fine and medium-grained sandpaper (sander). Depending on the type of coating, paint, impregnation, and varnish are purchased.
Loop with long wing
To hang the sash, buy hinges. There is a large selection in stores, it’s only worth noting that “antique” forged fittings look especially harmonious, and hinges with a long overlay wing, when installed on a lattice sash, will add rigidity to the structure and prevent the sash from sagging.
Locking hardware
For locking, you can also give preference not to ordinary latches and latches, but to choose something extravagant.
Wooden gate for a summer residence step by step instructions with photos
A wooden garden gate looks great - step-by-step instructions with photos will help you make it quickly and easily. The structure will require larch boards. This type of wood is preferable, as it is less susceptible to rotting and has a decorative cut. If desired, you can replace it with pine.
Thus, you need to prepare:
- larch blanks measuring 2000 x 140 x 20 (10 pcs.);
- pine boards 2000 x 150 x 50 (2 pcs.);
- loops (2 pcs.);
- metal toothed plates (6 pcs.);
- brass plates (4 pcs.);
- brass screws (40 pcs.);
- corner;
- latch;
- door handle;
- priming;
- protective agent;
- yacht varnish;
- chisel and hammer;
- hacksaw;
- drill;
- screwdriver;
- jigsaw;
- plane;
- bubble level;
- pencil and brush;
- skin;
- rope.
It is advisable to sketch out a diagram of the gate in advance in order to have an idea of the installation steps.
The gate is made as follows:
Make sidewalls . Loops are attached to them.
Align elements vertically using a level.
Support boards and attach to concrete pillars.
Treat the wood with several layers of antiseptic and protective composition, and cover with yacht varnish.
Install the support bar using self-tapping screws.
Assemble the frame , fastening the corners with brass strips and self-tapping screws.
Strengthen the structure with metal toothed plates , which are pressed into the wood and nailed.
This plate will make the gate reliable and durable.
Adjust the hinges for the gate.
Mount the hinges on the support bar.
Insert the frame into the opening to check the size fits.
Make a strut , which will give rigidity to the structure.
Attach the brace to the frame using plates.
The result is a strong frame for the gate.
Fix the frame to the hinges and cover it with boards. The first workpiece is installed on a support, which is leveled.
There are 2 screws for each sheathing board, 3 for corner boards.
Sew all the boards.
Drill the holes for the self-tapping screws in advance and countersink them so that the caps are slightly buried in the material.
Mount the handle. For ease of work, we advise you not to fasten the second board from the edge yet - through the opening it is easy to reach both sides of the gate.
Using a pencil and string forming a compass, draw circles at the top of the structure.
Using the resulting lines, make cuts with a jigsaw , process the cuts in the same way as the workpieces, only finish with not one, but two layers of varnish.
Install a brass angle that will prevent the hinges from aligning.
Secure the rubber fastener with a self-tapping screw.
These step-by-step instructions with photos will help you make a wooden gate for your dacha without much difficulty.
Manufacturing procedure
The first step is to install the pillars (depending on the size of the sash, timber 60x60, 100x100 is taken), and the sash is made according to the size of the resulting gate opening. Standard sash dimensions are 1.1x2m.
Dig two holes 70 cm deep the width of a bayonet shovel. It is convenient to use a garden auger for these purposes. The screenings are poured into a 5 cm layer at the bottom of the hole. Then you need to prepare a wooden beam. Its lower buried part is burned with a blowtorch and treated with bitumen. Then it is placed in the hole on spacers and filled with concrete.
To limit the travel of the gate, slats are placed on the posts to imitate a quarter.
Scheme for installing columns in a bundle
Important! To achieve an ideal mutually parallel position of wooden poles, it is recommended to first knock them down crosswise with slats, thus assembling a rigid box. After this, they are installed in the pits in the form of such a structure and concreted. After the concrete has hardened, the slats are removed.
Assembling the gate on the frame
For assembly, prepare two identical horizontal beams along the width of the gate, onto which vertical slats will be placed. They are placed on a prepared table parallel to each other. It is advisable to make markings on the table and screw in the stubborn punks.
To maintain a constant gap between the vertical slats, prepare a thin rail, which is laid in front of each subsequent sheathing strip to be filled. The figured top edge of the picket fence is cut out with your own hands using a jigsaw after all the slats are nailed (or screwed). Therefore, it is not necessary to ensure that the top of the sheathing is level. The ends of the sheathing strips can be cut with a cone, and the edge of the slats can be processed with a figured cutter.
What does the assembled sash look like?
To attach the pickets, it is better to use stainless steel screw cutters. After the vertical strips are filled, the structure is turned over, the strut is measured and inserted.
Frame sash assembly
Making a wooden gate with your own hands is more difficult if you choose a frame structure. The complexity of the work depends on the design of the sash and whether it has curved lines. As a rule, the lower jumper of the frame and two side straight ones, and the upper jumper can be either straight or curved. The sash can be divided into 2 segments, with the lower part being solid and the upper part being transparent.
For the frame, a 30mm thick timber is taken, and the filler is made of 10mm thick lath and plywood. The essence of the design is that using a hand router, a groove is made with a 10 mm cutter on the inside of the jumpers. Slats or plywood will be inserted into it. If it is necessary to make a ledge less than 10 mm, then take a thicker lath (12 mm, 14 mm, etc.) and make the groove with a corresponding cutter.
Schematic diagram of the frame structure assembly
The vertical bars do not have to be cut to length; the excess ends can be trimmed off after assembly. And the transverse ones must be cut to length, since 3 cm spikes will be cut on them. If the width of the side post is 70 mm, then the length of the transverse will be 80 mm less than the width of the gate (140-60mm). The thorn is cut with a hacksaw, the cheeks are chopped off with a chisel. The eye in the rack is drilled out using a drill and finished with a chisel.
The infill lath (or plywood) is cut to exact size based on the depth of the groove.
Frame assembly process
The frame is assembled with glue, the tenons are reinforced with blind dowels. First, the lower jumper is connected to the stand, the filler is inserted, then the upper jumper is put on and the second stand is inserted. For tightening, use a hip or rope twists.
The simplest DIY design:
Primary requirements
The gate itself is not capable of performing its functions; it needs a support, the role of which is most often played by a pole on which the gate is hung using hinges. It could also be the wall of a house, garage or other outbuilding.
Any gate requires reliable support
The support pillars must withstand the weight of the gate taking into account the wind load, so the choice of material for them is approached responsibly:
- the most reliable option is a metal pole. This can be a round or profile pipe with a cross-section of 60 mm or more, which after concreting can be lined with bricks or blocks;
The metal pole can withstand heavy loads
- wooden posts can also be used, choosing dense wood that is not afraid of moisture. For example, oak or larch. The lower part of the pillar, buried in the ground, is pre-impregnated with protective compounds.
Wooden poles require protective treatment
The posts for the gate must be concreted, buried below the freezing point of the soil. And if the post carries an increased load (for example, it is common to the gate and gate leaf), the concrete layer must be at least 60 cm greater than the standard freezing depth.
Note. When installed in heaving soils, the holes for the pillars are made to taper upward, but in no case expand. Otherwise, frost heaving will push the pillar out of the ground or change its position relative to the vertical axis. There are other ways to securely fix them in a given position.
Video - Correct filling of gate posts
The gate itself is hung so that it swings open into the yard and not into the street. This is done for two reasons:
- for convenience, so that you don’t have to retreat when entering the site, backing away from the opening door onto the street;
- for security, so that the hinge hinges are located on the yard side and cannot be hacked from the outside.
The gate should swing into the yard
There are also special requirements for the size of this structure.
- The width is no more than one meter, otherwise, with a gust of wind, the unlocked gate may swing open sharply and the hinges will be turned out. Ventilated picket gates can be wider. But it’s not worth making it narrower than 75-80 cm, especially if there are no wide gates nearby. A narrow passage is inconvenient if you need to carry large loads to the site, or simply when going out in winter clothes.
- The height of the gate should not be more than 2 meters. This is enough to close yourself from prying eyes. Greater height increases the area, and therefore the wind load.
- When calculating the linear dimensions of the canvas, it is necessary to leave gaps around the perimeter between it and the framing elements. The distance to the ground should be at least 8 cm so that in winter snow drifts do not interfere with the opening of the gate. On the side of the hinges the gap should be about 6 mm, on the side of the rebate (side and top, if any) - 2 mm. It is necessary in case of freezing and snow jams.
Average wicket parameters
Device
The gate consists of supporting pillars and a door leaf on a frame, which is attached to the pillars using hinges. The pillars can be brick (stone), wood or metal. When laying bricks, small pieces of thick metal or a thick metal rod are walled up into bricks, to which the frame is subsequently welded.
Metal poles are made from round or profiled pipes with thick walls. Round pipes are used less and less: it is more difficult to weld or attach anything to them.
A profiled pipe with the same cross-section (diagonal compared to diameter) and wall thickness can withstand high wind loads; it is easier to weld or fasten to flat edges using self-tapping screws and bolts. Therefore, it is increasingly used when installing gates.
Another option is to weld a metal corner to the frame made of a profile pipe. In this case, the filling will appear as if in a frame.
Wooden posts are usually used if the fence is wooden. Most often, the pillars are pine beams treated with protective impregnations. They prevent (or slow down) the destruction of wood.
But there are also cases when metal poles are installed, but the gate and fence are wooden. This is because wood in the ground quickly rots, even after protective treatment.
A little about the design of the support frame. It can simply be two pillars dug into the ground - this option is suitable if the soil is not prone to heaving (sand, sandy loam, fertile but not clayey soils). The pillars began to move. If there are jumpers at the top and bottom, the likelihood of such a problem will be much reduced
For heaving soils (clay, loams), it is desirable that the pillars be connected at the top and bottom. In this case, the likelihood of the gate skewing after winter is very small.
If you do not want to make a threshold in the opening, the lower lintel can be lowered below ground level (by a bayonet and a half). It will need to be thoroughly coated with an anti-corrosion compound, primed, and painted in several layers. And to avoid distortion, you should bury the pillars below the freezing level by at least 15-20 cm.
The frame of the gate is made of metal pipes or wooden blocks. Wood is used for wooden fences, metal - in all other cases.
With a frame made of a profile pipe with corrugated sheets, metal...
Perhaps the most universal version of a gate is with a frame made of a profile pipe or a metal corner.
You can attach any filling material to a metal base: wood, sheet metal, corrugated board, metal picket fence, flat slate, polycarbonate, chain-link mesh, metal rods, forged or bent elements... make a combination of several materials. There are a lot of options; if you want to make a gate, they usually mean a square pipe, and the design is chosen in the same style as the fence.
For a gate with a solid filling (wood, sheet metal, corrugated sheets, etc.), for the pillars take a profiled pipe with a cross-section of 60*60*3 mm. You can use thicker walls, but it’s better not to use thinner ones. For the frame, a rectangular pipe 40*20*2.5 mm is usually used.
The strength of this pipe is sufficient for medium wind loads. For light wind loads, you can take a 2 mm wall, but it will be more difficult to weld. Anything thinner than 2.5-3 mm must be welded in a special mode, and this is far from easy. If the winds are stronger, you can either increase the wall thickness, or use a larger cross-section: 40*30 or 40*40, even 40*60.
The height of a gate with an upper crossbar is usually about two meters, without a crossbar - from 1.2 m. Low ones are usually made in internal fences delimiting the site or in translucent low external fences. For solid high fences made of corrugated sheets, wood, or flat slate, the height at the fence level is more typical. The width of the gate is minimum 90 cm, optimal 100-110 cm.
It’s also worth talking about how deep to bury the pillars. The standard solution is 15-20 cm below the freezing depth . Based on this number and the height of the gate, the pillars are made.
Using a drill, a hole is made in the ground, at the bottom of which a bucket of medium-fraction crushed stone is poured. Then the pole is installed, set vertically, covered with crushed stone (can be broken bricks and other construction waste), compacted, and filled with concrete mortar.
When the solution has gained at least 50% strength (after 7 days at a temperature of +20°C), you can attach the frame to the posts. If you want to make a wicket right, do just that.
DIY example
The fence is made of corrugated sheets with brick pillars, and therefore the gate is made of corrugated sheets. Even during construction, metal plates were walled into the pillars, welded with a pipe in the middle.
It was decided to make a gate with additional jibs - so that the corrugated sheet would be more rigidly fixed, and also to strengthen the area where the lock is attached. The lock is still old, replacement is possible.
We weld the frame of the gate using an inverter welding machine from a 40*20*3 mm profile pipe. We will install it “in place”, welding it to the mortgages. Cutting the blanks:
- two crossbars with a length from one pillar to another (it turned out 108 cm),
- two racks - 185 cm high.
We cook the frame
We do not weld the crossbars, but only “grab” them to the embedded plates so that they hold on. Literally two welding points per mounting location. Before welding the second side, check that the crossbar is horizontal. We lay down the building level, correct the position, then grab it. So, it turns out that there are two horizontal jumpers in the opening.
We weld vertical posts to the installed crossbars. They must be vertical - at the junction with the jumpers the angle is strictly 90°. We check during the connection process and adjust if necessary. Also: the seam must be good, strong, scald on all sides, along the perimeter of the pipe.
The result was a frame attached to the pillars. We check the corners again, otherwise it may warp later and the gate will stop closing/opening.
We put the loops
Next is the most crucial moment - you need to weld the hinges. We took standard metal hinges for swing gates, which are abundant in any hardware store and on the market. They must be installed strictly vertically, and both on the same axis. Otherwise the gate will not open.
We weld the bottom hinge first, double-checking its verticality with a level many times. We try to install the second one on the same axis. First, we attach it to the embed, check it, and only then, if everything matches, carefully weld the seam. If everything is calculated correctly, the loop is adjacent to the frame pipe, so welding will not be difficult.
When the hinges are installed, remove the “tacks” that hold the gate. It magically now opens/closes. The next thing to do is weld the jibs.
The work is simple: we cut pieces of pipe of the same length, apply them to the intended installation location, and mark with chalk how to cut. We take a grinder with a metal cutting blade, cut it, check it, if necessary, modify it (with a grinder or a file - depending on the size of the “jamb”). When the jib “has become”, we weld it.
Similarly, we add reinforcement to the lock on the gate. To install the old metal lock at the top, it was necessary to weld a piece of corner, otherwise it would not be possible to secure it.
The last welding work - it is necessary to close the open sections of the pipes that are directed upwards and to the sides. If they are not closed, rainwater and snow will get into them, the pipes will begin to rust from the inside, which will accelerate the death of the frame. Welding at this stage is not necessary; you can seal it with silicone or find plastic covers of a suitable size.
Finishing work
This is all. The gate is almost done. Next - standard metal work - grinding, priming, painting the frame and the last stage - attaching the filling. In this case, it is no different from installing a profiled sheet on a fence.
Metal gates
The production of such gates is accessible to those who have a welding machine and confident use of this tool. Metal products are more durable and wear-resistant, so they are increasingly preferred.
Options for metal gates
Even if you want to have a wooden gate, the frame for it is often made of metal. To manufacture it, you need a profile pipe of square or rectangular cross-section. In some cases, a metal corner is also welded to the inner perimeter of the frame, to which a filling made of smooth or profiled metal sheet, wooden boards, plywood, polycarbonate, etc. is screwed.
Metal frame for gate
Instructions for making a frame
Step 1. We measure the distance between the support posts and determine the dimensions of the gate leaf, taking into account all the necessary gaps.
Take accurate measurements
Step 2. Cut the profile pipe with a cross-section of 25x50 mm to size. We leave “ears” on the horizontal parts, which will cover the vertical posts so that precipitation does not get into them.
Cut pipes to size
Step 3. Lay out the parts on a flat surface at right angles to each other and tack the joints by welding on one side.
The workpieces are placed at right angles to each other
Step 4. Make sure that all frame elements are in the same plane, if necessary, remove the “screw”.
Before welding parts, you need to make sure that the joints are even.
Step 5. Turn the frame over and weld all the joints until they are finished.
Welding components
Step 6. Cut a horizontal jumper from the same pipe, measuring the distance between the inner edges of the vertical posts.
Strengthen the frame with a horizontal jumper
Step 7. Install the jumper in the middle of the structure and weld it. Instead of a horizontal jumper, you can weld a diagonal jib.
Weld the jumper
Step 8. Grind the welding areas.
Welding seams are polished with a grinder
Step 9. We weld the halves to one of the posts with a loop without a pin, with the hole down.
Hinge halves are welded to the frame
Step 10. We install the frame between the pillars and fix it in the desired position, making sure to align it vertically. We mark the position of the mating parts of the hinges on the support post and weld them.
Weld the second part of the hinges to the support post
Step 11. We weld a corner to the second post as a vestibule.
A stopper for the gate should be attached to the second post
Step 12. We cover the frame with corrugated sheets.
The finished frame is sheathed with corrugated board to match the color of the fence
Next, you can weld the lock or bolt, and the gate is ready.
Advice. It is better to prime and paint the frame before attaching the sheathing.
Hinges for metal gates
Depending on the cross-section of the frame pipe and the type of facing material, a metal gate weighs at least 20 kg, and often much more. Therefore, to install it, it is necessary to use garage hinges with a ball or support bearing.
These hinges are best suited for a metal gate frame
Their size and number are selected according to the load with a decent margin in case of wind influences. It is better to hang heavy sashes on three hinges.
The examples of making gates given in the article can only be used as a template for creating models of your own composition. For example, lining a wooden X-shaped frame not with identical pickets, but with elements of different widths or heights. Or sew boards onto a metal frame and decorate the canvas with forged decor.
Material for making gates
Combined wooden gate with forged metal inserts.
An entrance gate for a private home can be made from a variety of materials. The requirements are small: the sash should open easily, prevent animals from entering, and serve as part of the allotment fence. High strength, heat conservation, and resistance to burglary are not important here.
If the fence is light, the material for the sash can be used the same as for the fence: chain-link mesh, Euro picket fence, wooden boards, iron bars for the lattice. If the fence is stone or brick, the material is chosen in accordance with the design of the residential building. Usually the gates are solid, but they can be decorated in an unusual way.
Most often, the gate to the house is made of the following materials:
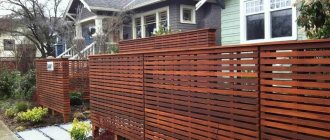
- Wooden boards or picket fence - the simplest cheap option, is a primitive frame of 3-4 boards and a picket fence filling. If the work is done carefully, such a gate is quite aesthetically pleasing.
- An interesting option is obtained if lining, terrace boards, and modules from planks are used for cladding.
- Metal profiles - often serve as a frame and are lined with corrugated sheets, steel sheets, and Euro picket fences. The model is more practical than beautiful.
- The grille is rarely made independently, but it is very impressive. Models with forging - applied forged or cast elements - are very elegant.
- Combined - combine materials for both beauty and practicality. For example, boards assembled in a metal frame will last much longer. The forged lattice gate with polycarbonate filling is exceptionally beautiful.
The easiest way to decorate wooden gates. The material is easy to process and cut. The service life of carved wooden sashes is no less than that of blind ones.