Making such a piece of furniture is easy and simple with your own hands. To do this, just choose the most suitable type of design, stock up on consumables and free time.
Peculiarities
The features of the hammock chair include:
safety and environmental friendliness (due to the use of natural and non-toxic materials);- original design;
- simplicity and ease of use;
- Possibility of use at any time of the year;
- ease of care;
- long service life.
A hammock chair is a soft version of a hanging structure . On soft pillows that sway from side to side, it is pleasant to spend summer evenings in the fresh air.
Advantages
The advantages of a hammock chair include::
- Wide selection of models. Such products differ in shapes, designs, colors, and materials of manufacture. Some chairs are something like a cocoon, others are a product with a soft fabric seat.
- Possibility of self-production. To do this, you will need to use minimal sewing skills and prepare supplies.
- A hammock chair can be framed or frameless. Both models do not have sharp corners or parts, which makes them popular among small users.
- The textile can be easily detached from the product and washed in an automatic machine.
Device
A hammock chair, as a rule, has a fairly simple design . It consists of:
Fabric seat. For these purposes, a tight cut is most often used.- Crossbars, which serve as a strapping element and distribute the load. The seat is tied to the crossbar.
- Sling. To do this, use a strong rope or braided cord.
- Suspension. For these purposes, chains for ceiling mounting or rings with a spring are used.
Wooden hanging chair
Don't skim through this master class without barely reading the title. This wooden chair is very easy to make; even a woman who has never picked up a carpentry tool can handle it. You will only need to practice a little drilling holes with a screwdriver and spend a little time sanding the boards with sandpaper.
A chair made from boards that is not at all difficult to make
Planks can be bought ready-made at a hardware store. Or you can disassemble a wooden box or construction pallet. The main thing is that they are strong, dry and without cracks.
Set necessary for making a chair
Approximate dimensions:
- length 70-80 cm;
- width 12-15 cm;
- thickness not less than 20 mm.
With this width, 15-16 planks will be required. They need to be aligned in length with a jigsaw or hacksaw, thoroughly sanded, rounding the edges, and impregnated with a protective agent or coated with varnish for external use.
For assembly you will also need a nylon or nylon cord.
| Step by step photos | Description |
Step 1 | On the treated boards we mark points for drilling holes with a step of 5 cm and a distance of 2 cm from the edges. You can mark only one board and drill it with a drill with a diameter exceeding the cross-section of the cord. And then put it on the second one, align it and make holes in it and all the others through the already prepared ones. This will ensure precise symmetry and alignment of the holes in all elements. |
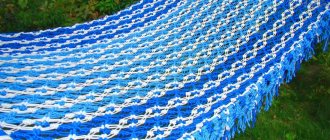
Step 2 | We lay the boards close to each other and thread the cord through the holes in a checkerboard pattern, as in the picture. |
Step 3 | Having reached the opposite edge, we go back, stretching the cord into the remaining empty holes. This is all very similar to lacing shoes, so it just seems complicated. There is no need to tighten the cord too much; it should provide some freedom of movement for each structural element. The ends of the cord are tied on the reverse side with a strong knot. |
Step 4 | To attach the rope for hanging the chair, drill holes in the first (top) and penultimate board. There should be two of them on each side, the distance between them and to the edge is about 4 cm. We stretch the ropes through the finished holes, bringing the ends to the front side. |
Step 5 | We take four more boards and drill the same holes in them through which we pass the ropes. These boards will serve as a frame that will prevent the slings from abruptly converging on the hanging point. Although you can hang the chair by attaching it at four points, then you won’t need a frame. |
Step 6 | For convenience, we place sofa cushions on the seat. |
Materials
A hammock chair can be made from different materials:
- rattan or wicker;
- with a base made of plastic or acrylic;
- made of thick textile without frame;
- non-standard models in the form of a drop.
Attention : when using the product outdoors, durable and wear-resistant materials are selected. They must cope with negative environmental factors and be resistant to rain, direct sunlight and ultraviolet rays and temperature changes.
As for the materials used to make the hammock chair, the type of construction and model are taken into account . The most common are:
Macrame. In this way, the products are decorated on a hoop, which is braided with a silk cord that is soft to the touch. Using this method, original products with fringe and various decorative elements are created.- Tarpaulin.
It is a fairly durable material and is perfect for outdoor use. The tarpaulin can withstand heavy loads up to 300 kg. It is not afraid of sudden changes in temperature, increased moisture, or direct sunlight. Its only drawback is the small selection of color palettes . This model will look harmonious on the veranda, in the garden or gazebo. - Textile. For these purposes, dense fabric is selected that can withstand weight up to 150 kg. Also, the selected material should not stretch or deform during operation. To increase the strength of the material, it is recommended to fold it in two layers. You should avoid light and easily soiled colors . Especially when using the product outdoors.
Hanging chairs on a frame
The frame for the chair can be made from different materials - it all depends on the intended shape of the product. And it can be either traditional rectangular or round. Of course, these are very conventional names, because a chair can resemble a hammock, an ordinary chair or a chaise longue, have a back and armrests, or look like a ball or cocoon.
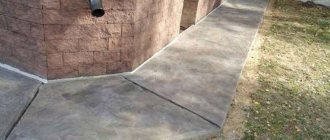
For straight frame elements, wood is most often used, which must be sanded smooth and treated with impregnations that protect it from the sun, moisture and insects.
Wooden frame elements
The situation is a little more complicated with round elements, but they are most often the basis for hanging chairs. But nothing is impossible. If the household has a man, a welding machine and a pipe bending machine, you can make circles and ovals of any size and thickness.
Round steel frame
This option cannot be called a simple solution, and besides, it is not available to everyone. Therefore, a metal gymnastic hoop can be used as a frame. Or make it yourself from a large-section metal-plastic pipe. Thin pipes do not have sufficient strength.
Metal-plastic pipe
Such pipes are sold in spiral-coiled coils, so there will be no problems with giving them the desired shape. You can connect the ends of the pipe to close the ring using a wooden insert that fits tightly into its cavities. The insert is secured with self-tapping screws screwed into both sides of the joint.
Cutting the pipe into pieces of the required length
Connecting a pipe into a hoop
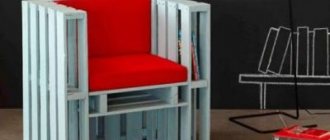
Returning to the welding option, we’ll take this opportunity and offer men a brutal model of a hanging chair that only they can make. To do this, you will need to weld a structure of several rings connected at the top point and diverging downwards.
At the bottom, a thick metal sheet is welded to the inner sides of the rings, and a wooden seat is placed on it, which, if desired, can be made soft by gluing foam rubber to it and covering it with leatherette.
Metal hanging chairs
Hanging cage chair made of metal
Hanging chair made of metal for the garden
Now that we’ve sorted out the materials for the frame, we can move on to the chairs themselves and the methods of their manufacture.
Hammock for sitting
The frame structure for this model is assembled from four straight parts. They can be wooden or metal - whichever you prefer.
Hammock for sitting
In total you need three thick strips and two thinner ones. It is better if they are round. You will also need a strong cord for weaving the seat and slings, a screwdriver with a drill equal to the diameter of the thin cuttings, and self-tapping screws.
Everything you need to make a hammock chair
Step 1. Drill two holes at the ends of two large-section cuttings. We insert thin cuttings into the outer ones and secure them with self-tapping screws. The frame for the chair is ready.
Making a wooden frame
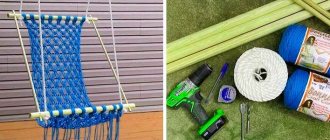
Step 2. We hang the frame at a convenient height. We cut 16-20 pieces from the cord of such length that it is four times the height of the frame. You can make more sections depending on the desired weaving density. The main thing is that their number is a multiple of four. We fold them in half and hang them on the top part of the frame. We tie a flat knot on every four threads.
Weaving a hammock
Step 3. Under the first row of knots we knit a second one offset by two threads. Each odd row repeats the first row, each even row repeats the second row. In this way we knit the entire fabric, which should be 15-20 cm longer than the frame. This process will be shown in more detail in the video at the end of the master class.
Continuation of weaving
Step 4. We secure the ends of the threads to the lower part of the frame with strong knots and cut them evenly. The slings can be woven with continuous flat knots of four strands, or simply take a thicker and stronger rope.
Securing the ends of the threads
Step 5. We thread it through the holes on the frame and in the top bar, tying thick knots under them at the desired height. And we hang the hammock chair in a convenient place.
Hanging a hammock
Video - Macrame “Chess” from flat knots
Advice. For those who do not know how to weave, but love to sew, it will be easier to make a seat from durable fabric. To do this, you first need to thread the horizontal frame parts into the drawstrings on the seat, and then connect them with the transverse bars.
Wicker chair
Wicker chair
Using the macrame technique, you can make a more comfortable chair on a round frame, for the manufacture of which you will need the following tools and materials:
- two rings with a diameter of 100-110 cm and 65-70 cm. Large for the back, small for the seat;
- 900-1000 m of clothesline or polyamide cord 4-5 mm thick;
- rope or slings for hanging - about 12 meters;
- tape measure or tailor's tape measure;
- wooden plank along the height of the back;
- scissors.
Step 1. Cut the cord, the length of which should be 40 times longer than the circumference of the seat hoop. We fold it in half, hang it on the pipe, threading the ends into a loop, and wrap the hoop in tight turns in both directions. Having made several turns, we secure the cord by threading the end into the previous turn of the winding and tightening it. We braid the back frame in the same way.
Winding the cord
Step 2. Cut the cords for weaving the seat, their number should be a multiple of four. We hang them on half of the hoop with a double loop.
Weaving patterns
Step 3. Weave the mesh with flat knots, as described in the previous example. First, we tie a knot on the four middle threads from two adjacent hinges, then we connect two threads on each side to the weaving, gradually expanding it to the diameter. After “crossing the equator,” we tie the ends of the threads released from the weaving to the second half of the hoop.
Weaving a chair on a round frame
Step 4. We fasten the frames of the back and seat to each other, tightly wrapping them with a cord. To raise the backrest to the desired position, we temporarily install one or two wooden spacers in the rear of the frame.
Connecting frames
Step 5. We hang the cords on the upper part of the backrest and weave according to the already familiar pattern, tying the ends to the back of the seat. Together with those tied in front, they form a fringe around the entire circumference. If desired, it can be made thicker by hanging short pieces of cord in between. Once weaving is complete, the spacer can be removed.
The wooden spacer is removed after weaving is completed
The chair is ready, all that remains is to hang it using a braided cord or slings.
Note! The cord or rope for braiding should not be very smooth, otherwise the knots will slip and unravel.
Wicker chair with soft cushion
Wicker hanging hammock chair
Hanging hammock chair on one hoop
Video - Hanging chair hammock. Wicker swing
Armchair made of fabric and hoop
Hoops come in different diameters. Choose the appropriate size or make your own from a pipe, depending on who the chair is intended for. It can be used as a children's swing.
Armchair made of fabric and hoop
The fabric for the cover should be dense and not unravel when cut. You can take quilted lining fabric with synthetic padding. Its length and width should be half a meter larger than the diameter of the hoop, and two such cuts will be needed.
In addition to the basic materials, you will need something else:
- a zipper with a length no less than the diameter of the frame;
- slings, carabiners for hanging;
- padding polyester with a large canvas for the inside of the chair and strips for braiding the hoop;
- strips of fabric for a hoop;
- interlining or bias tape for processing cutouts;
- sewing supplies;
- marker.
| Step by step photos | Description |
Step 1 | Spread the fabric on a flat surface and place the hoop in the center. |
Step 2 | We mark a circle on the fabric with a radius 25 cm larger than the radius of the frame. This margin is necessary so that the fabric is not stretched over the hoop, but sag, creating a comfortable seat. |
Step 3 | We cut out two identical circles from fabric according to the markings. |
Step 4 | Fold one of the circles in half and cut into two parts along the fold line. |
Step 5 | We attach a zipper to the cuts, retreating from the edges by 25 cm, taken for reserve. That is, the lock should be exactly the diameter of the hoop. |
Step 6 | Further, if desired, each fabric circle is quilted with padding polyester, but you can do without soft padding. Then both pieces are folded facing each other and stitched in a circle. |
Step 7 | Unzip the zipper and turn the cover inside out. Fold it in four and iron the fold lines so that they become noticeable. From these lines we set angles of approximately 30 and 45 degrees in both directions, as shown in the diagram, and mark the points at which we need to make cuts for attaching the slings. |
Step 8 | We cut the fabric according to the markings at the marked points in the shape of the letter Y, bend the petals inward, glue them with non-woven fabric and stitch them. Or we make semicircular cutouts and finish them with bias tape. |
Step 9 | We wrap the hoop in strips of padding polyester for softness. The smaller the diameter of the frame, the more layers it is better to make. |
Step 10 | We cover the hoop with fabric over the winding. |
Step 11 | We insert the hoop into the case and fasten it with a zipper. |
Step 12 | We cut off the slings or ropes on which the chair will hang. We make two sections of different lengths. For example, 2 meters for the back and 2.5 meters for the front. But it’s better to try them on on the spot and decide on their length depending on the height of the attachment point. |
Step 13 | We fold the slings in half, fasten them with a loop on the hoop through the cutouts made in the case and tie the ends with a knot. |
If textile or canvas slings are chosen for hanging, their ends are folded and sewn to form a loop into which a carabiner is inserted. This method will allow you to remove the chair and bring it into the house in case of bad weather.
Sewing the sling
Advice. You can also buy ready-made slings with carabiners that can be adjusted in length.
Video – Hammock chair made of metal hoop
Mounting options for home
The type of fastening of a self-made product can be:
Ceiling. To do this, use a hook attached to the ceiling. A chain is attached to it, which will hold the product. With such a model it will be pleasant and comfortable to swing from side to side.- Axial.
This option is also attached to the ceiling. But additional slings are installed on the sides of the seat, attached to the walls or ceiling. It will not be possible to swing on such a product like on a swing; the seat will only rotate around its own axis . - Shtangov. For this purpose, a special curved stand with a ring stop at the bottom is used. A suspension consisting of a ring and a spring with a chain is mounted at the top of the rod. This option is durable, reliable and stable.
- In the form of a platform with a double suspension. It is a strong and stable base equipped with sidewalls. This type of fastening is suitable for installing a spacious double chair.
- With a crossbar, at the ends of which rings with cords and a suspension are put on.
Stage 1 - wrapping hoops
The first step is to braid the hoops with a cord of medium thickness. It can be either synthetic - with the addition of polystyrene - or natural. It is worth paying attention to the uniformity of the winding. You need to tighten it every 10–20 twists. To avoid blisters, it is better to wear gloves. One meter of hoop will take about 40 meters of cord. For greater strength of the product, it is worth using hoops made of metal-plastic pipes with a cross-section of 35 mm.
Amazon Company
Scheme and drawing
Before you start making your own hammock chair, you will need to make a drawing of it. To do this you can:
- Use options found on the Internet. Among their variety, each person will choose the option that suits them, which can be modified according to their own preferences.
- Draw a diagram of the future product with a pencil on paper. For this option, you must be able to independently determine the dimensions and calculate every detail .
Stage 2 - weaving the mesh (seats)
Then you can move on to weaving the seat. When choosing a macrame pattern, it is important to consider that some patterns require a stronger tightening of the cord during weaving. For beginners, it is better to use the “checkerboard” pattern. It is important to constantly monitor the tension force - this will affect the elasticity of the seat. It is not necessary to cut off the free ends of the knots - they can be used to form a fringe.
Zhejiang Jowild Outdoor Co.
Types of swings in the form of a hammock
The design of the hammock and swing are slightly different. A hammock is a device for resting in a lying position. Because of this, it is mounted on vertical supports, making it uncomfortable to sit on, although you can swing. The swing is fixed to a horizontal crossbar. Depending on their size, you can swing here either sitting or lying down.
Important! There is nothing stopping you from using a hammock - a soft cloth with ropes to create a swing. However, it will be fixed specifically to the horizontal crossbar.
There are several design options:
Hanging swing hammock for children is a classic option. A small hammock is attached to the edges of a horizontal crossbar of the required size and the structure is suspended on any type of support - horizontal or vertical.
Hammock with seat – complemented by pillows and backrest. For convenience, the seat is attached to the fabric to achieve stability.
The chair is a structure with a rigid or semi-rigid frame. In this case, the perimeter and shape of the seat are specified by a plastic or metal frame, and the entire structure is often suspended from a hook. This model can be large in size and accommodate a company of 5–6 people. The design can be complemented by a canopy.
The drop cloth is attached to very narrow horizontal bars so that the edges of the fabric rise much higher than the seated person’s head. This model is intended for small children, as it prevents the baby from falling out of the seat. The hammock swing for the cottage in the photo belongs to this category.
To make swings with your own hands, different materials are used. Based on this feature, there are 3 categories of products:
Mesh is a traditional option, not the most popular today. The mesh stretches and sag over time; in addition, it digs unpleasantly into the skin.
Fabric - cotton with some synthetic fiber, burlap, canvas, nylon, and even parachute silk are suitable for hammocks. The latter option is exceptionally wear-resistant and never loses its appearance.
Wicker ones are the strongest and most durable. To make it yourself, they use vine - the best option for a do-it-yourself model, Brazil nut and rattan. Both natural and artificial materials are used, the latter being noticeably cheaper.
When choosing a material, take into account the load on the intended swing. A product made of parachute silk can withstand up to 200 kg, and a product made of mesh – no more than 80 kg.