Home » Building a house » Do it yourself
Vladimir 03/17/2020
19282 Views
Growing plants and creating extraordinary flower arrangements requires different types of containers. Some of them can be found in your nearest store. But in most cases, their shape and design leaves much to be desired. Therefore, today we will master the technique of making flower pots with our own hands.
What materials are best to use?
Floor, table, wall or unusual hanging planters can be made from many types of materials. The most important thing is that it is strong enough and lasts as long as possible.
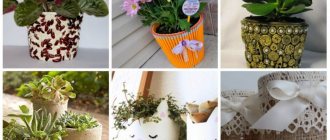
Flowerpot decor
You can make them from:
- sand and cement with the addition of liquid glass
- alabaster
- cerenzite: products from a solution prepared on the basis of calcium and aluminum salts are not only original, but also unusually durable
- wood: you can use both thin slats and massive wooden blocks of suitable size, in which the central part is removed
- vines: a wicker flowerpot-basket will fit perfectly into the decor of a room decorated in country style
- plastic: you can imitate weaving from plastic cut into thin strips or twisted plastic bags;
- heat resistant clay
- papier mache
- felt
- yarn, braid, twine, strong synthetic threads: they are coated with glue and wrapped around containers of a suitable size
For decoration, burlap, cotton fabrics of original weaving, twine, colored stones, nut shells, grain, tree bark, dried flowers, fur, paints and enamel, etc. are used. More massive flowerpots for garden flowers are made from rubber wheels.
Original decor of flowerpots using wooden clothespins
Do not forget that the shape of the container should be combined with the outline of the plant. After all, even the most unusual flower in an unsuitable flowerpot will look ridiculous.
Flowerpot made of cement and fabric: how to make a flowerpot with your own hands
Flowerpots made of concrete and fabric look very beautiful. It turns out to be a real work of art.
Of course, to make such a flowerpot as shown in the picture, you will have to work hard:
- First you need to mix the concrete solution so that it is not too thick. In this case, it should be more liquid, because in this liquid you will soak the fabric of your choice. We recommend using an old towel because it will give the pot a unique texture when it dries.
- After you dip the towel into the solution, make sure that it is completely saturated with the concrete solution.
- Remove the fabric from the solution and hang it on an upside down bucket. Immediately straighten the edges of the towel and leave the future flowerpot to dry for as long as needed (much also depends on weather conditions).
- Turn the finished flowerpot over, place it in the desired location and paint if desired. In their natural color, such concrete structures look quite nice.
Wicker pot-basket
In the classic version, vines or willow twigs are used for weaving . But, if you don’t have branches on hand, you can use plastic cut into thin strips or even old newspapers and tissue paper.
To protect against moisture, such products must be coated with glue or varnish.
Preparation of willow twigs
Weaving flowerpots from thin and flexible grapevines turns out to be more decorative. But, since grapes are grown only in the south of Russia, we will use willow branches.
The optimal time for collecting raw materials is early spring during bud break or July-August . The branches must be selected of the same length, as straight, long and flexible as possible, up to 3 mm thick. They are cut at a 45° angle with pruning shears. To check the flexibility, the rods are bent at 90° - they should spring back easily.
For weaving, both unpeeled twigs and branches with completely removed bark are used.
In the latter case, it is better to collect the raw materials in the spring - the bark of such a rod separates better. To remove it, use a special tool - a pinch. It is made from a thick branch with a splinter at the top. If the raw materials were collected in advance, before starting work, the branches are “revived” - soaked in hot water for 4-5 days.
To obtain a more intense color of the rods, boil them in hot water for about half an hour.
Weaving methods
Weaving the bottom of a flowerpot basket
For a small flowerpot you will need about 8 rods about 30 cm long:
1In the center of 4 blanks, you need to make a cut so that 4 more branches can be inserted there.
2 Weaving starts from the bottom. We select the thinnest twigs and begin to braid the crossed branches with them, 4 pieces at a time.
3After several rows (their number depends on the size of the bottom of the future flowerpot), we begin to braid two branches at a time, and after another 3-4 rows, one branch at a time. The braided blanks should be positioned at an equal distance from each other like a fan.
4When the size of the bottom is sufficient, we secure the remaining ends of the branches, intertwining them with horizontally located weaving branches.
5 To form the walls you will need thicker rods. They are pushed one at a time into the bottom weave next to the braided branches.
6 Carefully bend the rods so that they are perpendicular to the bottom and tie them at the top so that they do not interfere with work.
7 We begin to braid each of the branches located horizontally.
8 At the end of the work, we form the edges of the flower pots. To do this, we intertwine them with thin branches along with the remaining thick ends of the rods into a braid.
9So that the ends are not too conspicuous, they are cut obliquely at an angle of 45°.
10If you want to make a flower pot in the form of a basket with a handle, you need to take a rod, bend it and insert it into the sides of the product. Then a bunch of thin branches is wrapped around it twice. The second time, a bundle of twigs is pushed between the gaps formed in the first branches.
Thin branches can simply be glued horizontally around the perimeter of any container. For reliability, they are tied at the top and bottom using twine.
Technology and instructions
Step 1: Cut the plastic pipes
- The first thing to do is to cut the pipes into pieces that will correspond to the size of the future vases.
- This must be done carefully so that the edges are smooth and beautiful; for this it is better to use a special plastic stand, thanks to which you will definitely make even cuts.
- As for the length of future vases, it is desirable that they be of different sizes from tall to short to create an asymmetrical beautiful look.
Weaving from newspapers
How to make a flower pot out of newspapers? The process of creating it is similar to making flowerpots from willow branches . The only thing is that the paper must be properly prepared for work.
Preparation of blanks
To obtain strong “branches,” the newspaper must be twisted.
For this:
1The paper is cut into fairly wide strips 6-7 cm thick.
2Each strip is laid on a long knitting needle at an angle of 35-30°.
3We begin to wind the paper onto the knitting needle as tightly as possible, holding the tip of the newspaper with your finger for convenience.
4Glue the remaining edge so that we get a thin tube. One end should be slightly thicker than the other, so that in the future we can build it up by inserting one into the other. The length of the workpiece depends on the size of the future craft.
5 Remove the knitting needle from the tube and dry the glued area for 15-20 minutes.
6The resulting blanks can be immediately painted with gouache, watercolors, and acrylic paints. For these purposes, non-standard pigments are often used - for example, iodine, henna, basma, water-based wood stain, food coloring, etc. When creating patterns, ready-made products are coated with dye.
7To strengthen and protect from moisture, the finished pots are varnished. It is better to do this the first time at the preparation stage. The finished product is painted a second time.
We will not describe in detail how to weave flower pots from plastic bottles. The scheme of work is completely similar to weaving from newspapers or willow twigs.
Ready-made paper pots
Hanging flower pots are best used in rooms with sufficient light. If the room faces the shady side, it is better to grow indoor flowers on the window, where there is more light.
Methods of weaving from newspapers
A standard wicker flowerpot consists of a bottom, which is made separately, and sides. You can use any container as a form: from a bucket to a small jar.
There are many types of weaving. In difficult cases, several tubes are woven at once.
Paper weaving step by step
We'll stick to the simplest ones:
1First, you need to prepare a frame in the form of many rays emanating from the center of the bottom. For this you will need 12 tubes. They must be divided into 2 parts of 6 pieces and each of them must be secured with a clothespin.
2Fold both parts perpendicular to each other on a flat surface so that their intersection is in the center.
3Glue them together at the junction.
4Take a new tube, bend it in half and place the bend under any of the 4 crossed parts.
5 We begin to gradually braid them using the “rope” method, alternately twisting each part.
6After 2 rows have been intertwined, we begin to twist not several pieces at once, not 4, but 2 tubes at a time.
7 After a few more rows, we begin to braid each tube.
8When the bottom is ready, we begin weaving the wall. Take a suitable jar or other container and place it in the center of the bottom. To prevent the light form from moving out, it is better to fill it with something heavy, for example, stones.
9 Using a knitting needle, we make a small hole in the weaving next to the stand tube and insert a new piece of rolled newspaper into it, slightly moving the edge outward.
10The second tube must be placed under the adjacent rack.
11To prevent the rolled paper piece from breaking when bent, it is carefully pressed down and then placed perpendicular to the bottom.
12We begin to alternately braid each of the racks using 2 tubes.
13To make the workpieces softer, they must be kneaded periodically with your hands.
14The distance between them must be the same, so the racks must be adjusted periodically, installing them in the right place.
16The remaining ends of the tubes are intertwined vertically through several rows using a knitting needle. Excess ends are cut off.
17To ensure that the finished weaving looks neat, at the end of the work, the racks are threaded using a knitting needle into several rows of weaving and trimmed.
Dark-colored pots always heat up more in the sun, so they can only be used for heat-loving plants.
Papier-mâché flowerpot
If the collection of flowers is large, purchasing flowerpots for each of them is quite expensive. When using improvised means, you can not only save a lot, but also get the most unusual decorative products. An original papier-mâché floor or hanging planter can complement a collection of flower pots.
Papier-mâché cups
Paper-adhesive mass is an excellent material that is easy and simple to work with.
But it is better to use a painted and varnished product for planting flowers that are not irrigated with water.
So, let's describe the process of creating papier-mâché flower pots:
1We will glue the plastic container so that moisture does not dissolve the paper over time. You can use a mayonnaise bucket.
2The container must first be degreased and then coated with a primer for better adhesion (you can use regular glue).
3First, prepare the paste. For half a liter of cold water you will need a large spoon of flour. Brew it to a boil, remembering to stir so that no lumps form.
4Tear thin paper or newspapers into pieces measuring 4x4 cm. It is not recommended to use scissors and cut them - only with your hands.
5Mix the paste thoroughly with the torn paper.
6To strengthen it, you can add wood glue to the solution. A more homogeneous mass is obtained by adding chalk to the paste.
7You can also mix the composition with gypsum, clay or sawdust.
8When using cardboard, it must be torn into smaller pieces and first soaked in plain water, and then mixed with paste. The resulting mass is first squeezed out by hand, dried and ground on a grater.
9We begin to slowly, pressing tightly, apply the solution to the jar. We don't touch the bottom.
10Our product will take several days to dry.
11Using papier-mâché, you can simply decorate any container using the decoupage technique. To do this, blanks in the form of flowers or figures are prepared from paper and glue. Then they are glued to the flower pots and varnished. The gaps between applications can be decorated with decorative paper napkins.
12 Paint the work with watercolors, gouache or acrylic. The final stage is varnishing to impart water-repellent properties.
13The flowerpot in the shape of a stump looks very original. To do this, dried papier-mâché is painted first with black paint, and then with a second layer of strokes of ocher dye.
Finished papier-mâché work
Flower pots made of wood look very original. But, since such material will quickly begin to rot upon contact with moisture, it is better to make a larger container in which you can “hide” the plastic plant pot.
Multi-tiered flowerpots: ideas with photos
Multi-tiered flowerpots look very nice. They can also be made from scrap materials or construction materials. We invite you to consider several original options for your dacha or personal plot:
- If you have building blocks, you can arrange them beautifully so that they resemble a wall with flower pots. The pot will look like this:
- If you have old metal buckets that you can’t find a use for, you can also make a multi-tiered flowerpot out of them by connecting the buckets together to form a large flowerbed:
- The simplest way, which is very common everywhere, is to make a multi-tiered flowerpot from car tires. They just need to be layered in a checkerboard pattern and then painted. In our opinion, such a flowerpot is the optimal solution for a garden:
Plaster plant pots
For work you will need 8-10 spoons of dry rotgypsum
The technique is similar to the technology for working with cement mortar.
1To ensure that the finished product can be easily removed, the mold must be pre-greased with oil.
2It will be more convenient to remove a dried pot from plaster if you cut the plastic jar-mold in advance with a knife, and then temporarily glue both halves with tape.
3We will need two containers, one slightly larger than the other. We will insert them into each other, pouring a solution between them.
4First, pour the gypsum mixture only to the bottom of the container. The solution needs to stand and get stronger, and only then continue working.
5Insert the second container inside the first and fill the gap between them with the solution.
6The work can be simplified if you pour the gypsum mixture into the bottom, and then press it with a second container so that the solution comes out to the very edge of the pot.
7 We compact the solution with a wooden stick so that no voids form inside.
8 Leave the finished flowerpot until completely dry for a day.
9If desired, you can use a tool for cutting the cuticle of nails or a thin stick on a partially dried product (it must first stand for 7-8 hours) to cut out various patterns.
Original plaster pots
When making flowerpots, do not forget about the drainage holes that are made in the bottom of the container. Otherwise, the water in it will stagnate and the roots of the plant will quickly rot.
DIY flowerpot mold
It’s enough to simply make a mold for a flowerpot out of plaster. It will turn out to be light, in addition, you can give the plaster flowerpot any structure. Of course, it will be very fragile, so you will have to handle it very carefully so that nothing heavy falls on it. It is ideal to install such flowerpots in flower beds or gardens, where there is the lowest probability that something can damage them.
We tell you how to make this form:
- Take any rectangular cardboard box. It will need to be sanded on all sides. The plaster will adhere better to the treated surface.
- Make a gypsum solution of such a consistency that it resembles sour cream. You need to put pieces of gauze or a regular bandage into it. Wrap the box with this bandage.
- After this, leave the pot for a while so that the plaster hardens. All irregularities that will form can be removed using the same sandpaper.
- We paint the finished flowerpot with acrylic, and when it dries, we cover everything on top with enamel.
- The finishing layer is a varnish that will give the flowerpot shine and beauty. By the way, a plaster flowerpot can also be decorated with pebbles, shells and other tinsel. Although they look quite interesting without it.
Clay pots
There can never be too many flower pots, so we will make our next project from clay. For these purposes, you need to purchase a special one that does not require firing . Such mixtures are sold in stores that sell art supplies.
Decorative clay product
This type of clay hardens in air within 24 hours without any firing.
It paints and polishes beautifully.
1Before sculpting, lumps that are too dry are soaked in water. If the clay is flexible enough, this is not necessary.
2 First, it is thoroughly kneaded so that no voids or bubbles form inside, and then rolled out with a rolling pin to the desired thickness.
3The resulting “pancake” is cut into pieces.
4 Place any container on the resulting layer and cut off the bottom.
5Using a long narrow strip, wrap the sides of the mold.
6 Wet our hands with water and iron the resulting seams.
7Cut off the excess with a knife.
8After drying for 1-2 days, carefully polish the product until it shines.
9Paint the finished pots or varnish them.
Using old items
You can turn any old items into a flower pot, sometimes the most unexpected ones. For example, plant plants in an old salad bowl or teapot. If the product has a small crack, it doesn’t matter - it can be turned towards the wall, making it invisible.
Pots made from transparent materials, such as glasses or plastic bottles, look unusual. For decoration, light stones are poured onto the bottom, then earth. The top layer is decorated with a layer of dry sawdust.
Felt plant pots
How do you like a flower pot made from an old cosmetic bag? Or street flower pots made from bags (photo)? Agree, it's unusual. As well as products in the form of large shells, shoes, open suitcases and even jeans cut off at the knee.
Flower pots made from bags
You can even use an entire coffee table as a flowerpot, placing all kinds of plants in its open drawers. Maybe your imagination will give you more creative ideas.
Interesting
Other unusual ideas
- If you are a fan of high-tech style and you still have unnecessary computer floppy disks, you can build original flower pots from them. By the way, they are perfect for growing violets and other small plants.
- By gluing together 5 square mirrors of the same size or 5 ceramic tiles, you will get an easy-to-make, but stylish and original flower pot.
- Pots can be made from old vinyl records. If a vinyl disc is heated, it becomes soft and pliable, easily taking on the most unimaginable shapes.
Photo of DIY flower pots
Sources
- https://podelki.expert/kashpo-svoimi-rukami/
- https://posuda-gid.ru/gorshki/94-dlya-tsvetov-svoimi-rukami
- https://proffstroygroup.ru/dekor/kashpo-iz-betona.html
- https://krrot.net/kashpo-svoimi-rykami/
- https://yellowhome.ru/2018/02/15/kak-sdelat-gorshok-dlya-cvetov-svoimi-rukami/
- https://design-homes.ru/sdelaj-sam/gorshki-dlya-tsvetov-svoimi-rukami
- https://sad-doma.net/polezno/svoimi-rukami/gorshok-dlya-svetov.html
Decorating flower pots
A flower pot with an original design does not have to be made from scratch. You can also use standard flower pots or containers of suitable size. They can be painted with paints, covered with paper napkins or cloth.
Flower pots are made from macrome. Craftswomen who know how to hold knitting needles or a crochet hook in their hands can prepare knitted “clothes” for flowerpots. Lace, fabric, beads, buttons, coffee beans and cereals, etc. are also used for decoration.
An original idea using pencils
When decorating with eggshells, they are first degreased in a baking soda solution. After drying, the pieces are coated with glue and applied to the surface with the convex side.
If the distance between them turns out to be significant, small pieces are added to the gaps or the uncovered areas are covered with crushed shells. Then the product is coated with PVA glue, and after drying it is varnished.
Mosaic planter
Give a second life to an accidentally broken vase or tile by using it as flower pot decor. In addition to fragments of any size, we will need glue for ceramics and special grout for seams.
Flower pot decorated with mosaic
1Use a tile cutter to obtain shards. If you don't have one on hand, wrap them in a thick rag and beat them with a hammer.
2 We sort the fragments according to the size and color of the picture, setting aside those that suit them.
3 Coat the prepared container with glue and glue the fragments.
4 We fill the gaps between them with grouting compound. We remove the excess with a rag immediately before it dries.
5 If desired, varnish the finished product.
Using twine
Using inexpensive jute twine, you can get an antique-style product
So, let's describe the process of creating flower pots from rope:
1To work you will need a clay or plastic flower pot, twine and glue.
2Apply a drop of glue to the top of the container. We fasten the twine and begin to tightly wrap the container, securing it with glue every 3-4 turns.
3Having reached the edge of the pot, cut the rope and fix it with glue.
4Part of the container, for example, the bottom, center or top, can be painted a different color. To do this, secure paper tape in the right place. We paint part of the product. The tape must be removed before the paint dries completely.
5If you paint the pots in the same style, but with different patterns, you can get an original flower arrangement.
Decoration with jute twine
Decoration with fabric or lace
You can use any original fabrics, curtain borders, tulle or lace. Since this material is inexpensive, you can decorate flower pots throughout the house in the same style and color scheme.
Lace and twine trim
1To understand what size piece of fabric we need, we need to roll a flower pot over it. This way we know its height. A few centimeters should be left for hems. The diameter of the plant pot can be determined by measuring it at its widest point.
2For convenience, fill a regular medical syringe with moisture-resistant glue. The composition will be applied more evenly.
3Apply glue to the container from top to bottom in a stripe. Apply the fabric and smooth it with your palm. We glue another strip. With this step-by-step fastening you can perfectly adjust the tension of the fabric.
.
4The last to be attached are the edges with a slight bend along the top and bottom. In order for the fabric to lie flat, it must be cut in several places and overlapped.
5The last stage is coating the finished flowerpot with varnish. Please note that after this the fabric will darken slightly.
There are many ideas for making flowerpots. The author of this video suggests making unusual ones:
Preparing PVC pipes
At the next stage, we saw off the plastic pipes to the required length. Since the author makes two flowerpots at once - large and small, pipes of different lengths will be required.
You will also need to prepare plastic plugs for the pipes. Please note that you will need twice as many plugs.
To make a small flowerpot, the author uses 15 pieces of pipe and 30 plugs.