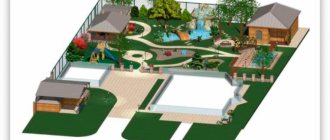
The owner of a private house or cottage is trying to develop the surrounding area. And at the same time, it is important to make the site not only aesthetic, but also practical. Therefore, considerable attention is paid to garden paths. Fortunately, there are different options for garden paths. They differ in cost and production time, service life, appearance and complexity of the device. What can paths in the garden be made from? From almost everything. And we will briefly talk about the most interesting solutions in the article.
Path made of pallets in the garden
Are you planning to arrange wide paths in your dacha? And at the same time, do you have the opportunity to buy old pallets inexpensively? Then there is a great way to quickly and easily do the job yourself without spending extra money.
Of course, it won’t be possible without preparation – no one has canceled the marking and excavation work. But before laying the sand and gravel base, you will have to cover the bottom with geotextiles or roofing felt. They protect wooden pallets from moisture and prevent grass from growing on the path.
The pallets themselves also need to be prepared. First of all, look for damaged slats (if old pallets are used) - they need to be replaced. It might even make sense to disassemble one and use it as spare parts for the rest. In addition, do not forget to treat the entire surface with an antiseptic, and it is advisable to cover the lower bars with mastic - this will significantly extend the life of the track.
The rest of the installation is simple. The main thing is to ensure that the pallets are the same height and that there are no differences between them.
Along the edges of the future path around the dacha, logs with a section of 100x100 mm or 100x150 mm are laid. Pallets are placed on them, which are fixed using self-tapping screws. Thus, the pallets form a single path and will not move under load. As you can see, making them yourself is not difficult.
Video
Ideas
pallet track 1
pallet track 2
pallet track 3
No. 3. What tools and materials will be needed?
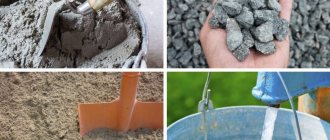
Before starting work, you should stock up on everything you need, namely:
- cement not lower than grade 300;
- sand;
- crushed stone;
- waterproofing additives for concrete;
- pieces of plywood, boards or metal to create formwork;
- wooden or steel pegs;
- sledgehammer or hammer for hammering in pegs;
- container for mixing the solution;
- a pair of shovels;
- steel construction mesh;
- smoother for leveling the surface of the path;
- trowels and spatulas.
Tire track
However, it is not necessary to wait until the tires are recycled and you will have to pay a lot of money for the rubber track made from them. Some craftsmen make paths near their dachas from tires! You can get them at service stations and tire companies, and completely free of charge - the employees will even be grateful if you save them from unnecessary junk.
True, you will have to work hard with tires. First of all, they need to be cut into strips. If you plan to do this yourself, you need to know that you should cut along the edge - then the rubber will easily straighten and be even. After this, the tire is cut into strips of the required width. When enough material has been prepared, installation can begin. Of course, to do this you need to dig a place for the future path and arrange a cushion of sand and crushed stone. And on very heaving soils, you can also organize a cement screed. On normal soils you can do without it.
Now the tire belts themselves are leveled. To do this, they are nailed to slats or boards impregnated with an antiseptic or coated with waterproof mastic. Already in this position, a path is laid out of them. It is important to ensure that there are small gaps between the strips through which water can easily drain from the path, allowing it to dry quickly after rain.
Video
Ideas
garden path made of tires 2
garden path made of tires 3
garden path made of tires 4
Paving slabs
For paving paths, ready-made slabs with a thickness of at least 50 mm are purchased. According to the color scheme, tiles of sandy yellow, red, blue or ocher colors suit the landscape of a suburban area. The tile on top should have an uneven, rough surface.
Lay paving slabs on pre-compacted sand. In places where there are constant crowds of people and significant traffic, the tiles are additionally fixed with cement mortar. When laying the tiles, lightly tap them to secure them and shrink them with a rubber hammer. The gaps between the tiles should be left narrower. When laying, you need to use a level board or level to check the horizontalness of the device.
Path at the dacha made of bottles
If we talk about budget paths at the dacha with your own hands, then it’s worth mentioning the option made from bottles. These can be plastic or glass bottles; some craftsmen lay out paths from plastic corks! Such paths are not afraid of temperature changes and high humidity, are durable and easy to use.
The bottles are pre-washed, cleared of labels and filled with water, sand or soil so that they do not deform under load. By the way, this is a great opportunity to get rid of the soil that appeared as a result of digging a trench - often there is nowhere to put it.
First, a trench is dug - the depth is about 30-40 cm. The bottom needs to be compacted and formwork built on the sides. Gravel, crushed stone or broken brick is laid at the bottom. Then there is a layer of geotextile or roofing felt - so that the grass does not grow and spoil the appearance of the path. A cushion of crushed stone and sand is poured on top of it. Bottles can be installed either vertically (neck down) or horizontally (neck towards the edge of the path). They are adjusted as closely as possible to each other. The gaps are filled with a mixture of dry cement and sand, and then watered with water from a watering can. Once the concrete has cured, you will have a strong, durable, cheap and attractive garden path.
Video
Ideas
Country house path made of bottles 1
Country house path made of bottles 2
Country house path made of bottles 3
garden path at the dacha made of bottles 4
No. 8. How to install formwork?
Formwork is a structure for pouring concrete. It is made of wood. If you want to make smooth lines or curves, you can always use plywood or other flexible material. The formwork is installed immediately or in parts, since the concrete is poured gradually. The second option will also save costs on materials.
The formwork should protrude 5-10 cm above ground level. It is necessary to lay a construction mesh at the bottom of the prepared trench, and every 5-6 m of the future path, install boards across it, which act as expansion joints . Thanks to them, the concrete path will not crack during temperature changes, placing stress on the boards. The height of the expansion joints must match the height of the track.
Digging in
This option is very similar to the previous one, but the difference is the method of laying boards or round timber cut from logs.
Having decided to create your own unique version of paths using this technology, you should take care of protecting the material from possible rotting.
No. 9. How to arrange a pillow?
The so-called cushion under the concrete path performs several functions, the main ones:
- concrete load distribution;
- drainage.
The sandy base allows water to pass through well, which means that the soil under the path will not freeze, causing deformation of the path. Under the sand, many experts advise organizing a layer of compacted crushed stone, but this is not always necessary. Over time, sand can sink into the ground along with water passing through it, so it is better to lay a layer of waterproofing made of roofing felt, geotextile or agrofibre . The last two perform very well, as they do not rot and allow moisture to pass through perfectly.
The sand layer must be compacted well. You may have to wet it for this, since there should be no voids left inside. The surface must be level so that the concrete layer is distributed evenly. It is worth noting that an alternative to sand can be a concrete screed or flat stones, but their thickness must be taken into account when deepening the trench.
Flooring technology
The path is built above the ground, which allows you to create an attractive sidewalk. Thanks to this particular solution, the material does not rot, is ventilated and will be in use for quite a long time.
The base will be logs, these are bars that are made in a rectangular shape. Since the logs are located in the ground, they must first be covered with a protective material, for example, it could be mastic.
Execution Features
To begin work, you should start from the very beginning stage, namely, marking. It is convenient to use a rope and pegs for this; with their help, the boundaries and direction of the paths are marked.
Along the paths, you need to remove all existing obstacles. Next, a trench should be dug, its depth simply determined by the width of the tile. It should be 4 cm deeper than the thickness of the tile. The cavities between the tiles must be filled with sand, and the edges of the path are strengthened with the support of the earth; it must be compacted.
Tile option
Many people consider the option of tiled paths for the garden, but for some reason they refuse it. Most likely, the main reason for failure is the complex installation technology.
In fact, the installation technology is not particularly complicated. The tiles can be laid on sand, which is much easier and cheaper than preparing cement.
Customized solution
In addition to the usual options listed, it is quite possible to create something individual and unusual. You can combine different materials.
It is very interesting to combine different materials, creating some patterns on the paths from them. The main thing is to control that they are in harmony with each other, and that everything turns out strong, beautiful and reliable.
Do not forget about the need to treat the wood, because if it comes into contact with wet soil, it can quickly begin to rot, and the stone must be securely fixed in order to eliminate the possibility of injury in the future.
Use a protective drainage membrane
To prevent weeds from growing through the path and water not retaining on it, place a special drainage fabric - for example, a profiled membrane PLANTER Geo TECHNONICOL - under the layer of sand on which the finishing coating is laid. This is a protective and drainage material made of high-density polyethylene with protrusions 8.5 mm high. Thanks to its two-layer structure - drainage channels and thermally bonded high-strength geotextile Typar SF27 - the PLANTER Geo membrane has a high water permeability. In addition, the material allows you to maintain the stability of the underlying layer and increase the load-bearing capacity of the entire structure.
The construction of a track using the PLANTER Geo membrane consists of the following stages of work:
- Prepare the base for the path: dig a trench and lay a slope-forming layer of medium-grained sand. Typically the slope is 3-5 cm by a width of 1 m. If necessary, a layer of needle-punched geotextile is laid at the bottom of the trench to separate the “pie” of the path being made from the ground. If there are heaving soils on the site (loams and clays), it is recommended to insulate the path with extruded polystyrene foam (XPS) slabs.
- Lay the PLANTER Geo canvas on the slope-forming layer or on the insulation (in the case of insulating the path) with the geotextile facing up. If it is not possible to cover the required area with one sheet of membrane, lay all subsequent ones with an overlap of 100-120 mm. Glue the seams between the membranes with PLANTERBAND bitumen-polymer tape. Secure the geotextile separately with adhesive tape to form a complete filter layer.
- Use a gravel-sand mixture to form the supporting layer of the path surface. The layer thickness must be at least 50 mm.
- Lay a finishing surface of paving stones, paving slabs or gravel. Do not forget that tiles, paving stones, saw cuts are laid on a cement-sand mixture.
An example of a path on a sand-crushed stone base with paving slabs and surface drainage
- A separating layer of needle-punched geotextile (installed if necessary).
- Slope-forming layer of sand (the sand is first spilled with water and compacted).
- Drainage membrane PLANTER Geo.
- Drainage pipe wrapped with Typar SF20 or SF27 geotextile in a trench with crushed stone backfill.
- Drainage layer of crushed stone.
- Concrete/mortar lock.
- Curbstone.
- The underlying layer is made from screenings.
- Paving slabs (paving stones).