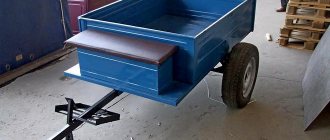
Planting and growing potatoes in our country has long become a very popular activity. Therefore, every owner of his own garden often thinks about how to make his work easier and plow, dig and prepare the soil for planting potatoes as quickly and efficiently as possible. Purchasing a walk-behind tractor is a complete solution to these problems. This very valuable unit allows you to effectively plow and cultivate land plots of varying length and degree of soil complexity.
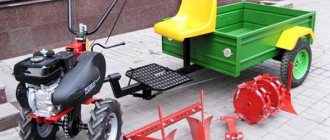
It is not surprising that every happy owner of such a device expresses a desire to use additional attachments in the future in order to significantly expand the capabilities of his assistant. Of course, you can purchase such equipment at specialized retail outlets, but you will have to spend a certain amount of money. Therefore, many people try to make a hiller themselves. In this case, it is not at all necessary to make an exact copy of the factory equipment. The main thing is to take into account the operating principle and general features of the product during manufacturing.
Why do you need a hiller?
Hilling increases potato yield
Hilling potatoes is a very important procedure for the growth of vegetables. Those who neglect to carry out this process get a low and small harvest. Hilling up using a technical method helps to get rid of most weeds between the rows. The grass between the holes can be pulled by hand. It does not take a lot of time. The remaining weeds between the rows of potatoes from technical processing can be easily removed using a regular hoe.
Advantages of processing potatoes using a technical method, using a manual, tractor plow or hiller for a walk-behind tractor:
- On average, productivity can increase by up to 30%.
- With timely loosening of the soil, it is actively saturated with oxygen. This allows the tubers to absorb more nutrients from the ground.
- Potatoes grow faster with the right air access.
Are there any disadvantages when hilling using additional equipment?
CULTIVATOR-WEDDERER
And the front part of the frame will serve as a kind of beacon. More precisely, a support wheel oriented towards the middle of the row spacing, since the cultivator itself, cutting into the surface layer of soil, becomes simply invisible in the resulting crumble. There was, however, an attempt to make the cultivator paw more noticeable by additionally installing vertical ends. But this idea soon had to be abandoned - too many “small things” clung to such an elaborate “chopper”.
The option, sketches of which are shown in the figure, is designed for inter-row cultivation of potatoes with a planting width of 0.5 m. Those who are accustomed to other seeding rates will have to make appropriate adjustments. It is easier to take a ready-made cultivator paw (for example, from decommissioned agricultural machinery).
But you can do it yourself, especially since the main dimensions are indicated in the sketch. In the upper part of the paw there is a bushing with a “mouse tooth” type corrugation (for details on its implementation, see No. 1 of the magazine for 1993) at the ends - for fastening in the corrugated cheeks of the rotary bracket and subsequent tightening with an M14 bolt and nut. As a result, it becomes possible to easily, quickly and widely change the angle of installation of the cultivator.
It is also better to borrow a weeder-clump breaker from agricultural machinery. Installed in the rear part of a homemade frame, it, together with the cultivator (on a swivel bracket!) forms a kind of hinge, the axle shafts of which are two M6 steel bolts with nuts and washers.
And to fish out worn-out and half-ground weeds from the conglomerate formed in the working area, a heavy multi-link chain, freely hung on end hooks, is used. The stems and roots of weeds, pulled to the surface by a rake, wither and die in dry, sunny weather.
The U-shaped rotary handle used in the weeder cultivator is practically no different from the analogue already discussed earlier. Another thing is the spring introduced into this design (wound from 1.5 mm steel wire) with a chain lock and hook. Such a seemingly simple device has a special role: to serve as both an indicator and a regulator of the load that the cultivator-weeder experiences during operation.
It also performs the function of pressing the working bodies to the soil surface, depending on the condition of the latter. The load naturally increases when working in heavy damp and turfy areas. The soil sticks to all structural elements and is driven into the weeder's drum.
Periodically shaking the unit helps. To make it faster and more efficient, I recommend welding small thrust washers to the cross member of the weeder’s frame (not shown in Fig. 2). One has only to pull the handle up and the hind ends of the paws will rest against them. Well, the jerk will cause a shock to the structure itself, as a result of which all the adhesion will immediately fly off and the equipment will be ready for work again.
And further. Make a long poker-type hook from 6mm wire rod. Hang this tool on your hand while weeding so that, as necessary, you can quickly clear the frame or, say, the same star weeder from tangled roots and other things. Let’s assume we’ve sorted out the mechanization of weeding. Next up is the hilling of potato plantations. Any gardener knows firsthand, but from his own hard-won experience, how difficult this work is. And, as a rule, it takes a lot of time to complete it.
You will get exhausted even if you take a hiller plow as your assistant, the advantages of which are outlined in the previous issue of the magazine. In particular, the use of the considered plow can improve the situation if you install it instead of a cultivator paw. But there is another, radical solution: to acquire more specialized equipment.
Features of operation and maintenance
Installing a hiller on a walk-behind tractor requires compliance with the rules for adjusting the angle of attack and depth of immersion, and it should be smaller compared to a plow. Wheels and a hitch are installed on the hiller, after which it is connected to the main unit. The walk-behind tractor is placed on a flat surface, while the hiller is lowered and connected by means of a hitch.
When installing attachments, the operator tries to ensure that the hiller stand is positioned vertically. This is the position that is necessary to correctly set the optimal angle of attack. After this, the hitch is lowered to the ground or even slightly deeper into it
It is important that the equipment is positioned below the lug support
Before starting the main work of plowing or hilling the land, it is necessary to carry out a test run in a small area
It is important to work in good weather, having first checked the sharpness of the working elements. In addition, before starting work, it is necessary to assess the condition of the soil
Along with this, it is necessary to determine the optimal speed of work, since a correctly selected indicator will contribute to greater efficiency and quality of work. For example, if the speed is high, the hiller will simply throw the earth in two directions instead of creating a hill and a furrow. When the equipment goes too deep into the soil during operation, the stand must be tilted forward by lifting the toe.
When it is necessary to plant potatoes using a hiller and walk-behind tractor, you must first make marks with a distance of approximately 65 cm. After this, create furrows and lay out planting material in them. After this, the wheels need to be replaced with rubberized ones, setting the wings to the widest position. Having placed the unit between the rows, they walk the entire row with a walk-behind tractor, covering the planted potatoes with soil.
Setting up the disc hiller primarily involves its correct direction relative to the furrow. The device must be positioned parallel to the beds with a given angle and working width.
This is what will determine the depth of tillage (furrow depth). If a moving-type hiller is installed on a walk-behind tractor, it is necessary to adjust the width and height of the ridge.
In the disk model, you can adjust the processing width. To do this, the lower points of the disks are moved to the sides by approximately 40–70 cm (the specific value will depend on the row spacing). When setting up, make sure that the disks are positioned symmetrically with respect to each other.
The soil is treated with such devices three times per season:
- when the seedlings grow to 15 cm;
- when they grow to 23–25 cm;
- at the moment of flowering.
Variety of choices
A walk-behind tractor or cultivator will help make planting and caring for potatoes easier. When working in the garden or vegetable garden, they are considered indispensable assistants. An integral part of the walk-behind tractor is the plow. It can be revolving and disk. An additional accessory to the technique is a hiller, which can be of several types. https://www.youtube.com/watch?v=IwXYxv73vvc
It will not be possible to immediately determine which hiller is better. The choice of hillers is influenced by many factors, including soil characteristics, the size of the land plot, and the financial part of the issue plays not the least role. Therefore, in order to make the right choice, you need to get acquainted with the description of the most common hillers for walk-behind tractors:
- Hillers that do not require independent adjustment of the width between the metal wings. The furrow for all crops will be the same distance, which is not very convenient. These types of structures are convenient to use for a motor cultivator weighing no more than 30 kg. In addition, the device’s stands are thin and not suitable for cultivating hard soil.
- Equipment that involves changing the width between the wings, so the distance between the furrows can be made different. You can also use two units at the same time on one hitch. It is recommended to install it on a walk-behind tractor weighing more than 30 kg.
- The most popular type is the single-row hiller. The device is designed to work with light soil pre-treated with a cultivator. If a single-row plow is used, the lugs are installed close to each other. This is necessary because hilling is carried out one row at a time. There is a more modern two-row hiller for a walk-behind tractor.
- Another device for hilling vegetables is the Dutch hiller. It allows you to adjust the wings not only horizontally, but also vertically.
- The active hiller (rotary) of the propeller version is easy to use. It has a completely different operating principle. The rotary hiller has rotors with parallel teeth instead of wheels. The device can be installed on a walk-behind tractor and cultivator with two forward gears. Propellers mounted on the crossbar are convenient for crushing and loosening the soil, removing weeds with roots and hilling plants.
- The best, judging by the reviews of owners of walk-behind tractors with an additional device, is considered to be a disk hiller for a walk-behind tractor. It consists of a T-shaped leader, screw adjusters, two stands and two disks. The working elements do not look like wings, but like disks. You can change not only the width, but also the angle of inclination. The result is ridges on the treated area of the required height and width.
Description of the potato variety Zhuravinka, cultivation and yieldRead
Before you start working on your plot of land, you need to know about the settings of the selected attachment. Improper use or installation of equipment may result in crop loss and other adverse results.
The preparatory stage is to cultivate the desired area, it is better to loosen the soil. At the same time, you can apply organic or mineral fertilizers. The looser the soil, the easier it will be to make furrows.
Before planting potatoes with a walk-behind tractor, you need to set marks at a distance of about 65 cm. Then, using a walk-behind tractor with a hiller, make furrows and lay out the planting material. After this, the wheels are changed to rubberized ones, and the wings of the potato hiller to the walk-behind tractor are set to the maximum width. The walk-behind tractor is installed between the rows and the plow is driven along the furrow, covering the planted potatoes.
Types of hillers
Hillers are used to facilitate labor when carrying out work related to planting and processing crops. Using the device, you can quickly cope with planting and hilling vegetables such as potatoes, carrots, beets and turnips.
There are 4 types of equipment models that are popular:
- lister;
- disk;
- propeller;
- with variable working width.
The equipment allows you to automate all stages of planting: making furrows and filling them with soil. Its use allows you to plant planting material in even rows, which will further simplify maintenance activities, as well as save effort and time.
A common model is lister hillers, which are easy to make yourself. The remaining devices are difficult to assemble and are used for installation on expensive walk-behind tractors, which are not used for cultivating local areas and small plots of land.
By design
Depending on the design, lister devices are divided into adjustable and non-adjustable.
Non-adjustable models are a solid structure consisting of two mirrored plates that diverge at a certain angle and have a common stiffener. Adjustable ones are usually two-row structures, in the settings of which you can change the depth and width of tillage due to the special arrangement of the constituent elements.
A rotary milling hiller (also called an active hiller) is installed in place of the base cutters of the walk-behind tractor. With its help, you can carry out all planting and weeding work, as well as harvesting and soil cultivation in an automated mode due to an additional device - a rotor.
The disk device has equal angles of inclination of the disks, which ensures its balancing. Externally, it looks like a frame placed on wheels with suspended disks. When the equipment operates, the discs grab the soil and add it to the place where the plant grows. Adjusting the racks allows you to change the distance between the disks, and, as a result, between the rows. It is convenient to use the device for chopping and loosening soil.
According to the operating principle
Depending on the functional characteristics, hillers are divided into two-row (or double) and single-row.
The double-row device allows you to process a row simultaneously from both sides, while it is possible to select the processing angle and furrow width due to the specific arrangement of the adjustable plates.
Single-row hillers are usually classified as non-adjustable. They consist of a single plate, and their characteristics do not provide for multifunctionality, since this type can only perform one operation per unit of time.
Necessary materials
Before we begin to analyze one or another method of making a hiller ourselves, we need to list a minimum list of what we will definitely need during the work.
KamAZ 65115 belongs to one of the oldest series of this plant, production of which began back in 1998. Here are all its technical characteristics.
One of these oldest companies is Vogele, which produces a wide range of asphalt pavers models. Vogele asphalt pavers stand for German quality and commitment to progress.
The T 70 tractor on wheels is the brainchild of the Chisinau Tractor Plant. By clicking on the link you will get acquainted with all the information on this tractor.
Of course, no one is forcing us to retrain as a blacksmith in order to forge all the necessary parts using the ancient method that was used several decades ago. But we still need a basic list of welding and plumbing equipment:
- Welding machine (it is preferable that this machine is intended for arc welding).
- Grinder with a set of different discs and attachments.
- Electric drill with a set of reliable drill bits.
- Electric emery.
- A gas burner, which is necessary to heat the metal during hardening.
- Vise or workbench.
- Various files and other consumables (bolts and other fasteners).
This list relates directly to the tools we need. In addition, you will need the material itself from which self-assembly will be made, but we will talk about this in more detail in the process of describing methods for making hillers.
Making your own hiller
Instructions will help you make a hiller with your own hands, as well as clear sketches of parts with the required dimensions. They are fairly simple designs. Any subtleties and features can always be seen in the photo or video of the manufacturing process. This will allow you to install all components correctly and quickly, so as not to have to redo the work later.
Required tools and materials
For work, you should prepare a number of tools: metalworking (vise, hammer, chisel, wrenches), electric (grinder, electric drill with a set of drills, welding machine), marking (tape measure, caliper). You also need to stock up on consumables: abrasive wheels, welding electrodes. Markings are applied with chalk, pencil or felt-tip pen. It is convenient to use a text proofreader in the form of a ballpoint pen for these purposes. It is easy to apply, and due to the formation of a thin line, cutting accuracy increases.
If almost every craftsman has the required minimum working tool (or you can ask your friends for it), then the situation with the necessary materials is more complicated. Depending on the design adopted, a different assortment of metal and its quantity will be required. The master does not always have such an assortment at hand. You'll have to buy it. However, a store or warehouse may refuse to sell such a small quantity. In this case, you need to look for alternative sources in production, repair shops or scrap metal collection points. For production you will need:
- sheet with a thickness of at least 3 mm;
- strip 40 x 4, 50 x 5 mm;
- profile pipe 15 x 15, 30 x 15 mm;
- fasteners (bolts, washers, nuts).
How to make a potato planter with your own hands: drawings Potatoes are loved by many gardeners, so they are often planted on plots of land. It is used as...
Preparatory activities
Initially, you should prepare drawings of all the parts and transfer them to thick paper on a scale of 1: 1. Then cut out cardboard patterns and place them on the metal surface so that as few scraps as possible remain. The grinder is used to make blanks. To do this, use an abrasive wheel to outline a contour to a depth of up to one millimeter, and then perform a full cutting. Bend parts in a vice or suitable mandrels. Mark the holes using a caliper and drill with a hand-held electric drill or on a machine.
For your information! To facilitate bending, parts are preheated with a blowtorch, gas torch or oven.
Making a lister-type hiller
The main part of this type of tillage tool is the ploughshare. This is a hiller plow for a walk-behind tractor that cuts into the ground. The construction of the structure must begin with it. To increase strength, it is advisable to harden the plowshare. However, this imposes a limitation on the list of materials for its manufacture. Low alloy carbon steels should be used. They lend themselves well to hardening and cutting. The plowshare is attached to the front using a bolted or welded connection. In the latter case, hardening is carried out after assembly.
The front part is made of steel sheet 3 mm thick. Bend it in two planes. To give the part smooth bends and transitions, it is preheated to 900 °C. The lower part should mate with the plowshare without gaps or distortions. To fit the parts, they are bent or trimmed. The front part is mated to the dumps on both sides. At the same time, the smoothness of shapes and transitions is controlled. The sole is made from a steel strip 5 cm wide and 5 mm thick. The bracket is cut out of a profile pipe with a cross-section of 30 x 15 mm.
Disc hiller
You can make your own attachments for a walk-behind tractor from an old gas cylinder. In this case, the top and bottom are cut out. The edges of the workpieces are processed with a grinder or sharpening machine. A hole is drilled in the center for fastening to the rack. The latter is made of steel pipe with a diameter of 26 mm. The traverse on which the racks are mounted is made of a metal profile with a cross-section of 40 x 40 x 3 mm. The coupling to the walk-behind tractor of a homemade disc hiller is made from thick-walled rolled steel.
Assembly
All parts are assembled into a single whole on a flat surface. To prevent displacement, clamps or clamps are used. Bolted connections are pre-twisted. Welded joints are cleaned of rust, scale or old paint. Gradually connect the elements and fix them with spot tacks. When the structure becomes rigid, check its compliance with the drawing, as well as the smooth movement of moving parts. After this, the final welding is performed.
Lister model
This homemade hiller for a walk-behind tractor is interesting because it is easy to make in a rigid, non-sliding version. Here is a photo of such a hiller:
Lister hiller
In order to do this, you need little time and material. Cut a blank from 2 mm steel according to the drawing, a certain configuration. Let's sharpen the future bottom edge. Let's bend it in the middle. How to bend? Through a fixed pipe. Complete the fold by punching the leading edge with a hammer. Then we spread the wings of the hiller. We fix the width between the wings with a steel cross member welded between them at the back. We punch through the bottom of the product so that the wings turn out to be ploughshare-like.
From the inside in front of the hiller, we weld a stand with several holes drilled so that you can adjust the depth (higher, lower) of the hiller’s immersion in the soil. We bolt the rod going to the walk-behind tractor to the stand. We attach the bar to the walk-behind tractor.
The same list model, made in a sliding version:
Sliding lister hiller
The hiller lies bottom up, so its structure is visible. Apparently, the hiller is factory-made. You can do exactly the same thing manually. Instead of a cross member tightly connecting the wings, three connection elements are used here: in the middle, welded in front, a rod with holes; two cross members from the wings, overlapping onto the middle rod. The connection point is secured with a bolt and nut.
The diagonal cross members are attached to the fenders using a welded eye, so the cross members can be moved. By moving the bolt closer or further along the rod, you can adjust the width of the wings. Everything else with a sliding lister hiller is done in the same way as with a non-sliding one. Of course, a sliding one is better. It turns out that you can adjust not only the depth, but also the width of the hilling.
Kinds
There are several types of tractor hillers on the modern market.
Lister equipment for a mini-tractor is considered the simplest model. Work with the ground is carried out thanks to the presence of a pair of connected and slightly spread wings. The thin stand prevents overloading when the moving device is immersed in the soil
It is important to mention that the lister hiller does not have the ability to adjust the grip, that is, the width of the rows must correspond to the equipment, and not the canopy adapt to the existing beds. The working width of the device is always fixed and ranges from twenty-five to thirty centimeters
This gap is sometimes not enough to process large areas, which, of course, is a disadvantage of this variety. A model with a variable working width is considered more convenient for use, which indicates the possibility of adjusting the space being processed.
- The disc hiller is considered a universal device, very convenient to use. Such equipment allows you to cultivate the land not only during planting, but also when the potatoes are actively developing. Models made of alloy steel and equipped with special rolling bearings instead of sliding bushings are considered to be the most reliable. The large diameter and thickness of the discs are also important.
- The next type of hillers is called propeller-type devices. As you can guess from the name, soil hilling in this case occurs with the help of propellers. These parts rotate, crush clods of earth, and then transport them from the space between the rows to the beds themselves. As a rule, propeller-type hillers are mounted on moving vehicles with two forward gears. This condition is necessary so that in second gear, the power of which reaches 180 rpm, in addition to loosening, the earth is also thrown over.
A two-row hiller allows you to simultaneously cut furrows for further planting of crops and immediately hill up the soil. When using the canopy, the soil between the rows is loosened and transferred to the bottom of the planted plants. Such a device, as a rule, makes it possible to adjust the working width by spreading the blades, as well as to keep them at the required depth. The double-body hiller allows you to process two rows, which sets it apart from other representatives of the model range. The width of the blade wings varies in this case from 250 to 430 millimeters.
It is worth mentioning that many craftsmen make such attachments on their own from available materials, fortunately the Internet contains a large number of suitable drawings and instructions. The role of discs is usually played by lids from old pans without an enamel coating. The diameter of the circles in these cases varies from forty to fifty centimeters, and the edges of the lids must be sharpened and, if necessary, slightly bent. A circuit is assembled from pipes and bushings, onto which the discs are then attached. The frame itself also has to be equipped with wheels for movement.
Structure
The structure of the disc hilling tool includes a frame on two wheels and two suspended discs.
If we analyze all the components more thoroughly, we can especially note the following:
- T-shaped leash;
- screw ties (lanyards) – 2 pcs., thanks to which the angle of rotation of the disks is adjusted vertically;
- rods – 2 pcs.;
- disks – 2 pcs.
Adjusting the racks ensures optimal variation of the distance between the edges of the disks. As a result, you can select the width that is required (within the range of 35 centimeters to 70 centimeters).
Wheels must be installed with a diameter of approximately 70 centimeters and a width of 10–14 centimeters. Otherwise, you can damage the plantings during the hilling process.
If you want to set a proportional rotation angle for the disks, then you need to adjust the screw ties. Without this, the hilling implement will constantly be pulled to the side. But the angle of inclination of the disks is not adjustable - it is always in one position.
Types of attachments for walk-behind tractors
The hiller demonstrates effectiveness when planting potatoes. This attachment is used on walk-behind tractors, which reduces the labor intensity and time of planting potatoes. Tillage tools come in various designs and are suitable for any planting conditions. Potato hillers for walk-behind tractors are not included in the standard equipment of the unit, but you can make them yourself.
Lister hiller
This species is widespread among farmers. Its wide blades give it an external resemblance to a butterfly. The latter are made of steel sheet. They are located on both sides of the axis. During operation, the equipment lifts the soil with a cutter, and the dumps distribute the soil from the center to the edges, forming a ridge. The tip of the device is lowered below the soil level to a preset depth. The latter is set using a retractable leg located at the rear of the mechanism.
In the factory design, the width of the soil collapse has a fixed value (on average 25-30 cm). Limiting the processing distance complicates the hilling of crops with row spacing of 40 cm or more. To change sizes, a movable structure is used. The variable-width attachment has an adjustment mechanism that expands or contracts the blades. This allows you to adjust the tool to the desired row spacing. However, a larger processing area leads to increased power consumption.
For your information! If the working width increases, a weak unit will not be able to form a ridge of the required height in one pass. One bed will require several treatments.
Disc hiller
Universal disc weeder for processing the arable layer. The working body is concave disks made of sheet steel. They enter the ground at a given distance, loosen it and form a ridge. For effective use, it is necessary to install the discs at an angle in the vertical plane, as well as relative to the direction of movement. Positive sides:
- Setting the processing width. The distance between two disks mounted on the frame is set depending on the size of the row.
- Combination with all types of walk-behind tractors. Even low-power units will perform soil cultivation, and the mounting design allows the equipment to be installed on any of them.
Manual hiller: how to make it yourself at home A potato hiller is an indispensable thing in the household. Technological progress has long stepped forward, it has appeared...
Propeller hiller
This is an active type soil-cultivating tool, the operating principle of which is the rotation of curved blades. It is used only on equipment equipped with a power take-off shaft. The latter drives the rotor disk. Rotation of the latter during tillage allows obtaining good productivity and quality of ridge formation. In one revolution, the disk loosens the soil, clears it of weeds, throws it onto the beds, and at maximum speed throws the soil to another place. However, the complexity of manufacturing does not allow making such equipment without the use of metalworking machines.
Where to find hedgehogs for potatoes
You can buy hedgehogs. They are often sold together with a walk-behind tractor and are included in the set of necessary accessories. If they are not available, talk to the seller and place an additional order. Or find someone who will make a design especially for you. But the easiest way is to make such equipment for processing potatoes yourself.
Hedgehog for handmade
If you carefully examine the design, you will see that making it with your own hands is not so difficult.
There are spikes attached to the rings. They are needed to get the job done. Two cones are attached to one handle. They need to be connected not parallel to each other, but at a slight angle so that elevations are formed in the garden bed.
How to make such a device with your own hands? It is not necessary to make exactly a cone. You can use a hollow tube with a diameter of 14 mm as a basis. Long metal teeth are welded to it - 5 pieces at a distance of 4 cm, measuring 60 x 8 mm. The device is mounted on a special frame and then screwed to a wooden handle. The hedgehog is ready for tillage. It is rolled back and forth across the garden bed. This requires physical strength. Before you make this device yourself, ask your friends to borrow it. It may be difficult for you to do the work, test yourself first.
Handmade hedgehogs have a fairly simple design
Hedgehog for walk-behind tractor
If you need a hedgehog for a walk-behind tractor, then you should think about buying it in a special store. But if you want to use homemade ones, carefully consider the design drawing.
Making a hedgehog:
- Find 3 metal disks of different sizes. Proportions: 240, 170, 100 mm or 300, 200, 100 mm. It's better if you use rings instead of discs. Then the whole structure will be much lighter. Another advantage of this lightweight option is that it is much gentler on the soil and plants.
- Take a pipe (25 mm in diameter). Collect disks on it. Start with the largest, end with the smallest. The distance between them is no more than 18 cm.
- Weld the spikes. A metal rod is suitable for them. One hedgehog will need about 40 spikes. The length of each is 10-14 cm. 5 spikes are attached to the small disk, 10 to the larger one, and 15 to the third. The part is attached to the axle itself.
- Inside is the largest disk, then the middle one and the smallest one. They are attached using bushings and jumpers to the frame at an angle of 45 degrees.
- You also need to add guide wheels. They are needed to reduce the load on the towbar. There should be two of them. First, a bracket is made from a metal strip 7 cm wide and 4 mm thick. Drill holes there and strengthen the wheels.
How to make it yourself
Most often, craftsmen make their own disc types of hillers. In this case, the main structural element is a pair of steel disks of a specific concave shape, which are installed at an angle to each other. Disc-type hillers can be made with either an adjustable distance between the disks or a fixed one. It is clear that the first option is more convenient, but the second one is easier to manufacture.
Before you begin manufacturing the hiller parts, you must first make a detailed drawing of the future device. You can take ready-made diagrams from the Internet for this. It will be useful for all gardeners to understand how to destroy weeds in the garden using folk remedies.
On the video - how to make a potato hiller with your own hands:
Hilling devices made from improvised means
It should be noted that a homemade hiller can be made without investing in the purchase of iron. This will make it possible to reduce the cost of the gun to a minimum. It is acceptable to use an iron product of suitable dimensions as the starting material. For example, an unnecessary lid from an old saucepan.
The main thing, when using a similar approach to business, is to remember the drawings and the required disk diameter. It can be no less than 400 millimeters.
This is explained by the nuances of soil cultivation, taking into account the area of potato roots, planting depth and clearance. Basically, the maximum planting depth is 60-80 millimeters, the length of the roots is up to 200 millimeters. The cover is sharpened on all edges, slightly transformed by bending and mounted on the walk-behind tractor.
Instructions
I would like to start by considering the process of manufacturing a disk hiller, because this type of device is the most in demand today.
By installing disc sizes of different diameters, you can hill up potato bushes of various lengths.
Disc hiller
Many people ask the question - how to make a hiller for a walk-behind tractor with your own hands? At home, this is quite possible if you follow certain recommendations. So, let’s describe the manufacturing process step by step (for example, let’s take a disk hiller for the Neva walk-behind tractor):
- For manufacturing, we will need cutters from an old seeder, or sheets of metal 2 mm thick. They are secured using bearings with seals.
- They need to be placed at an angle to each other. The distance between the lower parts of the disks should correspond to the track width of the walk-behind tractor. They are connected by welding or using ordinary bolts.
- Here you need to follow a strict recommendation - the disks must be symmetrical to each other. Otherwise, the walk-behind tractor with the hiller will drift to the side, which will significantly complicate the entire work process.
- In addition to the discs themselves, the design of the hiller includes screw lanyards, a T-type leash and stands. Lanyards, in this case, perform the adjusting function of rotating the disks along the vertical axis.
- A do-it-yourself hiller for a walk-behind tractor, the drawings and photos of which you see below, must be made in strict accordance with the dimensions. Of course, there will be improvisation, but for the first assembly experience it is best to use other people's work.
- Depending on the capabilities, you can make a fixed or adjustable working width. The second method is more convenient, because you can change the inter-disk distance by simply rearranging the racks.
- To aggregate the hiller with a walk-behind tractor, you need to use a hitch bracket that does not have a beam. The hiller's leash is attached to the hitch using a stopper, connected with bolts and washers. The stopper itself is inserted inside the square pipe and then tightened.
The disk hiller for the Salyut walk-behind tractor is made using the same method, because the design itself and the method of connection to the walk-behind tractor are completely identical to the Neva.
Active hiller
To make such a hiller, we will need exactly the same list of materials and tools that we used in the manufacture of the disk hiller:
- welding machine;
- sheet iron;
- Bulgarian;
- fastening connections.
Using similar tools, you can make an active hiller for the MTZ, Plowman, Champion, Carver, Husqvarna, Lifan walk-behind tractor. The manufacturing principle is in many ways similar to the disk version:
- The axles also need to be adjusted to the parameters of the walk-behind tractor, and the parts themselves are welded using a welding machine.
- As previously reported, this type of hiller places certain demands on the walk-behind tractor. It must have two forward gears, as well as a PTO - power take-off shaft. Many sellers of walk-behind tractors, when they say that a walk-behind tractor has two gears, mean one rear and one forward.
- So you need to clarify this point when purchasing.
- It would be advisable to manufacture several bushings with brackets, as well as additional metal blades.
Double row hiller
The double-row hiller is the same lister type of hiller, but in double volume. Let's look at the whole process step by step:
- For work we need a sheet of metal about 3 mm thick. It is necessary to weld the base of the hiller from this material.
- A 4 mm steel strip can be used as a bracket. The field board is made of a steel sheet 5 mm thick.
- The hiller stand takes on the main load during operation. Therefore, you need to make sure that it is the most stable and reliable in comparison with other parts of the hiller.
- The wings of the hiller can be made from a sheet of steel 2 mm thick. They need to be bent a little using a pipe of the required diameter.
In principle, this is where the process of making a two-row hiller ends. You can also make an adjustable system of hiller wings, which are attached to the base using hinge technology. At the tail of the structure there are rods that regulate the angle of the wings.
Otherwise, the manufacturing principle is completely identical to that of the fixed list version.
Hilling up potatoes
How to hill potatoes using a disk
The mechanism of action of manual hillers is quite primitive. Two gardeners should grasp the device from both sides (front and back). One rests on the front linkage handle and sets the hiller in motion, the other presses the discs into the ground, pressing on the rear linkage handle.
The disc passes through the soil, leaving a noticeable trail behind it. Using such a device, you can hill up plants located in close proximity to each other. But you can also adjust the distance between the disks; you just need to install a few additional parts.
Why is it necessary?
If you are reading this article, then you definitely know that potatoes need to be hilled. But why?
Now we will explain everything in detail:
- When loosening the soil, air flows to the roots, thanks to which they grow much faster.
- Again, when air reaches the roots, potato tubers quickly form
- If you hill up potatoes, you can increase the yield by 20-30%
You also need to follow some rules:
- Loosening needs to be done in a timely manner
- You need to loosen in cloudy weather. The best option is after rain, watering or morning dew.
- You cannot hill up potatoes during hot weather, as the plant may simply burn out.
As a rule, hoes, hoes and rakes are used; their use is energy-intensive and time-consuming. Compared to the hillers, the above tools simply pale into insignificance.
Manual hilling is very energy-intensive and time-consuming, and most importantly, you can make the hiller yourself.
Pros and cons of homemade devices
The list of advantages of homemade devices includes:
- accessibility - since anyone can make such a hiller
- - there are no cases where a person paid himself
- efficiency - as a rule, homemade devices are in no way inferior to market analogues, but this depends on the design
- raising self-esteem - it’s better to hill potatoes in a good mood
But the disadvantages include:
- safety of operation - but this depends on how well the hiller is designed
- quality - again, depends on how well the hiller is designed
Almost anyone can make a hiller with their own hands.
see also
Comments 55
very civilized! I can’t even believe what those who produce MB think?!
Region-73! That year, I also made the row spacing wide, cultivated (weeded) with cutters, and the harvest was surprisingly gorgeous.
For the last couple of years I’ve been spudning this way only. The disc hiller is much lighter than the plow type. The distance between the rows is standard 65-70 cm. It hills wonderfully on the original rubber wheels.
I made a similar design as an experiment from two large pot lids. The result is excellent.
no idea how much space there is between the rows
For the passage of a motorized weeder
Nothing supernatural. Kutaisi Super 610 with a wheel on cutters so that it does not dig into the soil.
As a child, we tried this method of hilling in a simple vegetable garden; I or my father acted as a walk-behind tractor)) You harness up and drag this piece of iron, there were also 2 iron circles)) Hilling is much faster, the only thing was to increase the distance between the rows. I will take note of your method of planting potatoes.
I weed the rows with a walk-behind tractor, that’s why the rows are so wide, and the distance between the tubers is only 20 cm, which is very good for digging and watering. From this plot I collect about 30% more than my neighbors from a similar plot with traditional planting. Processing and weeding takes approximately 30-40 minutes. Watering is carried out with a drip tape, which is embedded in the ridges.
Why is there such a distance between the rows? Ahh, I read the previous comments and understood. Is the harvest really good?
I collect one and a half times more than my neighbors from the same area.
Ok, I'll have to try it too
The aisle is really big! Another row will fit. But the unit turned out good!
Thank you. The row spacing is made so large on purpose.
What is your distance between rows of 1m?
This is done for weeding with a walk-behind tractor.
Hmm, if I planted potatoes like that, they wouldn’t understand me))))
This is a Dutch planting technology. For mechanized processing. I'm collecting more neighbors from this area, seriously.
I'll try next year. But look - if it doesn’t work out)))) you’ll have to bring me potatoes
Do I need to hill up potatoes?
Potato roots, like other cultivated plants, need oxygen and moisture for good development and growth of fruits. Hilling provides air access to the soil, loose soil allows water to pass through better, and sprinkled stems form additional tuberous roots. Another advantage is the destruction of the surface root system of weeds during the hilling process.
Before you begin, you need to take into account the climatic features of your area. Potatoes do not tolerate drought and high temperatures, but cold and excess moisture can lead to the death of the plant.
The culture develops best at +25 degrees Celsius. In growing conditions in northern regions with a cool and humid climate, hilling will only be beneficial. An additional layer of soil will raise the temperature of the root system, and increasing the area of land around the bush (forming high slopes) will increase evaporation, reducing soil moisture.
In the southern regions, hilling can only harm potatoes, since an increase in surface soil temperature can reduce yields. In this case, it is necessary to carry out only surface aeration for oxygen access and to fight weeds.