For a modern gardener, there are a lot of technical equipment necessary for farming. One of these most important assistants is a device called a walk-behind tractor. Many people simply cannot imagine their usual life without this tool for cultivating vegetable gardens.
A walk-behind tractor is a useful thing when used independently, but most often it is used in conjunction with a trailer.
The options for trailers for walk-behind tractors offered by retail outlets are very expensive and do not always correspond to what is desired. This circumstance forces handymen to make their own trailers with the required configuration.
In the numerous photos of trailers for walk-behind tractors made by yourself, you can see how diverse the models can be.
In order to assemble this or that unit for your walk-behind tractor, you will need to know and be able to do a lot.
In our article we will talk about exactly those criteria that are important when working on a trailer.
Possible trailer options
Trailers for walk-behind tractors most often fail due to exceeding the permissible load. Therefore, you should first decide on the main types of work for which the model is intended and the volume of transportation. The following options are possible.
Trailer arrangement for walk-behind tractor
Light trailer. The model, designed for a load capacity of 50-70 kg without the weight of the driver, can easily be made from an ordinary garden cart with one axle. It is enough to weld a towing mechanism to it and make a stand for the seat.
The universal option is suitable for transporting small-sized cargo weighing up to 120 kg on areas with uneven terrain. The U-shaped frame is welded from an I-beam. A towbar from a plow is attached to the drawbar.
The heavy model with rubber running is the most rational, although a little more expensive. It allows you to use all the capabilities of the walk-behind tractor and extends its service life by decades. To manufacture it, you need to purchase a metal profile of the required size and some spare parts for the automobile chassis.
Adviсe
Recommendations from experienced DIYers on how to independently assemble a trailer for a walk-behind tractor:
- When installing the body, it is better to use galvanized steel sheet with a thickness of 1 mm. If we consider wooden boards as a manufacturing material, we should take into account that wood is poorly resistant to moisture. Another option is plastic. This material is cheap and moisture resistant, but has low strength. For strength, it is preferable to make the bottom double. It is advisable to use stiffeners in the design;
- It is recommended to use wheels from a motorcycle sidecar and install them complete with the central part of the wheels. You can also adapt wheels from a car (Zhiguli or Moskvich). It should be taken into account that the size of the wheel affects the cross-country ability of the vehicle, the larger the higher;
- the design of the chassis should not be made heavier, as this will reduce the payload on the trailer;
- When manufacturing a trailer for a cultivator with a self-tipping function, it is preferable to purchase a trailer attachment unit to an industrial walk-behind tractor, since it is not easy to make it yourself, and the finished product is quite cheap and accessible. Moreover, buying a finished part will save you a lot of time;
- To create a frame, it is better to use profile pipes of square or rectangular cross-section. You can use a metal corner;
- It is recommended to fasten the trolley parts together using a welding machine, since the bolted connection is considered short-lived. It's even better to combine both methods.
The service life of a homemade trailer depends on the quality of the materials used in its manufacture, as well as on the method of fastening the structural elements.
Necessary materials
The set of materials and equipment required for work consists of:
- electric welding machine;
- Bulgarians;
- electric drills with drills of different sizes;
- ten electrodes No. 4;
- steel profile - tubular square with dimensions 40X40 20 m long and 20X40 15 m long;
- a steel pipe, the internal diameter of which corresponds to the external size of the bearing at the hub;
- sheet metal 2 mm thick with an area of 2x3 m;
- two hubs in a set from a Moskvich car of the M2140 or M 412 brand;
- two wheels from it, in normal technical condition;
- two garage door awnings.
The main dimensions can be selected independently, depending on the type of work, for example, 150X200 cm. The height of the homemade trailer is selected in such a way that it has a horizontal position in working condition. The trailer's carrying capacity for a conventional walk-behind tractor should not exceed 500 kg. For powerful walk-behind tractors with a 12 hp engine. With. the load capacity parameter may be greater. The trailer can be attached to the walk-behind tractor using a standard plow hitch or you can make it yourself. The carrier is made from a round pipe with a distance of 1.3 m from the trailer to the mounting hole.
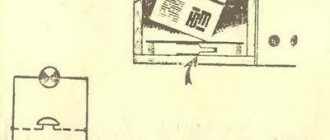
Scheme of hinged fastening of the carrier and the frame of the walk-behind tractor
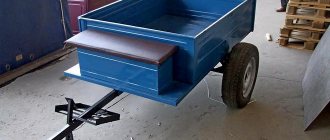
Seat - tool box
All metal parts are painted with black primer-enamel for rust, and the body and tool box are sheathed with galvanized iron roofing, which is mounted on ordinary blind rivets. The frame of the tool box is welded from a 20 mm angle and has dimensions: L 70 x W 34 x H 30 cm. The seat is made of a piece of chipboard and foam rubber, covered with dermantine. There is a lock embedded on the side (see photo).
The dimensions of this box were not chosen by chance, because there is a need to transport a chainsaw, an ax and a can of gasoline. And as it turned out later, the long seat is more comfortable when turning. The bottom of the trailer was made from two scraps of waterproof OSB 12mm thick. Subsequently, I will screw a sheet of galvanized roofing on top.
Housing welding
To make the skeleton of a homemade body, you should:
Motoblock trailer frame - drawing
- cut a square metal profile;
- weld a rectangular frame from longitudinal and transverse spars;
- make a couple of transverse spacers inside it to strengthen the underbody;
- then cut and weld the sides of the trailer - 4 pieces, each 50 cm high;
- sew up the sides with steel sheets and weld them to the base of the body;
- line the bottom with sheet metal and fasten it to beams made of metal profiles;
- install the tailgate using door hinges so that it can be folded back when unloading;
- if desired, you can make the sides folding;
- treat the structure with anti-rust and coat with primer.
Other details
In addition to the main driver's seat, a simple folding bench is installed, which is mounted on the front side of the body and rests on the side ones. Some trailers for walk-behind tractors are additionally equipped with a spare wheel. It can be placed on the side or bottom of the trailer on the metal bottom using special fasteners.
Near the driver’s seat, for the convenience of storing small tools that may be needed on the road and during repairs, small homemade metal boxes or special bags are secured.
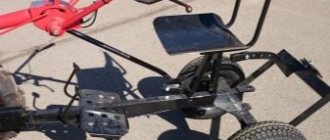
Chassis
Mounting wheels on a trailer hub
The most important part of the work is the installation of the chassis. First you need to prepare the wheel axle. Any wheels can be adapted, but a trailer for a walk-behind tractor made with rubber wheels will make it easier to control and increase driving safety. The axle is firmly welded to the side members at several points and to the longitudinal hinge. Its length must be chosen taking into account that the wheels do not protrude beyond the dimensions of the homemade body.
For better fixation of the axle, corner supports are used. The running gear must be installed strictly parallel to the transverse beam of the frame. The use of a tubular axle will increase the strength of the structure when the permissible load is exceeded. The position of the hubs in the pipe should ensure minimal wheel runout.
Wheels - choosing the right ones
The first step was to choose wheels for the trailer. At first I wanted to use the rear beam assembly with wheels from a VAZ 2109, but after assessing its considerable weight and the dimensions of the future trailer, I changed my mind. For my Salyut 100 such a trailer would be too heavy. There was nothing for sale in the stores other than wheels for garden wheelbarrows. The only suitable wheels that could easily withstand the load were the wheels from the little Oka VAZ-2111.
To begin with, I bought two used wheels with good summer tires. For brakes, it was decided to use assembled rear brake mechanisms from Oka, which I purchased along with rear axles and brake drums, which were also used. I bought two new handbrake cables, also from Oka, at a car store.
Making a trailer hitch
Effective use of various attachments on a walk-behind tractor is impossible without a high-quality hitch. You can do it yourself, saving on the purchase of a factory mechanism. When manufacturing a coupling device, it is necessary to ensure:
- compatibility of sizes for walk-behind tractor and attachments;
- simplicity and reliability in operation;
- the ability to configure equipment to perform a specific task.
Tow hitch for walk-behind tractor - drawing
The main part of the hitch is a U-shaped bracket with mounting holes. It is attached through them using pins:
- on one side - to the walk-behind tractor;
- on the other hand - to the trailer or other attachments.
The material for this unit can be a channel of the required size. The holes must be of a certain diameter. The pins are made of high-strength steel. The position of the device is changed using a lever. The coupling unit is located under the steering control.
Motoblock trailer assembly diagram
Assembly
The process of assembling the structure is simple, and you can do it yourself, having at hand the tools and materials necessary for the work, as well as a little knowledge in plumbing. The work is carried out in the following order:
- Creation of working documentation (project) with installation diagrams of trailed equipment for a walk-behind tractor.
- Selection of material for the manufacture of the frame and other devices of the future design.
- Selecting the workplace where the trailer will be assembled.
- Performing preliminary marking of mounting elements and components of the trailer mechanism.
- Laying out finished parts and combining corners.
- Connection of elements of a mounted device.
In this video you will learn how to make a trailer yourself:
Advantages and disadvantages of a homemade trailer
When there is a need to use a trailer for a walk-behind tractor on a farm, many are faced with a choice: what is more profitable - buying a device or making a trailer with your own hands? Everyone makes their own decision, depending on their skills in craftsmanship and existing prices on the market. The advantages of a homemade unit are the ability to:
- determine its dimensions according to your needs;
- change some parameters;
- choose strong and durable materials that will provide the walk-behind tractor trailer with a long service life;
- use improvised devices that will save money on factory samples.
Homemade trailer for walk-behind tractor
A DIY trailer can be equipped with other useful devices, for example, reflectors and brakes. To manage, you need to acquire some skills that will take a little time.
Video on the topic: Do-it-yourself trailer for a walk-behind tractor
Publications on the topic
Motoblock "Neva" and attachments
Making a homemade trailer hitch for a walk-behind tractor
Operating rules and technical characteristics of the Cascade walk-behind tractor
Preparatory work
First of all, you need to think about what size the trailer should be so that it fits a specific walk-behind tractor and is convenient to use. After this, you will need to sketch out a drawing or sketch of the cart, on which you will display the structure from different angles, put down all the dimensions and draw the nodes.
Trailer mechanisms
You need to think through everything down to the smallest detail so that no difficulties arise during assembly of the equipment. To do this you need to understand:
- non-separable units and parts will be connected by screwing, riveting or welding;
- how the axles, bearings, bushings, hinges will be connected;
- which seat is better to install (simple or rotating);
- what to make the stand for the parking leg from;
- do you need a tipping body, to which you will have to add a mechanical tipper or a self-resetting unit with a special handle;
- which connection unit to the walk-behind tractor to choose (on bearings, bushings or hinged).
Having dealt with all these issues, you can begin to prepare a list of necessary materials and calculate the approximate cost of the future trailer.