In winter, there is a need to clear snow from yards, walkways, driveways and other areas intended for the movement of people and vehicles.
Removing snow by hand is quite difficult, but you can make cleaning as easy as possible by building a convenient and practical cleaning tool.
How to make a snow scraper with your own hands, read the article.
Types of homemade snow scrapers
All scrapers have the same device. The equipment consists of a handle and a working blade, which is used to directly clean the snow. However, the shape and size of these elements can be different, depending on the purpose of the tool. For example, roof snow scrapers have a long handle. It can be solid or telescopic. The working blade is fixed perpendicular to the handle. The scraper is more like a rake.
To clear snow from paths and areas, scrapers are made wide. The simplest option is a rectangular sheet of tin or plywood with a handle. The stalk can be one or two, as well as straight or curved. A U-shaped handle is made on wide scrapers.
If we talk about assembling a scraper for snow removal with your own hands, then a scraper of this type sometimes has a working blade with side sides. The bucket allows you to capture a large volume of snow mass and transport it to a designated location.
Important! To make work easier when manually cleaning large areas, craftsmen came up with a type of scraper mounted on skis.
There are many configurations of snow removal equipment. However, all homemade snow scrapers have a main difference in the material they are made of. They create a tool from metal, plastic and wood:
- Plastic equipment is most often purchased in stores. However, you can make such a scraper yourself from a used plastic barrel, tray or other household item. The plastic is lightweight and snow does not stick to it. Due to these advantages, the work with the scraper is simplified. The edge of the working blade is usually protected by a frame made of a metal strip, which protects the plastic from abrasion. Store-bought products have stiffening ribs. They give strength to the working surface. Plastic scrapers are lightweight, convenient, and do not stick to snow
- The most popular tool for DIY assembly is a shovel-scraper for snow removal, where the material used is plywood and a wooden handle. It is not difficult to find a blank for such a tool in almost every home. Wood is easy to process, but has one drawback. Plywood strongly absorbs moisture. Over time, it begins to delaminate. A tool swollen with water becomes heavy, and wet snow sticks to the working surface. Wooden equipment is usually made from plywood
- In terms of strength, metal scrapers come first. However, not all equipment is created equal. Metal is a flexible concept. If you use ordinary tin and a pipe for the handle, then such equipment will quickly rust. It's heavy. Snow is frozen to the working surface. Inventory made of galvanized sheet steel is considered optimal in terms of price and quality. The protective coating prevents the rapid development of corrosion. However, the scraper is still a bit heavy. Over time, the galvanized layer wears off and rusty spots appear. Aluminum scrapers are considered the best. The tool is lightweight, rarely freezes with snow, and does not rust. You can also consider stainless steel, but the metal is expensive. Metal scrapers are durable, resistant to moisture and mechanical stress
Despite many disadvantages, wood still remains one of the most popular materials.
Screw option
A device with a blade has drawbacks, and the main one is the waste of time and effort to remove the layer of snow picked up by the blade. Often it is left right next to the road, creating high snowdrifts, which is not always acceptable.
The version of the snow blower with an auger will allow you to get rid of even roadside sediment, because its design provides for the throwing of the captured mass over a distance of several meters. This will help clear the yard or street completely, leaving the piles next to the fence.
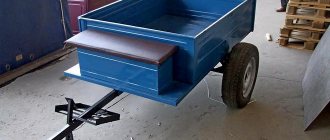
This option is welded or screwed from the front to a frame with wheels, which can be removed from an old wheelbarrow, for example.
Another design is a wheelless version, controlled by a tube. The body is mounted on a frame made of angles, from the bottom of which skis are screwed.
Main components and materials of both options:
- box - welded from sheets of metal;
- central shaft - is a ¾-2 inch pipe;
- gripper (scapula) - iron plates or pieces of channel;
- supporting elements;
- auger - made of rings or tape;
- motorcycle sprocket;
- ski made of plates or pipes;
- frame made of corners;
- bearings;
- a pipe for throwing out snow - you can take it from the stove.
Screw assembly sequence:
- 4 rings and 6 support plates are cut from roofing sheets or other metal.
- Six strips are placed on the shaft and welded to it at an angle of 90°. Then the sprocket is strengthened and the bearings are pressed in.
- Two blades made of plates are inserted between the middle guides. They are welded to the shaft and to the supporting elements. If pieces of channel bars are used as gripper blades, they are rotated 180° relative to each other.
- The rings are cut, bent and welded so that two intersecting spirals are obtained.
You can straighten them in two ways:
- Clamp the middle part in a vice, grab one edge with pliers and pull it to the side. Do the same with the other end.
- Weld one edge to the support element at the blade and stretch it.
If the rings are made of thick material and it is difficult to grasp them with pliers, then you can use two clamping devices, such as a vice.
After making the auger, a sheet of metal is laid out and the box is welded. A hole is cut out in its middle part for a pipe to throw out snow. You can make it yourself or use one already prepared from an iron stove. Some craftsmen use plastic ones.
Then a rectangular hole is cut in the body opposite the sprocket to allow the chain to pass through. The box is installed on a frame with runners or wheels and the chainsaw is strengthened.
How to make a snow scraper with your own hands
Before you start making a scraper, you need to think about its configuration and size. See what material is available. First of all, the equipment should be convenient for work. The cutting is made according to the height of the person. If the working surface is wide, it is optimal to provide a U-shaped handle.
For a wide scraper, a double U-shaped handle is provided
It is optimal to choose metal from the materials for the working surface. However, such a tool can scratch paving slabs. If the yard has such a decorative covering, then it is better to choose plywood or OSB sheet. You can make an excellent plastic scraper for snow from a barrel with your own hands if you cut out a fragment of the side wall. It is important that the plastic is not fragile and at least 5 mm thick.
The material for the handle is a wooden handle or an aluminum tube. It is not advisable to use a regular steel pipe. Such a handle will be heavy, cold, and uncomfortable in the hands.
The tools you will need are a saw, a jigsaw, a grinder, a hammer, a screwdriver, and an electric drill. The exact list depends on what material will be used for the work.
Advice! If you plan to transport the scraper in a car, you need to consider a collapsible or folding handle.
Video of DIY snow scrapers:
Main stages of work
Next, you will need to make the side walls of the scraper, which will be attached to the plywood. And for this, the master cuts two blanks from the board. If you have an edged board available, the work will not take much time.
At the next stage, you will need to screw the plywood to the side walls with self-tapping screws. For reliability, it is better to glue the boards and plywood together. PVA is not suitable for this purpose - it is afraid of moisture, but you can use polyurethane foam.
Then all that remains is to strengthen the lower part of the bucket with a galvanized strip and attach the handles, which the master made from wooden slats. To protect it from moisture, it is better to coat the scraper with a layer of varnish.
You can watch the detailed process of making a homemade snow scraper from plywood and boards in the video on our website.
DIY snow scraper made of metal
If desired, you can make two versions of metal equipment: with and without sides on the working surface. The easiest option is the second one. For a working blade, a rectangular blank is cut out of sheet metal using a grinder. The height of the scraper is about 50 cm. The width depends on how many people the tool is designed for. If one operator will operate, the parameter is limited to 60-70 cm. For two people, the width of the working surface is increased to 1 m.
The handle is a wooden handle. It is installed alone on a narrow canvas. A wide scraper is equipped with two cuttings, and at the end they are connected by a jumper. The handle is shaped like the letter “P”.
The presence of sides allows you to capture more snow
Using the scraper principle, you can construct a homemade snow scraper with your own hands if you equip it with sides. Here too there are two options. In the first case, the rear and two side sides are bent from metal. If you make them high, the bucket will be convenient not only to scrape off, but also to remove snow from the site.
In the second option, the metal ones bend only the side sides. The back shelf is made from boards. It additionally serves as a solid basis for fixing the cutting.
Criterias of choice
Modern options for snow scrapers can be very diverse. For example, there are manual options and there are mechanical ones. Moreover, the former are much cheaper.
However, all dump models share certain properties:
- ease;
- strength;
- They have a high quality handle.
The latter should not slip in the hand and have poor thermal conductivity, which is justified by the need to keep the hands of the person using it warm.
It follows from this that the choice of the required scraper option for clearing snow should be based on the specified properties.
This is necessary to ensure that the device is lightweight, but at the same time durable. Due to this, the person who uses the scraper will be less tired, and the chance that the device will break is minimal.
How to make a snow scraper for skis with your own hands
The disadvantage of all inventory is the complexity of management. While pushing, the scraper collects snow well only on a flat surface, but no matter how smooth it is, the working surface still hits pieces of ice, ground and other obstacles. Each blow is reflected by the load on the back. A cleaning device installed on the skis helps solve the problem.
The working blade mounted on skis does not rest against the ground when raking snow.
To make your own snow scraper, use a grinder to cut off two corners, pipes or tires 1 m long. The ends are bent, otherwise the skids will hit the ground while moving. A U-shaped handle is bent from a tube with a diameter of 15 mm. It is welded to the runners at an angle. Bend towards yourself. The angle is determined individually so that it is convenient to control. A rectangular metal sheet is bolted to the posts of the U-shaped handle. The lower edge of the working blade should be on skis so that it does not rest on the ground.
Required tools and materials
Before choosing materials and making the device, you should remember that the chainsaw engine has little power. You should not use the unit to clear ice or heavily frozen snow to avoid damage.
First you need to think about what to make the cleaner from and what devices to use. It is not difficult to guess that different types of work will require different materials. They will be indicated in the instructions for the manufacture of a particular design.
What tools should you use:
- welding machine;
- hammer, pliers, screwdriver;
- different keys;
- file;
- grinder and drill;
- hacksaw;
- vice.
How to make a snow scraper from plywood
For snow removal equipment you will need a plywood sheet 6 mm thick. The workpiece is sawed off to a length of 0.8-1 m and a width of 50 cm. The plywood is bolted to a U-shaped handle curved from a metal pipe or assembled from wooden cuttings. The scraper is almost ready, but it’s too early to clean the snow with it. In this form, the ends of the working cloth quickly wear out. The plywood begins to delaminate and break off in splinters.
It is optimal to frame the plywood with a steel strip
To improve the design, the lower end of the working blade is framed with a steel strip. It is fastened with rivets through through drilled holes.
Advice! A good handle for a scraper can be made from the frame of an old clamshell. The aluminum tube is durable, lightweight, and comfortable to hold with your hands.
Snow shovel made from PVC pipe: master class
This product is light, durable, and snow does not stick to it. Thanks to the reliability of PVC, the tool will not wear out or bend under stress.
To create a useful device you need to prepare:
- a piece of PVC pipe with a diameter of 20 cm;
- handle made of wood or aluminum;
- short screws;
- rivets;
- rail 5x5 cm;
- board 10 cm wide or more.
Tool making process
The first step is to create a mold for a shovel from lath. It should take the form of a furniture board measuring 46x46 cm. To do this, the slats are glued or twisted together, and the nose is slightly sharpened.
Advice! If there is no special tool, during the gluing process they immediately cut the slats diagonally one at a time, and then trim the parts with a plane already on the board.
Wooden shield for making a shovel
A chamfer is removed from the ends of the mold, four longitudinal tenons are cut out on it - they will form the stiffening ribs of the future shovel. If such work seems labor-intensive, use 4 thin slats instead of spikes.
A round groove is made in the central part of the form into which the handle will fit. The easiest way to round it is to cut it with a chisel and then burn the wood with a heated steel blank. A board edging is nailed along the perimeter of the form.
PVC pipe 20 cm
Next, proceed to the main stage of work:
- A piece of 40 cm is cut from a sufficiently thick and high-quality pipe, and an incision is made along it with a grinder.
- Connect a hair dryer and warm the workpiece well from the inside (put on gloves in advance). In this case, you should not linger in any area to avoid overheating of the PVC.
- Straighten the pipe, give it a flat look, pressing it with boards, plywood, or any unnecessary part of old furniture.
- Self-tapping screws are used to attach the PVC to the edging of the mold at the front.
- The plastic blank is heated again. The soft areas are pressed onto the mold immediately before they cool down, and the edges are screwed to the edging.
Handle installation
- The stiffening ribs are pressed through, and a rounding is also made for the handle. To do this, run a hairdryer over the corresponding areas of the PVC once again and crimp them with a block.
- To strengthen the handle area, cut a small plate from a piece of pipe, heat it and bend it. Then they make holes around the perimeter of the entire workpiece and fix the plate with rivets.
- Take the workpiece out of the mold, cut off the excess PVC from the edges with a grinder.
The shovel is almost ready. All that remains is to install the handle and drill it through with a bolt. The tool will be so durable that it will even be suitable for scraping ice. It will not break or bend for several seasons, and the cost of its production will be minimal!
Do-it-yourself scraper for removing snow from the roof
Snow covers not only paths, but also roofs. On the one hand, he doesn’t interfere there. However, it needs to be removed. Large accumulations of snow can cause the roof to collapse, and when an avalanche falls from the roof, there is a risk of injury to a person. A regular scraper won't do the job here. A long-handled device will be required. There are many options, but one of the simplest designs is considered to be a rake scraper.
They begin to assemble a homemade scraper with their own hands for removing snow from sawing off boards. The workpiece is taken up to 800 mm long and up to 200 mm wide. In any case, the board must cover the rake teeth, otherwise they will damage the roofing.
The board is fixed to the rake with a steel tire and self-tapping screws
The board is laid on the ground. A rake is placed perpendicularly on top. In this position, the teeth are parallel to the plane of the board. Now the elements need to be securely fastened. To do this, take a tire. Its length should exceed the width of the rake. Holes are drilled in the tire, placed on the teeth, and screwed to the board with self-tapping screws.
Snow is cleared from the roof by moving it towards you with a rake.
The only drawback of the design is the short handle of the rake. It is extended with an aluminum tube or a long wooden strip is used.
Lever Application
However, the design discussed above has one, but very significant, drawback - it is impossible for them to throw snow. This problem can be solved by equipping the handle itself with wheels . The advantage of this device is that you can use large diameter wheels - this will make movement easier. Some models consist of one wheel, but for greater convenience and stability, you can use three or four.
In this case, the handle is a lever, which allows you not only to transport snow, but also to throw it away. The easiest way is to use two wheels on an axle. The handle is attached to the rod with clamps. Before attaching, a bearing is put on it. This makes it possible to rotate the scraper. Since the work will be done in winter, the bearing must be lubricated with winter grease, otherwise it will not work. If the handle is T-shaped, this will also make the design more convenient.
How to make a snow scraper from 0SB
When you urgently need to remove snow, and you only have a piece of OSB board at hand, you can make a scraper using simple manipulations with a jigsaw. To assemble a scraper with your own hands for clearing snow, you don’t need drawings, but you need to build a pattern.
On the OSB board, draw the shape of the future scraper with a pencil. Towards the bottom, the drag scraper is expanded to 1 m. The corners are slightly rounded. Toward the top, the plate is narrowed approximately 30 cm from each edge. Two oblong holes for handles are drawn on the pattern. Now all that remains is to cut off the excess parts of the OSB board using a jigsaw according to the markings. The area near the handles is carefully sanded with sandpaper. For convenience, they can be wrapped with electrical tape.
Attaching the blade to the tractor
Most walk-behind tractors are equipped with a standard bracket for attaching attachments. It can be used to attach the front shovel of a tractor. If necessary, you can make an adapter to ensure that the blade turns to the left or to the right. When installing the bucket at the rear of the machine, skimmer mounting technology can be used.
Making the front bucket mount:
- Weld a profile pipe onto the back of the bucket. For reinforcement, it can be bolted after welding.
- Make a semicircle with a radius of 10 - 12 cm from a metal sheet 1 cm thick. The workpiece must be welded to the profile pipe. Holes are drilled in a circle to make it possible to set the angle of rotation of the blade.
- When making a shovel, the holder is also made. To do this, you need to make a “g”-shaped profile from a square pipe. The short side of the holder is attached to the rotary sector, and the other edge is rigidly fixed to the tractor bracket. The height will be adjusted using bolts screwed into the adapter.
There is a simpler method of fastening; for this, eyes and locks made of durable steel sheet are used.
DIY snow scraper with brush
The store-bought version of a scraper with a brush resembles a double-sided rake, only instead of teeth there are bristles on one side, and a rigid base is fixed on the other side. When cleaning, first scrape off the bulk of the snow, and then sweep away the remains with a brush.
A shop scraper with a brush is usually equipped with an aluminum telescopic handle, which allows you to remove snow from a height, such as a roof.
In the DIY version, you assemble a snow scraper with your own hands from plywood, securing a long handle perpendicular to the rectangular blank. One side is framed with a tin strip. Bristles from a plastic broom or brush are applied to the other side of the workpiece, pressed with a metal tire and secured with self-tapping screws through the drilled holes.
Where is this technique used?
A universal snow blower is designed to clear large areas of snow. The basic principle of throwing the snow cover to the side is similar to human labor, only more economical. There are no complex components in their design, which increases operability and maintainability.
Roads and road transport structures of any complexity. Special design workshop “Spetsroad”: TDR – traffic management project. Design since 2010, significant experience in passing and approving state and commercial examinations.
In addition, anyone can handle their operation. With a large area, it is simply impossible to do without such a device.