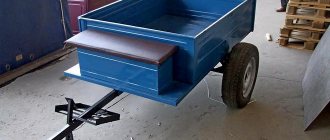
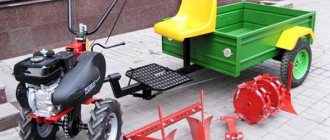
The walk-behind tractor is an indispensable household assistant. This special equipment is multifunctional in use and can: plow and hill up the land, and even chop wood. Craftsmen have come up with a new way to use a walk-behind tractor in economic activities - and this is the function of a snowblower. But how to make a snow blower from a walk-behind tractor with your own hands according to a drawing?
A walk-behind tractor is needed for earthworks in the summer. With the appearance of snow, he gathers dust in the barn without any use.
In winter, the engine of a walk-behind tractor can be used to create a snow blower.
This idea arose due to the lack of snow removal machines in remote villages. In such places, there are frequent cases of winter shifts, and to prevent this from happening, a walk-behind snowblower was invented.
Buying a ready-made model of a snowblower is expensive. Assembling an industrial prototype with your own hands will cost the craftsman many times less (see here).
But creating it at home is not easy.
How the device works
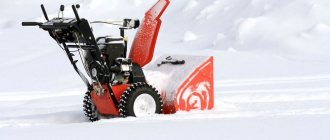
The snow blower cuts into thick snow and clears the road without much effort. In one minute it can process 12 m3. Mass ejection speed 70 km/h. At this speed, the snow thrown out of the disposal pipe lies very far from the cleared road.
Principle of operation
When starting work, a novice inventor needs to solve several organizational issues:
- What type of engine to use: electric or gasoline.
- Decide on the type of snow blower.
It's not difficult to decide on the engine. The main thing is to clearly understand for what purpose the walk-behind snowblower will be used. If the scope of his work is limited to the courtyard, cleaning the paths from the house to the garage, then an electric motor
.
But if you plan to use the snow blower in all corners of the populated area, then you need to choose a gasoline engine.
To choose a snow blower, you need to know what types exist and what they are used for:
Snow plow bulldozer
- Snowmobile bulldozer. Operates using a front blade. Convenient for removing accumulated and caked snow.
- Snowmobile fan. Throws away the snow mass with blades (with the help of their work, the snow rises and falls into an inclined pipe, from which it flies out and spreads far from the area being cleared).
- Auger snowmobile. The snow is picked up by the auger and falls into the hole in the pipe, from where it is thrown out.
- Snowmobile vacuum cleaner or air-fan. It works on the principle of sucking up sticky snow and quickly throwing it out of the sweeper from the opposite side.
It is best to use a screw attachment. The rotary mechanism copes well with both light snow and well-compacted surfaces.
Watch a video about homemade mini tractors. This is a universal tool with great functionality.
Mini tractors can also be used for snow removal. Read this article about it.
If it’s difficult for you to make a mini tractor yourself, then read about mini tractors made in Belarus.
Tools for making your own snow removal equipment
Any work can only be done if you have a tool, so it is advisable to have:
- electric drill - without it it is impossible to make holes of a given diameter in the right places;
- riveter - will help create strong permanent connections in sheet material;
- electric welding machine - required for welding the frame, as well as individual units;
- angle grinder - will be used for cutting steel workpieces, as well as cleaning welded joints;
- metal scissors;
- measuring tool - used to mark and control the parameters of parts, as well as the entire snow blower (usually a caliper, tape measure and ruler are sufficient);
- hand tools for fixing parts and temporary fasteners - will allow you to perform work efficiently and with minimal effort;
- a slipway - even the simplest one, made of wooden blocks, will help simplify the assembly process; the design of the snow blower has a spatial structure that needs to be assembled, fixing individual parts and assemblies in different places.
Design and diagram of a snow blower
Before you start designing a machine, you need to prepare calculations and drawings. It will be easier to prepare if you have a clear idea of the visual image, the operating principle of the unit and its functioning in your head.
How does a snow blower with an auger attachment work:
Scheme 1
The front part of the cleaner consists of a huge bucket with a funnel that collects a large amount of snow. Inside there are two conveyor screws - this is an auger (see here how to make it yourself), moving the accumulated mass into the pump. Each screw consists of blades that rotate around the screw.
Once the motor is running, the blades begin to rotate. Each rotation cuts sharp jagged edges into the snow, then is replaced by a second sharp blade.
Rotating conveyors and screws perform the following main functions:
- snow crushing;
- add it to the pump.
The conveyors have a trick - they are located at an angle to the pump, which allows snow to be brought to the pump. With the help of rapid rotation of the screw, the snow mass breaks out at high speed and is carried by air pressure over a long distance.
A scoring plate is attached to the bottom of the “shovel”.
If the structure of a universal device includes an air-cooled electric motor, then the air intake must be protected from accidental contact of the electrical part with wet snow.
Scheme 2
Simulation preparation scheme:
- Buy, or use an existing walk-behind tractor engine. For example, Honda brands (requirements: 6.5 liters per second; auto transmission; gear ratio);
- Prepare a plastic pipe, mainly sewer, with a diameter of 16 cm;
- You will need roofing iron;
- Plywood (10 mm thick) will come in handy;
- Half-inch pipe;
- Steel corner;
- Take a pipe measuring ½ inch;
- The steel plate should be equal to 120*270 mm;
- Jig for drilling holes;
- Rear wheel axle.
- Check the plain bearings according to the pipe size. If the pipe is wider than the inner ring, then it can be turned on a machine.
The total width of the homemade machine is approximately 65 cm (the working width is 50 cm), which is convenient for storage.
The compact size of the motorcycle snow blower allows you to increase maneuverability and clear snow from even the narrowest paths.
More information in the following videos:
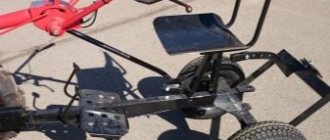
Converting a walk-behind tractor into a bulldozer
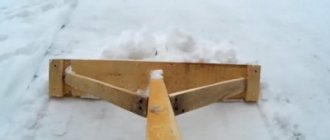
The simplest homemade snow blower for a walk-behind tractor is considered to be a blade. The shovel is a hitch. It is attached to a trailer bracket on the frame of the unit, resulting in a small bulldozer. The blade is equipped with a mechanism that allows you to change the angle of rotation of the shovel to move the snow mass to the side.
You can make such a snow blower for a walk-behind tractor with your own hands from a piece of pipe with a diameter of 270 mm or an old gas cylinder. To do this, the workpiece is marked along lines to make three segments. One of the elements is cut out with a grinder, after which the rods and towing mechanism are welded on the back side.
The principle of operation of the blade is simple. When the walk-behind tractor with the snow blower moves forward, the shovel rake up the snow cover. And since it is installed at an angle, the snow evenly moves towards the side of the road. If the walk-behind tractor needs to return to its original position, the blade is raised and the reverse speed is turned on. To continue harvesting, the shovel is lowered to the ground again and moved forward in first gear.
Advice! To prevent damage to the paving surface with a shovel, a rubber knife from a conveyor belt is placed on its lower part. For better grip on slippery surfaces on primers, the rubber wheels of the walk-behind tractor are replaced with metal lugs.
How to make a snow blower from a walk-behind tractor with your own hands - instructions with assembly drawings
In order to significantly reduce the time required to reinstall the motor, you should install quick-release mounts on your homemade vehicle.
You can create a harvesting unit on a TV-6 lathe. To make a snow blower for a walk-behind tractor with your own hands, it is recommended to follow the drawings.
Drawing 1
and instructions:
- A box is made from iron sheets, the ends of which are bent into something like skis.
- A shaft is made from the pipe, at least 5 cm thick.
- A grip made of two welded curved plates in a U-shaped manner is welded into the box. Both plates should not be rotated 180 degrees relative to each other.
- A self-made auger is made from a conveyor belt (1.5 m long and 10 mm thick). Using a jigsaw, cut 4 rings from tape (diameter = 28cm). If you don’t have a jigsaw, you can replace it with a special board with two screws screwed into it.
- This board is used like a compass - rotated in a circle. This manufacturing method produces high-quality rings.
- Make a hole in the casing made of galvanized iron opposite the spreader and install a pipe into it. This pipe will serve as a snow spreader. Holders are welded to the pipe on both sides of the spreader.
Screw - A gear or pulley must be installed above the auger drive shaft (the choice depends on the drive). The auger is welded to the finished plates with two rings on each side). The rings on one side are cut and welded to the beginning of the other end.
- One side of the workpiece is welded to the gripping blade, and the second end, reinforced with a strip of steel, is welded to the shaft at a distance of 5 - 10 cm from the free end.
- Select the auger drive.
- It can be either chain or belt. A belt drive should be used if the engine has a pulley and if the auger jams during operation, the belt will slip safely.
- The size of the grip body should be 2 - 3 centimeters larger than the pulley. In this case, the pulley will not cling to the housing, but a small gap between them will remain.
- To protect the auger from damage, it must be equipped with a spare pin that breaks off if the auger jams.
- A round hole is made behind the grip, into which a bent pipe of the required caliber is inserted and welded.
- Check that the distance between the gripper blades and the rear wall of the box is minimal.
- Attach glasses to the sides of the box.
- It is better to create glasses from AMGB aluminum and attach them to the car using Mb bolts. The bolts must be tightened with nuts.
- The shaft rotates in bearings located in the cups. It should look out of the box at a distance of 5 - 10 cm.
Gutter - The rotary gutter can be made from a sewer pipe (160 mm in diameter). A gutter is attached to this pipe, giving the snow direction. This chute is attached to the body of a pipe located on the auger with a similar size.
- The diameter of the chute must be greater than the width of the auger plate, which is responsible for throwing out the snow mass.
- A sprocket is welded at the end of the shaft to change speeds.
- The sprocket and shaft are connected to the walk-behind tractor using a chain.
- The rotor is connected to the front wall of the housing using rivets with a diameter of 4 mm. If skis are installed on the unit, then wooden blocks can be installed under them. Or screw strips of plastic.
- Make a frame from steel corners (50 * 50 cm). Corners measuring 25 * 25 mm are attached to the transversely installed corners. The power unit is mounted on them.
- The machine handle is bolted to the longitudinal angles.
- After the assembly is complete, the walk-behind snowblower can be spray-painted.
From the drawings listed below, you can assemble both an independent snow blower and an attachment to a walk-behind tractor.
Drawing 2
Drawing 3
Drawing 4
Neva working machines are often found in the national economy.
The drawing for creating a snow blower with your own hands on the Neva walk-behind tractor looks like this:
Drawing 5
Four types of mechanisms
Before you figure out how to make a snow blower for a walk-behind tractor with your own hands, you need to find out what they are like.
- Bulldozer method of clearing snow. The mechanism is made by hand - a bulldozer-like blade as an attachment to a walk-behind tractor.
- Screw method. A screw mechanism is made, connected to the mechanical part of the walk-behind tractor. The created mechanism is mounted on the adapter.
- Fan-powered, rotary snow blower for walk-behind tractor. A box with a fan is made, which is connected to the motor of the walk-behind tractor through belts or chains. Snow is sucked through the fan blades and thrown out through a side pipe.
- Screw with fan (mixed method). The snow is captured by the auger and fed into the discharge pipe. There's a fan running there. It sucks up the snow coming from the auger and throws it out through the pipe.
Useful tips and warnings for using a homemade snow blower
- In order to increase the efficiency of the snow blower, and not reduce all its actions to zero, you need to take into account the following rule. The hole through which the snow mass is thrown must be large enough.
Walk-behind tractor - We should not forget that a walk-behind tractor is a summer equipment. In order to avoid malfunctions and operational problems, you need to keep your homemade walk-behind tractor warm. This storage method allows you to avoid wasting time warming up the engine before work.
- It is advisable to change the type of gear oil. It is better to switch to synthetic brands of oil used in extreme conditions, or to thinner ones.
- Before each use of the device, it is recommended to check the tightness of the belt and threaded connections.
- After 6 hours of fruitful work, it is advisable to adjust the chain tension, the amount of deflection, which should be within 10 * 15 mm.
- When using the device for the first time, you should check the tightness of the fasteners after 30 minutes from the start of work.
Detailed description of methods
Homemade bulldozer snow blower for walk-behind tractor.
A bulldozer type blade is made of steel sheet. Dimensions according to drawing. Welded. The blade is attached to the walk-behind tractor with brackets with rods that will need to be made. The lower part of the blade is the knife. They cut off the snow and take it to the side. Pass the rods (device for turning) from the blade into the eyes in the blade and pass through the attached tubes to the control. For convenience, a stroller is made from various parts, consisting of a frame, two additional (rear) wheels, and a seat. The frame is attached to the walk-behind tractor. In front is a blade controlled through the traction of the walk-behind tractor. The handles of the walk-behind tractor are the steering wheels of the device. The two rear wheels are spaced apart for stability. The wheels of the walk-behind tractor become the front wheels of a homemade bulldozer - a snowplow.
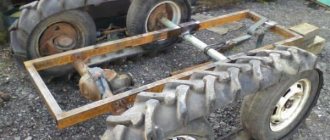
Auger snow removal walk-behind tractor.
A box for the auger is made from a steel sheet. At the bottom the box is like skis. Eyelets are made on the sides of the box through which the shaft will be threaded. On top of the shaft inside the box there will be a metal tube on which screw elements are welded: 2 metal rings each. You need to weld a grip on the tube in the center. It is made from two pieces of light angle, connected together, welded, and welded to the tube. At the end, it is advisable to weld the main structural element - the gripping blade. Make sure that there is a minimum distance between the blade and the back wall of the box.
The outer inner ends of the auger blades are welded to this structure welded in the middle of the pipe. The other ends of the screw (right and left sides) are welded to the tube; the welding is reinforced with an additional strip of steel on both sides. On the right and left sides there are spirals towards each other. We insert the finished auger into the casing. A shaft is inserted through a tube (screw axis) with welded spirals and a gripper structure. Through the side eyelets.
The tube with welded elements ends up inside on the shaft, in the space between the inner walls. We drill along the edges of the tube and shaft. We secure the shaft with the tube with two bolts and nuts. We make fastenings at the walls of the box where the shaft is threaded. There must be bearings in the sockets (cups) on the shaft. Bearings in cups must be of the closed type. To prevent snow from getting into the bearings. The shaft should stick out from the box body. The auger for the walk-behind tractor is secured.
Place a pulley or sprocket at the end of the shaft. For belt or chain drive. Connect the created system with the walk-behind tractor mechanism. Chain or belt drive. If there is a pulley at the bottom, then the A100 belt will go for transmission from the walk-behind tractor. Make a rotary gutter from a plastic plumbing pipe. Attach a chute to it to throw out snow. It should be wider than the width of the auger. To prevent the auger from becoming clogged with snow. Additionally: the wheels of the walk-behind tractor can be replaced with skis. You need to make compact, wide, short skis for the walk-behind tractor. Then the snow will be easy to clean. You can leave the wheels if the surface to be cleaned is smooth, for example, asphalt.
Fan snow blower for walk-behind tractor.
First, an oval box is made of metal to suck up snow. On the back side of the box, using various tricks, you need to mount a glass with a bearing (the bearing is closed), along with the fan impeller. Protect the fan with a grille (casing). Bearings (4 pieces - in pairs on both sides) hold the shaft on which the fan is mounted. The rear part of the shaft is fixed in a bracket where two sealed bearings are located. Shaft looks out of the device. At its end there is a gear or sprocket, from where the transmission comes through a belt or chain to the driving mechanism of the walk-behind tractor. In the oval box, next to the fan, there is a wide hole at the top. A light curved pipe is inserted into it. Wide enough so that thrown snow does not get stuck. The mounted snow blower for the walk-behind tractor is ready.
Screw-fan (rotor) – mixed method.
To make such a mechanism, you need to complete all the work to create a screw device, adding a fan-rotor method to it. Let's measure it out. We make a box of certain sizes from metal for the auger. Initially, at the top of the box we mark a place for the outlet pipe. We make a corresponding hole in the casing.
Let's start creating the auger . We select a shaft and a tube on the shaft with the expectation that the tube will fit onto the shaft without play, it will fit tightly. Since the shaft will sit on bearings on both sides of the box, the shaft must be made so long that it is slightly longer than the width of the casing. The tube should be the same size as the internal size of the box, but still a little smaller. So that when the shaft is torsed, the ends of the tube do not touch the box. Now we make parts for the auger. The trunnions are made of two-millimeter steel. We cut two steel rings on one side. Carefully turn the open ring into a spiral. Two spirals - we connect the rings, weld them together. We get one spiral of two turns - for one side of the auger.
We do the same with two more rings made of two-millimeter steel. This results in two spirals for both sides of the auger. Now we are making one more detail - a snow ejector. From two corners, in the shape of a P, we weld them together, and weld a spatula at the end. We weld this part to the tube, in the center. Everything needs to be measured and made so that when assembled, the blade part in the center of the auger is at a minimum distance from the back wall of the box.
Factory models
Any company that manufactures walk-behind tractors can also offer a range of snow plows. There are popular models on sale from such manufacturers as Centaur, Neva, Zirka, etc. The only big advantage of a factory design over a home-made one is that they are made of high-quality steel and are more difficult to damage. Moreover, such models last longer than homemade ones. But, on the other hand, they cost a lot.
There are a lot of options for factory dumps, so you should check before purchasing whether this model is suitable for your existing walk-behind tractor. At the factory, snow plows are not equipped with spring mechanisms due to the low speed of movement. If the speed of the walk-behind tractor is low, then the protective mechanisms for contact with the ground lose their meaning. Moreover, the factory models do not have mechanisms for lifting and turning the unit. In this regard, the price of the factory design is reduced.
For higher performance, it is recommended to replace conventional rubber wheels with factory or homemade lugs. This will speed up the work process.
Prices for snow blowers may vary. Basically, the cost of these varies from 4 thousand to 6 thousand rubles.
Summing up: the necessary set of tools and the economic benefits of homemade products
To make homemade snow blowers you need a minimum set of tools:
- Welding inverter.
- Bulgarian.
- Powerful drill or drill press.
- Set of locksmith tools.
- Consumables - cutting discs, electrodes, drills, etc.
Most likely you cannot do without turning work . If you don’t know a turner or don’t have your own lathe, you’ll have to order metal processing, and this is an additional expense. In addition, you will need parts from old mechanisms or decommissioned automobiles and motorcycles. But the main thing is that you need a gasoline engine or walk-behind tractor. If there are no “unnecessary” units lying around on the farm, then you will have to buy them. This will lead to an increase in the cost of homemade products. Let's not forget about the time costs.
Therefore, before you start making a homemade snow blower, evaluate your strengths by weighing all the pros and cons and come up with an estimate. If costs exceed profitability, then you can consider purchasing a new or used snow blower. Moreover, there is no need to chase famous European or Japanese expensive brands, with a bunch of additional (and often unnecessary options). The experience of portal users suggests that the “honest, proven Chinese” does an excellent job of clearing the snow on the site.
authors of homemade products can be found in the topic: “Homemade snow blower with your own hands.”
- How to make comfortable sawhorses for sawing wood.
- How to make a spring log splitter from what you have on hand.
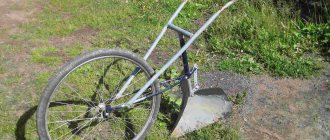
How to create a snow dump from a barrel?
Making a shovel on your own is easy when you have a welding machine, a grinder and an electric drill in your home. Here is one simple way. You will not need to search for the required material, since you can use a simple 200-liter iron barrel.
Carefully cut it into 3 pieces and you will have 3 curved pieces for the snow plow. By welding 2 of them along the contour line, we obtain an element with an iron thickness of 3 mm, which is fully enough for the rigidity of the shovel
The lower segment of the shovel is reinforced with a knife. To do this, you will need a metal strip 5 mm thick and the same length as the blade grip. Holes with a caliber of 5-6 mm are made in the knife at intervals of 10-12 cm for mounting a protective strip of rubber.
The mechanism for attaching a shovel to a motor cultivator is quite simple and can be done at home. To the shovel, assembled from two parts of the barrel, approximately in the middle of its height, a pipe with a cross-section in the form of a square measuring 40x40 millimeters is welded for reinforcement. Then, in the middle of the pipe, a semicircle of thick iron is welded, in which 3 holes are pre-drilled, required to stabilize the angles of rotation of the blade shovel.
Next, a bracket is welded from the same tube, outwardly similar to the letter “G”, one edge of which is placed in a hole on the semicircle, and the second is connected to the chassis of the unit using bolts.
Tags
make a snow blower from Homemade snow blowers use from snow. from a walk-behind tractor or or a walk-behind tractor use a walk-behind tractor. Snow blower to make a snow blower with your own for a snow blower from Snow blower to make a snow blower from a homemade snow blower with your own hands with your own hands with your own hands with your own hands with your own hands often the control handle is attached with your own hands. with your own hands from with your own hands.
casetoolcanblockcharacters
Preparing for assembly
Before making a snow blower from a cultivator, you should carefully prepare. First you need to study the drawings. They must indicate the dimensions of the parts and methods of attaching them to the structure.
In addition to studying the diagrams, the farmer should prepare the equipment.
To assemble equipment from a cultivator you will need:
- spanners;
- Bulgarian;
- drill;
- welding machine:
- screwdrivers;
- vice and pliers;
- hammer and file;
- electric hacksaw.
For materials to make a snow blower from a cultivator you need to buy:
- roofing steel sheet;
- profile pipes of different diameters;
- sheet of thick plywood;
- conveyer belt;
- steel corners;
- a pair of sealed bearings.
All metal products prepared for work should be checked in advance. When assembling equipment from a cultivator, parts that have rust should not be used. The farmer also needs to carefully inspect the bearings. If the slightest cracks form on them, then the parts need to be replaced.
Design Features
First, let's define the design itself. A walk-behind shovel is a curved working surface that consists of the following elements:
- rigid frame;
- stiffeners;
- curved steel sheet 2 mm thick;
- heels (2 pcs.);
- knives (metal and rubber).
A metal knife is used for excavation work, when it is necessary to level the ground, etc. In cases where areas are cleared of snow, debris, etc., a rubber knife (gentle) is used, which will protect the nozzle itself from damage upon contact with solid covering, and pavement (tiles, asphalt, concrete).
Blade shovel
A standard shovel is 100 cm wide and 40 cm high.
There are two types of walk-behind blades, which have some visual differences in their design:
- Blade shovel.
- Ladle.
A shovel blade for a walk-behind tractor is intended only for clearing areas of debris, snow, and is used for leveling crushed stone, soil and sand. The bucket is closed at both ends with welded plates, so in addition to the actions already described, it can also be used for loading the same sand, earth, snow, garbage, etc.
We invite you to look at the photo, which shows how a shovel differs from a bucket:
Installation type relative to walk-behind tractor
Due to the relative simplicity of the design, relatively low weight (up to 16 kg) and great functionality of the work performed, the dumps can be attached to both medium and heavy walk-behind tractors.
Depending on the design of the walk-behind tractor itself, the canopy can be attached to:
- to the front;
- behind the motorized device, taking into account that the steering column of the latter rotates 180 degrees around its axis.
Location of the working body
There are two types of dumps:
- adjustable (rotary);
- unregulated.
Rotary blades are universal, as they allow you to set the required angle of attack:
- right tilt;
- left tilt;
- direct installation.
Non-adjustable canopies are rigidly fixed in the position required by the operator (straight, right, left) and are not subject to adjustment.
We invite you to watch a video of a walk-behind tractor using a straight and rotary blade:
Types of hitches for walk-behind tractors of famous brands
The hitch is an indispensable device that comes complete with a walk-behind tractor, which allows you to aggregate various attachments. Depending on the brand of walk-behind tractor and its design, the configuration of the hitch itself also changes. In addition, hitches are also adjustable (angle of attack, horizontal) and non-adjustable.
There are several types of fastenings:
Kit hitch equipped with front lift mechanism
Types of lifting mechanism
Lifts allow you to raise and lower the working element (blade for a walk-behind tractor), and perform loading and cleaning work. There are several types of lifts:
- manual or mechanical (lever);
- hydraulic (using a hydraulic pump).