Laying natural stone enhances any landscape and exterior. This natural building material has been used since ancient times, it has its own wild beauty, is durable, environmentally friendly (does not emit harmful substances even under the influence of temperature fluctuations), and the variety of textures and colors is amazing. The only disadvantages of natural stone can be considered the high cost, compared to artificial materials, and the strictness of the worker’s skill. Uneven shapes require painstaking selection.
Wild stone is used for cladding buildings inside and outside, for paving sidewalks, and to highlight architecture.
Species used as facing material:
- shell rock;
- tuff;
- shungite;
- flagstone;
- slate;
- granite.
Self-installation of natural stone
Laying natural stone enhances any landscape and exterior. This natural building material has been used since ancient times, it has its own wild beauty, is durable, environmentally friendly (does not emit harmful substances even under the influence of temperature fluctuations), and the variety of textures and colors is amazing. The only disadvantages of natural stone can be considered the high cost, compared to artificial materials, and the strictness of the worker’s skill. Uneven shapes require painstaking selection.
Wild stone is used for cladding buildings inside and outside, for paving sidewalks, and to highlight architecture.
Species used as facing material:
- shell rock;
- tuff;
- shungite;
- flagstone;
- slate;
- granite.
Flagstone for the facade: choice
For facade cladding, experts recommend laying flagstone of the following types:
- sandstone - color from cream to light brown, durable, resistant to adverse weather conditions;
- limestone - the mineral most often found in the middle zone, white or light gray in color, unfortunately, intensively absorbs smog and dirt, and loses its decorative effect;
- tuff - depending on the deposit, it can be from cream and light pink to brown, it is very decorative and durable;
- slate - layered structure, color ranges from white to black, depending on the composition there are golden, green and purple stones;
- granite is an especially durable material with a grain structure ranging from white to black;
- pebbles
All these stones have a wide range of colors; tuff cladding is the most decorative, but it is also cost-effective compared to other options. Wild stone is characterized by:
- environmental friendliness;
- high strength;
- low water absorption;
- resistance to temperature fluctuations;
- excellent sound and heat insulation;
- lack of deformation and light fastness;
- frost resistance;
- hardness;
- hygiene;
- ease of processing and installation;
- durability.
When choosing stone cladding, you need to take into account the overall color scheme of the building. It is not recommended to completely cover the facades; finishing of individual areas looks more decorative: the base, terraces, protruding elements - bay windows, staircases, fireplace chimneys.
Preparation
Before laying natural stone, you need to do preparatory work. Having determined the surface area that will be lined, we add a margin of 15–20% to it. The resulting figure will correspond to the required amount of building material.
It is important to sort the wild stone after delivery to the construction site. Remove the coloring one, distribute the whole one by size and shade to make it easier to lay out the drawing. Next, the stones are washed with water pressure and dried in air.
Purchase of materials, required tools
Before purchasing materials, you need to determine whether you will lay the cladding with glue or mortar. To determine the need, you need to accurately measure the surface area, and purchase building materials 10–15% more than required for adjustment.
If the wall is high, you will need additional plaster mesh and dowels to secure it, and for cladding wooden surfaces, you will also need waterproofing material for external use (geotextile or bitumen-polymer roofing material).
To work you will need tools:
- laser construction level, tape measure and plumb line;
- trowel, notched trowel, spatula;
- containers for mixing glue or solutions;
- drill or construction mixer;
- rubber hammer;
- perforator;
- grinder for cutting stone.
Also, do not forget about special clothing and safety glasses when working with an angle grinder, and scaffolding for working at heights of more than 4 m.
Stone paths
The technology for making a natural stone path is not complicated, but it requires painstaking work and the use of physical strength.
You need to mark the area for the path with your own hands using pegs and a cord.
The width of the garden path can be from 40 cm, the sidewalk - from 80 cm, depending on the number of people who will walk there, the main entrance is provided with a width of 3 m. The slope of the territory must be at least 2 degrees. The sidewalk can be made convex, then water will flow from it to all edges, and not in one direction. It is necessary to think through a drain or drainage system in advance.
A layer of soil is removed from the marked area. The depth of the selected soil depends on the function of the area. For pedestrian and bicycle paths, remove about 300 mm:
- 200 mm for a cushion of crushed stone and sand;
- 50 mm on concrete base;
- 50 mm for stone and mortar.
Crushed stone and sand are alternated in layers of 50 mm. Flagstone for this purpose should be from 20 to 35 mm thick. For a road that involves vehicle traffic, the trench depth should be from 500 mm:
- on a sandy base 300 mm;
- on concrete screed 100 mm;
- the rest is for facing material and adhesive solution.
The cobblestones must be at least 40 mm thick.
Before making a stone path with your own hands, it is advisable to distribute and mark them. When laying stones, the excess can be cut off with a grinder with a special cutting wheel (sold with the stone mark). In order for the boundaries of the site to have smooth edges, it is necessary to make formwork.
FASTENING PARTS FOR CONNECTING cladding elements TOGETHER
Elements of external and internal cladding are connected to each other and to the wall with metal pins, staples, clamps, and fasteners. All of them must be protected from corrosion. To do this, steel elements are pre-coated with a layer of zinc or aluminum. It is prohibited to bend the fasteners after applying the anti-corrosion coating. Some structures use fasteners made of stainless steel, non-ferrous metals and alloys (copper, bronze, brass).
Adjacent elements of the external and internal cladding are connected end-to-end, stepped and wedge-shaped. When connecting end-to-end, the stones are in contact with their end faces; for slab thicknesses up to 150 mm, steel pins and staples can be used to eliminate relative displacements. Pins (pyrons) are made of round steel with a diameter of 3-8 mm and a length of 30-60 mm and are used in horizontal and vertical seams. The pins are inserted into sockets drilled in adjacent cladding elements to half their length. Staples are made of round or strip metal. They are placed in horizontal or vertical joints perpendicular to the plane of the slabs. In order not to increase the thickness of the seam, grooves are cut in the slabs and staples are inserted into them.
Fasteners for connecting stones to the wall. The cladding is connected to the wall with metal anchors and fasteners, which are simple and combined hooks, pins, staples, etc. A simple hook is made of round stainless steel with one curved end. The dimensions of the hook depend on the size of the cladding element. The hooks are installed in horizontal rows, two pieces per slab. The depth of installation of hooks into the wall must be at least 100 mm.
Combined hooks are made of stainless steel and are used to simultaneously connect cladding elements to each other and to the wall. In each horizontal row, two of them are installed in a slab. For fastening marble, dolomite, limestone slabs, mainly brass, copper, copper-plated anchors or stainless steel anchors are used.
To reduce the load and protect the supporting row from deformation during wall shrinkage, it is recommended to cladding multi-storey buildings in tiers. The unloading support row can be installed on the structural elements of the wall being lined and separated from the underlying tier by an expansion joint 5-15 mm wide. In claddings that are installed on a finished wall, the unloading row is supported on steel elements made of angle steel, fixed in the load-bearing wall. If the seam is left open at this joint, it is filled with sealant. For individual stone structures, fastenings are specially designed.
Main works
Laying natural stone is done in several ways.
Dry
Laying wild stone on sand. The method is suitable for creating:
- sidewalks;
- terraces;
- areas with low traffic volume.
A flagstone with a thickness of 50 to 80 mm is required. The pillow should be made of sand, 50 mm deep. The sandy base is leveled, well watered and compacted. The stones are fitted tightly to each other, with minimal gaps up to 20 mm, which are then filled with sand or pebbles, less often with clay, and generously filled with water.
This type of laying of natural origin material on sand is recommended for regions with a mild climate - at sub-zero temperatures, icy unevenness appears on the paths. This method is also not suitable for heaving soils.
Laying material on a gravel base
The bed is made with a depth of 200 to 300 mm. First, a sand cushion is created - the filled sand is compacted well. Next, gravel is poured in the same amount and leveled.
The entire base is watered and compacted additionally. The next stage is laying stone on the paths with cement mortar.
The layer of construction mixture should be about 30 mm, with its help you can level the surface of the site even if the thickness of the stones is different.
The thickness of the flagstone depends on its type - gray flagstone is up to 30 mm, white or orange should be 40–50 mm. Natural stones are adjusted to each other, keeping an eye on the level and leveling the path with a wooden mallet. The mortar on which flagstone was laid is also used to fill cracks. To prevent the pavement from collapsing after the first winter, expansion joints are created at intervals of 600–700 mm, the width of the joints being 10–50 mm.
Wide seams can be decorated by pouring fine gravel or soil on top and planting lawn grass there. After 24 hours, water the sidewalk and clean the surface with a stiff brush. To create the effect of wet stone, polyurethane varnish is applied to the flagstone. To protect natural stones from stains, they are treated with a specialized compound.
Laying building material with glue
The base is also made of sand and crushed stone. A concrete screed is made on top. Construction adhesive is prepared before its direct use due to its rapid drying.
To save money, you can add cement and sand to the glue. The consistency of the finished solution should be uniform, like liquid sour cream.
Glue is applied to the prepared stones using a hard brush. Excess glue is applied to the screed with a trowel, so that cavities do not form later, which can lead to the destruction of the path. Dried stones are placed, pressing them down well to distribute the building mixture. Carefully remove excess from the stove, immediately wiping the contaminated surface with a hard rag.
Subsequent elements are pressed against the previous one, so you can remove excess adhesive solution, keeping the already laid part of the sidewalk clean. The path must dry thoroughly before use. Next it:
Installation of ventilation systems- Pipes for internal sewerage
How to choose a window sill?
- washed with water pressure;
- inspect for cracks or smeared elements;
- correct deficiencies;
- cleaned again.
Construction of arches from stone
Stone arches are quite common architectural elements that can decorate any site or yard. The construction of stone arches is carried out using formwork, which ensures the strength of the entire structure.
When constructing arches, it is worth considering that increasing the length of its overlap increases the requirements for the strength of the material used. In structures up to 3 meters long, any stone can be used, including flat ones: limestone, sandstone or quartzite. When creating high arches, it is assumed to lay high-strength natural stone of a prismatic shape, with a base in the form of a quadrangle or trapezoid. The life of such arches will be long, but construction costs a lot of money.
Arches, which are door or window openings of buildings, are erected as follows:
- The stones are laid on prepared formwork, which is positioned in the appropriate plane.
- The facing and jointing is carried out.
- After 2 weeks, the formwork is removed and the joints are opened in places that were difficult to reach due to the formwork.
Wild stone for wall cladding
Before laying natural stone on a vertical surface, it is checked for chips and cracks. Potholes and bumps larger than 20 mm are eliminated.
Important! The wall must be strong enough to support stone cladding (such as brick or other block materials). For a plasterboard partition, it is better to choose light rocks (tuff) or chalk-based artificial stone.
The surface of the wall is cleaned of dust with hard brushes or rags, and covered with a primer. The base of the masonry is strengthened with a reinforcing mesh so that the cladding is durable and does not crumble after two years. The metal mesh is secured using self-tapping screws with dowels or reinforcement. For 1 sq. m of mesh requires 10 fastenings.
The washed and sorted stone must be laid according to the principle of a pyramid - the largest are at the bottom, with the height of the masonry the size of the elements decreases.
To make it easier to monitor the vertical level, a lighthouse rope is pulled, against which the laid stone should rest but not pull back.
The tiles are first coated with a thin layer of construction adhesive, which will clog the pores of the material, and then the base layer is laid on the surface.
The stones are laid out taking into account the dressing, the principle is the same as for brickwork - the element of the next row should cover the seams of the previous one. The stones are laid on which mortar – adhesive or cement; in any case, they are adjusted to each other so that the seams are not wide, up to 30 mm.
Cladding with natural stone with your own hands is a very labor-intensive and painstaking task, but as a result you can get a chic decor.
Related video: Rubble stone laying
Installation of PVC windows- Covering the drain hole with your own hands
- How to lay flexible tiles on the roof?
Laying natural stone with your own hands
Since ancient times, natural stone, or, as it is called, wild stone, has been considered the best material for covering the ground in courtyards. The planes covered with plastic represent an inseparable part of the landscape design. Laying wild stone on the site is a design component that complements and emphasizes the design of the landscape and architecture of the house, as well as a sign of the excellent taste and wealth of the owner of the house.
Well, laying decorative stone with your own hands just requires careful and careful execution of the work. If all installation rules are followed, your paths will be beautiful and smooth years later.
Laying natural stone
Installation material
The optimal material for laying is considered to be flagstone, or rubble cobblestone , which has a slight thickness and an unedged border. The name “flagstone” itself speaks only about the outline (tiles of different thicknesses and different sizes), but not about its origin. Flagstone can be slate, lemesite, granite, quartzite, etc. The most famous version of flagstone is considered to be sandstone. There are a large number of variations of natural sandstone. This type of decorative cobblestone is rich in color shades: ranging from light gray to a shade of red. This helps create an entertaining and unusual ornament.
The advantages of rubble stone masonry are as follows:
- Its processing will not be difficult;
- It's durable;
- This is an environmentally friendly product;
- Has an affordable price.
The thickness of the flagstone reaches 30 cm . It is sold in small, irregularly shaped layers. Rubble cobblestones are distinguished by the simplicity of laying technology.
In addition to flagstone, it is customary to use paving stones (cobblestones resembling a cube or rectangular parallelepiped), limestone, tuff, shell, and granite.
Natural stone finishing is chipped or sawn. Firms engaged only in the production of building materials from cobblestones produce quite a lot of stones of various types, varieties and shapes. Therefore, when choosing them, as a rule, there are no difficulties.
Laying methods
You need to know that laying a path with wild stones involves several methods:
- The use of a reinforced concrete foundation with a thickness of about 17 cm. It is often used in places with heavy loads (traffic areas);
- For screening - the upper straight layer for coating costs less. The option has become popular among urban gentrification;
- For sand - a technique that is much more expensive due to the prices of the material. And also the sand cushion is characterized by a rather low resistance to deformation, which does not allow the use of materials on weak soil.
Preparation of masonry
Before laying cobblestones, you should make a calculation of the required material . Using a tape measure, the entire plane of the laying area is measured. Next, from this area the size of the surface where the stone will not be laid is calculated.
Don't forget about spare material. Due to the fact that the cobblestones are uneven, you should make a reserve of more than 10% of the tiles, because you will need to select the crumbling or flaking stone.
How to properly lay a vapor barrier on the ceiling?- Is it possible to glue wallpaper on whitewashed walls?
- Imitation of a brick wall made of gypsum plaster
Afterwards, the soil and groundwater level are assessed. Do not forget that such work is carried out only by specialists. Due to the uneven shape of the flagstone, liquid may be retained. Therefore, you should think about the location of the drainage and drainage system in advance. However, such a procedure is not always necessary. You can simply pour a small layer of sand before laying artificial stone. If decorative cobblestones are needed for laying pedestrian paths or parking areas , you should use auxiliary soil compaction using a vibrating plate.
Layout technology
Cobblestone masonry is carried out using the seam method, i.e. the sheets are located at a distance from each other. If there is a small distance between them, use a seamless installation method (distance no more than 0.5 cm). The second installation option requires a lot of effort. In addition, you will have to spend much more material than with the first option, since all the material will need to be adjusted to the required size.
As a rule, artificial stone begins to be laid from the side rows . The outermost cobblestones should be laid on a base - cement mortar. The gap between the flagstones forms a distance of at least 5 mm, which is filled with medium-sized sand, compacted, backfilled and watered. Sand is poured between the stones to prevent vegetation from growing in these intervals. If you have certain skills in this, then laying artificial stone with your own hands will not pose a big problem.
It is customary to distinguish three technologies for laying decorative stone:
- The arc method is the most popular;
- Row method - laying, which produces smooth seams for one purpose;
- Any way.
Installation on walls
In order for masonry stone to look good on the wall, it is necessary not only to put in a lot of effort, but also to have skill . When natural cobblestone does not require an exact sequence of actions, granite tiles lose their appearance if the seams are shifted and the horizontal level is not maintained. Laying natural stone on the wall will help create an original interior that will indicate the aesthetic tastes of the owner.
To achieve the desired result, you should act according to the following technology:
- First you need to prepare the base for installation, the wall (you need to plaster it and cover it with a bonding primer);
- Do not skimp on adhesive for laying tiles;
- In order for the concrete solution to spread evenly, it should be applied to the wall with a ribbed spatula;
- Masonry should be done from bottom to top;
- Do not forget that marble and granite do not require any distance between each other; they are laid without seams;
- Having drawn a horizontal line of the first row on the wall in advance, start from the corner;
- In order to press the tile to the wall, you should tap it with a rubberized hammer, or press it well with your hands;
- Use a building level to control the horizontal and plumb position;
- Immediately after laying, it is necessary to check each tile to ensure that it lies parallel to the wall (apply a level to the laid row and look from above: if there is a gap, you need to level the slab by tapping with a rubberized hammer).
Wet and dry masonry
It is customary to distinguish between wet and dry masonry options. The technology of dry laying of artificial stone causes difficulties when working with natural torn stones, which differ from each other in thickness, height and width . In order to improve the reliability of the masonry, the free space between the cobblestones is filled with earth or building mixtures. This option is often used when constructing low hedges or curbstones.
Wet masonry is used for the construction of tall buildings in the form of welded structures. This method of working with natural stone is quite simple and does not cause any difficulties.
In most cases, natural cobblestones are characterized by a distorted, torn shape. Therefore, the laying of torn stone is facilitated by the good alignment of the cobblestones, which is manifested due to their unevenness.
Laying natural stone with your own hands is a rather complex and effort-requiring process . However, the end result is a neat and elegant path or platform made from an environmentally friendly product.
Plot
Today, wild stone is one of the most popular building materials for finishing work. Natural beauty and excellent physical and technical characteristics make it possible to use it to decorate the facade of a building and in the arrangement of garden and park landscapes. However, this material has a number of disadvantages. In addition to the high cost, which fully depends on the mining technology and production standards, laying natural stone itself is not easy and requires not only special tools, but also certain skills. This article will talk about cladding with wild stone.
Content:
Today, the market offers a huge assortment of stone of artificial origin, which flawlessly replicates the texture and texture of a natural solid mineral.
It also has such advantages as:
- resistance to temperature fluctuations;
- low specific gravity;
- wear resistance;
- color fastness;
- durability;
- affordable price.
Its advantages include absolute compatibility with other materials. A stone path will look harmonious in any landscape. And the finishing of the basement can be done on houses built from various materials.
Scope of application of wild stone
Depending on the material from which the piece elements were made, the scope of application is determined. Thus, gypsum-based stone is used for interior decoration. Its advantages include its light weight, excellent workability and environmental friendliness.
Cement-based tiles are intended for cladding fences, facades and basements of buildings. It is also widely used in the development of the surrounding area:
- when paving open terraces, driveways and walkways;
- when finishing stairs, steps, borders;
- when decorating pools, springs and other bodies of water;
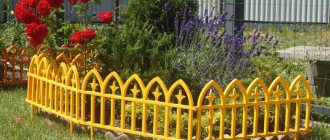
- with the spectacular design of alpine cities, small architectural forms, sculptures.
Often this material is used for fragmentary finishing of walls inside a building. It should be remembered that to give fireplaces and stoves an aesthetically attractive appearance, a heat-resistant analogue is selected.
Laying wild stone
The process of laying both artificial and natural stone is similar to brickwork, so there should not be any particular difficulties during the work. There are two technologies based on bonding the material with or without binding solutions.
- Wet method. The masonry using this method is especially strong and reliable. Ideal for cladding vertical surfaces, it allows the construction of structures of any height and shape. With this method, there is no need to adjust the elements in size - the empty space will be filled by the adhesive mixture, and will also firmly connect the stones both to the surface and to each other. A sand-cement mixture or tile adhesive can be used here.
- Dry method. This technology is used in the construction of low fences, fences or decking of paths and platforms. Fitting stones with so-called ragged edges to each other will not be easy; it will require some experience and skill. The resulting voids are filled with small pebbles, clay or sand.
Everything you need to know about loads
When working with stone material, it is necessary to take into account the thickness of the flagstone; here we do not mean the type of stone, but free-form tiles with uneven edges.
- Vertical surfaces (walls, barriers, etc.) are faced with stones up to 2 cm thick;
- for arranging paths, pedestrian or bicycle paths, terraces or open verandas, material with a thickness of 2 to 3.5-4 cm is used;
- access roads and places with intense traffic are laid with flagstone, the thickness of which is 4 cm or more.
- When working on vertical planes, larger elements are placed on the lower rows. It is important to ensure that the horizontal joints are offset; here you need to use the rules applied for brickwork. To clad the corners of the building, stones that are stronger are used.
- Excavation of soil when terracing or arranging paths is carried out at different depths, this parameter depends on the operational loads. For sidewalks and walking areas, the depth under the base can be about 30 cm. If the passage of passenger cars is expected, then the height of the walls of the pit should be at least 50 cm.
- Concreting the base before paving is carried out for structures intended for intensive use, as well as if the soil is subject to displacement and with a small thickness of the material (up to 3 cm).
- A small bulge in their central part will help prevent moisture from accumulating on paths and platforms.
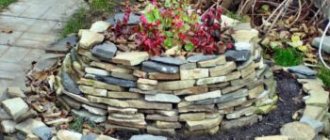
Basic rules for laying wild stone
- For wild stone, there is one laying pattern - arbitrary, because the broken shape does not allow laying in an arc or in a row. Before work, you need to carefully consider the location of the elements and their color combination. Sometimes the fruits of improvisation do not match the final performance.
- The shade of flagstone may vary, so it is important to take this nuance into account when laying. So that the difference is not so obvious, the elements are placed randomly, using alternately from one and the other batch.
- If the material has relatively small differences in shape and size, then you can lay out several rows and mark their sequence with numbering or marks (marked with chalk). Such a “rehearsal” will significantly reduce the time for general styling.
- Any solution or glue that has inadvertently come into contact with the face of the stone should not be removed immediately. Such actions can only fill the pores of the material and subsequently nothing can be done about it. Here it is necessary to allow the binder to harden, and then carefully clean it with a spatula, wiping the cleaned areas with a dry rag.
- On vertical surfaces, laying begins from the top rows; this approach will minimize the contact of the adhesive composition on the already laid stones.
Basic requirements for various materials
- The concrete base must be as smooth as possible and free from dust, foreign particles and protruding elements.
- The wooden surface has low adhesion, and it will not be possible to stick a stone onto it directly. To do this, the wood must first be treated with water-repellent impregnations, and then a reinforcing mesh must be secured, which will ensure adhesion between the flagstone and the base.
- The iron surface is covered with soil, then an iron mesh is installed for reinforcement. Next, the base is plastered, and after drying, the stone is glued on.
- It is recommended to apply the solution or glue both to the surface and the back side of the flagstone, so the cladding will be solid and will provide a more durable fastening.
Well, it would not be amiss to remind you to maintain a horizontal level of the coating, which guarantees its comfortable operation.
Wild stone wall decoration
- For work, a solution of sand, cement and plasticizers is mixed. You can also use ready-made solutions in the form of bitumen mastic or adhesive intended for ceramic or porcelain tiles (for outdoor use).
- The astringent mixture is applied in a thin layer to a small vertical surface so that the glue does not have time to dry during installation. A thin layer of mastic (about 1.5 cm) is also distributed on the back side of the stone and attached to the base with a slight pressing movement.
- The seams between the elements should be as uniform as possible, the width of which, as a rule, does not exceed 3 cm. To fill the seams, you can use a grout mixture or the same mortar that was used for the masonry.
Wild stone photo
- Special corners are installed on both internal and external corners. Such elements align the joints of the walls, and also give the surface a complete and aesthetically attractive appearance. The shade of the components is matched to the color of the masonry material.
- First, a corner is slightly sunk into the adhesive mass, and flagstone is glued on top of it. Trimming the element is done with a grinder on which a disk with a silicon carbide coating is mounted.
Laying stone on a horizontal surface
- This section will offer several options for laying flagstone. Among the general stages of paving, the following steps can be noted:
- Garden and pedestrian paths can be straight or winding, wide or narrow; their shape and size are determined by the layout of the site. Pegs are placed along the line of the path and string is stretched.
- Soil is removed to a depth of 30-50 cm, depending on the magnitude of the expected load on the future coating. The more intensive the exploitation, the deeper the pit.
- Geotextiles are laid at the bottom of the base, on top of which a 15-20 cm layer of crushed stone and sand is poured.
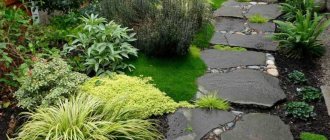
Laying stones “staggered” - garden path
- Flagstone is laid in a chaotic manner on the prepared base, firmly pressed into the sand. The distance between the elements can be 2 cm or more; the larger the stones, the wider the seams can be. Excess sand between the elements is swept out and filled with soil, which is later planted with grass seeds.
Laying stone “dry” - walking or cycling path
- A dry (!) sand-cement mixture is poured on top of the crushed stone layer. Material with a thickness of at least 3 cm is laid on it. The distance between the elements must be at least 1 cm. The stones are compacted using a rubber hammer.
- Water the finished structure with water from a hose, being careful not to knock the mixture out of the seams. After a few days, you should carefully inspect the seams and, if necessary, fill the existing voids with PCB diluted in a small amount. This method of laying provides labor and time costs, but without detracting from the strength properties of the resulting path.
“Wet” stone laying – driveways or paths with intensive use
- Formwork is being constructed along the entire path. A layer of sand and crushed stone is filled with lean concrete. After complete drying, they begin laying flagstone. A sand-cement mortar with the addition of plasticizers or latex is used here. You can purchase a ready-made tile mixture, which you just need to dilute with water.
- The binder is applied both to the base (in small areas) and to the back side of the stone. The size of the seams between the elements is left to the choice of the site owner. When installing piece elements, excess glue is carefully removed with a spatula, and the voids are filled flush with the coating.
Suppliers of facing stones
There are many companies on the market engaged in the production and supply of artificial wild stone. Each of them strives to expand the product range without loss of quality. The cost of products from different companies does not have a significant difference, the price per sq. m. m. is determined by the complexity of the production process and the materials used.
In this segment, three brands can be noted whose products are distinguished by high-quality characteristics and reasonable prices:
- “The Art of Stone” - the company is the holder of international diplomas and certificates. In addition to stone, it also sells related products: jointing, water repellents, glue, etc.
- " Kamrock " produces products that are superior to foreign analogues in some respects. Our own database and staff of designers allow us to regularly update our product line.
- “ White Hills ” - over 10 years of existence on the market, has managed to establish itself as a reliable partner, thanks to a well-organized logistics system.
Method 1. Stone garden path on a sand or gravel-sand base
Laying natural stone on a sand or gravel-sand substrate is perhaps one of the most popular, relatively simple and reliable ways to create a garden path that will look very picturesque anywhere in the dacha area.
Track markings
First of all, thoroughly clean the area for the future path, remove various debris, growing plants, roots, etc.
Mark the contours of the future path, which can be winding or straight. To do this, use a tape measure, level, wooden pegs and twine to mark two opposite sides of the alley. Tie the rope low, and align the cord to a single level, focusing on the height of the future masonry.
Driving stakes every 0.5-1.0 m, mark to the end of the area. Make sure that the segments between opposite wedges along the width of the path are the same throughout the entire length of the path.
If you are planning a border, when marking, do not forget to take into account the space for the edging.
Preparing the base
Depending on the planned load, you can make a preliminary gravel-sand or sand cushion. In principle, ordinary sand under a stone is quite enough for a country side path, but if the soil is “unstable” or loads are expected, it is recommended to also make a gravel base.
8a1d51ae7e29a94946074dda54afebd6.jpe 4984731b81be828f1c5f8692af47b7f1.jpeSo, in the first case, along the marked lines, dig a flat ditch of 5-10 cm for a sand cushion - this is quite enough for a flat stone, which is much easier to lay. But for rubble stone, when choosing the thickness of the substrate, be guided by the depth of the largest stones.
Then fill the trench with sand. Moisten the sand with water and lay it in an even layer, carefully compacting everything. Try to keep the backfill as even as possible.
In the second case, the ditch is dug deeper - 15-25 cm. Place any large bulk material at its bottom in a layer of about 7-12 cm. This can be crushed stone, gravel, slag, brick fragments, etc. The gravel bed also needs to be well leveled, moistened and compact. Place a layer of sand evenly on top of the crushed stone as described above.
Laying stone
Now carefully begin to place the stones in the sand, as if pressing them into the surface. Press the stone into the sand harder, and to level the material you can tap it with a mallet.
Constantly check the horizontal position of the masonry with a nylon thread or level. If necessary, add sand under the natural stone or remove excess. It is recommended that the top of your stone path be higher than the “horizon” of the ground to prevent rainwater from accumulating on the surface.
If the stones are relatively small or medium-sized, it is better to lay them end to end or with a small distance of 1-3 cm. But for large stones or stone slabs it will be more beautiful if you leave gaps of 5-8 cm or even more between them.
Sealing seams
You can fill the sections left between the stones with vegetable soil and sow a special decorative lawn in the cracks.
Another alternative is to fill the space between the slabs with small material like decorative pebbles. Sand is also used for seams, only the distance between the stones in this case should be small, up to 3 cm.
For greater reliability, the gaps can be sealed with liquid cement mortar (this is especially recommended for rubble stone or small flat stone). Mix sand and cement in water in a ratio of 3 to 1 and carefully work the sections between the stones with a trowel. Narrow cracks are easier to fill with a plastic bag or bag with a hole. Before laying the mortar into large cracks, you can add small hewn stone, leaving gaps of no more than 3 cm. If the mixture gets on the stones, remove it with a rag.
The jointing should be either convex, slightly above the level of the path, or flat, below the level of the stones. “Recessed” seams are not allowed, as water will accumulate in them, and cracks will appear in winter.
After laying natural stone, it is recommended to pour water on top. Finally, install curbs if necessary.
Laying wild stone - a description of the process with step-by-step instructions
Back call
Leave your phone number and the manager will contact you
Send a request
Leave your phone number and the manager will contact you
Laying wild stone differs from laying paving slabs and paving stones.
After reading the article, you will learn about the preparatory steps before laying, how to mark the area and how to lay wild stone.
Preparing the base
Wild stone path
The basic steps for preparing the base are similar to those described in the articles How to make a base for laying tiles on soft ground, How to make a base for laying tiles on a slope, How to make a base for laying tiles on swampy and wet soils, and Preparing the base. The marking, preparation of the earth trough, calculation of the amount of materials and the procedure for laying the underlying layers are similar to those described in the relevant articles.
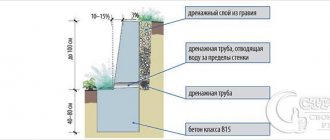
The only differences are in the methods of drainage. For paths up to two meters wide, drainage is arranged using drainage ditches that run parallel to the path on both sides (permissible on one side).
If it is impossible to drain water using ditches, a drainage collector is laid under the base, which is connected to the city storm sewer or river. Pipes and storm water inlets are raised from the collector to the surface of the blind area. From the article (Schemes for drainage of rain and melt water) you will learn in more detail about methods of water drainage.
How to lay it correctly
Unlike paving slabs and artificial wild stone, the back side of natural wild stone is uneven, with protrusions. This form is obtained as a result of splitting and peeling large stones (boulders) or entire layers. Therefore, the laying technology differs from that adopted for any type of paving slabs.
Having built the base, pour the sand-cement mixture (ratio 1:1) and start laying. Place the tiles on the surface of the base and tap them a couple of times with a rubber mallet to ensure a tight fit. Rock the tile. If it moves, trace the outline of the tile, then remove it.
Place a mixture of sand and cement between the tile outline and the indentations in the base, then lay the tile back. Press it and turn it clockwise 2-3 times and counterclockwise by 10-15 degrees. Rock the tile, if it wobbles, turn it 2-3 more times and lay the next one.
Sidewalk and curb made of wild stone
The distance between the tiles depends on the material with which it is filled. If you fill it with earth, on top of which you plant grass, the distance between the tiles is 4-7 cm. If you pour a mixture of sand and cement (it will additionally strengthen the blind area), the distance between individual tiles is 1-2 cm.
After laying 2-3 tiles, check them using a level. Permissible deviation is 1 cm per meter. If you are laying tiles on a slope, check with a long level or ruler. Apply a level or ruler and evaluate the height difference between the tiles. If the height difference exceeds 5 mm, recess the protruding tile or raise the deep-seated tile.
To recess the tile, turn it clockwise and counterclockwise by 15-20 degrees 2-3 times. To raise the tiles, remove them and evenly add a mixture of sand and cement to the required thickness. Then place it in place and press down.
Fill the space between the wild stone tiles with earth or a mixture of sand and cement. Then water the blind area with water (10 liters per sq.m.). When the soil or mixture subsides, add more and water again at the rate of 5 liters per sq.m. When it sag, add it again and water it with water (one liter per sq.m.). Let the tiles sit for 4-5 days, after which you can walk on them. If necessary, sow the soil between the tiles with grass. Such paths or areas look stylish and attractive.
Path paved with wild stones
The technology for laying wild stone is in many ways similar to laying paving slabs or paving stones.
We invite you to watch a video on how to lay wild stone in your yard with your own hands:
After reading the article, you learned how laying wild stone differs from laying other types of tiles, and learned how to pave it.
Laying sandstone on walls
For vertical surfaces, preparation of the base consists of stripping it of the old coating.
If the plaster is strong, prime it with a deep penetration solution.
This is a must, natural stone is heavy, and sandstone also has low moisture absorption.
The base absorbs water through it, which can lead to situations where the slab falls out of the masonry.
But one should not assume that only thin slabs are suitable for walls.
Sandstone with a thickness of more than 10 mm will be well supported by support at the end.
The finish is suitable for concrete buildings and walls made of white brick, but red is not the best option, as its strength decreases over time.
When choosing sandstone, the laying technology of which requires surface reinforcement, be prepared to fill the metal mesh in advance.
It is attached to 6-8 dowel nails per meter of area. The surface is leveled with a sand-cement mixture.
d05d8eca84104d0e1be786d232cf1f0d.jpe
There is no need to skimp on glue for installation, but it can and even needs to be diluted. The introduction of sand and cement into the mortar will add strength to the masonry.
The mixture should not be too liquid in texture; on the contrary, a slightly dry version is better.
This solution continues to breathe after drying, reducing the possibility of the slab falling out.
For larger stones, you can add a fastening with a wire passed through the back of the piece and the reinforcement mesh.
Complete drying of the masonry lasts about one month, so work with natural stone can be considered seasonal.
The air temperature, for proper hardening of the adhesive layer, should not be less than 5°C.