A do-it-yourself stationary high-pressure washer can be made on the basis of a special pump for sinks, a high-pressure hydraulic pump for special equipment (like NSh) or an air compressor. When the question arises whether to buy a factory-made pressure washer or make one yourself, there are several factors to consider. A homemade car wash using improvised means is usually cheaper than a ready-made MIA with similar parameters. Provided that components are chosen wisely and are of high quality, it surpasses factory ones in reliability and is not inferior to them in performance.
In this material we will look at how to make a high-pressure washer with your own hands and look at the three most popular design options and answer basic questions about homemade MIAs.
What is a pressure washer?
Today, you no longer need energy and time to fight dried-on dirt and dust that has clogged up in nooks and crannies, because every year new models of high-pressure washers . These devices are used for washing windows, cars, walls and doors of houses, barbecues and other objects that are difficult to clean with a rag or brush. Strong water pressure copes with this task much more effectively and saves money spent on washing the car at a service center; water consumption is also minimal. Therefore, having such a sink in your arsenal is useful for everyone.
How not to wash the engine compartment of a car
First, let's talk about negative examples that can often be observed among careless motorists, that is, about what should not be done.
You cannot mercilessly spray the entire engine compartment with the product.
, especially under high pressure, because the drug gets into places where it shouldn’t go: on the generator, wiring and other components of electrical equipment - these parts do not tolerate water and chemical solutions.
Do not wash off the applied product and dirt with too powerful a stream of water.
Water has a pervasive property, which in this case can only harm the car. At the same time, do not forget that the heat and noise insulation on the inner surface of the hood is quite fragile, and therefore a powerful jet of water can tear it.
You cannot wash the area under the hood outside during the cold season.
Water can get into the moving parts of the engine and freeze. For example, if the starter freezes, turning the key can burn the windings of its motor and also burn the battery.
Do not start washing under the hood without first removing large debris from there.
eg dry leaves. Otherwise, the drainage holes for draining water may become clogged, and then during the next wash or rain, many important parts may end up in the “aquarium”.
Now let's talk about what can and should be done when washing the engine compartment. As already mentioned, dirty parts under the hood of a car cannot be cleaned with a damp cloth. To do this you will need special tools and equipment.
Preparing material and tools
To make a mini-sink you will need the following components. The pump is one of the main components of the sink. The performance of the device must be quite high (pressure range: 100−200 bar). When choosing a pump for a mini-wash, you should also pay attention to the material it is made of. It is desirable that the cylinder head be made of brass, the pump pistons made of ceramics or durable metal. The period of operation of such a pump will undoubtedly please you.
Other parts needing attention
In order for a homemade high pressure washer to be assembled correctly with your own hands, you will also need other components.
Additional items:
- filter element - a fine mesh that prevents the entry of dirt particles and debris;
- capacitor, single-stage gearbox - optional components, but they make it easier to start, improve the quality of work, and productivity;
- compressor – can be used as a pump, the basis for a car wash, greatly simplifying assembly;
- performance regulator, unloading valve - parts that ensure safety and efficient operation;
- clamps or hydraulic sealing - will make the connections airtight;
- elements in contact with water are selected from corrosion-resistant alloys.
Having completed the collection of spare parts, you can begin fastening the elements and installing them on the frame. It is important to maintain the ability to repair equipment by more often using threaded connections.
Read also: Calendula ointment, horseradish, folk recipes
Answers to frequently asked questions
How can you save money when making a pressure washer?
When making a high-pressure washer with your own hands, you can save money by using inexpensive, used, but serviceable parts from disassembly of various machinery and equipment. However, what you should not save on is the pump. If you take a low-quality or already worn-out pump, it will quickly fail.
Why does a pressure washer lose pressure over time?
A drop in the performance of the MVD is a sign that the pump was chosen poorly and is quickly wearing out. When the washer pumps normally when cold, but as it operates it begins to supply water worse, this indicates overheating and the need for additional cooling of the units.
Does water hardness affect the pressure and service life of the sink?
Mineral particles dissolved in water can act as an abrasive, gradually scratching the friction surfaces, deposited on device parts and accelerating their wear. They can also clog the spray gun nozzle.
What to do if the assembled sink does not produce the required pressure?
If the washer pumps weakly, despite the suitable parameters of the pump and motor, you need to make sure that the motor develops sufficient power. Three-phase electric motors on a 220 V network operate only at 30%, and this may be the problem. If the engine is at fault, it needs to be replaced with a more powerful one or repaired (if we are talking about an internal combustion engine).
How to make a homemade Karcher for a car
How to Make a Karcher with Your Own Hands / Simple homemade products / Sekretmastera
Watch this video on YouTube
The design of the sink is extremely simple; to create it you will need a plastic container with a tight screw cap with a capacity of 4 - 20 liters (canisters for storing gasoline are very suitable), a spray gun, a set of quick-release hose connectors (3/4 threaded fitting, two connectors for the diameter of the hose , adapter coupling 3/4 - 1/2), car nipple for tubeless tires and a piece of hose 1.5 - 2.5 meters long. The tools you need are a knife with a sharp end, silicone sealant and a car pump or compressor.
Watering gun Water container
The operating principle of a mini washer. A hose with a watering gun is connected to the bottom of the water tank. A car nipple - a fungus - is built into the filler neck. Fill the container with water to 3/4 - 4/5 of the volume, screw on the lid and pump the container with air. The system creates excess pressure under the influence of which water will flow out when the trigger of the gun is pressed.
Making your own car lift
To wash or perform various repair work, the car owner may need a lift, which can be made independently.
To make a mechanical lift that will be installed in the garage, you will need the following parts:
- A worm gearbox, the load capacity of which must be at least 300 kg, and the gear ratio must be at least 60 kg.
- Three steel corners measuring 7.5 by 7.5 by 0.8 cm.
- Steel plate 1 cm thick.
- Two strong iron chains.
- Durable hook.
- A few bolts.
- Steel cable 5 mm thick.
- Two star-shaped keys of different diameters.
It is also useful to read: Effective means for washing a car engine without rinsing with water
Lift assembly:
- We fasten the steel corners using welding or bolts on opposite walls.
- We install a steel plate on the corners of the lift and secure it with 7 bolts.
- We install the used worm gearbox on the plate.
- We fix the large key on the gearbox drive.
- We drill holes in the plate and thread a chain through them, after which it needs to be closed into a ring.
- We attach a key of smaller diameter to the output shaft of the gearbox.
- We drill two holes in the lift plate.
- We pass the second steel chain through the holes.
- The chain is thrown over the smaller key, and the second part is attached to the hook.
This way you can easily make a simple car lift yourself, which can be used in the garage for washing the underbody and performing various repair work.
Advantages of homemade equipment
If there is no financial opportunity to purchase a device, or there is a desire to assemble high-pressure washing equipment with your own hands, the instructions given below will be of interest to you. Before you make a high-pressure washer, you should know about the advantages of the technology:
- low financial expenses;
- possibility of modernization;
- functionality at the level of production technology;
- fast production;
- operational simplicity;
- high efficiency;
- no need for spare parts and no additional expenses.
Using the equipment, it is possible to effectively, quickly and efficiently wash away contaminants of any degree of complexity. You can clean various surfaces of the car body. A homemade high-pressure washer, made and operated with your own hands, eliminates damage to the surfaces being treated. This quality favorably characterizes the cleansing technique in the eyes of the user.
Drying the engine after washing
You cannot start the engine immediately after washing, as the engine needs to be dried. Regular paper towels work well for drying the unit. With their help, it is necessary to remove water as efficiently as possible. After this, you can remove the protection in the form of bags and foil. Make sure that no moisture gets on the protected elements. If drops of water are found on connectors and electrical contacts, they should also be thoroughly dried.
Finally, we add that if corrosion and oxidation of the battery contacts is detected, you can use a solution of baking soda and water in a 1:1 ratio. This solution is applied with a toothbrush and allows you to clean the indicated parts. Then you need to wipe the cleaning areas with a cloth soaked in water, after which you will need to completely remove any remaining moisture using a dry paper towel or rag.
How to choose the best external engine cleaner to effectively remove engine oil and dirt from surfaces. Engine cleaner test, recommendations.
How to safely wash a car engine without water: common methods. Cleaning the engine compartment and internal combustion engines using special means or steam washing. Adviсe.
How to properly wash the engine and engine compartment of a car with a Karcher. Pros and cons of the method, professional and self-washing. Possible malfunctions after washing the engine.
Is it worth washing the engine with steam: the pros and cons of the method. What could be the consequences after washing the engine and engine compartment with water, chemicals, or steam?
The engine does not start after washing the engine: the main reasons why the power unit cannot be started. What can be done in such a case.
Is it possible to wash the engine with the onset of cold weather, when this procedure is recommended. How to properly wash your engine in winter. Tips and tricks.
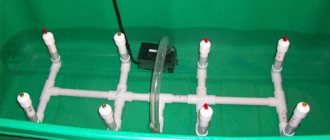
Homemade mini-wash project
The proposed mini-wash project includes the following set of basic elements:
- pump;
- electric motor;
- coupling for connecting the first two positions;
- container for water and detergents;
- frame;
- gun with nozzle;
- high pressure hoses;
- nozzles
The operating principle of the manufactured sink is very simple. After connecting to the water supply, the water enters the container, where it is pumped using a pump.
Next, the water is supplied through a hose to a gun with a nozzle. If the gun is equipped with a special nozzle, you can change the nature of the water flow, which is determined depending on the surface being cleaned.
We make equipment ourselves
First of all, you will need to choose a suitable pump for washing. If you plan to operate the equipment for commercial purposes, choose industrial equipment. The main principle remains the choice of a plunger pump equipped with ceramic pistons. The crank mechanism increases the service life. The main parts of a high pressure washer are:
- washing filter;
- hoses;
- additional nozzles;
- water containers;
- detergents;
- sandblasting for washing;
- durable wear-resistant body;
- High pressure pump;
- engine (gasoline or electric).
- The container is equipped with a pump, and the connections must be completely sealed and durable. Fixation involves the use of couplings.
- On the other side of the tank you will need to fix a hose that will supply water.
- The hose is equipped with a tip that directs the water stream.
An auto-loading valve, available in two variations, will need to be connected to the pump. The first type is represented by a closed valve. The system releases pressure after closing the gun, and then water is pumped from the outlet to the inlet. It is recommended not to operate the device for more than 3 minutes. The valve with inlet is convenient. The liquid is transported through the collector to the container or to the sewer immediately after the pressure is released (depending on the connection option for the sink).
There are two ways to connect the motor to the pump. If you have a motor with a full shaft, it can be connected directly to the pump. The motor shaft is placed on the front bearing, creating additional load. This technique shows the most economical results. If you make a sink with such an engine with your own hands, it will have a significant service life between repairs. This is caused by high starting loads. It happens that it is not possible to remove the pump shaft from the engine. In this regard, it is advisable to install a soft starter.
Another method of coupling the motor to the pump is provided, in which a clutch is used. It is used as a cushion that softens the shock during equipment startup. The coupling serves as a protection that prevents the shafts from being damaged. In order to reduce the load during startup, a soft start can be used. Thanks to this element, it is possible to gradually increase the power in the system.
The sink must be connected to the water supply system using a hose. The connection hose must be at least 7 meters long. The length of the hose allows you to smooth out pressure drops in the water supply. Provide a filter for washing. It is recommended to use a hose with a check valve, which increases the operating pressure.
Water supply for autonomous washing
Not all high pressure pumps are capable of sucking standing water from a tank or do a poor job of it. In this case, the following solutions are possible:
- If the pump requires a constant supply of water under pressure, you need an additional booster pump with a corresponding capacity, operating constantly.
- If you need to supply liquid under pressure only for starting, any pump (submersible gasoline pump, windshield washer pump, universal pump) capable of creating a starting pressure and connected parallel to the main water intake hose is sufficient. It can only be turned on at startup.
- You can do without a booster pump if the water tank is located above the pump, and the water intake from it is arranged below. If the high-pressure pump is not afraid of airing and is able to start working by self-priming, additional pumps are not needed even when drawing water from a barrel.
Main components
Since we do everything from improvised means, problems may arise with such a parameter as reliability. I believe that any sink or foam generator should be assembled in accordance with GOST and other requirements. If you violate all the recommendations and sculpt a structure from the first spare parts you come across, it’s better not to start.
If you are ready to act consistently and competently, then maybe something good will work out. Homemade car washes are not a myth at all. A lot of people, including my friends, collected them. They work well. Although my foaming agent works no worse. Yes, I bought it and I'm not ashamed of it.
So, since we are talking about homemade sinks, let's see what components they are assembled from.
- Pump or pump. The first priority will be to find a pump. Since a sink is a water supply device, there is no way to do it without a pump. Moreover, so that water comes out through the nozzle under high pressure, capable of removing dirt from the surface of the machine, we select the pump at 150 bar. Some charge more, but this is unnecessary. Otherwise, the paint will come off along with the dirt. The block head must be made of brass or bronze. Such materials are least susceptible to corrosion, and therefore the device will last a long time. Supplying 15 liters of water per minute is enough to thoroughly wash your car.
- Electrical engine. The next in line will be a 220V electric motor. In addition to it, you need a condenser unit so that the sink starts without problems. The higher the rpm, the better the performance. Pumps that are too fast and produce a high speed will wear out quickly. Don't take them. A consumption of 2-3 kW and a rotation speed of no more than 2000 rpm is considered optimal.
- Clutch. It is needed to connect the pump to the engine. Some people also install a belt drive in one stage. With the help of this gearbox, the speed and load of the engine with the pump are balanced. The gear ratio must be selected based on the required output parameters.
- Water container. Use a tank that you can power from a constant source of water. This could be a regular tap or a well, for example. If the water is dirty, install a filter at the inlet. The main reservoir will serve to add car washing shampoo.
- Performance regulator . A special valve must regulate operating parameters and, if necessary, redirect unused water pressure into the container. This reduces the load on the pump.
We've sorted out the basic elements. But there is also a hose, nozzles and other components that are part of a homemade sink. Or think about which one to choose among ready-made sinks sold in stores.
Principle of operation
Using high pressure, a jet of foam is supplied, which not only removes all contaminants from the surface, but also disinfects it. The internal structure of the unit allows you to create foam of the desired density and evenly apply it to the machine. Foam is formed in several stages:
- A stream of water passes through a car shampoo suitable for a foam generator.
- It mixes with the air stream and foam begins to form.
- At high speed, the resulting substance is sent to a special foaming “tablet”.
- Foam of the required density is already coming out of it.
The foaming agent allows you to clean very quickly, and it also significantly saves water. A small amount of water is sufficient for the jet; high pressure will ensure the required spray speed and surface area to be treated. Thus, a foaming agent and a high-pressure car wash very quickly take a leading position in the list of necessary tools for the garage, according to car enthusiasts.
How to properly wash a car engine at home
The process of washing a car engine can be divided into two main stages: preparatory work and the washing itself. The final result directly depends on the thoroughness of each operation.
Preparing the engine for washing
Before you spray the engine compartment with a generous layer of cleaning solution, there are several important preparatory procedures that need to be completed. At first glance, they seem unnecessary and time-consuming, but the benefits of these operations will be enormous, because after washing you will not have to dry wiring, electrical appliances and other parts for a long time.
- First of all, you need to disconnect the negative terminal from the battery.
- Wiring areas with joints, sensors, generator and connectors should be protected from moisture using plastic film and tape.
- It is highly advisable to remove the engine crankcase and gearbox protection for free access to the lower part of the engine.
If necessary, you also need to disconnect those components and parts that interfere with access to the engine.
Choosing a mini-wash
When choosing a household AED, you should consider the following parameters:
- Performance.
- Pressure.
- Pump material.
Plastic pumps do not last long and are installed in inexpensive, low-performance devices that can be used to wash a bicycle, motorcycle or garden cart. It is not enough to wash a car. More precisely, with the help of such a car wash you can wash your car, but it will take a lot of time due to its low productivity.
The car can be easily washed using a pressure cleaner with a brass or silumin pump . These are middle class household appliances. Their performance and pressure are sufficient to wash any passenger car. Essentially, it is the best choice for home use.
Of course, if a car enthusiast has extra money, he can buy a high-class household high-pressure car wash, but for the average car enthusiast this is a luxury.
Useful tips
There are a number of effective recommendations, by listening to which you will be able to achieve the maximum effect from using a home-made sink:
- Debris accumulating in the filter element of the tank must be removed in a timely manner.
- It is advisable to inspect the connections in a timely manner and tighten them if necessary.
- Each electrical element of a homemade sink must be grounded, for which use a flexible three-core wire in double insulation. Also, use a plug with a grounding terminal for this purpose.
- Connect the power outlet to the ground securely.
- The strong jet pressure of the manufactured apparatus is not needed. Otherwise, the injection pump will be overloaded, which is likely to have a negative impact on the paintwork of the equipment. These actions will lead to moisture entering the electrical equipment, damage to the equipment and additional waste.
- Select a water pressure that is suitable for removing major dirt from the surface being treated.
The product must be convenient to use, and therefore you should not resort to using large parts. If you live in an area where power is often cut off, it is advisable to provide an alternative power source: equip the equipment with a rechargeable battery.
A device of our own production is capable of washing away contaminants of varying complexity from any surface, from any object. Even the most stubborn dirt stains will be removed without any streaks or residual dirt. The big advantage of the installation is the inability to damage the surface being treated during the cleaning process. Listen to the advice of experienced specialists - save time and money by creating useful household appliances with your own hands.
DIY car wash
The cleanliness of a car is not only an aesthetic indicator, but also protects the product from negative environmental factors. After all, stuck and dried dirt may contain aggressive elements that damage the paintwork. Also, long-term and regular contamination of the body can lead to irreversible damage to the metal, including through corrosion on individual elements. In this case, regular visits to a car wash or home water treatments can help. But in the second case, you need to buy a washing device or make a car wash with your own hands from improvised materials. Prices in stores generally start from 5 thousand rubles. The upper threshold may not stop at 20 thousand. Therefore, we will do it ourselves.
Processing of models 2105, 2107
Before applying anti-corrosion material to the VAZ-05 and -07 you need to:
- dismantle all parts that interfere with access to the cavities being processed, that is, shields under the front fenders, spare tire, trunk cover, sidewall linings;
- cover the oval openings of the sills at the base of the pillars with something so that when washing, water does not penetrate into the interior;
- Rinse all areas where anticorrosive is applied with water. But before that: pull out the plugs in the rear wheel arches, in the beam of these arches, in the cross member under the front seats, in the niche for the spare tire, and clean the drainage holes. After washing, blow everything with air and dry it.
The following cavities are treated with anticorrosive agents first:
- Between the rear fender and the wheel arch
- Rear side members
- Rear floor cross members
- Recess under the fuel tank
- Rear lower cross member
- Recess for spare wheel
- Mudguard strut
- At the connection of the front flap with the side of the wing
- In the hood pockets
- At the connection of the front panel with the side of the wing
- Front upper cross member
- Front lower cross member
- To the front suspension buffer bracket
- In the front fender pockets
- Doors
- Thresholds
- In the jack bracket
- Cross members between rear wheel arches
- Rear side members
- Front side members and their reinforcements
For more affordable shown in the picture
Places where anti-corrosion material is applied to the surfaces of parts and hidden sections of the body of VAZ-2105 and 2107 cars
After the anti-corrosion treatment of the car with your own hands is completed, you need to remove traces of mastic using a swab moistened with white spirit or kerosene, then replace the previously removed parts, including plugs, plugs, covers, etc.
This article indicates only the key points in the anti-corrosion treatment of VAZ bodies. In the process, each of the models may have its own specific nuances. But in general, any car enthusiast can perform such body treatment.
Internal pressure
The higher the pressure inside the housing, the stronger the stream of water gushing from the hose, which means the dirt comes off easier. Set the pressure carefully, because water can simply break a fragile car part or glass and leave dents. Manufacturers set the pressure at 150-170 bar, but 100 bar is enough to clean a car. If the contamination cannot be cleaned with a jet of water, purchase a special nozzle for the hose, a turbo cutter. It will help wash tires, wheels, and remove dirt accumulated in the cracks. You can use the mini-wash both outside and inside the car. If you are using a turbo cutter, you will need a pressure of 160 bar.
What parts are needed to assemble a car wash?
Setting up a mini-wash is a simple process. The work begins with the selection of parts for subsequent assembly of the structure. The working part must be assembled from high-quality, proven materials. The components, with the exception of the pump, do not have to be new. But the serviceability is first checked to avoid breakdowns.
Basic washing elements:
- The pump or motor that creates water pressure is the main part. When choosing, pay attention to performance and the ability to create pressure. For infrequent use, at home, a pressure of 100 bar is sufficient. When installing additional equipment, nozzles, up to 160 bar is required. Average figures vary between 100–200 units.
- The electric motor is the power source of the system. When assembling it yourself, it is recommended to choose single-phase devices with a potential of 220V. They are safer and more accessible.
- Coupling – necessary to connect the pump and the power plant. It is preferable to have models that can perform the functions of a fuse and balance the misalignment of the shafts along the axis.
- Housing, water container – ensures a uniform supply of water masses. Tanks made of durable plastic or metal are used.
- The frame is the basis for securely fastening the elements. Often additional wheels are installed at the bottom for mobility and ease of use.
- A gun with a nozzle and hoses are required to supply water. The hose chosen is high-quality, reinforced.
- Nozzles - used to change the nature of the water flow. There are many models used to solve specific problems.
You should not skimp on the quality of parts - this will affect the performance of the device.
Device
Now it would be useful to consider the structure of the sink and understand what components it consists of. The design of any high pressure washer will consist of 5 main and a lot of auxiliary elements.
If we talk about the main ones, we are talking about:
- motor;
- pump;
- pump;
- fuse;
- filters.
Now let's talk about them in a little more detail. The motor is the basis of the entire structure. It is thanks to its presence that it is possible to achieve pump operation that can be called stable. The electric option will be the most common, although there are also autonomous solutions. If we talk about autonomous options, then the fuel for them will be either diesel or gasoline. If we talk about a pumping unit, then its main purpose will be pumping water from a special container or a centralized network.
If we are talking about a centralized option, then the sink must be equipped with special hoses.
The pump is directly responsible for increasing the pressure. An important criterion for this part is wear resistance. Here it should be said that this parameter will depend on the material from which it is made. Most often these days it is made of plastic. This option is not of very high quality, since if you use the device for more than 20 minutes, its failure is almost guaranteed. There are brass solutions that will be more reliable.
It should be said that the models on the market, as a rule, are equipped with plastic options. For this reason, a self-made model can be significantly more reliable.
The motor fuse is responsible for controlling the operation of the entire pump. As soon as the water level reaches a critical level, rotation of the engine becomes impossible. This is usually observed when liquid enters but does not come out due to the fact that the hose is blocked and the type of washer in question continues to operate.
The filter is the main element of protection that protects the sink from mechanical problems due to sand or other foreign particles of considerable size getting inside through the nozzle.
External car wash units
External components are mounted on a frame, which is better to make yourself or choose a suitable ready-made structure. Usually the frame is made on the basis of a profile or curved pipe. You can install wheels on the bottom so that the sink is not stationary, but mobile. Stops, handles and clamps will help you move the device.
- Hose. If you have sorted out the water intake, you need an element through which the liquid will begin to flow to the machine. Choose reinforced rubberized hoses or plastic products. Just make sure the hose is durable and has tight connections to the water intake. If necessary, you should be able to quickly repair the hose and change it.
- Connections. It is better to connect areas where elements are connected to each other and come into contact with water using fasteners made of corrosion-resistant materials. For example, bronze or brass.
- Gun and nozzle. You can take a ready-made sandblaster or another suitable gun that has a nozzle. Outwardly they resemble pistols at gas stations. The water jet should only be released when you press the button. It’s better to take a ready-made gun and not worry. My advice to you.
We do everything consistently and carefully, connecting the elements tightly together. In fact, selecting parts and creating a full-fledged sink from them is not an impossible task.
But you will still need a cutter to cut the holes, a whole set of different components. It is far from certain that they will be at hand or suitable in size, type of material, and so on. Someone makes sinks from NSh 10 (gear pump) and is happy with the result. Others twist and turn something, but in the end they go to the store and buy a foaming agent, connecting it with the purchased branded sink. Although a foam generator can be made from a compressor and auxiliary mechanisms, I would prefer a ready-made product.
In some cases, it is better to think about which sink from a leading manufacturer to take to wash your car, rather than spend several days unsuccessfully trying to assemble a sink from scrap materials.
I am not at all opposed to making useful things with my own hands. But in terms of washing there are many pitfalls. As for me, it is better to spend more money and less time on a proven Karcher factory car wash, for example, than less money and more time on a homemade device. It remains to be seen how this homemade product will work and what surprises it will reveal during operation.
The rating of factory sinks clearly demonstrates the leaders of the segment. Will you be able to achieve similar characteristics to such devices by doing the washing yourself? Hardly. Can you save money? Probably yes.
: Attach a bucket for storing the Hypermop
Show 3 more imagesThe hyper mop is long and heavy. She needs a “quiver”! A 20 liter bucket is ideal for our needs. I drilled a few holes in the bottom of the bucket to allow the water to drain, and then drilled small holes in both the bucket and the scuba holder to secure them together.
: Disassemble the mop head
This is a fun step. You start with 8 mops and end up with an amazing car wash hyper mop.
- Buy mops
- Drill out the rivets
- Remove all plastic parts
- Carefully wrap the zipper around the center across the existing blue cord
- Cut the blue cord
- Tighten the zipper slightly
- Wrap the mop around the hyper mop handle
- Tighten the zipper
- Go back to step 1 and repeat until you have no mops left
The hyper mop is almost ready!
Requirements for a homemade Karcher
A properly assembled homemade Karcher is practically no different in its technical characteristics from the branded one. The main thing is to take into account the requirements for the unit:
- the product must have high performance, which refers to the volume of water required to be pumped by a pump for a certain time. This determines the force of pressure;
- it is necessary to take into account the pressure exerted on the surface by the force of the water flow. Cleaning the bottom of a car will require a lot of pressure;
- It is imperative to install an additional cleaning filter on the structure, which will prevent the ingress of microparticles, chemical elements and iron elements. It will also protect the device from mechanical influences.
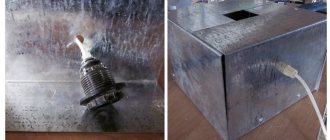
Is it possible to assemble a sink based on a fuel injection pump?
Many people are interested in the question: how to assemble a high-pressure washer with your own hands from an old fuel injection pump. Fuel pumps for diesel equipment are indeed capable of creating a pressure of hundreds of atmospheres, but they are of little use for making a sink for several reasons:
- The performance of the fuel pump corresponds to the consumption of the internal combustion engine and does not exceed several tens of liters per hour;
- Injection pumps of old engines with mechanical diesel fuel injection have separate outlets to the injectors and supply liquid not in a stream, but in pulses;
- Injection pumps for Common Rail systems operate linearly, pumping fluid into the hydraulic accumulator (fuel rail), but they also have insufficient performance;
- The pressure force of many injection pumps depends on the speed, and if you spin the pump too hard, it will create a thin jet with a pressure of more than 1000 atm, which is too much for washing.
For these reasons, do-it-yourself high-pressure washing from a high-pressure fuel pump is more likely to be classified as a garage hack. This is also confirmed by the lack of successful examples of making a high-pressure washer from a high-pressure fuel pump with your own hands: there are no videos on the Internet, diagrams, drawings and text materials on this topic were also not found.