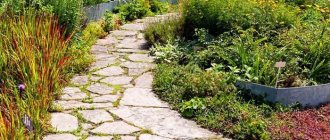
Natural stone
This is the best material. Today, the following natural stone is most often used for walkways.
- Granite. The stone contains field twine, mica, and quartz. Its distinctive characteristics: high strength, resistance to moisture and frost. It perfectly withstands up to 200 thawing-freezing cycles. In addition, it has a variety of colors, ranging from a gray tint to a dark red palette. This is the most preferred natural stone for paths in the country.
- Shales. Such rocks have a layered structure. That is why such stone is most often found in the form of slabs. Most shales are porous. Therefore, the material requires additional processing with special compounds. Quartzite slate is closest to granite in terms of performance properties. It is most often used for paving paths.
- Shungite. This natural stone is a good option for decorating a site. There is a layered material and a monolithic one. The latter has a whole list of advantages. It is high density and strength, resistance to frost, chemical influences, and abrasion. But its color palette will not please you with its diversity. Shungite can be black or various shades of gray. Sometimes the stone contains inclusions of pyrite or quartz. They provide amazing veining on the surface in golden or white color.
- Sandstone. This stone is very popular, just like granite. But sandstone is somewhat inferior to it in terms of hardness, although it also belongs to durable materials. It is easy to process. Thanks to this property, the stone can be easily given the desired shape. Sandstone will delight you with a variety of colors: light yellow, pink, gray-green, fawn.
- Quartzite. It is a quartz slate containing mica. It is characterized by high hardness and strength. Such properties create serious difficulties when processing stone. Typically the material is reddish, white, gray or greenish in color. In addition, its shade varies depending on the lighting. It is durable and amazingly beautiful, so it is often used for paving paths.
Artificial materials
Quite often, owners of suburban areas order artificial varieties of materials for arranging paths. They are distinguished by the following advantages:
- Attractive design , abundance of colors and textures, including those imitating natural coatings.
- A variety of shapes , from simple (rectangle, square, oval, etc.) to complex (for example, tiles in the form of tree leaves, complex geometric shapes).
- Resistant to abrasion , fading, high and low temperatures.
- Light weight for easy delivery and installation.
- Moisture resistance , no absorption.
- Acceptable cost.
Artificial stone for paving paths has practically no disadvantages; the disadvantages include lower resistance to mechanical stress compared to its natural counterpart. As for concrete, which is also used for landscaping, its disadvantages include not being very aesthetically pleasing, but you can give the surface the texture of flagstone or use dye to create a beautiful coating.
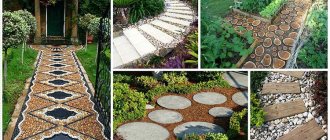
Paths made of paving slabs, polymer sand tiles, porcelain stoneware and concrete pavement with imitation stone Source seattlehelpers.org
Paving slabs
The material consists of a cement-sand mixture with the addition of granite chips, plasticizers and pigments. The main advantages are a non-slip surface, high strength, attractive appearance and a large selection of colors.
Polymer sand tiles
The composition includes sand, polymer, plasticizers and pigment. Such tiles are more durable, resistant to moisture, aggressive chemicals, and ultraviolet radiation, and are available in different shapes and sizes, but are not cheap.
Porcelain tiles
Porcelain stoneware paths have an attractive appearance, look solid, and have excellent durability. The material is very heavy, so you will need to carefully prepare the base.
Concrete
Durable, reliable coating, withstands severe temperature changes, and is not afraid of moisture. However, the concrete surface itself does not look aesthetically pleasing; additional processing will be required to make the path beautiful.
Stone paths
The technology for making a natural stone path is not complicated, but it requires painstaking work and the use of physical strength.
You need to mark the area for the path with your own hands using pegs and a cord.
Pegs and cord will help fence off the work area
The width of the garden path can be from 40 cm, the sidewalk - from 80 cm, depending on the number of people who will walk there, the main entrance is provided with a width of 3 m. The slope of the territory must be at least 2 degrees. The sidewalk can be made convex, then water will flow from it to all edges, and not in one direction. It is necessary to think through a drain or drainage system in advance.
A layer of soil is removed from the marked area. The depth of the selected soil depends on the function of the area. For pedestrian and bicycle paths, remove about 300 mm:
- 200 mm for a cushion of crushed stone and sand;
- 50 mm on concrete base;
- 50 mm for stone and mortar.
Crushed stone and sand are alternated in layers of 50 mm. Flagstone for this purpose should be from 20 to 35 mm thick. For a road that involves vehicle traffic, the trench depth should be from 500 mm:
- on a sandy base 300 mm;
- on concrete screed 100 mm;
- the rest is for facing material and adhesive solution.
The cobblestones must be at least 40 mm thick.
Before making a stone path with your own hands, it is advisable to distribute and mark them. When laying stones, the excess can be cut off with a grinder with a special cutting wheel (sold with the stone mark). In order for the boundaries of the site to have smooth edges, it is necessary to make formwork.
How to choose a stone for paths
In addition to the stated thickness, density is important for flagstone, especially sandstone, since this rock absorbs moisture well, and loose stone will peel off due to freezing. In addition to thickness and density, it is also necessary to pay attention to several more factors:
- The dimensions of the plates are not cut, and all the plates are different, but a stone with a side size in the range of 30-55 cm is considered more convenient in terms of work.
- Edges - unless the design direction suggests otherwise, stone with linear or slightly curved but smooth edges is easier to lay (easier to fit and maintain the seam). Of course, if necessary, you can trim it, but even flagstone will require serious physical effort, powerful tools and special discs.
- Origin - if possible, you should prefer stone from local quarries, since flagstone from warm regions is likely to react to the harsh Siberian conditions with strong delamination.
Unfortunately, the reality is that there are not only conscientious sellers on the market, and the fact that a stone is ordered that meets all the wishes is not a guarantee that it will be received.
UmRus Member of FORUMHOUSE
We bought flagstone for the garden path - from 3 to 3.5 cm, terracotta color. The path is exclusively pedestrian; stone laying is planned using sand cement. The quality of the delivered stone is very confusing - during a visual inspection and unloading with a manipulator, only a good, smooth stone was visible. Inside there was a large amount of uneven material on both sides. I understand that the stone is natural, the surface is not perfectly flat, but I would like to understand what unevenness is acceptable in order to lay the stone and use the path normally. What is normal for a natural stone, and what is defective, and which stone can be returned?
- Relief - the stone has a two-sided relief surface - can it be laid without compromising quality, do the bumps need to be cut off or require an exchange?
- Color - we ordered terracotta, one pallet is normal, the second stone is from gray to rusty-black with white specks, and we also come across one that is clearly burnt. How will such a stone behave?
- Thickness - the stone was ordered 3-3.5 cm thick, most of the stone has the stated thickness, but then the layer is thinned down to 1 cm. How to work with such a stone, cut off thin parts or require an exchange?
There is no reason to worry only about the relief; otherwise, the customer was very unlucky with the supplier.
GraniTT70 Member of FORUMHOUSE
It is normal for sandstone to have uneven surfaces. But the fact that unscrupulous sellers try to deceive customers is not normal. The only small consolation can be the prevalence of this phenomenon - people are deceived all the time. Small items, smaller thicknesses, and other defects are slipped into the middle of the pallets. There is loose flagstone - it is not suitable for paths; it needs a smooth surface, even edges and hard rock. Hire a specialist who will lay the stone for you, go to the base where they sell it, and let him help you choose. I’m basing it on my own experience – I choose it myself, I put it in myself. If possible, exchange it.
Distinctive features of the material
First of all, you should understand what exactly flagstone is, which is often used to create nice garden paths. These are flat slabs of natural stone, the thickness of which can vary from twelve to fifty-five millimeters. The shape of stone plates can be almost any - square, rectangular, oval, round.
Depending on the source material, there are several types of flagstone stone. The most popular are granite flagstone, slate flagstone, and sandstone flagstone.
The widespread use of flagstone stone in landscape design is due to its many positive features, each of which will be considered separately.
Smooth and non-slip surface
Stone plates have an absolutely flat surface that does not slip when exposed to moisture or snow. This ensures safety and comfort of movement along garden paths.
The degree of moisture absorption of flagstone depends on the initial density of the stone and averages about 6%.
Ease of processing and installation
Processing flagstone is not difficult. Natural stone is easy to cut, grind, polish and engrave. Laying out paths from this material is also very simple. This is done using the standard method without border edging.
Shapes of stone
- Flagstone is a crushed stone with torn edges and a smooth surface. The natural configuration of the stone ensures the preservation of the natural texture.
- Galvanized flagstone - differs from the previous type in rounded edges.
- Paving stones are stone slabs, sawn into identical pieces, convenient and easy to install due to the clarity of their shapes.
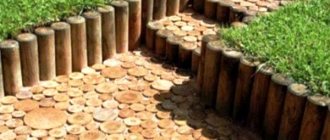
- Pebbles are pebbles of various sizes, used in bulk form to cover part or the entire area of the path, limited by the curb to maintain its shape.
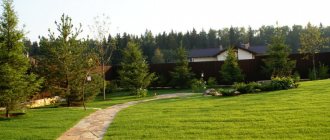
DIY garden path made of stone slabs master class
Garden paths made of stone slabs on a concrete base are very popular among owners of large garden plots. This path looks very prestigious, is easy to install and low maintenance. The only negative is that creating a track will take quite a lot of time and effort. But the result will fully justify itself!
For a stone slab walkway, the foundation is very important. It must be made very firmly so that the slabs hold firmly and last a very long time.
The instructions for creating this garden path are quite simple, but there are a few small nuances to consider:
- The stones of the path should be higher than the ground level so that water does not accumulate on it and flow down
- Not all stones are suitable for creating a taco path - for example, marble will make it very slippery
- The path should be fenced with a curb so that over time it does not begin to collapse.
With the help of a simple master class, even the most inexperienced builder can make such a path!
Photo source kamni.ws
Laying sandstone on sand
An excellent summer cottage option that does not require large expenditures.
Instead of excavated soil, the path blank is filled with sand to a height of 5 cm, moistened with water, and compacted.
The next layer is performed before masonry work; it consists of dry cement and sand in a ratio of 1 to 7.
The cake is compacted, then prepared slabs are laid on top of it.
Once the sandstone has been placed, the gaps are re-filled with the mixture and filled with water.
During the drying period, avoid mechanical impacts on the track.
After 2-3 days, after the mortar has settled in the masonry joints, fill them again.
Natural stone for paths - step-by-step paving instructions
When you get tired of picking up stones, you can proceed to the most interesting part of the process - namely, laying them. Don't forget to prepare all the tools needed for this process - a trowel, a bucket and a few dry rags.
Step 1: Site Preparation
If you carried out dry laying on a concrete screed, carefully remove the sandstone to the side, maintaining order. Prepare glue in advance for lubricating the stones themselves - properly mixed glue will not contain lumps and will remind you of liquid sour cream in thickness. The selected tiles should be coated with glue on the side that will be applied to the ground using a hard brush. While they are drying a little, sweep the concrete base thoroughly, you can even vacuum it - dust can significantly ruin the installation process.
Step 2: Gluing the Stones
So, you have prepared the material for installation. Apply the pre-prepared adhesive mixture, namely its economical version, to the site with a trowel. It should be applied carefully, even in excess, but in no case leaving empty spaces - water will definitely get into them, and at sub-zero temperatures this can lead to the tiles breaking off from the concrete base.
Place flagstone No. 1 on top of the mortar and press down firmly. For greater confidence, it doesn’t hurt to even press on it with your feet. You must squeeze out as much glue as possible from under the stone - in this case, it will lie firmly on its base, leaving no voids underneath. Carefully collect excess glue back into the container with the mixture.
Glue the second tile in the same way. Dashes and symbols will significantly speed up the process. When docking, first press on the side that is in contact with the already laid stone, and only then press on the other side. The second option is also possible - lay the sandstone at a short distance from the “neighbor” and, while pressing on it, simultaneously move it towards the already glued tile. In this case, excess glue will appear in the gap between them. You cannot leave them there - remove them with a trowel and wipe the stone with a rag, since washing off the glue will be a very difficult task.
After laying a few tiles, you will feel like a real master in such a matter as paving with natural stone with your own hands. Make sure that there are no differences between them; with the help of the adhesive mixture you can always raise the tile to the desired level. You will not encounter any more difficulties in laying natural stone.
Step 3: After installation
It will take several hours for the glue to set well. And the very next day you can take a stiff brush and clean the area, generously watering it with water. It is acceptable for the glue in the gaps to wash out a little, forming hollows. The surface of the paths must be sprayed with water for several more days until the glue completely hardens. Surely, you will like the look and color of wet flagstone - in order to achieve a permanent effect, you can cover your DIY natural stone garden paths with polyurethane varnish.
https://youtube.com/watch?v=JWb4yLwd7PU
Final works
Paths made from natural materials in an irregular garden are often laid without a border, using hidden edging.
After paving is completed, the seams and especially wide gaps are filled with fertile soil and sown with low-growing varieties of lawn grass (bulbous bluegrass, creeping grass, knotweed, etc.). If there is a lawn around the paved surface, it will fit harmoniously into the overall landscape without a sharp transition from grass to stone. In regular gardens of the classical type, paved surfaces are separated by borders, and after paving is completed, they are finished in another way:
- fine sand is poured onto the surface of the paved area;
- with a stiff brush or broom it is driven into the seams between the stones;
- water the path, compacting the sand;
- repeat the process until the gaps are filled.
When finishing a paved path on a concrete foundation, you can also fill the joints with a liquid solution of cement and sand. It is carefully rubbed with a spatula between the slabs, as when laying tiles. After drying, you will have to repeat the treatment of the slabs with a stiff brush to remove any remaining mortar. Finally, the surface of the paved area is washed with water from a hose.
Drawing and site marking
Before starting construction work on the site, you need to draw up a project. When creating a drawing, you should consider the location of the main buildings, lawn, garden and other design details. You can place paths along well-trodden paths. To simplify the work, you can hire specialists, but then construction will cost more.
When drawing up your own drawing, it is advisable to take into account certain points:
- you need to draw a site plan with all buildings;
- in order to save money, it is advisable to lay paths in the shortest possible way;
- You should not skimp on width. It should be sufficient for 2 people to pass simultaneously (1–1.2 m). But doing it more widely is also irrational. The size of the sites is chosen arbitrarily, based on the wishes and capabilities of the owners;
- To make it more decorative, you can experiment with the shape of the paths, but you should take into account the main directions of movement of household members around the site.
After drawing up the drawing, it’s time to start marking, for which you will need stakes, rope (or twine), tape measure and a hammer.
When laying the contours of paths, several nuances are important:
- It is not advisable to hammer in stakes at large intervals. If the rope tension is weak, the distance should be reduced;
- a compass made of 2 stakes and a rope will help in marking smooth turns (1 stake is driven into the center of the circle, and a straight arc is drawn with the second);
- on changes in the landscape it is easier to make a step. This technique will look more aesthetically pleasing and will help to lay the flagstone better;
- too smooth paths with right angles hide the space.
Paving methods
You need to foresee in advance whether it will be a simple walking path or a wide access road. Taking into account the purpose of the place of movement and the characteristics of the soil, it is chosen exactly how paving with flagstone will take place.
You can pave in one of the following ways:
- on a sand base - suitable for paving simple, narrow walking paths that do not experience heavy loads;
- on a sand and gravel base - used on unstable clay soils, paths on such a base will last longer, they are not afraid of heavy loads;
- on a concrete base - suitable for installing narrow paths and wide driveways; the base will withstand almost any load.
Paving the path on a sand and gravel base
How to pave paths on a sandy base? Before starting work, it should be taken into account that such structures are not able to withstand enormous loads. This method is suitable for laying narrow walking paths.
Sequencing:
- using pegs and rope you need to mark the paths according to the previously prepared drawing;
- dig a trench along the markings 5 cm deeper than the thickness of the tiles;
- pour sand into a 5 cm layer at the bottom of the trench;
- the sand must be lightly irrigated with water, it should be moist but not wet;
- lay the stone on top in random order, leaving a small gap between the tiles;
- Fill gaps with sand.
How to lay flagstone on paths on a sand and gravel bed? The technology will be slightly different:
- mark paths with pegs and twine;
- Dig a trench 10 cm deep, you can install curbs on the sides;
- fill the trench with gravel 5 cm high, and on top with a layer of sand 5 cm;
- pour sand with water and compact it;
- lay stone;
- fill the space between the tiles with fine gravel.
If the path runs along a lawn, then green lawn grass will also be appropriate in the gaps of the laid flagstone. To do this, fill the space between the tiles with lawn grass seeds and water well.
Laying flagstone on a concrete base
How to pave flagstone on a concrete base? It is enough to perform several sequential steps:
- mark the paving area;
- dig a trench at least 40 cm deep;
- install formwork that follows all the bends and turns of the future path;
- the soil must be compacted, then a layer of gravel 10 cm high must be poured;
- lay the reinforcing mesh;
- mix concrete in a special container and pour it into the prepared trench, leave it to harden for several days;
- Lay the flagstone on a layer of mounting adhesive.
When laying on concrete, you should arm yourself with a brush with metal bristles and a rag; with their help, you will need to remove the adhesive that protrudes between the tiles when laying. This must be done immediately, before the composition hardens.
Knowing how to lay flagstone on paths, you can turn your site into a truly paradise, where there is a place for relaxation, children's games and barbecue.
Necessary tools for working with stone
You can pave the path yourself. To do this you need the following tool:
- Bayonet and shovel shovels for working with soil.
- Rubber mallet.
- Level for determining the correct position of individual stones.
- An angle grinder with special attachments that are designed for working on stone.
- Brush for removing debris.
- Rope and pegs for marking the area.
- Vibrating shrink machine.
- Devices for preparing concrete.
You will also need crushed stone, sand and cement to prepare the base and lay the stone.
Path on a gravel base
This design is also not very complicated. Let's look at how to lay out a stone path.
- Initially, you should outline the territory. The following dimensions are recommended: pedestrian path - at least 80 square meters. cm, front entrance – 3 m.
- Dig a trench along the pre-marked pegs. Its depth is 20-30 cm. In the same way as described above, level the surface and compact the soil.
- It is necessary to install curb blocks along the walls of the dug trench. You can use formwork made of boards. They should be fastened together using self-tapping screws. The top of the structure is coated with a primer.
- Geotextiles are laid. This will protect the path from unwanted vegetation.
- A “cushion” is poured into the trench, which contains equal layers of sand and gravel. Its thickness is approximately 30 cm.
- The layer is watered. It's being compacted.
- Now you can lay the flagstone. It is recommended to leave a minimum gap between the stones.
- All seams are carefully filled with sand. You can add small crushed stone.
- If the path will be used frequently, it is recommended to apply a thin layer (2-3 cm) of thin concrete on top. This layer will protect it from premature aging.
Benefits of natural stone
The main advantage of the material is environmental friendliness and safety, which is very important in the modern environmental situation, where people are surrounded by dirty air and water, harmful radiation and products. Natural stone, unlike artificial analogues, does not emit chemicals during temperature changes
Natural stone, unlike artificial analogues, does not release chemicals during temperature changes.
The material is characterized by high strength and wear resistance, and is not subject to deformation under the influence of humidity and other climatic changes.
Another advantage of natural stone is its aesthetic appearance; the material is widely used in finishing work; recently, laying natural stone on paths has become widespread.
The range of shades and textures offered by nature itself can satisfy the most demanding client.
Flagstone is considered the most suitable material for paving paths, as it is durable, versatile, and easy to install and operate. The technology is not complicated; laying natural stone on paths does not require the use of complex equipment or materials.
Comparison with artificial materials
When comparing materials, pay attention to:
- Features of the applied production technology.
- Technical and operational characteristics.
- Price.
- Application area.
In all of the above parameters, except price, natural material is superior to artificial material. The high cost is justified by the fact that paving stones of natural origin last much longer. A one-time financial investment will pay off over a long period of operation, because natural stone does not react to environmental influences.
sand cushion
The cheapest option is a sand cushion. It has relatively low strength and reliability, but is suitable for paths that will not be subject to high loads. It is not recommended to use in case of high groundwater levels and moving soil. The preparation of the sand cushion is carried out by scattering the material in an even layer. It is recommended to add water from time to time, because... this will simplify the compaction process.
Laying natural stone
The technology of laying natural stone allows you to do the work yourself. In this case, installation features depend on the thickness and configuration of the stone. Among the features of the work being carried out, the following can be noted:
- Smooth paving stones are laid closely, maintaining a minimum gap. Gaps between individual stones can cause the foundation to erode.
- Work begins with laying out 1 row, the length of which should be no more than 1 m.
- The next step is to create a transverse row, gradually creating areas of 1 m².
- The correct placement of the paving stones should be checked periodically. For this, a building level is used.
- When individual stones settle, a solution is added. The protruding elements of the track being created are easily knocked down with a rubber hammer.
- After laying all the tiles, the seams formed are sealed with cement-sand mortar. To do this, the prepared mixture is scattered over the surface and distributed with a brush. After 3 days the operation is repeated. The voids should be filled in order to eliminate the possibility of precipitation penetrating under the material.
If uneven tiles are used, they are selected in such a way that the seams are minimal. Gaps that are too wide are sealed with sand and filled with water.
Natural materials for arranging paths
Natural stone is characterized by the following properties:
- Frost-resistant.
- Durable.
- Durable.
- May have different shapes.
The properties of a material largely depend on its origin. The most common are:
- Slate. It has a layered structure, so it can be quickly divided into separate slabs if necessary. Due to its porosity, the material is destroyed when exposed to moisture in cold weather.
- Shungite is considered one of the most durable stones, which allows it to be used when creating paths. There are paving slabs and paving stones on sale; the design and color may vary significantly. A small amount of quartz in the material results in the formation of white and gold patterns.
- Quartzite is frost-resistant, hard and durable. The material is difficult to process and requires special tools. Quartzite tiles and paving stones can be white, red, or green. Developers often prefer quartzite due to its good price-quality ratio. A cottage with paths made of this material is a practical solution.
- Granite is considered the most durable natural material that can be used as a decorative surface. The appearance of the created paths is attractive, but granite is rarely chosen for summer cottages due to its high cost. Natural stone for paths is sold in the form of tiles with smooth edges, which simplifies installation work.
Goldite and lemesite can be used to create paths. Marble is considered one of the most expensive natural materials, therefore it is most often used for interior decoration.
Methods of paving flagstone
The main options for paving slabs: dry mix and glue.
Based on the type of base provided, they are divided into laying on a bed of sand, gravel or reinforced concrete.
For a garden path, a sand base is quite sufficient, because there are no great load requirements for it.
The stone for laying should be within 5-8 cm thickness; the larger the slab, the better.
A layer of crushed stone is added if the site has clay soil, so the path will receive an additional margin of safety.
On a gravel base, you don’t need too thick pieces of flagstone, 4-6 mm is enough.
Masonry joints can be filled with a sand-gravel mixture or soil with lawn grass seeds.
In the latter case, the distance between adjacent pieces of sandstone needs to be increased.
The method, which assumes a base of reinforced concrete, is suitable if flagstone is laid with your own hands in places with a large load on the surface. Sidewalks and driveways, basement around the building.
The material acts as a cladding glued to a solid base.
DIY brick grill
To create a full-fledged recreation area in a private yard, a brick grill is one of the best options. This design has many design options, and also has a lot of other positive characteristics... “More”
Layout type
With a variety of formats available, from mosaic to large slabs, the aesthetic options are truly endless. The same room will look completely different if you choose mosaic or, for example, large-format tiles as cladding. The influence of tile joints is felt, as they break the surface into a certain number of components. The only exception is the use of retified tiles, which allow you to achieve the effect of a monolithic surface. The same thing can be seen if you use rectangular tiles in the cladding, but of different formats.
The narrow tile seems to be elongated in length. Designers often use this feature to adjust the geometry of the room, placing the layout pattern either along or across the surface being tiled. The larger the tile, the more consistent the coating appears. However, this does not mean that such a solution is ideal for absolutely all premises. The harmonious perception of space directly depends on the proportional relationship between the size of the room and the format of the facing tile used. This is especially true for its large elements used in layouts. Simply put, everything should be proportionate to each other. Otherwise, even the most exquisitely designed tiles may be out of place.
The color of the tile also affects the visual perception of the format. The dark one will seem larger than its true size, the light one - much smaller. This feature also needs to be taken into account, especially when choosing color combinations.
Substrate preparation and installation
To ensure that the paving stones do not move during use, the base must be properly prepared. There are 3 main technologies:
- Concrete.
- A combination of cement and sand.
- Sand.
Planning and marking
It is recommended to start work with planning and marking the site, which will allow you to determine the required amount of materials. Other recommendations:
- The path should be located at a sufficient distance from trees, because roots can damage the integrity of the foundation.
- The width of the path should be no more than 1.2 m. It is recommended to choose a multiple size of paving stones, which will reduce the amount of work.
- It is recommended to give simple forms of tracks, because... with complex ones, you have to spend a lot of time cutting the stone. Due to the high hardness, this is quite difficult to do.
- The slope must be created in such a way that precipitation is diverted away from the structures.
Marking on the site is carried out using pegs and thread. It allows you to maintain high precision when carrying out work.
Drainage layer design
Heavy rainfall can create a lot of problems because... water washes away the base. Therefore, experts recommend creating a high-quality drainage layer:
- The top layer of soil is removed taking into account the markings.
- The recommended depth of the trench to be created is 30-40 cm.
- A layer of sand is placed at the bottom of the trench and compacted well.
- The next step is to lay geotextiles, and the fabric should overlap by 10 cm. This layer is required to reduce the likelihood of weed growth, because it only allows water to pass in one direction.
- The drainage layer is represented by a layer of gravel, the thickness of which is 10-15 cm. A fine fraction material is selected, which should be compacted. The layer is covered with non-woven textile.
excavation
Installation of curb stones is carried out after creating a drainage layer. The height of the curb is adjusted by adding sand. Most often it rises 5-7 cm above the ground.
Construction of a concrete base
The main load will fall on the concrete base. It is created as follows:
- A layer of sand 3-4 cm thick is poured.
- The border is often used as formwork. If necessary, the spread of concrete mortar can be limited by securing edges made from boards around the perimeter.
- A layer of concrete 10-15 cm thick is poured into the created formwork. If a car drives on the surface, the base is reinforced. It takes about 72 hours for the composition to dry.
- After the concrete has gained hardness, a cement-sand mixture is poured onto the surface. The selected tile will be laid on it.
Concrete foundations are expensive. However, if the technology is followed, the track will last for a long period.
Cement sand base
A universal option is a cement-sand base:
- To begin with, a layer of sand 7-10 cm thick is created and compacted.
- Dry cement crumbles and is compacted again.
Laying methods depending on the type of base
Owners who plan to build paths in their summer cottage with their own hands need to choose the material for the future foundation correctly. It can be sand, concrete or crushed stone.
In addition, it is worth knowing about two types of masonry:
- Suture. The flagstone is selected so that 24 hours after paving, the gaps between the elements are no more than 1 cm.
- Seamless. Each stone fits closely to the other by cutting off excess parts with a grinder. The pattern of the path turns out more natural and beautiful than in the first version. However, the process is labor-intensive and will require a lot of time.
Having a plan of paths on the site, it is necessary to fix it on the ground. Straight paths are marked using rope and pegs. Winding ones can be marked using a watering hose, laying it along the edge of the intended path. Pegs are also driven in along the hose.
Excavation must be carried out to a depth slightly less than the required thickness of the road surface. This is done in order to compact the surface of the base of the track after excavation. The width takes into account the size of the curb, if any.
Natural stone paths can be laid in several ways.
Geotextiles are laid over the compacted soil to prevent gravel from penetrating into the ground. A gravel cushion (10–15 cm) is poured onto it, which is carefully compacted. The next layer is medium-sized sand (5–10 cm), which is also compacted or spilled with water to compact it.
1 - compacted soil; 2 - geotextiles; 3 - gravel 10-15 cm; 4 - sand cushion 5-10 cm; 5 - natural stone 4-6 cm; 6 - border made of stone or concrete
When laying the stones, you need to press them down a little and beat them with a rubber mallet. The path should be at least 4–5 cm higher than the planning level of the land plot. A slope must be made, preferably on both sides of the path to drain water.
To prevent the stones from spreading to the sides, a strong border is made. In addition, it is advisable to fill the seams between the stones with a cement-sand mixture. To do this, you can make a cone from a thick bag. A small hole is made in the corner and the solution is carefully poured out so as not to stain the stones.
Such a path can be made without cement-sand mortar. The seams between the stones are filled with sand using an ordinary mop. The sand is simply swept from the stone into the seam and carefully compacted.
The sequence of installing the base under the stone in this option fully corresponds to the first. A layer of cement-sand mortar with a composition of 1(C):3(P) is laid on a compacted sand base.
1 - compacted soil; 2 - geotextiles; 3 - gravel 10-15 cm; 4 - sand cushion 5-10 cm; 5 - masonry mesh; 6 - cement-sand mixture 2-4 cm
When laying road stone, it also needs to be pressed a little into the mortar and adjusted with a rubber mallet. Such a path will withstand winter heaving of the soil if the groundwater is close to the surface of the site. But in this case it is good to provide drainage.
354a218a270046dc67849d957bd89443.jpe 746536e207e1c01c902d6f582e1e19e5.jpe
dbafbfe0fb781b2967eeca98f7c87ff7.jpe
44edc26a99389baffd720d9cd584e48e.jpe
The stone can be laid on a sandy base according to the principle of the first option, but with a wider seam. Next, the seam is filled with fertile soil. Lawn grass is sown in it, which subsequently combines very beautifully with natural stone.
The base for the road surface remains almost the same as in the above options. It is advisable to lay another layer of geotextile on the compacted sand layer so that the gravel does not mix and does not go into the sand.
This is interesting: a dry stream in a garden made of natural stone photo
There are many uses of natural stone in landscape design. The second most popular after garden paths is such an interesting view as a dry stream. Dry streams are often used as garden paths, and sometimes simply as garden decoration.
A dry stream first appeared in Japanese gardens - those who did not have the opportunity to have a real stream on their property made an imitation of it from stones.
With the return of fashion for all Eastern cultures, the dry stream has also returned - now many people make such a designer novelty on their own. Often a stream not only serves as a decoration, but is also used as a path.
A dry stream will fit perfectly into any garden and will become the “highlight” of any site. If you have not yet decided how to decorate your summer cottage or garden plot, be sure to consider this option!
Characteristics of slate flooring.
This rock is characterized by a unique layered structure and original surface pattern. It is formed during the process of sedimentation of silt on the seabed. There are two types of shale in nature: crystalline and clayey. The first is characterized by dark shades, the second by lighter and warmer colors.
The special properties of slate are:
- rough surface that prevents slipping;
- low moisture absorption;
- resistance to frost and UV;
- excellent sound and heat insulation performance.
Important! Slate flooring goes well with other types of flooring: laminate, parquet.
Laying flagstone on façade walls
Reliable installation of flagstone on the walls is not possible without preparing the base; it is necessary to remove the remnants of the old coating, level, prime and reinforce with mesh.
Newly constructed buildings must stand for 6 months, only then can cladding be carried out.
The deadlines have been reduced to a quarter when the stress in the masonry is less than 0.5 MPa.
The actual laying of flagstone on the façade begins with sorting the stones.
For finishing passages, external and internal corners, pieces with a pronounced right angle are selected.
Plates with one or more straight edges are the main masonry material, but the largest slabs are used to finish the bottom row.
Try to trim sandstone only in exceptional cases, this way the facade will look more organic.
The bottom row starts from the corner, all subsequent rows are bandaged.
The adhesive composition is applied to the back of the plate with a notched trowel, the plate itself is pressed against the wall with force to remove air from the solution. Grouting of joints is carried out simultaneously with installation.
As you can see, laying flagstone on walls or paths is a painstaking process, but not complicated.
You can easily cope on your own, without the involvement of specialists.
DIY brick barbecue
DIY brick barbecue: photos and drawings with step-by-step instructions. Garden plots are an excellent place not only for decoration, but also for creating areas for relaxation and pleasant pastime... “More”
Installation technology
The installation of floors is carried out on a prepared base (screed). Our company, if necessary, can perform monolithic work on the base of the screed. Before laying the parts, the horizontal surface is treated with a primer and a cement-based adhesive composition from 10 to 30 mm is applied. After completing the installation of the products, all abutments and joints of the parts are filled with a special grout or two-component adhesive for stone. After the final laying of the slab, it is advisable to further process the natural stone. After this operation, the surface becomes a single whole without feeling the seams between the plates.
What tools and materials will be needed
When starting to work with flagstone, you need to prepare the necessary tools and related materials. Let's take a closer look at each of them.
Kiyanka
A mallet is a small carpenter's hammer, the striking element of which is made of durable rubber or wood. Using this tool, you can achieve the tightest possible fit of stone slabs to the base.
Master OK
A trowel or trowel is a tool necessary for uniform stirring and subsequent application of cement bonding mortar. Made in the form of a small spatula with a handle.
Level
Using a building level, stone slabs are laid with maximum accuracy relative to the ground surface without errors.
This essential tool can be made of metal, wood or plastic. Its important elements are barrel-shaped measuring flasks filled with liquid - they are called “level eyes”. A widespread model is a level with two “eyes” - horizontal at 180 degrees and vertical at 90 degrees.
Border
Garden paths made of flagstone stone are most often made without a border. However, it is also possible to have a low border made of small vertical stone slabs.
Bulgarian
To cut stone slabs, you need a grinder (grinder or angle grinder) with improved dust protection and adjustable speed.
Crushed stone
High-quality crushed stone combines well with flagstone, making the garden path more impressive and durable. There are three main types of crushed stone - slate, granite and gravel.
Roulette
To mark garden paths, a construction tape is used, which combines the properties of a compass, calculator and marker.
Pegs and cords for marking
The future garden path is marked using sharpened wooden pegs. They should be driven to a depth of at least 300 millimeters. Then stretch a marking or tapping cord, which is also known as coated thread, across the entire inner surface of the stakes.
Shovel
Using a shovel, a trench is dug in the place where it is planned to arrange the future garden path. The depth should average 30 centimeters.
Wire brush
A brush with hard bristles made of metal wire will be needed to remove traces of rust, salt deposits and other defects from the surface of the flagstone stone.
Vibrating plate for soil compaction
A vibrating plate or vibrating roller is an indispensable tool when laying paths made of any types of tiles. For ideal compaction of stone slabs, paving slabs, gravel, crushed stone and sand, devices of various capacities are used.
Concrete mixer
This device is used not only for stirring the cement mortar, but also for rolling in natural stone.
Sand
The masonry mortar contains sand, which can be river, sea or quarry
In addition to its origin, attention should be paid to volumetric weight, density and composition
Our works
The chaotic pattern used during installation speaks of serenity. Geometric patterns of varying complexity are fascinating, as if some kind of mystery is hidden there. In addition, durable material will not require repairs and will delight more than one generation with its beauty.
Laying flagstone on a concrete base
Maximum loads can be withstood by a coating made using the technology of laying flagstone on a concrete base with reinforcement.
The thickness of the sandstone is allowed less than when installing on a dry mixture. The weight is supported by the base, and the stone acts as a cladding.
Paving begins with the preparation of formwork. Then a layer of gravel is laid on the compacted bed, which is leveled and compacted.
A reinforcing mesh of metal is placed on top, the cake is filled with a concrete solution to a thickness of 20-30 cm. The base will be ready after drying a few days later.
The stone is directly laid out using an adhesive solution, which is applied to the base of the path and the back side of the flagstone.
Pieces of material are beaten with a mallet to prevent the formation of cavities from air accumulation.
The level helps to control the level, try to avoid changes in height, walking along such a path is not comfortable.
The next day, clean the resulting coating from excess adhesive solution, leave to dry without subjecting it to stress for several days.
For greater adhesion strength, you can cover with a covering material or lightly wet the path during the curing period.
To reduce glue consumption, it can be supplemented with sand and cement, because their prices are an order of magnitude lower.
One part of glue to two parts of the mixture, the resulting solution should not separate into fractions, the ideal consistency is like thick sour cream.
Do-it-yourself barbecue from a gas cylinder
Often there are old things on the farm that can be put to new uses, and sometimes they can be used to create structures that seem complex at first glance. A striking example of this is the creation of a barbecue from ... “Read more”
VARIETIES OF STONE
Externally, the stone looks like some kind of unprocessed tile of irregular geometric shape.
They usually have the same thickness but different sizes. This stone is one of the cheapest in its segment. It is easy to care for. In addition, anyone can lay out paths in the yard with them, since laying the sheet is very easy.
The stones come in different shades; the most common stones are gray, red, yellow, green, and black.
When moisture gets on the tiles, they may turn dark green. Less common are stones of red or yellow shades.
How to place a plastic sheet correctly?
You can use both polished tiles and wild stones. Another advantage of this material is that it is the most durable compared to its analogues. However, the technology for laying the “savage” is a little more complex than that of paving stones or concrete, but this does not prevent the paving stone from taking a leadership position.