Topiary is an art that became popular in the mid-20th century. Cute trees decorate holiday tables or simply use them as interior decoration.
The materials you can use are artificial flowers, plastic, napkins, as well as natural plants. Size, shape, style, color - all this is left to the imagination of the master who has to do the work. Below you can find a detailed master class.
Materials and tools for creating topiary
Before you start work, you need to collect all the material and tools. Beginners should definitely have on hand:
- You can use a simple foam ball as a base. This is a classic option where the barrel and other components will be attached.
- Sticks, clean brush.
- Paints - gouache.
- Glue.
- Varnish.
- The basis for the trunk can be petals from cones.
Before you start making topiary for the holidays, it is advisable to study all the nuances and details. Many craftsmen have professional tools - brushes, paints, various fasteners and pliers for parts.
An artificial grass topiary will be a great addition to any area.
Master class on making
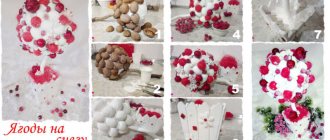
Barrel preparation. Clean the tree branch from twigs, twigs, moss, and plaque. Paint with light-colored acrylic paint in several layers.
Preparing the base. Dilute the gypsum in a container, pour it into the pot and install the stem. While the plaster has not hardened, place coffee beans in 2-3 rows. Wrap the pot in burlap, tucking the edges inward. Tie with a brown satin ribbon.
Note!
DIY satin ribbon bows - step-by-step instructions for creating unusual bows + detailed diagrams with photosDo-it-yourself furniture restoration: step-by-step master classes on restoration at home (120 photo ideas)
Do-it-yourself rack: step-by-step instructions with photos and descriptions on how to make an unusual rack
Glue the ball blank to the barrel. Let dry.
Decorating the sphere. Lay out the coffee beans in two rows, the bottom row with stripes down, the top row with stripes up in the holes formed. Select grains for decoration that are large, beautifully and evenly roasted.
The gluing work is painstaking and requires patience, as each half must be glued separately. A drop of glue is one grain. The coating should be without gaps. If the ball is visible, add another layer of coffee beans.
After drying, the sphere is coated with several layers of varnish with a glossy effect.
Base for topiary
Finding a large foam ball is not so easy, so the craftsmen found other options that will allow them to get the job done quickly and accurately. Here are several options for a topiary ball:
- Make a base from paper, water and glue. The technique is called papier mache. You can find instructions in the public domain.
- A small cardboard box can also replace it.
- A ball of thread stuffed with padding polyester.
- Polyurethane foam ball.
- Knitted threads pre-impregnated with glue.
There are a lot of ways to make a base; all that remains is to choose the most suitable option.
Topiary made from napkins
Making crafts from scrap materials is fun and easy. You can include children in the activity, since the creation uses safe devices that cannot harm the baby. Brief instructions for topiary made from napkins:
- First you need to take care of the foundation. How and from what it can be made was described above.
- Next, you need to find wooden skewers or sticks on which the finished flowers will be glued.
- Napkins - it is advisable to choose plain, bright and different colors.
- Glue, brush, tape may also come in handy.
The manufacturing method is simple; you need to make a large number of flowers from napkins. One option: fold each sheet into a triangle and roll it up. You will get roses, the ends of the paper are glued and dried. Next, each part is attached to a skewer, which is stuck into the base.
Topiary with artificial flowers
Heavenly Harmony
The “Heavenly Harmony” topiary is made on a synthetic padding ball, planted on plaster in a plastic flower pot, the trunk is a curved wooden branch.
The tree of happiness is decorated with homemade flowers made from viscose napkins, sisal balls, berries and fabric roses. At the base there are sisal balls, a pot with lace, satin ribbons and flowers. The composition is completed by a double satin bow tied under the crown on the trunk.
Go to master class
Awakening of Spring
The flower tree of happiness “Awakening of Spring” is a colorful and wildly blooming meadow, personifying sunny May days and warmth.
We used homemade flowers from napkins and felt, ready-made foamiran and fabric roses, sisal balls, stamens, leaves and small inflorescences. There is a decorative butterfly perched on the crown, and a cute foam bird at the base of the topiary. The tree is mounted on plaster in a tall flower pot with a perforated border. The master class is presented in photo and video format with subtitles, tips and recommendations from the author.
Go to master class
Charm
Purple-white topiary from flowers is made quite quickly, but labor-intensively - buds from cardboard egg trays are formed in several stages: cutting out blanks, painting and assembling, gluing felt or organza leaves.
We offer step-by-step master classes in video (FullHD 1080p) and text format with photos.
Go to master class
The scent of spring
Wedding tree of happiness in white tones with green splashes in the form of artificial leaves, which are in harmony with light green sisal and a large green apple at the base, refreshing and enriching the composition.
Topiary on a ball made of newspapers, a crown made of apricot kernels, the main decor is prefabricated flowers from cardboard trays for eggs. An elegant thin trunk of a curved shape is a branch of Corilus. The decorative tree is planted on plaster in a low ceramic cup. The main elements are painted rich white - in Provence style. The master class is available in photo and video format with detailed step-by-step instructions.
Go to master class
Orange mix
Orange topiary from orange peels is made quickly, but requires preparatory work: drying the orange peel and citrus slices takes 3-7 days.
In addition to orange flowers, foam tangerines, berries, satin ribbons and bow-shaped pasta were used for decoration. We offer a detailed master class in video, photo and text format with step-by-step instructions for making topiary yourself.
Go to master class
Topiary made of satin ribbons
Atlas is regularly used for crafts; it is an excellent material that is accessible to everyone. The process of making topiary, in this case, will be similar to the quilling technique. What should be done:
- The barrel is made from a clean and neat stick.
- Small details are created using the quilling technique. Each ribbon is carefully twisted into a flower; it is better to use double-sided tape to secure it.
- The parts are attached with glue to a stick, which is inserted into the base.
At the end, add other decorations if desired.
Topiary in the shape of a heart
Sapphire Heart
Coffee topiary “Sapphire Heart” with a foam base 15 cm wide, a curved Salex trunk, planted in a lilac plastic pot on plaster.
The heart is thickly covered with coffee beans painted in 2 layers: bronze and white. The crown is decorated with foamiran roses, two types of artificial flowers, green leaves, alder and larch cones, as well as small cones. The barrel is painted white. Go to master class
On the wings of Love
This heart-shaped topiary combines a textured coffee surface with elegant floral decoration.
Roses made of ceramic plasticine in various shades of pink are in harmony with the butterfly and a scattering of pearls with stamens. The tree of happiness is planted in a white ceramic cup, the trunk is made from a curved branch of corilus (salex). The composition is completed by delicate wings made of natural feathers. Go to master class
Corrugated paper topiary
Bouquets of flowers are often wrapped in similar paper. Therefore, after the holiday, it is recommended not to throw it away, but to use it for creative purposes. Instructions:
- Take a foam ball - this is the upper base.
- You need to prepare the pot in advance.
- Next, neat roses are made from paper and placed on the base using hot glue.
A wooden skewer or stick is used as support. Its characteristics will depend on the weight of the upper structure.
Installing the base
For the base, use a flower pot made of clay, plastic, a cup, a wide vase, previously cleaned and decorated. Acrylic paints, braid, lace, buttons, and pasta are used as decoration.
The container is filled with a solution of gypsum or alabaster and the trunk is immediately installed. While the solution has not yet thickened, the surface is sprinkled with decorative shavings, pebbles and floral mesh are laid out as desired. Sand, stones, polyurethane foam, and plasticine are rarely used as filler.
Tip: The consistency of the gypsum solution should resemble thick sour cream.
Candy topiary
This is a great way to surprise a work colleague or relative. Such a bouquet will definitely be remembered for a long time and will appear on all social networks of the birthday boy. Make the craft according to the following instructions:
- It is necessary to take any of the bases proposed above.
- Be especially careful when choosing a treat; regular long caramels are not suitable. It is necessary to take chocolate ones, decorated in a bright wrapper, preferably triangular in shape.
- Next, each candy is coated with hot glue on the bottom and placed on the base.
A beautiful pot is also used as a structure holder. Candy is heavy, so you need to fill the pot with something heavy, such as stones or sand, in advance.
What materials to use for crafts
For crafts, various improvised and “foot” materials are used: dried flowers, berries and fruits, various types of moss, branches, vines, nuts and cones, acorns, small stumps and much more.
Where to get it
Collecting the necessary materials for creativity is simple: you just need to look around and be a little patient.
Simple options:
- Perhaps there is a huge and unnoticed chestnut tree growing on your way to work.
- You gave a bouquet of flowers, but it has already withered? In this case, you can disassemble it and dry the flowers.
- You can also dry spoiled berries and fruits in the oven at low temperature.
- Or you can organize a walk in the forest or park with friends and children, and in addition to having a pleasant time, stock up on branches and pine cones.
- And, as a last resort, now in florist shops you can find not only ready-made compositions, but also the necessary materials, such as decorative moss.
And what to make of them
The options for using the collected material are limited only by imagination, and in some cases by functionality, for example, it is hardly possible to make a flower vase from maple leaves and white glue. However, if you place a plastic container inside, the problem of water leakage will be solved.
Ideas:
- Frames for photographs, paintings, panels or mirrors. Acorns, chestnuts, pine cones, twigs, pebbles, dried flowers, dried fruits, and birch bark are great for decorating frames.
- Flower vases can be decorated with branches, sawn pieces of wood, small stones, and coffee beans.
- Festive wreaths . Wreaths for doors for the holidays can be made from almost any material, from fir branches to eggshells. Easter wreaths made from rough branches combined with delicate lace look great.
- Bouquets . Various kinds of compositions are made from spruce branches, willow, dried flowers, cones and dried berries, physalis, rose hips, dried hydrangea, ears of wheat and much more. In this case, the choice is influenced by seasonality.
- Topiary . To make decorative trees in pots, moss, dried flowers and herbs, twigs and cones are often used.
- Kitchenware . Some types of dishes, for example, fruit baskets, can be made from vines and branches. Ordinary canning jars also look beautiful, with small cones or acorn caps glued to the lids and painted with acrylic metallic paints, used as containers for bulk products.
Making crafts from natural materials on your own allows the imagination and creative potential of both adults and children to expand widely.
Wedding topiary
The craft is in demand among future newlyweds. This is an ideal option for decorating holiday tables. Candies and napkins are not suitable in this case.
Experts recommend using high-quality artificial flowers to make your work look neat and expensive. For production you will need:
- Several reasons - it depends on the client’s request; they definitely use foam balls, they are more stable.
- Artificial flowers - purchased from a good supplier.
- Identical pots.
The manufacturing process is similar to the previous ones. To ensure that the flowers stick and can withstand the holiday, a hot glue gun is used.
It is advisable to do the work a day before the event.
Topiary “Money Tree”
A pleasant activity for those who want to add a little symbolism to the interior of their home or give an unusual gift. You can use both real and counterfeit money, which can be purchased at any joke store. Master class on making a money tree:
- Take a base - you can quickly make it from polyurethane foam.
- Next, each bill is twisted into a flower or tube.
- Double-sided tape is used for fastening, especially if the money is real. If glued, a person will not be able to use them in the future.
The design is placed on a small pot, which is stylishly decorated with additional elements or simply a wish.
Other models
If you have a collection of shells, hearts or other items, why not use them for topiary? The tree can be the most fantastic, the main thing is to be smart and take an unconventional approach to the design. Other options:
- on a marine theme: made of pebbles and shells;
- on a military theme: from khaki-colored scraps;
- summer version: with miniature fruits made of plastic or felt;
- for Valentine's Day: from hearts;
- money tree: made of coins and artificial gems, etc.
Do not deny yourself the pleasure of creating the happy tree of your dreams!
Topiary made of pine cones
After a walk in the forest, many people bring home a large number of real Christmas tree decorations. Children's competitions are often limited to ordinary crafts that everyone gets bored with. There is a solution, you can learn how to make topiary from cones. Instructions:
- For work, it is better to collect small cones of the same size.
- For the base, take a dense foam ball.
- Next, each cone is glued using PVA glue.
The teacher and judges will definitely like this hedgehog.
A Few Basic Principles
With all the variety of forms and ideas, there are some points that remain unchanged for each product.
- The trunk of the tree itself is made of durable material; in some crafts you can use polystyrene foam, but it will have to be modified in terms of rigidity.
- The central part is covered with acrylic paint, the shade of which matches the overall decor.
- Glue and paint should not emit odors after drying.
- The stand is filled with any material that can reliably hold the base and provide sufficient stability to the product.
Autumn topiary
Everyone at least once in childhood collected a bouquet of autumn leaves. Variegated colors filled the houses and pages of books. Now there is another way to brighten up an autumn evening and fill your apartment with a pleasant smell. Master Class:
- The leaves and autumn flowers are quite light, so you can take any option suggested above as a basis.
- It is better to collect different leaves so that the bouquet looks bright and unusual.
- Each branch is carefully stuck into a round base.
There is a drawback, such a craft will not last long. However, this option can be used as a holiday table decoration. How to make a frame for a topiary - use plaster or sand.
Crafts for children
Often the phrase “I need a craft for the garden” causes a nervous tic in parents. However, if you approach the task with passion, it will become a great opportunity to have fun. So, collecting materials will become a real quest for a child on a walk, and making them will become a creative game.
What you will need
For children's crafts, pine cones, acorns, pine twigs, pumpkin seeds, cereals, twigs and sticks, dried flowers and leaves, and ferns are most often used.
Auxiliary Tools
Plasticine, white glue, needles and paper clips, colored paper, felt, and matches are used as auxiliary materials.
What will happen
Ideas for crafts, as a rule, are set by the teacher, but they are always very extensive, and parents have to rack their brains a little about what to glue together from leaves on the “Golden Autumn” theme. Below are some ideas for children's crafts.
Ideas:
- hedgehog, Christmas tree, bear or rooster made of cones;
- a house made of cardboard covered with pebbles, with a roof made of dry leaves;
- pumpkin house;
- a pot with an artificial flower made of “foot” material;
- deer, little men, caterpillars and various animals made from acorns and matches;
- various kinds of applications;
- tree made of cones;
- a spider on a web of twigs and acorns;
- a basket of plasticine and twigs with fruit made of painted pebbles;
- owl made of pine cones and cotton wool;
- caterpillar made of plasticine and chestnuts;
- dinosaur made of pine cones and plasticine;
- a panel of a tree using painted pumpkin seeds as foliage;
- stained glass windows made of dry leaves, PVA and twigs;
- an aquarium made from a painted cardboard box with fish made from leaves on strings;
- various little animals with frames made of newspapers, covered with moss.
When choosing, you should not limit yourself only to natural materials for the development of children's imagination. So, if you ask your child to think about what to make sand from in a cardboard aquarium, you can together find a non-standard solution, for example, glue semolina, salt or oatmeal.
Felt topiary
A large number of toys and useful household items are made from this material. Therefore, if there is some free felt left in the house, you can make a cute gift in a pot. Peculiarities:
- Flowers play a key role. Making them is not so easy, since the felt is not so voluminous. The equipment can be found in the public domain.
- Each flower should be attached to a round base using hot glue. The tape will not support the weight of the material.
To make the decor item look neat and unusual, you should add a little greenery. Leaves are also cut using scissors.
Symbolic meaning of the tree
The tree symbolizes development, dynamic growth, seasonal withering and restoration, wealth and well-being. The branches mean versatility, variety of choice, and the common trunk is a symbol of unity. In mythology, a tree is a magical, powerful image, the abode of gods and spirits. In Feng Shui practice, the tree of happiness in the home is a symbol of prosperity, abundance and wealth. In addition, a topiary created independently is an original gift, a sign of respect and love, a real surprise for connoisseurs of handmade crafts.
An excursion into history The etymology of the word “Topiary” comes from the ancient art of topiary cutting of garden trees and shrubs - “Topiar” (Topiary material from Wikipedia). From Latin, topiaria is a gardening art that has been actively developing in Europe since the times of the Roman Empire. Shrub sculpture was carried out by specially trained slaves - topiaries.
Shell topiary
A similar technique was used in ancient Rome, only instead of improvised objects and materials, it was used to maintain areas of palaces.
Gardeners did this, cutting various shapes from bushes. Therefore, topiary is not just a round decoration, but a whole art where there are no boundaries. Manufacturing Features:
- You won't be able to find shells that are the same size. Therefore, for the base you need to make a foam plastic figure of any shape.
- To make the process easier, small shells are taken from which patterns can be made.
- Many craftsmen use squares and triangles onto which elements are glued.
It is not recommended to work with children, as shell fragments can injure their hands.
Coffee topiary
This option will definitely appeal to coffee lovers. The peculiarity is a pleasant smell throughout the room. It is unlikely that it will be possible to make coffee from such beans in the future, but the master will definitely receive positive emotions from the process. How to make topiary from coffee beans with your own hands:
- It is better to make an original table decoration on a foam base. In this case, the coffee ball will look beautiful from an aesthetic point of view.
- Each grain is glued using PVA glue.
- Next, the ball is placed on a skewer and into the pot.
The weight of the product is large, so the pot must first be filled with a putty solution.
Secrets of making a crown
The crown is the most important part of the topiary. And the most labor-intensive - regardless of its form. How and from what to prepare it?
- The foam ball and rubber ball have already been discussed. This is a finished form of the crown, and therefore there is nothing to talk about here.
- Crown made of polyurethane foam. We take a mold of any configuration and fill it with polyurethane foam. When the foam has dried, carefully remove it from the mold, remove streaks and roughness - in a word, give the crown the desired look.
- Crown made of threads. We take a regular balloon and inflate it. Soak strong threads in PVA glue. We wrap them tightly around the entire surface of the ball. Having wrapped it, apply another layer of glue on top of the thread. Next, wait for the glue to dry. After waiting, we pierce the ball with a needle and remove its remains through the crack between the dried threads. It turns out to be a durable ball of thread.
- Foam crown. Everything is simple here. We take a piece of polystyrene foam and give it any shape.
- Papier-mâché crown. It is difficult to make a ball from this material, but any other shape is welcome. To do this, apply glue to the paper and paste it layer by layer. Whatever shape the crown turns out to be is what it will turn out to be.
General principles for making topiary
All topiaries, no matter how they look, are made according to the same pattern. Let's take a closer look at the process of making crafts.
- We start from the crown. This is the main and most difficult part of the craft, so it is logical to start with it.
- We are preparing the decor - that is, what will decorate the crown.
- We attach the decor to the crown.
- Let's make a trunk. What shape and material it will be from is up to the artist.
- We connect the crown with the trunk.
- The last stage is securing the product. Containers in which topiary can be fixed have already been discussed. How exactly to secure it? The simplest and at the same time common and effective way is using plaster. This is not a difficult procedure at all. Simply insert the topiary trunk into the container, fill the container with dry plaster, add water and wait for the plaster to dry. That's it, the trunk, and with it the entire topiary, is securely fastened.
- All that remains is to decorate the container so that the plaster is not visible. This is done in different ways: we cover the plaster with lace, tinsel, serpentine or artificial grass, cover it with small shavings or beads, etc.
Well, now let's talk about more specific things - how to properly make this or that type of topiary.
Making topiary from tangerines
Tangerines, as a traditional symbol of the New Year, most often serve as the basis for making topiary. For this craft you need to stock up on:
- small tangerines;
- a ball (see above for more details);
- spruce branches;
- real leaves of an oblong shape or some other shape (for example, leaves of ruscus, mistletoe, etc.);
- the basis for the trunk (the material and shape are chosen by the artist);
- twine;
- a container into which the finished craft will be inserted;
- salt or sugar;
- thin flexible wire;
- glue;
- scissors;
- stationery knife.
Next, we begin the creative process.
- We tie each tangerine crosswise with twine.
- We attach a wire to the twine (to each tangerine separately). Look at the photo to see how this is done.
- We proceed to the most responsible and painstaking procedure - attaching the tangerines to the base. To do this, we tie the fruits one to one using a wire. Let's start from the bottom, it's easier this way.
- When the entire base is covered with tangerines, decorate it with leaves. Let’s clarify: the craft looks better with live leaves. But such leaves quickly wither. Therefore, to make the product last longer, live leaves can be replaced with artificial ones.
- We attach the crown to the trunk.
- We place the trunk in a flower pot or other container and fix it with plaster.
- After waiting for the plaster to harden, we cover it with spruce branches. To do this, lightly moisten them in glue, then sprinkle with sugar or salt. It will look like a spruce branch is covered with frost. We hide the plaster with them.
That's all the work. The tangerine topiary is completely ready.
Topiary made of pine cones
And here is another version of topiary with traditional New Year’s motifs. It is made from ordinary pine cones. The method of making it is not much different from the method of making the same product from tangerines.
There is some difference, of course. Cones, unlike citrus fruits, are not tied with twine. Free spaces between the cones are masked with pine needles - natural or artificial. The containers in which the finished craft is placed are usually painted with white paint that imitates snow. However, no one forbids decorating the finished product based on one’s own idea of beauty.
A slightly modified version of topiary made from cones looks great. In this case, the cones are diluted with tangerines and nuts, and the space between the fruits is masked with colored yarn.
Making topiary from Christmas balls
This refers to the balls that are usually used to decorate the New Year tree. To make such a craft, you will need:
- a lot of New Year's toys-balls;
- crown base – foam ball;
- flower pot or other container;
- trunk;
- toothpicks;
- tinsel and other decor (at the artist’s discretion);
- glue gun;
- beautiful fabric (satin is best).
Let's start making topiary.
- Let's start making the crown. To do this, glue one toothpick to each toy (ball).
- We insert toothpicks into the base of the crown along with the balls glued to them.
- In this way we cover the entire crown with balls. Here it should be borne in mind that no matter how you press the balls against each other, but all the same, since they are round, the base of the crown will be visible. Therefore, it is better to decorate those places where the base is visible with spruce or pine branches, pieces of cotton wool, etc.
- When the crown is completely ready, we connect it to the trunk.
- Next, prepare a flower pot or other container in which the crown will be located along with the trunk. To do this, decorate the container with fabric. How exactly - again depends on the artist, since there are many ways to decorate.
- We insert the trunk into the container, fill the container with plaster, add water, wait for the plaster to harden, hide the plaster, decorating its surface in any way you like.
If desired, such a craft can successfully replace the classic New Year tree.
Making “delicious” topiary
What does "delicious" mean? It means made from sweets and lollipops. For obvious reasons, children will take part in the making of such topiary with special pleasure. To make it, you need to prepare in advance:
- a lot of sweets and lollipops;
- foam ball;
- double-sided adhesive tape;
- container for topiary;
- fabric for decoration.
The “candy” topiary itself is very simple to make.
- Cover the base with tape.
- Glue the candies and wrappers onto the tape.
- We connect the trunk to the base.
- We fix the finished product. In this case, it is better to do without gypsum, replacing it with foam plastic, which would fit in the container in volume and shape. This shape is easy to make using a regular knife.
- We decorate the container with sweets or lollipops, filling it to the top so that the foam is not visible, and on the outside with cloth.
This topiary will decorate the New Year's table (especially for children), it will fit perfectly into the interior, and it is good to give as a New Year's present. That's how many advantages and benefits this simple product has!
Topiary made from coffee beans
A very original and cute product. Moreover, if desired, it can be made either traditionally round or in the form of a coffee tree. Let's first talk about topiary with a round base. It should be done like this.
- We take a round base from any material.
- Cover it with coffee beans. They fill the entire space well, adjacent to each other closely, so that the base itself will not be visible.
- We connect the base covered with coffee beans to the trunk.
- Insert the barrel into the container.
- Fill the container with plaster and add water.
- When the plaster hardens, we decorate it, as well as the trunk, at our own discretion.
Now let's talk about the coffee tree.
- We take a different basis for this craft – not a ball, but a cone. The material in this case also does not matter much.
- We cover the cone with coffee beans and connect it to the trunk.
- We place the cone into the base and fix it with plaster and water.
- We decorate the resulting product.
Shell topiary
This product, or more precisely, its production, is in many ways reminiscent of the previous version - topiary made from coffee beans. Judge for yourself.
- We prepare sea or river shells of different shapes, colors and sizes.
- If possible, add coral particles, small pebbles, beads or artificial pearls to them.
- We take a round base (if desired, instead of a round one, you can take a base of any other shape).
- Glue shells, pebbles, coral particles, pebbles and beads on the base in random order.
- Here it is necessary to take into account that all this beauty will not be attached to each other closely, which means that fragments of the base will be visible. To prevent such holes from spoiling the overall picture, we cover them. For example, using regular linen twine. It looks very good in combination with shells, stones and beads.
- Further - everything is on the knurled track. We connect the crown with the trunk, lower the end of the trunk into a container, add plaster and water there, wait for the mixture to harden, and decorate it to your own taste.
Of course, someone might say that such a topiary is not quite New Year’s, but more summer. Well, it's a matter of taste and preference. In the end, everyone knows that after the New Year spring will definitely come, and then summer. And it is the shell topiary that will remind those gathered at the New Year’s table of this immutable, but such a joyful and expected fact.
Making topiary from tinsel
And this version of topiary is definitely New Year’s. Moreover, it is even easier to do than the analogues mentioned above. In fact, such a craft does not require any special refinements or preparations.
- We prepare the base for the crown - a ball, cone or some other shape.
- We stock up on enough tinsel. In addition to this, we are preparing material for decorating the finished product. By the way: in this case, glass beads, or rather, a necklace made of such beads, are best suited as decoration. But, of course, they are not the only ones. It all depends on the taste and understanding of beauty by the artist himself.
- We wrap the crown with tinsel. To keep it in place, we fix it with glue.
- We connect the crown with the trunk, and the trunk with the container. Gypsum and water will help us.
- We decorate the container with the same tinsel and fabric.
Twine topiary
This is, so to speak, a New Year's product in a loft interior style. That is, the thing is quite abstract. It resembles a stylized New Year tree. Making this craft is as easy as shelling pears.
- We prepare a cone from any durable material.
- We wrap this cone with twine in tight rows. The color of the twine is at the discretion of the artist. If you want the product to look more like a Christmas tree, then you need to take green twine.
- When the cone is covered with several layers of twine, tie the ends or fix them with glue so that the twine does not unwind.
- Then everything follows in the usual order. We connect the base with the trunk, place the trunk in a container and fix it there with plaster and water.
- We decorate the product using any available and acceptable methods.
The result is a somewhat ascetic and harsh, but at the same time, an original stylized New Year tree. This craft is especially suitable for creative people who are tired of traditional ways of celebrating the New Year. If any of the readers consider themselves to be of this nature, well, go for it. Moreover, making such a craft is truly a child’s task.
And here is a twine topiary with a ball-shaped crown. Not a Christmas tree, but who can say it’s ugly?
Topiary with several trunks
There are such crafts - and why not? There are several ways to make them.
- Make several (two, three, etc.) crowns, attach a trunk to each of them, and then connect all three crafts with crowns. The result will be one product with several trunks.
- Make one large crown and attach several trunks to it.
- Here it should be taken into account that the container for such a topiary should be slightly larger than usual, otherwise the crown or several connected crowns will outweigh and the craft will not be able to stand.
Topiary wreath
This craft differs from other types of topiary in its crown. It is not in the form of a ball, cone or some kind of abstract figure, but in the form of a wreath. All other creative procedures are essentially the same. We attach a small wreath to the trunk, place the trunk in a container, fix it, and decorate it.
For the New Year, such a craft may not be very useful, but for Christmas it will be very appropriate - both as a decoration and as a gift.
Finally, watch two videos that show you some ways to make Christmas topiary.
DIY New Year's topiary ideas
We present to you photos of New Year's topiaries made of various materials in the form of Christmas trees, balls and others.
New Year's topiary
This work is done with children, there are no dangerous elements. Instructions:
- You need to find fir cones.
- You can complement the composition with balloons or candies.
- A ball of polyurethane foam is used as a base. Usually, this material remains after repairs and is not difficult to find.
Next, each branch is carefully stuck into the base. After which, it is placed on a strong stick and placed in a pot filled with a heavy solution. Fasteners are definitely needed, as it will harden for about a day. Next, the work is decorated with Christmas tree decorations.
Choosing a barrel
The trunk in topiary always looks thin and long compared to the stand and head.
More often, the barrel in crafts is made smooth, but double or intertwined, multi-barrel holders look original. Curved trunks look intriguing, forcing the observer to guess the direction of the axis or guess how the ball is held.
For the trunk, take tree branches, pre-painted in the colors of the main elements of the ball. Also suitable are pencils, popsicle sticks, and wire wrapped in ribbons. The trunk is decorated with bows, insect figures, beautifully colored fabric, and twine.