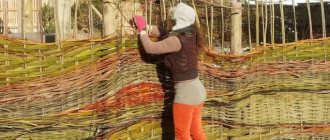
Recently, wicker fences made of vines have begun to appear more and more often on property. And this is not surprising, because it is cheap, easy to manufacture and an unusual type of fence that anyone can make. Of course, a wicker fence is not suitable for protecting an area, but it is quite suitable for dividing a site, as well as for decorating flower beds and playgrounds.
This article will discuss how to make a vine fence with your own hands.
Advantages and disadvantages of a wicker fence
Before starting to build a vine fence, a person should weigh all the pros and cons of such a design.
pros
- Nice appearance. Such a fence can decorate any area, bringing comfort and a special atmosphere filled with rustic motifs.
- Environmental friendliness. Wicker fences made from grapevine, reed, willow, and hazel are environmentally friendly, because natural materials are used in their construction.
- Cheapness. There are no costs required for the manufacture of such a fence, because almost all the necessary components can be prepared yourself.
- Simplicity of design. Looking at photos of wicker fences on the Internet, it may seem that they are difficult to implement. But this is not true at all. Such a structure can be made by one person, without anyone’s help, since there is no need to pour a foundation or concrete supports.
Minuses
- Poor site protection. A wicker fence is more suitable for decorative purposes inside the site, and not for protecting the area from visits from uninvited guests.
- Flammability. Dry materials from which the fence is made can easily catch fire if it comes into contact with fire. This must be taken into account when choosing the location where the building will be located.
- Short service life. A wicker fence will only last about 7 years. But a fence made of polymer vines is more durable.
- Problems with reconstruction. If any part of the fence breaks, it will be necessary to dismantle the section of the fence where the damage occurred.
Features of wattle fence for a summer residence, pros and cons
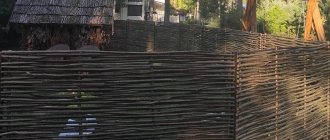
The classic fence is a lightweight fence made of branches. The structure of such a fence is chaotic, a little sloppy, the material used is almost unprocessed. Nowadays, wicker fences are made up to 1.5 m high. You can also find a real wattle fence of a larger size, but this design does not justify itself: the material is too fragile, and the gaps between the branches do not hide the area well from strangers.
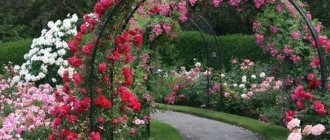
The wicker fence on the site looks beautiful and original
Therefore, now fences are more often used to delimit the space of a site into zones, fencing flower beds and beds. If you add some ethnic accessories to such a fence, your garden will take on a colorful look.
The advantages of wicker fences include:
- cheapness and availability of materials;
- environmental friendliness and naturalness;
- originality and unusualness of the solution;
- Possibility of assembly and disassembly if necessary.
But there are also disadvantages.
- The structure may not last long, especially if it is made of thin rods. Even dense wicker will last on average 5–7 years. After this, the decay becomes noticeable. Natural wood is very susceptible to dampness. To extend the life of the fence, avoid the accumulation of water under it. Try to regularly mow the grass under and around the structure - in such thickets, high humidity lasts a long time. In addition, it would be useful to treat the surface annually with antiseptics or protective varnishes.
- A wicker fence can perform a security function only if it is made of durable materials, including thick, dense rods. It is difficult to make such a design with your own hands.
Which raw materials to choose?
You don’t have to buy raw materials for braiding; you can find it yourself. A wicker fence is made from reeds, hazel, or vines, but most often flexible branches of a willow vine are used, because they are the easiest to weave.
Decoration and additions
You can not only make a vine fence with your own hands, but also decorate it. Often this also does not require funds. For example, clay jugs and jars are classics for framing wickerwork.
Climbing annual and perennial flowers and decorative grapes feel great near the fence. But the clinging greenery is not to everyone’s taste, because it disguises the fence itself.
Without covering the wickerwork, you can spot-plant sunflowers and hollyhocks next to it. In the open space they will grow lush, tall and decorate the fence. In addition to flowers, creeping varieties of blackberries, peas and beans will feel good next to the fence.
Developing a country theme on your site, you can place an old cart wheel or a stone millstone next to the fence. And if you add a few more unpolished stones and greenery, then a whole rockery will form near the fence.
But crafts made from plastic bottles and other improvised materials, beloved by many summer residents, do not combine with natural wicker.
Procurement of raw materials
Before you make a vine fence, you need to prepare everything you need. Willow shoots, which have excellent flexibility, are used to create a fence. The best time for harvesting is late autumn or early spring, but you can also go in the summer if the fence needs to be made urgently.
You need even and smooth vines, 1-3 cm in diameter. Using a sharp knife, cut them diagonally. After this, bundles of twigs are tied and sent for drying.
To create a wicker fence, you also need branches with a diameter of more than 4 cm and a height 50 cm greater than the height of the wicker. This will be a support. You can also use pine branches.
It is advisable to sharpen the lower ends of these blanks so that there are no problems with driving them into the ground.
Fence made of vertical weaving birch branches
A fence made of birch branches
A fence made of real birch branches is, first of all, an unusual decoration for a site. It is also worth noting that such a palisade very well protects the dacha area from outside penetration. Not every person will dare to overcome a high and rather dangerous-looking fence made of vertical birch branches. It’s not difficult to make an original fence with your own hands, the main thing is to find the right amount of material for construction.
Wattle fence - a fence for a flower bed
Materials and tools
- Fence supports. Most often, wooden beams or logs with a diameter of at least 10 cm are used.
- Cross bars. The length of the slats depends on the size of the fence. Each span requires 3 blanks. It is recommended to use wide slats measuring 25 by 46 mm.
- Birch branches. For vertical weaving, it is recommended to use material that is fairly thick in diameter - at least 3-5 cm. The length of the branches depends on the height of the fence. Optimal - 170 cm.
- Hammer.
- Self-tapping screws.
- Screwdriver.
- Rope and stakes for marking the fence.
Step-by-step instruction
Step 1. Preparation of branches for the fence. When constructing a fence, it is advisable to use fresh birch poles that have good flexibility. This will simplify the weaving process. Immediately during harvesting, it is necessary to completely clear the poles from the side branches. The length of all birch blanks must be the same.
Step 2. Installation of support pillars. Wooden beams or logs need to be treated with an antiseptic and dug into the ground 40-50 cm. If the fence is high, the supports can be concreted. The pillars need to be dug at a distance of 3 meters from each other.
Step 3. After the pillars are firmly fixed in the ground, you can begin installing the crossbars. If the width between the supports is 3 meters, then the length of the planks should be 3 m, 10 cm. The planks are screwed with self-tapping screws to the posts: the first at the top, the second in the middle, the third at the bottom.
Vertical wattle fence
Step 4. Installation of birch poles between the planks. The first pole is inserted between the transverse slats from top to bottom. When weaving, birch branches bend between the crossbars. The second branch is attached between the slats in a mirror manner relative to the first. The third branch is attached exactly like the first. In this way, all birch branches are attached to the very end of the canvas. Using a hammer, you need to knock down rows of branches, reducing the gaps between them.
How to make a wattle fence
Over time, the damp birch branches in the canvas will dry out and stop deforming. Such a fence will last for many years, decorating your garden plot and protecting it from uninvited guests.
Find out tips from professionals on how to plan a 6-acre plot from our new article.
Preparing to create a fence
Before weaving the fence, the vine is given flexibility using a “steam bath”. You can also leave the raw materials in warm water for several hours so that they gain moisture and become more flexible.
If the fence is constructed from shoots that have been recently cut, then the leaves do not have to be removed from them. Pine branches intended for support are cleared of bark.
To prevent them from rotting, it is recommended to treat their bottom with an antiseptic or tar.
It is also necessary to remove the bark from the willow vine.
Photo gallery of wicker fences
Below are photos of ready-made examples of wickerwork, made from various raw materials, using the most popular weaving techniques.
A wicker fence will add folk color to the area. Proper preparation of the material and moisture treatment will significantly improve the appearance of the fence and its service life. If you wish, you can master the weaving technique yourself and start installing the fence.
Materials and tools needed to create a fence
In addition to the materials mentioned earlier, you will also need:
- Wooden perches or metal wire;
- Hammer or mallet;
- Sharpened knife;
- Pliers;
- Pencil or other convenient device for marking;
- Ruler or tape measure;
- Brushes;
- Mordant or iron sulfate.
Where to use wattle
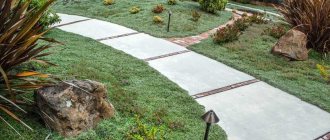
This is how small plots of land are fenced. The fences are also used as additional fences inside private property. Low variants are also erected along paths. They are often used to separate gardens, vegetable gardens and flower beds from the rest of the space. The fence perfectly demarcates the territory of two neighboring plots. Low and medium-high fences will not cast much shadow in any direction. The branches are excellent for constructing partitions used for zoning areas. This is how summer and children's playgrounds, gazebos, and terraces are set up. Fences are also used to decorate barbecue areas. Low wicker fences can be seen in themed restaurants. Pletni is an important element for expressing ethno-style. At dachas and other properties, a wicker fence goes well with other wicker items - chairs, rocking chairs and tables.
Making a fence
First you need to make markings: the boundaries of the future fence are marked with pegs, a rope is pulled between them; The places where the supports will be driven in are indicated.
The distance between the supports should be about 30-50 cm. The greater the weight of the willow vine, the greater the distance the supports can be installed. If the supports bend during weaving, you can fasten them together with wooden poles from above.
- Best Time to Thin Your Yard
Mesh filters. What are they?
Soft windows. What it is?
Usually fences are woven vertically or horizontally.
Peculiarities
An ordinary fence is a light barrier made of shoots and flexible branches. This type of fence features chaotic lines and a makeshift structure. The material is used in its natural form, almost without being processed. Wicker fences are mainly decorative structures, because they are rarely erected to a height of more than 1.5 m. There are also tall modifications, but this option is not always justified, since large dimensions do not solve the problem of the fragility of the material itself, and even in a large fence there will be more cracks and they will, in principle, become larger.
The above nuances imply frequent repairs of the fence, as well as greater openness of the area for viewing by strangers. The main advantages of wicker are the low cost and lightness of the consumables. Wicker fences are still relevant today and can be combined with many styles of site design.
Horizontal weaving method
- First of all, the willow twig needs to be fixed. Take the thick edge of the vine and bend it around the second support; the continuation of the vine is wound behind the first support.
- In this way, the vine is carried out in a figure eight, reaching behind each support that comes across. It will be very good if one vine covers at least three stakes.
- When the vine runs out, take another one and start weaving from the previous support. The joint is removed with pruning shears and secured with wire.
- The vines of the next row wrap around the supports from the opposite side - in a mirror image.
- When a couple of rows have been completed, you should begin to tighten the weave. Using a mallet, tap the vine so that the weaving is horizontally at the same level.
- The ends of the vine are moved to the back side and removed with a sharpened knife so that they are flush with the fence.
Some craftsmen recommend weaving with a bundle, but in this case the rods must be very flexible and thin. A fence made in this way will look embossed.
The resulting fence looks very good, but there is no limit to perfection. To make the structure even better, you can stain it and apply varnish.
To increase the service life of the fence, you should treat it with a wood antiseptic intended for such purposes. It makes sense to treat the part of the fence that is located near the ground with vitriol.
Proper preparation of available material for wattle fence
Willow, willow and hazel are considered the most suitable for weaving. Their branches are long, flexible and even; they have practically no transverse processes. In some regions, wild reeds are used in weaving fences; its stems have the same qualities, but their disadvantages include fragility. The strongest material for weaving is bamboo, but it does not grow in our latitudes, so it will have to be purchased.
Willow is the lightest, most common and affordable material for making wattle fences.
For support pillars you will need even branches of greater thickness, with a diameter of at least 4 cm. It is appropriate to use boards, metal rods or round beams. This will have a positive effect on the longevity of the product, but such pillars will stand out too much from the general background, and the fence will no longer look natural.
Types of fence weaving
Having decided on the choice of material, you have to think about what type of weaving will be used in the process of constructing the fence. There are several options for weaving fences from branches . Each of them can be easily implemented with your own hands. The speed of weaving will directly depend on the amount of work:
- Weaving branches for a fence in a horizontal way. Assumes the presence of long branches - over two meters. The rods are laid between vertical columns, which are first dug into the soil and filled with concrete. It is best to make the distance between the supports at least thirty centimeters.
- Vertical weaving of branches for a fence. To make such a fence, you need to secure the branches horizontally to tightly installed supports - they will be the basis for starting weaving. It is best to select supports with a diameter of about 5-6 centimeters.
Weaving in a checkerboard pattern. In this case, the twigs need to be installed horizontally, several pieces in one bundle at a time. Thanks to this technique of weaving a fence, a checkerboard pattern appears on the surface of the fence.- The most difficult weaving technique is diagonal checkerboard. To do everything correctly, you will need to secure wooden frames between the pillars, on top of which branches are attached at a distance of 10-15 centimeters. After this, the fixed rods will need to be turned in a diagonal direction, while the following branches are woven between the rods towards the opposite diagonal. It is very difficult to make such a fence on your own the first time, so first you need to practice weaving.
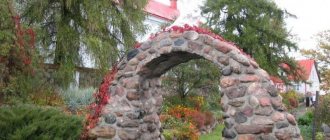
You can also make a round fence that will look gorgeous around front gardens or flower beds. Such fences perform a decorative function and simply help decorate the area.
conclusions
Wicker fences for a dacha are one of the simplest and most cost-effective ways to decorate your backyard and create zoning for the area. Solid and tall, it will also become reliable protection.
Correctly selected and well-processed materials, carefully thought out and executed design will make it a durable and strong calling card of the entire site.
Do-it-yourself plow: the best designs and tips on how to create an effective device (70 photos)DIY summer house - main stages of construction and decoration (95 photos)
- Growing zucchini - simple and detailed instructions for planting, caring for and harvesting (85 photos)
Final installation
Wicker fences can be divided into three types:
- Low - up to one meter.
- Medium - from one to two meters.
- Tall - two meters and above.
Low fences are widely used to create decorative elements of landscape design; they are used to enclose flower beds, paths, and playgrounds.
Middle fences zone the territory of the site to emphasize the boundaries of space.
High fences are installed along the outer boundaries of the site; they act as a full-fledged fence.
Before starting to build the fence, mark it:
- pegs are driven into the corners of the site;
- pull a cord between them;
- mark the places where intermediate stakes will be installed.
The distance between the intermediate stakes should be about 30-50 cm. The heavier the rods, the farther the pegs can be placed. To prevent them from bending during weaving and to stand straight, it is advisable to fasten the upper ends together with strong and even wooden poles.
The most popular types of weaving are:
- vertical;
- horizontal.
How to carry out horizontal weaving: technology for performing the work
- The vine must first be secured. To do this, take the thick end of the vine in your hands and wrap it around the second stake; the continuation of the rod bends around the first stake.
- Next, the rod is led in a figure eight, bending around the subsequent stakes. It is desirable that one rod overlaps at least three supports.
- After the first rod ends, take the second one and weave from the previous stake. At the same time, the vine grows. The junction is cut with pruning shears and secured with tape or wire.
- The rods of the second row go around the stakes on the other side - in a mirror image.
- After several rows have been woven, the weaving must be compacted. To do this, knock on the rods with a mallet, aligning the weaving horizontally.
- The ends of the rods are brought to the inside and cut off with a sharp knife flush with the fence.
- Some professionals advise weaving with a bunch, but this technique requires a very thin and flexible vine. In this case, the fence will look embossed.
How to carry out vertical weaving: technology for performing the work
- Horizontal supports made of thick rods must be nailed or tied to the stakes driven into the ground, leaving a distance of about 25 cm between them.
- To make the fence look neat, a strip is attached along the top edge, which is removed upon completion of the work.
- The vine is stuck into the ground and intertwined with horizontal supports. Having reached the top, the vine must be trimmed evenly or entwined with the upper horizontal rod.
A vertical fence can become covered with greenery in the spring, as willow takes root very easily.
This type of wattle fence is called living. Within two years it will grow greatly and will only become stronger over time. It will be impossible to climb over it. Such a fence must be properly maintained by trimming unnecessary overgrown branches. It is better to do this in early spring or late autumn. To make the fence “alive”, the vine cannot be treated with anything.
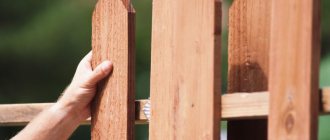
How to make wicker fencing with your own hands: preparing the base
The base can be made from almost any type of wood. You will need to make sharpened pegs from the material to insert into the soil. Install them at the same distance from each other. The recommended depth for driving supports into the ground starts from 20 cm and increases depending on the height of the planned structure to 50 cm.
The ideal structure will withstand strong winds and ground settlement. The minimum permissible diameter of support pegs is 4-5 cm. Larch poles are among the most durable.
Note! If the pegs are made in the classic version (i.e., made of wood), then they are treated with impregnations, antiseptics and varnishes. These measures are aimed against rotting and fragility. The cuts need to be additionally charred.
Lately, wicker fences in ethnic style have become especially popular.
Under the base it is necessary to make drainage from sand and crushed stone. The height of the fence is determined based on the purpose and individual wishes.
Types of weaving fences
Weaving options are distinguished according to several criteria. Depending on the height, it can be high (fence height more than 2 m), medium (1-2 m) and low (below 0.7 m). The first type of weaving involves the creation of permanent structures, for example, an external fence. The second is used to separate zones and separate small summer cottages. The third type is associated with the creation of decorative partitions, fencing flower beds and paths. Depending on the principle of connecting the elements, horizontal, vertical and inclined weaving is distinguished, as well as the less common round and checkerboard. In the first case, we are talking about laying long rods perpendicular to the vertical supports. In the second, horizontal veins act as the basis for the vertical placement of branches. The inclined option implies diagonal placement in increments of up to 0.3 m. According to the installation method, weaving is divided into poles, which is done directly onto the supports, and in sections, when the canvases are woven separately and then placed between the pegs.
Plastic wattle
An excellent alternative to a regular wicker fence is a plastic fence. This type of fencing is not afraid of time. They are also attractive to look at - they look modern and original. Plastic can have high strength, which will protect the product from minor mechanical impact. One of the most popular materials is polyvinyl chloride (PVC). Fences, partitions and other objects are made from it. PVC is resistant to corrosion, rotting, extreme temperatures and temperature changes, and direct sunlight. Dirt is easily washed off from a plastic fence; special solutions are not needed. Plastic structures are lightweight, so transportation and installation will be quick and without complications. An untrained person can install such a fence. A fundamentally important feature of a material such as PVC is its resistance to fire.
Disadvantages of installing a plastic fence:
- a strong impact on it will leave defects that will be clearly visible;
- high price.
How to decorate a vine fence
The finished wattle fence looks very beautiful, but to give the fence individuality, many people paint it with stain and varnish it .
To paint the rods white, they are treated with hydrogen peroxide and then varnished. You can put clay pots on the stakes; they go well with the wattle fence. Such a fence is often decorated with climbing and climbing plants, which are used to create hedges. A wicker fence with sunflowers growing along it looks very beautiful and original.
In order for the fence to last longer, it must be treated with a special antiseptic intended for wood. It is better to treat the lower part with hot bitumen or vitriol.