Bird nests placed by birds on trees are cute and interesting, but homemade decorative crafts made from twigs like a house for birds are a completely different matter from the design sphere. The popularity of decorating the interior with such “fluffies” with toy eggs or figurines seated in them is becoming more and more widespread, which makes the algorithms for making them yourself more and more in demand.
Anyone can cope with this task, and the photos below of possible nests made from branches, options for using them in the interior, and recommendations for using such decorations will help with this.
Chicken nests
How to make nests for laying hens from boxes. Such short-lived nests are made for temporary housing of birds from clean, high-quality materials.
How to make chicken nests for eggs. The simplest way is to cut an opening in the box, and the birds quickly get used to such nests, in which a different number of cells can be made.
Dimensions
When building nests, it is necessary to take into account the breed of chickens:
- For ordinary laying hens, small structures with the following parameters will be sufficient: 25x35x35 cm.
- Individuals of meat and egg breeds need more spacious shelters with dimensions of 30x40x45.
Each nest (regardless of the breed) must have a threshold with a height of 5 to 8 cm, as well as a special bar designed for birds to take off (located ten centimeters from the entrance and having a cross-section of 5x2 cm).
With a large number of laying hens, it is advisable to place nests in 2-3 tiers, making sure that the height of the nests of the lower tier is at least 30-40 cm from the floor level.
Above the upper tier it is necessary to make a reliable roof with an angle of inclination equal to 45-50 degrees (such a slope is needed in order to wean chickens from the habit of sitting on the roof and soiling nests with their droppings).
duck nest
The duck nest must meet the following requirements: complete sound insulation, minimal lighting, thick, dry bedding.
For construction you will need: screws, a ruler, sheets of plywood, 6 wooden slats, a saw.
Sequence of work:
- Two square blanks 0.4 x 0.4 m are made from a sheet of plywood;
- For the entrance, a square hole of 0.17 x 0.17 m is cut at a height of 9 cm;
- Square side walls with sides of 0.4 and 0.5 m and a roof are manufactured;
- A frame is constructed from slats;
- The parts are attached to the frame;
- Bedding is placed at the bottom, which needs to be replaced regularly. For the bottom material, the use of wood is preferable, but iron is undesirable.
In order to teach a bird to lay eggs only in a built nest, you should put imitation eggs made of plaster or chalk in it and not collect eggs in their presence.
Where can I place it?
After the process of making the craft reaches the finish line, you can think about placing the product. So, the following options are offered:
In the house. You can decorate any room in an apartment or house with a nest - the personification of comfort, family and warmth. The decoration looks especially good with a container of cereal or painted eggs placed in it.
On the street. A decorative nest for the garden is an interesting addition to any fence or a custom feeder for outdoor birds. You can try to find new residents by hanging a nest on the top of a tree.
As a present. A standard packaging box with a bow or a boring package is nothing compared to a bird's nest design. To give it a festive look, all you have to do is sprinkle the craft with glitter and add a shiny ribbon to the weave.
A decorative nest is one of those crafts whose simplicity of manufacture hides originality, practicality and incredible aesthetics. All that remains is to find suitable branches to decorate the interior of the living room or garden with an original accessory.
Geese nests
The goose's nest should be spacious, and the material for it can be unnecessary baskets, boxes and car tires.
The nest is at least 60 cm high and is installed in a dark place so as not to disturb the birds. If several birds are planning to hatch eggs in the nest, it should be divided into several compartments.
Required materials and accessories: saw, hammer, ruler, clapboard, bedding material, plywood.
Stages of work:
- The lining is sawn into strips for walls of 50 and 60 cm;
- Slats are nailed to 4 slats at a distance of 4 cm;
- The bottom is made of plywood;
- Treat the finished nest with a disinfectant solution.
What types of nests are there?
Types of nests:
- Nests with egg collectors have several design variations. But this is the most optimal type, of course you will have to tinker with it. It is good because the chicken is in contact with the egg for a minimum amount of time and the egg will not fall under the chicken’s feet, but into a separate container. Therefore, it will not be trampled or pecked, this is especially convenient with a large number of laying hens.
- Nests made from scrap materials, i.e. any clean, capacious container: an empty box, box, wicker basket, etc. This option can be used with a small population, or just for beginning poultry farmers, temporarily or even permanently.
- Nests in the form of boxes are chicken houses-boxes with an opening; they have several cells, inside, a cozy space where, perhaps, 3-4 laying hens or more can comfortably lay at the same time.
Nest boxes
- Take wooden material and cut out the workpiece to the required size.
- Having previously calculated the number of cells you need.
- This is done by dividing the length of the entire structure by the desired width of 1 cell.
- Height is determined in a similar way.
- Next, using large nails or screws, we connect the workpiece together, starting from the bottom, and strengthen it on the sides with timber.
- We carefully cut out the entrance hole for the hens, make a threshold (at least 10 cm wide) and a platform for the hen to take off, with a distance of 10–14 cm from the entrance hole. If the nest boxes are multi-tiered, add stairs to them.
From scrap materials
- Various available materials are also good: cut old car tires, unnecessary boxes, bookshelves and other shelves, any unnecessary containers, buckets, etc.
- The main thing is that the nest is the right size, spacious, comfortable, clean, and does not have gross defects in the form of chips, burrs, etc.
- These containers, of course, are not durable, but they will perform their functions perfectly.
- They are filled with sawdust or hay, preferably fresh.
- And once installed, they cover it with curtains for the hens’ peace of mind.
Nests-egg collectors
A little difficult to perform, but the result itself will definitely please you. Especially if it is not possible to often look into the chicken coop.
This can be done in 2 ways:
- nest with 2 bottoms;
- special container.
For a nest with 2 bottoms you will need:
- lumber;
- fasteners;
- tools: hacksaw, knife, hammer, etc.;
- for bottom upholstery: non-slip material: linoleum, thick fabric, rubber, plywood, felt, etc.
Algorithm of actions:
- Build a nest according to the well-known doghouse principle. Immediately make a drawing, mark and cut out the parts, and clean up.
- The bottom here is special; it must be attached at a slope (5–13°) to the back wall. Make sure that there is a good gap between the bottom and the wall; the egg should roll freely into it.
- Now let’s take the tray; it should be slightly longer than the nest, about 10–14 cm. This is done in order to collect eggs without any problems. We upholster it with unnecessary but soft material and stuff a bar in front to prevent the eggs from rolling off.
- Fix the pallet tightly to its main structure at a slope of 5–7° so that the dietary product can roll off without being damaged.
Nest with regular container, materials you need:
- chipboard;
- select or make an egg collector;
- upholstery;
- tools, large nails;
- gloves.
Job:
- We first make it according to the general principle, or the one indicated above: we build a strong box, connect the walls, make sure that the bottom has a slope of 8–10°, make a waterproof roof, close the front, not forgetting to cut a good inlet hole.
- We cut a hole in the back and bottom, slightly larger than the diameter of the egg. And we place the container down, do not forget to cover it with fabric first.
Willow nest
How to make a chicken nest woven from willow twigs. Stages of work:
- A cross is woven from willow twigs;
- The cross is braided using the crossing method. In this case, each turn is pressed with force against the previous one. After braiding, the diameter of the cross should be 0.7 m;
- Side rods with pointed ends are inserted and the sidewall is woven;
- The edges are braided. The ends of the rods are fastened in the center with wire;
- A spacer ring is fixed inside the basket;
- At a height of about 20 cm, the previously tied rods are untied and the edges of the basket are braided with them;
- Each rib is wrapped around the next one, and the third is folded 5 cm and cut off;
- After weaving the last rod, the protruding ends of the rods are cut off.
In case of difficulties, it is recommended to familiarize yourself with the videos posted on the World Wide Web on how to make a nest from willow branches on your own.
The threatening pose of a goose when a person approaches indicates that the time has come to take care of the nest in which it will hatch eggs.
The nest should be disinfected with a special composition and bedding should be made of hay (straw is not suitable for this purpose).
During the incubation period, there should be enough water and food near the nest. In winter, nests are placed in heated rooms.
If there are several nests with females nearby, their view should be limited by curtains to prevent mutual observation. Adequate ventilation is also necessary.
Primary requirements
When making a place for resting and sleeping for chickens with your own hands, you need to take into account the physiology, number and breed of birds. The basic rule when arranging a perch is to place the birds freely and easily on it; they should not disturb each other during movements.
The paws should easily grip the pole. Laying hens will rest and sleep on this device, so the entire adult population should fit on it
The basic rule when arranging a perch is to place the birds freely and easily on it; they should not disturb each other during movements. The paws should easily grip the pole. Laying hens will rest and sleep on this device, so it should accommodate the entire adult population.
For the convenience of birds, it is recommended to place the finished structure in a warm, well-lit or illuminated place at night and protected from drafts, away from window and door openings. This will make them feel safer.
Length
The length of the device depends on the number of inhabitants of the chicken coop. It is generally accepted that 18–25 cm of perch is enough for one laying hen, depending on the breed. But if possible, it is preferable to make the bars longer - in cramped conditions, the chickens begin to fight and throw off smaller laying hens.
It is worth noting that an overly long bar is undesirable - without additional supports it will bend under the weight of the chickens.
The ideal perch length is no more than three meters, with one or more additional supports.
Diameter
It is very important to correctly determine the size of the bar for the perch.
To build a perch of a suitable diameter, you need to remember the structure of a bird's paw: three fingers in it are directed forward, and one in the opposite direction. When sitting on a branch, birds bend their legs at the knee joints, tendons stretch and muscles contract. They grasp it tightly with their fingers and cling to the wood with their claws, which allows them to hold on tightly and not fall even during sleep.
The use of shelves, boards, thin sticks and thick logs that the bird cannot grasp with its paws is not allowed - they will be very uncomfortable on them.
According to the recommendations of experienced poultry farmers, it is necessary to use a block whose width is equal to half the length of the chicken’s open paw or the distance from the thumb to the beginning of the middle finger.
Height
An equally important criterion is height.
For small laying hens it is 60–80 cm, for large birds - at least 80 cm.
When sitting on a perch, the birds make a jump and fly up a little, which serves as a little warm-up for them. But laying hens should not experience any difficulties, so the height of the structure should not be exceeded by more than one meter.
For the convenience of chickens, poultry farmers advise building a small ladder that they can climb without causing inconvenience to their neighbors.
Table: main perch parameters for different breeds of laying hens
| Bird size | Small | Average | Large |
| Height from floor, cm | From 60 to 80 | From 70 to 90 | From 80 to 110 |
| Distance to wall, cm | From 25 to 35 | From 35 to 45 | From 45 to 55 |
| Vertical distance between tiers, cm | From 30 to 35 | From 40 to 45 | From 45 to 50 |
| Horizontal distance between tiers, cm | From 35 to 40 | From 45 to 50 | From 50 to 55 |
| Distance from floor to pallet, cm | From 35 to 45 | From 40 to 50 | From 50 to 60 |
Wooden pigeon nest
You will need the following materials and tools:
- Metal mesh;
- Hammer and nails;
- Saw, ruler;
- Sandpaper;
- Wooden bars.
Sequence of work:
- Sand the bars;
- Saw the bars according to the markings;
- Make a mesh bottom;
- Assemble the parts into a single structure.
Materials and tools
There are no strict requirements for what materials a bird's nest should be made of. Flexible twigs and twigs are ideal for creating crafts - you can collect them on the street, in the park, or in your own garden. You can buy hay at a pet store - this material can be easily used to form a souvenir of any size.
Handmade craftsmen use thick paper, cardboard, threads, raffia fibers, sisal, tufts of grass, feather grass and fluffy yarn in their crafts.
What you may need:
- for work – glue gun, scissors, transparent glue;
- base – cardboard, polystyrene foam, plastic plate;
- fixation - threads, twine, wire, yarn;
- finishing - pebbles, feathers, leaves, shavings.
You can decorate the work with decorative plastic eggs or put quail eggs inside the formed nest, after blowing the contents out of the shell.
Also, compositions are often supplemented with decorative birds, flowers, and figures of ducklings.
Styrofoam nest
In addition to polystyrene foam, you will need glue and a saucepan for production.
Sequence of work:
- Mark the foam;
- Cut into rectangular pieces;
- Cover the foam with parchment paper;
- Heat water in a saucepan, place it on the parchment and, pressing it, make a hole;
- Cover all parts with glue and then with a bandage for strength.
Nest designs
- Pillars made of any material can serve as support for the nests.
- The wooden base for the roof nest is made from boards nailed to the crosspieces and then attached to the roof ridge.
- On top of this base, a platform, grate or wheel is attached with nails.
Only professionals can arrange a site for black stork nests.
Nesting boxes for guinea fowl
Guinea fowls lay eggs during the warm season in nests made of blades of grass and branches, which they build themselves. Guinea fowl do not hatch eggs in artificial nests.
If overly timid guinea fowl abandon the clutch, the hen can continue to hatch without harm to the offspring.
Master class “Bird in the nest”
Nina Chashchina
Master class “Bird in the Nest”
Spring is the time of awakening of everything new and living. Migratory birds have returned home. There is already enough food for them, last year’s seeds, awakened insects. In spring, birds build their homes. Nests are used by birds to incubate birds and feed their chicks. You need to take care of the birds, do not come close to the nests and do not pick up the chicks. Birds are afraid of the smell of humans and do not return to the nest .
To make such a craft we will need: colored cardboard, colored paper, a bird , brown torn paper, glue, scissors, woolen threads.
Take cardboard of the color you like, glue a white circle in the middle
Draw a bird
And we begin to apply the outline of the bird with brown paper, using the tearing method
After filling the entire space of the bird , coat it with glue in a chaotic manner for the nest
And we put woolen threads on the glue, it turns out to be a nest
Take blue paper (you can use light blue)
for eggs, black for tree branches
outline with a pencil and cut out
We lay the eggs under the woolen threads, it turns out very voluminous
Glue tree branches
Add greenery - leaves and the bird
This is how the craft turned out.
Master class “Bird made of fabric” On the eve of the arrival of spring or at its beginning, you can have a conversation with the children and talk about the signs of spring: the snow is melting, the sun is shining brighter and more often.
Master class on crafts from napkins “Little Bird” A little bird lives with me, chirps in the mornings and sings songs. Spring has fully come into its own. The warm sun warms you with its own.
Master class “Bird” To make a bird we will need: a yellow frieze, a flower-shaped button, two black beads, red felt, falofiber, threads, a needle.
Master class “Bird” made from natural material Hello, dear colleagues. Today I would like to present to your attention a Master class “BIRD” made from natural material. Natural material.
Master class “Bird” made of fabric with your own hands In our area, Zimushka will dominate for a long time. And I really want sunshine and warmth. Let's hurry up Spring. Let's make a simple bird.
Master class “Small Bird”. Paper craft The holiday of the Annunciation throughout Great Rus' was highly revered by the people as a day of perfect freedom and peace. Annunciation is a holiday of the beautiful.
Master class “A small bird - a spring bird” Goal: creating conditions for the development of children’s creative abilities through obtaining their own creative product. Tasks: 1. Intensify.
Master class “Bird pendant” Spring has come. The sun rises earlier and shines longer; The night is getting shorter and the day is getting longer. Thaws appeared on the sunny hills.
Master class “Tit Bird” from napkins I would like to present to your attention a master class on making a titmouse using a paper napkin. This work will be interesting.
Master class “Bird from an Egg” You will need: A chicken egg, gouache paints (yellow, red, white, black, glue, a plastic cocktail tube, a piece of fur, thick.
Pheasant nest
These birds prefer to hatch their eggs indoors. A small depression measuring from 1.3 to 2.5 m is created in a layer of peat, covered with turf and dry grass on top. The enclosure is sown with millet, rapeseed and other plants.
Making an aviary:
- Metal, concrete or wooden poles are installed in holes filled with cement;
- A metal mesh is stretched between them;
- The roof is mounted on top. If necessary, rafters are installed.
Turkey nest
From the very beginning, care should be taken to ensure that the nest is located in a quiet, dark, draft-free, warm place. The floor of the turkey house is covered with hay and straw, earth or branches
The nests can be made of wooden boxes, which should be thoroughly cleaned, treated with a disinfectant and dried. After laying the bedding, the nest should be fenced off with a screen.
Brick nest option
One row of bricks is laid on a pad of cotton padded jacket. In a nest equipped with an egg collector, the bottom consists of several parts; a container for collecting eggs is placed under it.
The litter requires daily replacement, and eggs should be collected as often as possible at a minimum cool temperature. Eggs are stored in a fairly dry room with no odors.
It should be remembered that if the bird does not like the nest, it needs urgent rework. Otherwise you will not get good quality eggs.
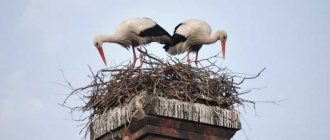
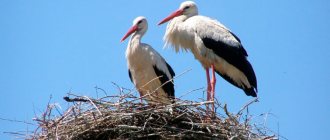
Test of strength
Before the birds arrive, it is important to make sure that the nest will not crumble as soon as the bird family settles there. Check your strength every year
design. Remove excess branches, dirt, strengthen the nest. Then the chances that it will be inhabited by long-legged inhabitants will increase.
We recommend reading:
Beautiful houses for a well - 115 photos of design ideas and examples of well design- How to make a hammock for a summer house: ideas and tips on how to make a simple and beautiful hammock with your own hands (120 photos and videos)
- Making a mailbox with your own hands: tips and step-by-step descriptions of how and what to make a mailbox from (95 photos)
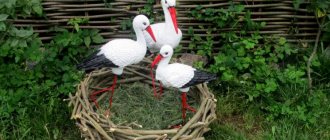
Do not despair that the storks did not settle here in the first year; they will take a closer look at it, and the next season they will choose it as their home.