Topiary is an art that became popular in the mid-20th century. Cute trees decorate holiday tables or simply use them as interior decoration.
The materials you can use are artificial flowers, plastic, napkins, as well as natural plants. Size, shape, style, color - all this is left to the imagination of the master who has to do the work. Below you can find a detailed master class.
Materials and tools for creating topiary
Before you start work, you need to collect all the material and tools. Beginners should definitely have on hand:
- You can use a simple foam ball as a base. This is a classic option where the barrel and other components will be attached.
- Sticks, clean brush.
- Paints - gouache.
- Glue.
- Varnish.
- The basis for the trunk can be petals from cones.
Before you start making topiary for the holidays, it is advisable to study all the nuances and details. Many craftsmen have professional tools - brushes, paints, various fasteners and pliers for parts.
An artificial grass topiary will be a great addition to any area.
Base materials
The basis for topiary can be made from anything. You can buy a flowerpot with a beautiful decor in the store and use it. The main thing is to think over the color scheme of the future product before purchasing it, so that it does not turn out that the beautiful decor of the flowerpot does not suit the intended crown decor at all or will conflict with it in color. In this case, you will have to cover the flowerpot with cloth or paper and re-decorate it manually. The souvenir will be good in the end, but the money spent on a beautiful flowerpot can be considered thrown away, because you can manually decorate a simpler thing that is at hand and does not cost money.
Base for topiary
Finding a large foam ball is not so easy, so the craftsmen found other options that will allow them to get the job done quickly and accurately. Here are several options for a topiary ball:
- Make a base from paper, water and glue. The technique is called papier mache. You can find instructions in the public domain.
- A small cardboard box can also replace it.
- A ball of thread stuffed with padding polyester.
- Polyurethane foam ball.
- Knitted threads pre-impregnated with glue.
There are a lot of ways to make a base; all that remains is to choose the most suitable option.
Topiary made from napkins
Making crafts from scrap materials is fun and easy. You can include children in the activity, since the creation uses safe devices that cannot harm the baby. Brief instructions for topiary made from napkins:
- First you need to take care of the foundation. How and from what it can be made was described above.
- Next, you need to find wooden skewers or sticks on which the finished flowers will be glued.
- Napkins - it is advisable to choose plain, bright and different colors.
- Glue, brush, tape may also come in handy.
The manufacturing method is simple; you need to make a large number of flowers from napkins. One option: fold each sheet into a triangle and roll it up. You will get roses, the ends of the paper are glued and dried. Next, each part is attached to a skewer, which is stuck into the base.
Frame wrapping for decorative wood
The base of the crown of 8 out of 10 topiaries - the backing - performs 2 functions: it improves the gluing of materials, and is also a base decorative layer that masks the color of the ball.
Pre-winding or painting the base prevents the material from burning when gluing the decor with a hot glue gun.
Substrate manufacturing methods:
- Sisal wrapping.
- Twine.
- Wrapping with knitting or sewing threads.
- Gauze or fabric covering.
- Painting a topiary ball (required when gluing coffee beans).
- Apricot kernel base.
1. Wrapping with sisal 2. Wrapping with twine or yarn 3. Wrapping with thread 4. Covering with gauze 5. Painting the base 6. Backing with apricot kernels
Of course, a ready-made foam ball is the best choice for a base for a tree of happiness, with virtually no disadvantages. However, you should not neglect free methods: we recommend using a topiary ball made from newspapers - the best option, also without flaws and, moreover, with minimal costs!
Topiary made of satin ribbons
Atlas is regularly used for crafts; it is an excellent material that is accessible to everyone. The process of making topiary, in this case, will be similar to the quilling technique. What should be done:
- The barrel is made from a clean and neat stick.
- Small details are created using the quilling technique. Each ribbon is carefully twisted into a flower; it is better to use double-sided tape to secure it.
- The parts are attached with glue to a stick, which is inserted into the base.
At the end, add other decorations if desired.
Barrel materials
For the trunk, you can use wood, metal, and plastic. A slightly curved branch looks very good as a trunk for medium and large-sized topiaries. You can also make a barrel from a piece of metal-plastic pipe, bending it slightly if desired. For small products, a flat plastic tube, pencil, metal rod or thick wire is suitable. If desired, the barrel can be coated with paint or wrapped with a beautiful ribbon. When choosing the thickness of the trunk, you need to take into account that a tree with a stem that is too thick will look rough, and one with a stem that is too thin will look defective. And wrapping it with tape will help slightly increase the thickness of the barrel.
Corrugated paper topiary
Bouquets of flowers are often wrapped in similar paper. Therefore, after the holiday, it is recommended not to throw it away, but to use it for creative purposes. Instructions:
- Take a foam ball - this is the upper base.
- You need to prepare the pot in advance.
- Next, neat roses are made from paper and placed on the base using hot glue.
A wooden skewer or stick is used as support. Its characteristics will depend on the weight of the upper structure.
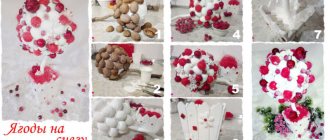
Candy topiary
This is a great way to surprise a work colleague or relative. Such a bouquet will definitely be remembered for a long time and will appear on all social networks of the birthday boy. Make the craft according to the following instructions:
- It is necessary to take any of the bases proposed above.
- Be especially careful when choosing a treat; regular long caramels are not suitable. It is necessary to take chocolate ones, decorated in a bright wrapper, preferably triangular in shape.
- Next, each candy is coated with hot glue on the bottom and placed on the base.
A beautiful pot is also used as a structure holder. Candy is heavy, so you need to fill the pot with something heavy, such as stones or sand, in advance.
Wedding topiary
The craft is in demand among future newlyweds. This is an ideal option for decorating holiday tables. Candies and napkins are not suitable in this case.
Experts recommend using high-quality artificial flowers to make your work look neat and expensive. For production you will need:
- Several reasons - it depends on the client’s request; they definitely use foam balls, they are more stable.
- Artificial flowers - purchased from a good supplier.
- Identical pots.
The manufacturing process is similar to the previous ones. To ensure that the flowers stick and can withstand the holiday, a hot glue gun is used.
It is advisable to do the work a day before the event.
Decoration materials
To decorate topiary, you can use all kinds of natural and artificial materials and some food products. The main thing when decorating is not to use many different materials at the same time, because in this case the tree will not look elegant. You also need to make sure that there is no color clutter.
To do this, you need to use no more than three primary colors when decorating. Moreover, when assembling the base, you need to use 1 color and 1 material less than when making the crown. This is necessary so that the crown attracts the attention of the beholder.
Topiary “Money Tree”
A pleasant activity for those who want to add a little symbolism to the interior of their home or give an unusual gift. You can use both real and counterfeit money, which can be purchased at any joke store. Master class on making a money tree:
- Take a base - you can quickly make it from polyurethane foam.
- Next, each bill is twisted into a flower or tube.
- Double-sided tape is used for fastening, especially if the money is real. If glued, a person will not be able to use them in the future.
The design is placed on a small pot, which is stylishly decorated with additional elements or simply a wish.
Topiary made of pine cones
After a walk in the forest, many people bring home a large number of real Christmas tree decorations. Children's competitions are often limited to ordinary crafts that everyone gets bored with. There is a solution, you can learn how to make topiary from cones. Instructions:
- For work, it is better to collect small cones of the same size.
- For the base, take a dense foam ball.
- Next, each cone is glued using PVA glue.
The teacher and judges will definitely like this hedgehog.
Making green topiary on a frame
Topiary figures can not only be cut from plants with densely spaced foliage, but also made on a frame base. This is a good option for landscape design that will help add zest to a summer cottage or country house.
Read: Basic principles of territory zoning and garden design.
Making a frame: how to make it and from what
The frame is designed individually, taking into account the required size and shape. To do this, draw a sketch and calculate the required amount of materials. It is also important to pay attention to the stability of the structure and its aesthetics.
The basis of the frame composition is strong wire with a cross-section of about 2 or 3 mm. A figure is formed from it, which is then filled with substrate for growing plants. Holes are provided in advance for planting them. Sprouts are placed in them, distributing all the branches evenly.
To create 3D figures, several types of plants can be used in one installation
Advice! To maintain the shape and volume, foam is placed inside the structure. It does not make the model heavier, but allows you to maintain the desired relief.
Using a ready-made frame
It is also possible to create your own topiary based on ready-made frame structures. For formation you will need moss or other substrate.
Procedure:
- The moss needs to be prepared - sorted out and soaked in water for half an hour.
- Fill the holes of the mold with the composition. If possible, it is worth using not only low, but also climbing plants, distributing them evenly.
- Secure the climbing plants along the frame with special clips.
- After the mold has dried, you can begin final shaping and regular maintenance.
Advice! Lightening the overall weight of the structure can be achieved by adding polystyrene foam distributed into small bags during the soaking stage of the moss.
A ready-made frame for creating topiary greatly simplifies the work of creating figures.
Rules of care
When creating a structure in the spirit of topiary from natural material, it is important to provide drip irrigation. This will help maintain the shape of the figure and its attractive appearance.
A difficult period for green figures is winter. When frosts are expected, the topiary must be protected from low temperatures.
The following options are possible:
| Approach to solving the issue | Features of the figure | Ways to resolve the issue |
| Transfer to another location | Relatively small in size and weight | The best option would be to transfer the figure indoors |
| Insulation on site | Large in size and/or weight | Insulation is provided by covering with a specially made wooden box, which can be insulated with foam plastic or straw |
Realistic large plant figures are created based on the frame
Advantages and disadvantages
Beautiful topiaries are the pride of a gardener. But before you take up the scissors and start curly trimming, it is advisable to familiarize yourself with the pros and cons of such a design.
Advantages:
- originality of design;
- possibility of transportation;
- structural stability;
- year-round effect.
Compositions can include not only figures, but also natural wood, stone and other materials
Flaws:
- Regular haircut is required;
- the choice of crops that are suitable for topiary is limited;
- plants must be planted according to the scheme;
- complex forms can only be realized with experience.
For your information! A practical application of topiary can be functional zoning (division) of space.
Autumn topiary
Everyone at least once in childhood collected a bouquet of autumn leaves. Variegated colors filled the houses and pages of books. Now there is another way to brighten up an autumn evening and fill your apartment with a pleasant smell. Master Class:
- The leaves and autumn flowers are quite light, so you can take any option suggested above as a basis.
- It is better to collect different leaves so that the bouquet looks bright and unusual.
- Each branch is carefully stuck into a round base.
There is a drawback, such a craft will not last long. However, this option can be used as a holiday table decoration. How to make a frame for a topiary - use plaster or sand.
Felt topiary
A large number of toys and useful household items are made from this material. Therefore, if there is some free felt left in the house, you can make a cute gift in a pot. Peculiarities:
- Flowers play a key role. Making them is not so easy, since the felt is not so voluminous. The equipment can be found in the public domain.
- Each flower should be attached to a round base using hot glue. The tape will not support the weight of the material.
To make the decor item look neat and unusual, you should add a little greenery. Leaves are also cut using scissors.
DIY topiary is a great gift
A fairy tree can be an excellent gift for almost any occasion. If it is Valentine's Day, then this tree can be decorated with all sorts of valentines, hearts and other attributes of the holiday of love. If you want to please the newlyweds with such a gift, then be sure to add banknote decorations to the topiary, and if in honor of the birth of a baby, then do not forget about coins and balls. And in honor of the housewarming, bows, balls, flowers and also coins will look great. Even for Halloween, you can make such an unusual decoration from a pumpkin or simply to decorate the kitchen from various fruits or vegetables.
To create a New Year's mood, give your topiary the shape of a Christmas tree and decorate it with all kinds of toys and tinsel. For the spring holiday - March 8 - do not skimp on decorating the topiary with flowers - artificial or real (live or herbarium). Don’t be afraid to experiment and combine materials that at first glance seem incompatible - twigs, flowers, soft and plastic toys, candies and ribbons. As a result, you will create a truly unique decor.
A great option would be to make an edible tree. Take berries, fruits, and various sweets as materials for it. Please note that such a gift or just decoration will not be durable, otherwise it will simply get damaged. With the help of such topiary, you can add variety to your holiday table and please yourself and your guests.
Shell topiary
A similar technique was used in ancient Rome, only instead of improvised objects and materials, it was used to maintain areas of palaces.
Gardeners did this, cutting various shapes from bushes. Therefore, topiary is not just a round decoration, but a whole art where there are no boundaries. Manufacturing Features:
- You won't be able to find shells that are the same size. Therefore, for the base you need to make a foam plastic figure of any shape.
- To make the process easier, small shells are taken from which patterns can be made.
- Many craftsmen use squares and triangles onto which elements are glued.
It is not recommended to work with children, as shell fragments can injure their hands.
History of origin
The art of topiary has a long history. If now this is one of the trends in needlework, then topiary used to be called a garden with decoratively trimmed shrubs and trees.
In ancient times, the art of topiary trimming of trees and shrubs was highly valued. The first mentions of this date back to the times of the Roman Empire and the famous Gardens of Babylon. The nobility had gardeners who were considered true masters of their craft and could create original shapes from the crowns of trees and bushes. This art flourished in the 16th and 17th centuries .
And at the beginning of the 18th century, the fashion for plant architecture came to Russia. Experienced craftsmen created figures of people, animals and birds from bushes.
Now interest in this art is still gaining momentum, especially in European countries.
In Britain, topiary has been brought to perfection and has long been a source of national pride. They decorate parks, squares, alleys and hedges.
For designers, decorators and simple needlewomen from all over the world, hand-made topiary wood is gaining increasing relevance.
Coffee topiary
This option will definitely appeal to coffee lovers. The peculiarity is a pleasant smell throughout the room. It is unlikely that it will be possible to make coffee from such beans in the future, but the master will definitely receive positive emotions from the process. How to make topiary from coffee beans with your own hands:
- It is better to make an original table decoration on a foam base. In this case, the coffee ball will look beautiful from an aesthetic point of view.
- Each grain is glued using PVA glue.
- Next, the ball is placed on a skewer and into the pot.
The weight of the product is large, so the pot must first be filled with a putty solution.
Decor and assembly options
All topiaries have common features. It is necessary to have a lower part as a retainer, the pillar itself and the top. The role of the base for the top part in the form of a crown is played by a ball or other structure. However, the top can also be made in the form of a flower, animal or abstraction. There may be several trunks. They are straight and curved. The container for attaching the barrel is filled with plaster or other composite materials and decorated with several decorative elements. Topiaries are decorated with various fruits, lionfish, twigs, beads, gold threads, gold leaf, colored ribbons, nets, and sticks. You can trim the crown using boxwood leaves, banknotes and coins, living plants and flowers, soft New Year's toys, sweets, paper, felt, various compositions, ribbons, napkins and tree fruits. The theme can be coordinated with certain holidays.
From coffee beans
You will need selected coffee beans, a barrel, containers for mixing and fixing, scissors, tape, a glue gun, a ball with a diameter of 8 cm. Despite the fact that it is easier to glue the beans with stripes down, it is better to direct them outward. Therefore, it is recommended to adhere to the following algorithm: first, lay the layer with stripes down, and lay the grains turned in the opposite direction into the formed dimples. The coating will have no gaps. The next step is to fill the container with composite and install the barrel. After the mixture has hardened, they begin to decorate the surface. It can be finished in a different manner or in the same way as the ball. First, one layer of grains is glued with stripes down, then the top layer in the opposite direction. The top of the trunk is lubricated with glue, and the crown is fixed to it. It needs to be wrapped in something light and decorated.
From the cones
The kidneys need to be collected and processed. Dirt is removed with a detergent; residual resin is removed using cotton swabs. A vinegar solution will help remove even the smallest insects. You will need all the main components that are used to create topiary and, in addition, thick threads, needles and branches of some plant (in most cases, thuja branches are chosen). The cones should be approximately the same size, round and fairly open (for example, pine). Those that have not opened sufficiently are corrected with pliers or placed in the oven. Using glue and thread, the buds are secured to the prepared ball. In the classic version, the cones “look” outward, but topiary with the opposite arrangement of buds looks no worse. The ball is decorated with golden elements, animal figures, as well as the fruits of other trees - acorns and chestnuts.
Cones that are most suitable for decorating topiary:
- Pine;
- Cedar.
From a decorative point of view, Siberian cedar cones look very beautiful.
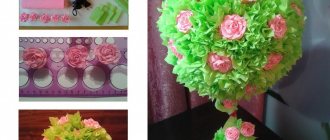
From napkins
You will need a set of components such as a stapler, multi-colored napkins of different sizes, wire, one or more sticks, a spherical shape, a pot, beads, and ribbon. Napkins are usually used to make flowers, and less often - various figures.
You will need to pin several napkins together in the center (or one large one, folded several times). After this, a circle is cut out of them. The edges are made smooth or wavy. The irregularities will help create chaotic petals. The cuts will make them more voluminous and fluffier. As each layer is lifted, the shape will become more and more flower-like. To finish a ball with a diameter of 20 cm, you will need about thirty of these elements. They are secured with glue and wire. It should be remembered that to recreate the natural size of the flower, you will need circles about 10 cm wide. Green foliage from fragments fastened or glued in the shape of a leaf should be added to the flowers.
From satin ribbons
To design the crown you will need at least ten elements. A satin ribbon or several ribbons of different colors are cut into equal lengths. Material with a pattern will also work. The pieces are folded in half and placed on top of each other in the form of a symmetrical flower, the middle is fixed with a heat gun or stitched.
You can do this with one ribbon, gradually folding it in a circle into the shape of a flower. The free ends are left under the center. Creating a sunflower from ribbons is more difficult: 15-centimeter sections are folded in half and bent to form a loop when connecting the ends. Several dozen such elements will be required. After this they are connected to the center. It is recommended to make two rows of petals. The middle of the sunflower is decorated with seeds or coffee beans. The second option is better as it will take less time.
Corrugated paper
Strips about half a meter long and 3-5 cm wide are cut out of the sheets. To give the shape, the upper corner is bent, after which a second, full bend is made. You need to hold the top with one hand, and lift the bottom with the other. Twisting movements are made. When the strip is folded into a tube, all that remains is to remake this shape into a rose. The base of the crown is made from newspapers. They form a ball. The spherical structure is attached with twine; later you will need to do the finishing with roses. The next step is to install the trunk in the flowerpot. It must be inserted into polystyrene foam and filled with alabaster. The resulting surface is then decorated. You can choose small branches of living plants as decorative elements. The next step is to attach the roses to the ball using pins or hot glue. They can be placed in even circles or in chaotic rows.
From felt
You will need material of different colors for the flowers and green material for the leaves. Additional materials and accessories should include ribbons, braid, a can of acrylic paint, a beautiful container for the base, a stick, a foam blank in the shape of a ball, large beads and other decorative elements.
To decorate a large ball you will need seven sheets of felt, including two green, the rest in different colors. The leaves are cut out immediately into the desired shape, and the flowers are created from round fragments. Spiral cuts, glue and bead decoration will give the flowers their final look. A crown ball can be easily created from crumpled paper. Glue, thread or tape is enough to secure it. After this, fill the lower part of the composition - the pot. Then the bottom of the structure is decorated with decorative stones, the top is decorated with ribbons, and the rod connecting the two parts is spray painted.
To fill the pot you need:
- stones;
- cotton wool;
- gypsum.
From candy
Expired sweets can be used as topiary. If the idea is that fresh candies can be torn from the composition and eaten, then they need to be attached carefully and with a minimum amount of glue. To decorate the top of the topiary, any candies, marmalade, truffles, marshmallows, long candies, sweets on a stick (Chupa-Chups, etc.) will be useful. The optimal material for a ball under the crown is polystyrene foam; papier-mâché balls are suitable. The role of the base can be performed by a pot of plaster or polyurethane foam. The leg is fixed in it. The last stage of assembly is installing the crown. The rod is inserted almost to the center of the ball. The finishing stage is the most interesting. The trunk is decorated with shiny coatings, bows, sparkles, and ribbons. The pot is decorated with large beads, coins, stones, and live moss.
From fresh flowers
This product will be a great gift for Valentine's Day. You will need the flowers themselves, as well as ribbons, a floral sponge, decorative moss, a wooden stick, putty, a plastic bag, and a flowerpot. The inside of the pot is covered with a bag. Putty is poured there, the remaining space is then decorated with decorative moss. After installing the rod, the composition should be left for ten hours. When the composite material has completely hardened, it will be necessary to remove the protruding edge of the bag. Next, a small layer is cut off from the floral sponge. It is moistened with water and placed in a flowerpot. Decorative moss is laid out on this moistened surface. The remaining part of the sponge will serve as the basis for the crown. The trunk in the form of a wooden stick is fixed in its center. All flowers are attached to the crown using glue and tape. The composition needs to be decorated with decorative elements.
To use topiary as a gift, you need to collect an odd number of flowers.
From coins and bills
It is sometimes called the “money tree,” but topiary has nothing to do with the real plant with the same name. In order to create a tree, you will need: a foam ball, a piece of wire, strong wire, scissors, alabaster, a glue gun, a satin ribbon, sisal fiber, a vase, copies of banknotes (you can buy them in children's toy stores or order them online). The bills are folded in such a way as to create a petal with additional “internals”. The petals are arranged into flowers, five in each. They are glued or stitched, and coins are glued to the center. Then the “money” flowers are placed on a foam ball.
To fix the trunk, the vase is filled with alabaster diluted in water in equal proportions. The consistency of the mixture should resemble sour cream. Then several pieces of wire are inserted into the vase to imitate stems. The container is decorated with sisal.
From natural materials
In the process of creating such products, they implement their own creative ideas. In general, it is recommended to use the following ingredients: chestnuts, acorns, shells, stones, leaves, dried fruits, a large paper container with a beautiful design, twigs, gypsum, paper sheets. First, a crown is created - the paper is rolled into a spherical shape and secured with thread. A hole is made in the ball. Hot glue is poured there and a rod is inserted. The bottom part is formed from a large paper cup and the plaster with which it will be filled. The rod is fixed in the container and waited until it hardens. The next stage is decoration. It is better to decorate the trunk along its entire length. The crown can be decorated to match the theme of any season. It is recommended to bring together elements that symbolize different natural elements. Any shapes and textures combine perfectly:
- tree fruits;
- fragments of vegetation;
- parts of corals;
- colorful stones.
Using quilling technique
The following materials and tools are needed: tapes, napkins of different colors, toothpicks, polystyrene foam, glue, a piece of pipe, a spherical shape, a pot, a ruler, colored paper. The first stage is cutting strips from sheets of paper. The ideal length of the strips is 30 cm, width - 1.5 cm. Each piece is cut into tinsel and glued at the edges with another one. The color of the stripes may be different or the same. All strips are twisted around toothpicks into small scrolls. Each of them turns out on one side. The result is cut flowers, which is a characteristic feature of the quilling technique. Then they are glued to the ball using hot glue. You can make a ball for the crown yourself, or buy a regular plastic one. Before allowing the crown to dry, it is fixed in the air. You will need to install the ball on a piece of pipe and fix it in a pot with foam plastic.
New Year's topiary
This work is done with children, there are no dangerous elements. Instructions:
- You need to find fir cones.
- You can complement the composition with balloons or candies.
- A ball of polyurethane foam is used as a base. Usually, this material remains after repairs and is not difficult to find.
Next, each branch is carefully stuck into the base. After which, it is placed on a strong stick and placed in a pot filled with a heavy solution. Fasteners are definitely needed, as it will harden for about a day. Next, the work is decorated with Christmas tree decorations.