Cement gnome for gardening
Hello, friends!
We continue the gardening theme, or rather, decorating garden plots!
This time, we will make a cute gnome from cement. This decorative craft will wonderfully decorate the landscape of your garden, but it is simple to do and will not cost much at all.
To work you will need:
- Cement mortar;
- Nylon stocking;
- A sleeve from an old sweater or jacket;
- PVA glue;
- Acrylic paints;
- Aerosol paint;
- Aerosol, universal varnish.
Step 1.
We make a standard cement mortar: 1 part cement, 3 parts sand and water. We take a nylon stocking and fill it with the required amount of solution.
Step 2.
We form the solution in the stocking in the form of an elongated drop.
Step 3.
Approximately in, we make a small protrusion and fix it with an elastic band or thread, this part will serve as the gnome’s nose. Let the solution dry for about a day. To ensure that the “drop” does not lose its shape while the cement hardens, the upper part of the stocking can be tied to something.
Step 4.
We remove the stocking and begin making a hat for the gnome. To do this, cut off a straight part of the sleeve from the sweater and tie one edge of it with thread. We make a liquid cement mortar with the addition of PVA glue and thoroughly saturate the sleeve with it. Then, we put the sleeve on the gnome’s head and shape it beautifully.
Step 5.
We wet the area under the nose and sculpt a part from the solution in the form of a beard to this place. Using a fork, we make grooves that imitate beard hair and form a mouth. This step is optional, you can act at your discretion. Leave the craft until completely dry.
Step 6.
Let's move on to coloring the craft. Cover the gnome’s “face” with a rag and paint his hat with spray paint. Then, remove the rag and paint the rest with acrylic paints.
Step 7
After the paint has dried, we coat the entire product with aerosol varnish, this will protect the paint from external influences.
Work is done. Now, you can easily give your garden plot originality with the help of such a wonderful gnome))).
Friends, share our articles on social networks, don’t forget! All the best to you and all the best!
Interesting ideas for beginners
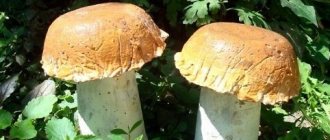
Having no experience in using cement for decorative purposes, it is better to start with something simple that does not require modeling skills and obtaining the desired consistency. The first exhibits in your garden can be cute mushrooms, colorful balls or original flower pots.
To make a mushroom you will need an old rubber ball (the size of the cap will depend on its size), a plastic bottle (it will become the basis for the stem, its size should be proportional to the cap), a metal rod to attach the cap to the stem. The ball is cut into two halves, one of which is placed in a bucket of sand and pressed evenly. Next, cement mortar is poured into the resulting form and leveled.
The bottom and neck of a plastic bottle are cut off and inserted into the filled form in the center, immersing it by 1 - 2 cm. Then, using a long iron rod, the future stem and cap of the mushroom are connected and the cavity inside the bottle is filled with the solution. The product should harden for several days, after which you need to remove the piece of the ball and the plastic cylinder.
After a few more days, the product can be coated with paint and decorated with various elements. Mushrooms of different sizes look impressive on the plot in the form of a small clearing. It is also worth noting that your imagination may tell you to use other containers (bowls, jars) and methods for making garden mushrooms.
It’s enough to just make an openwork ball that seems so light and airy. For the base, use a balloon (the size of the future shapes depends on how much you inflate the balloon). Next, any rope is placed in the prepared solution and then the ball is wrapped around it.
Do not wrap the base too tightly; you need to leave enough holes for further removal of pieces of the burst ball. When the product is dry, you can begin decorative coating.
If you cover the balloons with cement mortar with a small amount of gypsum added for faster hardening, you can get original garden lanterns or flower pots.
Using this technique you can also make vases for dried flowers. In this case, not only the outer side, but also the inner side is subjected to decorative painting.
DIY cement crafts for the cottage and garden - a selection of practical master classes (70 photos)
Excellent opportunities are provided to lovers of unusual DIY decor. In case you have extra pounds of cement. Then we present to your attention various crafts made from cement.
We assure you that homemade products will please the eye and will be unique elements of beauty indoors or in the garden. From concrete you can create any shapes that pop up in your imagination. Any dimensions are also possible and are limited only by the amount of concrete mixture.
A special advantage lies in the ability of the master to create crafts to his liking. For example, a flower bed can be created according to an individual design and without resorting to calls to special companies that deal with this. We strongly recommend that you at least try it, it definitely won’t turn out bad or ugly. And if successful, this will save money.
When your skill level increases, you can easily cast gnomes from cement and paint them and give them life with bright colors.
How to effectively use garden crafts.
Plan in advance where to place the figures in the garden. This will make it easier for you to determine the exact size and color of the garden figurine.
Decide what style your garden will be. No matter how beautiful your garden crafts are, they should be in the same style.
Don't overload your garden with crafts. A few simple but funny garden figurines in advantageous places in the garden will make a greater impression than an ill-conceived mass of the most wonderful and interesting garden crafts.
Coordinate the size of the figurine and the garden. Large open spaces require larger figures. And small garden figurines can be interestingly placed near tree trunks, near a small pond or fountain, along garden paths.
DIY garden crafts will add more interesting details to the overall look of your garden.
My mother, like many women who have their own personal yard, loves to take care of it and improve it in every possible way. After she had thoroughly enjoyed all the delights of planting flowers and caring for them, it was time for the decor. But it would be too easy for my mother to go to the store and buy figurines for the garden. She decided to make them with her own hands, and it turned out quite well, and most importantly - reliable and durable!
Advantages of cement crafts
- One of the most important advantages of this substance is its relative cheapness.
- Durability and strength of finished structures, resistance to weather conditions.
- Concrete can be painted in a variety of colors. Decorating also does not bring any problems.
- Ease of use of concrete. The main difficulty is creating a stencil design for pouring.
Important Rules
The concrete mixture is prepared as follows: Part cement and twice as much sand (if increased strength is needed, you can take 1 part sand), part glue. Next, add a little water and you need to achieve a thick consistency. The solution will be ready for use and will not cause any trouble.
All crafts require warm conditions and a lot of time to harden. Hardening time can vary up to two weeks. To prevent cracks from appearing, the figure is covered with bags.
After the hardening time has passed, the figure must be covered with a primer, then varnish or paint. If irregularities appear that interfere aesthetically and create inconvenience, use a file and sandpaper.
Cement can be replaced with plaster; this material allows you to make figures hollow and more decorative.
Origin story
Garden gnomes - decorative figurines used in landscape design, originally appeared in Germany and Italy back in the 19th century, and then gradually spread throughout the world. It is generally accepted that the first of them was created by Philip Griebel in 1872. A ceramic figurine in a pointed red cap and a white beard symbolized a protector, so it was installed at the doorstep of the house. In 1874, the production of gnomes was put on stream. Since then, the demand for such garden decorations has either increased or fallen sharply.
Various movements have even formed against garden gnomes: some people consider the figurines to be a manifestation of bad taste and philistinism, while others consider them dangerous objects that steal the soul from living mythical creatures.
Concrete garden decorations
Sculptures cast by craftsmen are expensive and the simplest rules may not be followed during production. And if you study and cast the figures yourself, you can eliminate all errors and expensive costs. In fact, you don’t need a lot of knowledge or special skills to make concrete.
Everything you need can be found in the garage, and you can easily buy cement at any hardware store.
Here we will describe the basic requirements for making figures with your own hands.
- Buy concrete grade M400 or higher.
- If using gypsum, mix with moisture-resistant additives.
- The water for the solution must be clean, boiled or suitable for drinking. Due to this, the design will be of high quality and durable.
- For particularly complex structures, a mold and frame must be assembled. Heavy figures must have a stand.
- Figures cast from concrete must be covered with paint or varnish. This is done for durability.
- Gypsum can be mixed with cement or glue to give greater strength.
What will you need?
Mom, knowing how to work with cement, prepared the following building materials in advance.
- Cement.
- Sand.
- Water.
- Plastic spatulas of various sizes.
- A pair of nylon stockings.
- Two medium-sized plastic bowls.
- Knitting.
- Scissors.
- The simplest hair ties (set of 10 pcs.)
- Accessories (we will discuss this item in more detail later).
That's all. These things can either be found at home or bought for pennies in the nearest stores. Having prepared all this, you can get to work.
Making crafts
One of the original crafts is intended for warm and cozy evenings. We will provide one option for you, and then improvise yourself and create more unique and individual figures.
Craft lamp
- To create such an interesting craft, you will need a ball. We advise you to find several right away.
- The balloons are inflated to different sizes, do not inflate too much, keep in mind that the cement layer will be small and the structure will be fragile.
- Cement is applied to the inflated balloon. It is important to completely cover the ball but leave some space at the top.
- After complete hardening, all the balls burst and are taken out of the finished craft.
- In honor of the last step, candles are lit and placed directly into the craft. These balls look unusual and beautiful.
This method can be used with rope soaked in cement mortar. All steps are completely identical, but rope is used instead of cement. It looks even more unusual and specific. Guests will probably think that this is a purchased decor and will be surprised that you can create this yourself.
There are not only beautiful crafts for the garden. But also extremely useful in everyday life.
For example, for the next craft you will need only two brushes and all the materials from the previous craft.
Pour cement into a plastic basin and place the brushes at an equal distance from each other. After hardening, the main purpose of creating such a useful element immediately becomes clear.
The craft is necessary for cleaning shoes. Moreover, it is easy to do, but has a lot of benefits.
It is worth paying close attention to safety precautions when working with cement. There have been cases of the mixture getting into the eyes. There's nothing wrong with it if you quickly rinse with water and get rid of every bit of it. But the feelings are unpleasant.
When working in creative mode, remember to put in maximum effort and lots of love. We assure you that everyone around you will notice the love put into the craft.
There are such cement masters that it is simply difficult to call their finished figures a craft. They look like works of art and are great for any garden or backyard.
One day, pictures of concrete gargoyles on a fence appeared on the Internet. This is amazing. We believe in your endeavors and hope to see a few more gargoyles on the fence.
Cloth
Mom decided to simply dress her first two gnomes in old rags. They turned out too small, but at the same time incredibly cute, so accessories such as knitted little hats and scarves were just right. By the way, my mother had in her arsenal those same hats from old dolls from my childhood. And she simply put a gray sock on the head of one of the gnomes. She also used scraps of old socks to make scarves and gloves for the gnomes.
Garden decorations made of cement - simple and profitable
To transform a site, it is not necessary to spend time and money on expensive ready-made figures and decorations. A budget solution is cement, which not only allows you to create a variety of objects, but is also durable. At the same time, the technology for using this material is as simple as possible and does not require professional skills or complex tools.
Cement vases are a common type of crafts.
Garden fountain with leaves.
We will not talk about the principles of creating a fountain in the country. This is the topic of a separate article, and you can read about it in detail here. We will make leaves from cement. >
We need a fairly large sheet, and with the help of cement, we form a copy of it.
After drying, the sheet can be worked out in more detail and painted.
And you will become, almost free of charge, the owner of such a beautiful fountain.
Required materials and tools
To work, you need a spacious room or place on the site, which should be covered with plastic film. This will prevent cement from getting onto your lawn, floors, and other areas. The film can be fixed with bricks or other heavy objects.
After preparing the site, you should take care of tools and materials. You will need:
- a metal container with a volume of at least 10 liters for diluting the solution. A basin, barrel or other similar devices are suitable for this purpose;
- a construction mixer or a drill with a screw attachment - they are used to make the mixture homogeneous;
- much water. It is best if there is a water tap nearby, since the instrument will need to be washed periodically;
- rubber gloves, an apron, napkins and rags that will help keep things clean and do the job comfortably;
- molds for figures (plastic, plaster, silicone, polystyrene, metal, wood and others) or frames. Ready-made options are available in construction stores and craft stores;
Molds for garden figures made of cement can be purchased at hardware stores and craft stores.
History and features of the use of figurines in the garden landscape
Millennia have passed since the time when wealthy houses in the cultural centers of civilization - Japan, China, Egypt - began to use large and small figurines in the decoration of the surrounding area. In addition to small architectural forms, decorative stones were common, collectively forming palm alleys - places for religious rituals. In the gardens of Mesopotamia, wild ivy entwined arbors and pavilions; Indian floating gardens were widely known.
Along with stairs, climbing plants and fruit crops, decorative garden figurines began to spread, placed singly and in groups near artificial ponds and gazebos. In the territory of modern Great Britain, landscape forms are popular to this day in the form of a landscape style without straight lines and symmetry.
READ Large DIY cement flowerpot
Garden gnomes appeared in Germany in the 17th century.
The first garden gnomes appeared in Germany in the 17th century; the plant still produces terracotta figurines, which are in demand all over the world, despite the abundance of ceramic, plaster and plastic budget analogues. They were used not only to decorate the territory, it was believed that they warded off evil, promoted prosperity, and protected the estate. Gradually they spread throughout Europe and the UK, and today they are even used in Asian landscapes.
Territory size
It is necessary to sensibly correlate the area being equipped with the dimensions of the product. In particular, large thematic compositions will not be appropriate in compact gardens; such models will clutter the space and make it even cramped. Small decorative elements can easily get lost in the vast landscape.
Preparation of cement mortar for garden crafts
The cement composition should be of medium consistency, reminiscent of thick sour cream. This will allow you to create the desired crafts without much effort by pouring cement into a mold or using other methods of using it. To do this, take into account the technology for preparing the mixture:
- Sand and then cement are poured into the preparation container. Dry ingredients are mixed.
- Next, add water at the rate of 250 ml per 1 kg of sand-cement mixture. At this stage, you can add a colored component to the composition, for example, water-dispersion coloring: this will allow you to create a colored figure and coloring will become optional.
- The substances are thoroughly mixed. If the volume is less than 5 liters, then for stirring you can use a trowel or a trowel - a steel spatula polished on both sides with a curved handle. In other cases, use a drill with a mixer attachment.
First you need to mix the dry ingredients, and only then add water
Creating details
Well, now, based on the resulting oval, you need to create all the missing details. The main thing to do is to separate the head. We pull out the upper part (smaller) of the total mass and tie an elastic band on the future neck of the gnome. After this, we use our palms to form the head again so that it turns out smooth and even. Now you need to make the arms and legs. We also use elastic bands for this. It is worth noting that the gnome’s arms and legs will be round, like from a cartoon. After all the body parts are tied, we reshape the torso and smooth out all the nervousness.
Making garden crafts
Figures for garden decoration can be based on a frame made of wood, plastic, metal, polystyrene foam, or they can be made by pouring into a mold. The technology in this case will have some differences:
- If the frame (mold for filling) is outside the figure, after making it, carefully remove it, taking out the figure. Before pouring the solution into the mold, it is first lubricated with a mixture of liquid soap, water and vegetable oil in a ratio of 2:5:1. This will make it easier to remove the mold from the figure after it dries;
Any form must be greased for ease of removal of the finished figure.
If the frame is located inside the figure, there is no need to lubricate it
Consider, for example, the creation of concrete balls that are empty inside. The resulting product can serve as a flower pot, candlestick, etc. Procedure:
- Inflate the balloon, tie it and coat it all the way to the knot. If the ball must be solid, then a durable rubber or plastic ball is completely coated with cement, applying the composition with gloved hands in several layers. When you need a round product with chips or holes, it is best to use a balloon and not completely cover it with cement.
The frame for cement figures can be removable or permanent
Dried crafts can be decorated or left unchanged.
As an option for concrete balls, you can use not whole products, but those made from cement-impregnated ropes.
- The balloon is inflated.
- Wrap it with a thick rope - twine.
- Using a brush, apply cement mortar to the rope and allow it to dry.
To create an openwork cement ball you will need a thick rope - twine
Such openwork balls look unusual and beautiful.
Video: making mushroom crafts to decorate the garden
Working with stockings
In order to make a gnome, it is best to use stockings. Quality is not important here, the main thing is that they are not too thin and do not break at the most crucial moment. So, mom cut off the elastic band of the stocking and hooked its edges to a small bucket. In other words, she put it on the bucket like a garbage bag. This manipulation is not essential, but in this position it is easiest to put cement mortar into the stocking. Then it became clear - we throw our “sour cream” into the nylon and compact it a little.
Painting and decorating cement garden figures
The design of the crafts is done after they are leveled with sandpaper. To do this, you need to lightly sand the surface with sandpaper and remove dust with a brush. Then the craft can be left unfinished or the following decorative methods can be used:
- painting with alkyd, aerosol or other paint that is intended for outdoor use and can withstand high humidity and temperature changes. Before painting, the surface is primed with PVA glue and allowed to dry. Small details are painted with an artistic brush;
Cement figures for the garden must be painted with waterproof and weatherproof paints
To decorate figures, you can use mosaics, acrylic stones and other products
Cement products look good on the site even without finishing. The gray color of the figures will suit any landscape design.
Unpainted figures look laconic, but attract attention
Placement of gnomes on the site
After choosing the gnomes, a new task arises - placing decorative gnomes on the site. You can place them in the garden in different ways.
Here are some options:
- Near the flower beds;
- Near decorative fountains, streams and ponds;
- On the sides of paths or paths;
- On the veranda;
- Near the gazebo;
- At the entrance to the greenhouse.
In general, it is better to combine figurines with other art objects. Compositions in the same color scheme also look especially beautiful and harmonious.
Options for figures for a cement garden
You can decorate the area with figures in the form of toys, animals, fairy-tale characters, but you should always take into account the compatibility of products. On a site with a classic design, wrought iron gazebos, unpainted cement figures or plain white products look elegant. Colorful crafts in the form of gnomes and mushrooms will allow you to create a real fairy tale in the garden with a lot of color and wooden carved gazebos.
Figures of fairy-tale characters or animals are suitable for a garden decorated in folk style
Among the options for garden figures that can be made from cement, the following are especially popular:
- swans, foxes, dogs, hippos, owls and other birds and animals. They should be painted in natural colors. Of these figures, ladybugs are the simplest to make, for which you only need to pour concrete into a deep plate, creating a hemisphere. In other cases, ready-made forms are used;
Large figures require a frame, which is coated with cement
Small cement figures are suitable for any area
Cement balls are a simple but effective garden decoration.
Mushrooms can be painted realistically or given a fairy-tale look.
Hands can be created using a mold or frame
Japanese lantern is suitable for the most laconic landscape design
Cement leaves look very natural after painting
Cement is combined with stones to create towers
Photo gallery: garden crafts made from cement
Universal rules for creativity from cement mortar
Old rags, tights and cord turn into flowerpots and gnomes
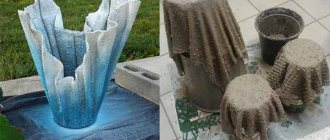
A good idea is to soak the fabric in a solution of cement and sand. What will happen is eloquently described in the film “Gentlemen of Fortune.”
To ensure a durable structure, pieces of fabric soaked in the solution are hung on a stand and covered with polyethylene. After the cement hardens, a flowerpot is obtained. It can be painted.
Old tights are no less functional. You should take a tighter specimen and cut off one stocking. Cement mortar is poured inside. To organize the legs and nose of the gnome, parts of the fabric are tied with lace. The top of the stocking without cement can be tied as in the picture.
The second part of the tights, soaked in cement, is tied around the blank, forming the bottom of the cap. The tails of the knot form a gnome's mustache. The structure is hung on a rope. After the concrete has hardened, the figures can be painted to suit your taste.
It is possible to create many compositions from twine soaked in cement mortar. The simplest thing is to wrap it around a regular balloon. After the cement has hardened, you need to remove excess pieces of concrete with a sharp object. The structure can be painted. The result is a decorative ball for the garden.
Burdock leaf and balloon form the shape of a fountain and lamp
Using a balloon as a mold, you can make your own garden lamps, balloon-shaped flower pots, or decorative concrete balls.
A large burdock leaf is a wonderful form for DIY concrete crafts. Leaves made from concrete are suitable for creating a path, a decorative waterfall, or simply decorating an area.
Master class on making a decorative fountain from concrete leaves:
- On a flat surface it is necessary to pour a gentle hill of sand. The hill should be slightly larger than the size of the prepared burdock leaf.
- A plastic film is placed on the sand, and a large leaf of the plant is placed on it.
- Thick cement mortar is laid on top of the sheet. The workpiece is covered from exposure to the sun and moistened during the hardening process.
- After the solution has completely hardened, the concrete sheet can be primed and painted. From several sheets you can organize a path in the garden or a mini waterfall.
From the example of a craft using a plant leaf, it is obvious that the surface of art concrete can be very different. In the photo below you see an example of the work of the crumpled film when filling the head of the fungus, thanks to which the figure acquired a more natural appearance. When making flowerpots, plastic or rubber inserts were used to form stars. The surface of the ladybug can be laid out with pieces of ceramic tiles. The walls of plant pots are covered with gravel chips. Thus, your craft can be decorated using various methods.
Surface texture of cement crafts for every taste
Master class: making a flowerbed cat figurine for the garden
A cat flower bed is a simple solution for decorating a garden and growing small flowers. For work you will need wooden planks with a cross section of approximately 2×3 cm. The length is determined depending on the height of the future craft. The wire is necessary for attaching a plastic rectangular container to the boards. Main stages of work:
- The legs of the future cat are attached to the plastic container using screws. They should be the same size and located in the corners.
- From the side of the head, a short stick of small length is attached to the wall of the container with screws, which will be the cat’s neck, and on the opposite side a longer board is also attached for the tail.
- You need to make holes throughout the entire container and thread the wire through them in any order. This is necessary to fix the cement.
- After preparing the frame, cement is applied with gloved hands. The layer should be at least 1 cm. The inner surface of the pot is also treated with a cement mixture.
- Drying lasts about 48 hours, and then the product is treated with sandpaper, dust is removed and painted.
The cat can be painted in bright colors
We sew a Scandinavian gnome with our own hands
I propose to make a gnome with me (size 26 cm, including the cap), which will surely appeal to both adults and children! Such a toy would be appropriate both on the festive table and near the Christmas tree.
So, let's get started... (all descriptions of the photos are located below them).
We will need it for work.
Tools:
- scissors;
- needles with balls;
- short and long sewing needles;
- pliers.
Materials:
- threads to match the materials;
- strong thread;
- thick fabric (I have fleece for the cap and felt for the base of the toy);
- material for filling the toy and beard (I used sheep wool, but you can also use padding polyester or holofiber);
- flesh-colored fabric for the nose (rectangle 4.5 cm by 5.5 cm - for me it’s a piece of knitwear);
- plastic for the inside (I use a folder cover, you can use a plastic cover with a smooth surface);
- optional - bell (bell);
- buttons for decoration.
- "Torso" of a gnome;
- Cap;
- Toy base;
- The inner part of the base is made of plastic.
We attach the patterns to the materials (you can create the patterns yourself, according to the dimensions indicated in the photo, or you can trace the outline of the patterns with a pencil, attaching a sheet of paper to the computer screen, increasing the scale of the picture to the appropriate size). We outline, give allowances of 1 cm (except for plastic - there are no allowances needed).
Make a mark along the edge of the “torso” part, 3 cm away from the pattern line.
Sew a “back needle” seam using small stitches, folding the felt right side inward, from the mark to the bottom edge of the “body.” Make a couple of knots (tack), do not cut the thread short.
We attach the lower part (base) to the “body” of the gnome using needles with the front side inward.
We sew a “back needle” seam using small stitches.
Turn the workpiece inside out and insert the plastic circle inside. Insert wool.
Photo on the left: we place marks 2 cm wide in the area of the future “face”, departing from the bottom seam 6 cm (for the nose) and 7 cm (for the beard).
Photo on the right: sew a “stitch forward needle” on the spout piece with a strong long thread, moving 1 cm from the edge of the piece.
Insert the wool, tighten the spout part, edges inward. Tie two or three knots tightly.
Draw strips of wool about 20-25 cm tightly with a strong long thread, retreating 1/3 from the edge. Tie a few knots. Inserting one end of the thread into a long needle, insert the beard marks into the edge on the right, and then repeat with the other end of the thread, on the left. Bring the ends of the thread into the inner part of the “body”.
Tie several knots tightly. Do not cut the ends of the threads!
Do the same with the nose, but inserting the needle into the mark for the nose (1 cm below the mark for the beard).
Hide the ends of the threads (do not cut them short!). Sew the back of the gnome’s “body” with a blind stitch, adding wool.
(Tip: to make the toy heavier, you can add rice, buckwheat, peas, etc. inside the body (along with the wool).
Photo on the left: this is what our gnome looks like. Photo on the right: we sew the cap with a “back needle” seam, along the marking line, starting the seam from the wide part of the cap.
Without cutting the thread, bring the needle to the front side and sew on the bell.
Next, bend the edge of the cap, retreating 1-1.5 cm and securing with needles, stitch the seam “forward with the needle” with stitches of 1 cm.
Place the cap on the gnome, fixing it with the needles to the gnome’s body.
Place a stitch “forward with the needle” along the seam on the cap, grabbing the felt (i.e. insert the needle exactly into the seam laid earlier, when folding the cap). Having reached the edge of the beard, make several stitches in one place.
Photo on the left: without cutting the thread, bring the needle out from the opposite side (I did not sew the cap above the nose), make a couple of stitches, and go down, stitching exactly into the seam, sewing the cap to the felt.
How to make a flowerpot from cement and rags
A flowerpot made of rags and cement is one of the simple products. To work, you need square-shaped pieces of thick non-stretch fabric, plastic film, and poles for hanging products. Sequence of manufacturing steps:
- Rags are placed one by one in the prepared cement mortar. They should be well saturated with cement on all sides.
- Each piece of fabric is hung on a separate post. First, you need to attach a round or square board to the top of the post, which will help form the bottom.
- Polyethylene is placed on the rags, which will ensure high-quality fixation of the cement.
For a flowerpot, it is important to thoroughly saturate the thick fabric with cement.
Criterias of choice
In order for the figurine to correspond to the spirit of the garden and adequately decorate the site, when choosing it you need to focus on the design features of the landscape.
Sources:
https://v-nashem-mire.ru/info/gnom-iz-cementa-svoimi-rukami-poshagovo/ https://xn80aaaacr6axp9are4j.xnp1ai/post/gnomy-iz-tsementa-i-chulok-master-klass. html https://stroypomochnik.ru/gnomy-svoimi-rukami-dlya-sada-01/