Types of decorative carts and their sizes
Decorative carts are divided into three main types depending on dimensions:
- Small ones, no more than a meter long, are suitable for decorating lawns.
- Medium ones, 2–3 meters long, two-, three-, four-wheeled, are installed near a country house, fences, winter gardens, greenhouses, gazebos.
- Large floats starting from three meters in length are suitable for decorating open and prominent places closer to the center of the site. Used as a stationary flower bed.
Flowerbed-cart on a summer cottage
Cups
2-3 tires placed one on top of the other will turn into a cup if you make a handle on one of the sides.
A strip 5-8 cm wide is cut out of the tread, one end is bolted to the bottom tire, and the other to the top. The cup is installed on a pre-cut side of the tire, like on a saucer. A teapot is made using this principle, but you also need to attach a spout to it.
To make the teaware more realistic, you can use tires of different diameters and cut off the side part on the upper parts. Cups with a teapot are painted accordingly: with large polka dots, Gzhel, with floral patterns.
How to make a cart for a garden with your own hands
A decorative cart for the garden with your own hands is made of wood or forged metal. Variants of twisted metal wheelbarrows are rare, because... Independent production of such decoration requires professional skills and special tools. But any owner can make a wooden cart, starting from drawing a drawing and ending with assembling the structure.
Construction of a drawing
First, choose a model of the future decorative cart and sketch it. Mark the approximate dimensions in the figure, take into account all the structural features of the object, and mark the main points for assembling the elements. The drawing must include schematic images of structures indicating the exact dimensions of wheels, axles, and body.
Cart project for a summer residence
DIY cart wheel
Prepare a full-size template of the part:
- Take a rectangular sheet of plywood as a blank.
- Drive a nail at an equal distance from the edges in the center to a depth of 15–20 mm.
- Take a thin strip of suitable length.
- Drill two holes with diameters of 5 mm and 8 mm along the edges. The distance between them should be equal to the diameter of the rim.
- Use the smaller hole of the strip as a loop to secure it to a nail driven into the center of the workpiece; insert a pencil into the larger one.
- Using the resulting compass, draw a circle.
- Divide it into eight equal sectors.
Cart wheel drawing
To create the rim - the outer part of the wheel in the form of a circle - you will need eight identical wooden planks. The length of each should be several millimeters greater than the distance between the points along the edges of the designated sectors of the circle.
Using a miter saw or bow saw with an adjustable rotary table, saw off the ends of the boards at an angle of 67.5 degrees. The required length should be checked against the template. Place the finished planks on the workpiece to check the quality of the joint.
To connect the elements and assemble the wheel rim, use the following step-by-step instructions:
- Use a jigsaw or band saw to cut the wheel rim pieces into the shape of a ring assembly.
- Lubricate the ends of the wheel rim elements with glue. Connect them and tighten them with a strong cord, belt or woodwork strip until the glue dries completely.
Making wheels and cart body
How to fit wheels on axles
The second stage is combining the wheels into a pair with a wheel axle made of wooden blocks and a shovel handle, cut to the required length. Step-by-step creation algorithm:
- Take a sheet of plywood of the appropriate size for the template. Using a drawing compass, apply the necessary markings: you need to draw the desired diameter of the wheel axle bases.
- Use a jigsaw or band saw to cut out the base of the axle of a suitable size from a piece of wood. Check the template.
- Drill holes in the center of each base of the axle, the diameter of which exactly matches the diameter of the selected shovel handle.
Wheel assembly
The axle is attached to the wheel with spokes made of cylindrical wooden sticks. The length of the spokes is selected according to the template and drawings, taking into account the internal diameters of the wheel rim and axle. Installation parts:
- Mark the points of the proposed holes for installing the spokes: eight on the rim, eight on the axle - 16 in total. Previously, you divided the circle into eight equal parts. The points for the grooves for the spokes on the rim and axle should be located along the edges of the marked sectors strictly opposite each other.
- Drill 16 slot holes in the rim with a diameter equal to the diameter of the spokes.
Assembling wheels with axle:
- Treat all grooves for installing spokes with glue.
- Insert them into the holes in the wheel axle bases.
- Sand the opposite ends of the spokes so that they fit tightly into the grooves drilled on the rim.
- Press the finished wheel with a heavy object on top for better grip.
- To remove excess glue, sand the surface of the wheel with sandpaper.
- Insert the shovel handles into the grooves cut in the center of the axial bases. Place the finished spoked wheels on the resulting axle and create a wheelset.
- Secure the finished structure.
Making a flower bed body
For the body of a decorative cart, take boards, self-tapping screws, nails and screws to connect the body parts. Step-by-step instruction:
- Sand the boards and beams with sandpaper.
- According to the drawing, assemble the frame by treating the edges of the boards with glue and fastening them with nails, screws or self-tapping screws.
- Wait for the frame to set. After the glue has dried, remove any excess and sand the finished frame.
- Assemble the bottom of the body and the walls of the body from boards. They should also be securely fixed with nails, screws or self-tapping screws.
Assembly of structural parts
A decorative cart is assembled with your own hands according to the principle of a designer. Step-by-step instructions for installing the body on a finished axle:
- Prepare four bars. Each of them should have one beveled side.
- Secure them to the wheel axles using glue, self-tapping screws, nails and screws.
- Sand the bars and install the body on them.
- Fix it on the bars using self-tapping screws, nails and screws.
- Sand the finished cart and varnish it.
Manufacturing stages
How to make a flowerbed from tires?
- The work of making a flower bed begins with cleaning: removing stones from the tread, shower. Before painting, the surface of the tire is degreased with any solvent.
- Artists say: “What is not drawn will not be written.” Therefore, the drawing must be transferred from the sample as accurately as possible, without missing small elements. The more precise the contours on the flowerbed, the easier it is to work with a jigsaw and brush.
- It is easy to work with a knife only with the softest rubber. When cutting patterns on hard material, it is good to use an electric jigsaw. They are comfortable making basic arcs and shapes. To perform small elements, cut through dense rubber with a sharp knife.
- Unscrewing the product is simple, but will require some effort. The tight edge on one side should be trimmed. Secure one side tightly and turn the tire out. Two people can perform the operation.
- Sand the cut top edge of the flower vase. This will eliminate small burrs that form when cutting the material.
- The inner surface of the tire is ideal for creating decoration. With the help of a photo of a flower bed at the dacha made from tires, you will see how an unusual flower vase is formed from this material. A smooth surface can be given the texture of stone or brick, and the similarity can be emphasized with paint. Before painting, the surface of the vase must be degreased. Using multiple shades and the illusion of shadows will create a natural look.
- There are paints and aerosols for painting. The first ones require a brush or roller. And they must be used when drawing the texture. You will need several shades. The spray can saves you a lot of time, but this painting option is much more expensive. Be sure to try both options. By painting a flowerbed with an aerosol, you get an even color. If you paint the product with a brush, you will have to work out the details or, conversely, achieve a smooth application.
Garden cart decor
Decorating a homemade decorative cart is a creative process that depends on your imagination and ideas:
- Flower garden from the body. Fill it halfway with soil and plant beautiful plants.
- Firewood for country barbecues. Place massive carts near a stationary grill.
- Inside the body of a medium-sized cart, place small sculptures, plant pots, pots and metal cans of flowers. Decorate the outside of the body with hay bales and props.
- The cart is covered with soil as if it were overturned and earth is pouring out of it. Then the improvised flowerbed is planted with flowers - a floral “waterfall” is obtained.
Practical advice
Any tires are suitable for making garden figures: summer, winter, domestic, foreign, but not new. If the tire turns out during the production of a garden figure, you should choose the most worn out treads. The lack of relief and abrasion of the rubber makes cutting the material much easier. In addition, such a tire is easier to turn out.
Tips for beginners:
- It is somewhat easier to work with imported tires, since they are softer than domestic ones;
- Rubber is cut with a sharp knife dipped in soapy water or machine oil;
- The knife can be replaced with a jigsaw, but working with it requires a certain skill;
- Sections of workpieces are processed with a grinder in order to smooth out irregularities and nicks;
- Before painting, tires should be washed and degreased, otherwise the paint will peel off quickly;
- For painting, paint compositions for exterior use (enamels, aerosol automotive paints) are used.
The rubber of car tires is reinforced with nylon or steel cord. Nylon is cut with a knife, but for cutting metal you should prepare metal scissors or a grinder.
The marking will help you recognize what type of cord is in the wheel: if it is marked “steel”, then there is metal inside.
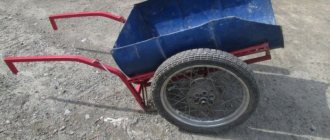
DIY flower garden wheelbarrow
A wheelbarrow flower garden is a great idea for decorating your garden! Doing it yourself is not as difficult as it might seem at first glance - the main thing is to have imagination and listen to the advice of experts
Any garden probably has an old garden wheelbarrow that can easily be turned into a beautiful flower garden. You can also use an old box by converting it into a wheelbarrow or cart. For this you will not need much, namely: a wheelbarrow or a box; polyethylene film; fine gravel or expanded clay for drainage; soil mixture; flower seedlings.
And the main thing is your imagination and good mood.
1. Take an old wheelbarrow or box (you can make it yourself from several unnecessary boards). We restore it to your taste: paint it, varnish it, or leave it in its original form - vintage is now in fashion.
2. Line the bottom with polyethylene (this is done for the convenience of autumn cleaning and to avoid rotting of your structure).
3. Place a drainage layer of expanded clay or fine gravel on the bottom of the wheelbarrow. Layer thickness - at least 5 cm.
4. Pour a layer of soil mixture on top of the drainage layer and lightly press it down.
5. Carefully remove the seedlings from the pots and straighten the roots of the plants.
6. Sprinkle the roots of the plants and the areas between the plants with the soil mixture.
7. Water at room temperature and sprinkle with a layer of mulch.
Your flower garden is ready! You can also put flower pots in the wheelbarrow. Ampelous flowers look especially good. In addition, thanks to its mobility, you can easily change the location of your flower garden depending on the degree of illumination, weather conditions or your desire.
When preparing the material, photographs of Oleg Kulagin were used
Swan
Having gained experience in creating simple structures from tires, you can begin to create more complex products, for example, making a swan. The first stage is marking. The reality of the bird depends on how correctly it is performed. Most of the lines are drawn on the working path of the wheel: the tail, body, head and beak of the bird. Fenders are drawn on the sides of the tire.
It is recommended to start cutting out the swan with the longest straight lines. Thanks to this, when small parts remain, most of the rubber will be cut off, and the “jewelry” work will be easier to complete. You should also be careful in particularly critical areas (neck, wing feathers, beak) so as not to make the wrong movement and spoil the workpiece.
It is much easier to turn out a tire with a carved swan than a flowerpot. The main thing is not to use too much force and not tear off any part.
All parts of the bird are in stable condition, except for the long neck. To prevent it from falling, holes are made along its entire length at intervals of 5 cm, metal brackets are inserted into them, after which a thick wire is pulled between the brackets and the rubber (a wire rod can be used).
The wire is bent in the desired position to make the bird's neck look graceful. Finally, the swan is painted in a suitable color: white, black. Naturally, the beak should be red.
Video instruction:
How to make a flower garden from an old cart with your own hands
Almost every owner of a country house accumulates a lot of unnecessary things that are a pity to throw away. However, if you add a little imagination to them, you can get very unusual items for decorating your local area. There are many ideas for decorating flower beds, including using an old trash cart as a flower bed. Such an item can be easily integrated into the landscape by sowing it with beautiful flowers.
There are also plenty of options for planting flowers in a wheelbarrow; for example, you can tilt it, “scattering” the plants throughout the flowerbed. The cart should not be disguised with tall flowers or fenced. Its body is decorated with various patterns or tinting compounds. The standard wheels should be replaced with rusty metal ones, which will undoubtedly give the flowerbed a special look.
Decorating a flower bed with an old cart is widely used, but it is not always possible to find a suitable item. At the same time, you can make a cart with the desired design yourself. Carts that can be moved are especially convenient. In this case, it will be easier to care for the plants planted in it and move it to different places in the garden.
Work should begin with the creation of drawings. A suitable design can be selected from photographs on the Internet. The drawings must contain all the necessary dimensions of the parts.
The main material for their manufacture will be wood. Wheels can be picked up from antique carts; they will look more stylish. If this fails, you will have to make the wheels yourself. For experienced craftsmen, this will not present much difficulty, but beginners will have to work hard, preferring wooden wheels.
Wooden wheels can be made from round cuts of a tree trunk, or from a board at least 5 cm thick. First, a circle of the required diameter is drawn on the surface of the board. A hole for the axis is immediately drilled in its center. The circle is cut using an electric jigsaw.
Next, elements of the frame and body of the trolley are made from wooden blocks and boards. They are carefully sanded with sandpaper and assembled into a single structure. The parts are fixed using wood glue and self-tapping screws. After assembly, the cart must be treated with antiseptic compounds to prevent wood rotting.
At the final stage, the cart is decorated with paint of the desired color and installed in the designated place in the garden. Plastic film is placed in the body, soil is filled in and plants are planted. The film will create additional protection for the tree from moisture and prevent the formation of dirty streaks when watering flowers.
Which tire is better?
Favorite - worn winter tires. This material is the softest, it is easiest to cut out designs and shape edges. In addition, it is also much easier to turn it out. The original tire betrays its origin. And the turned-out material doesn’t look like itself at all. If you use a jigsaw to cut out the texture of a stone and tint it with a suitable colored primer, then it will be difficult to guess the original material of manufacture. With the help of painting you can implement any design solution.
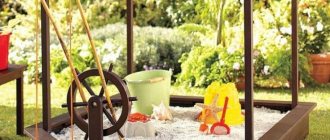
Creative flower beds in carts 8 photos Favorites
There are many ideas on how to design a flower garden. But the owners didn’t seem to worry too much about this flowerbed. They brought a cart of flowers and poured them out in the yard. Joke. But that's the idea.
It turned out quite creative.
The idea is, of course, not new. Flowers are poured out of everything to create a beautiful flower bed - jugs, tubes, barrels, giant mugs and even teapots. But the option with a trolley looks the most natural . If you decorate the cart properly and find old cart wheels, it will turn out very beautiful. For greater naturalness, the flowerbed does not need to be fenced with anything; this gives the picture more spontaneity and surprise.
In general, carts are quite widely used for decorating flower beds . Of course, it’s good if you find a real cart; a mobile flowerbed is very convenient; you can move it to a new corner of the site every day. But making a homemade cart is not at all difficult, like in this photo, you can even put it in a pond. And it is convenient to care for flowers; it can be dragged to the shore if necessary.
Although it is not necessary to use carts, wheelbarrows in landscape design look no less attractive , the main thing is to decorate them beautifully. Here you can see a version of flower beds arranged in wheelbarrows.
Here a very beautiful bouquet has been selected and although the car itself is quite modest, it looks very attractive due to the flowers.
And here is a very beautifully selected composition with jugs and a cart. This still life will undoubtedly decorate any area.
Here, too, there is a very beautifully chosen composition, but in a real cart. Containers with flowers hanging on strings look especially good. Such a flower garden will look good on the side of the road or in front of the entrance to the site.
Flower beds in carts are very original, so use this opportunity to decorate your site.
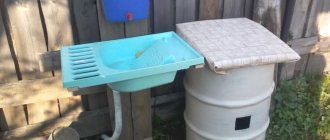
Flowerpot
To make a flowerpot, you will need to turn the tire inside out. Since this work is not easy, this should be done by a person with sufficient physical strength, or by inviting someone to help. The tire is laid flat on a flat surface, and markings are made on the side. It’s easier to do it by preparing a template from thick paper in advance. A stencil cut in the shape of triangles or semicircles is pressed tightly onto the rubber and outlined with chalk. According to the markings, using a sharp knife with a comfortable handle, the petals are cut out, and the cut part is set aside.
Advice. The width of the petals should not be less than 10 cm, otherwise the flowerpot will become deformed over time.
The tire is turned over with the cut side down and the process of “fighting” with it begins. Having stepped on the edge of the tire with your foot, you need to grab the cut edge of the workpiece with both hands and forcefully pull it up and towards you.
When the convex part turns out, you should try to hold it so that it does not return to its original position. Things will get easier after completing half the circle.
Dirt accumulates inside the tire, and it is easier to wash it off when it is on the outside, that is, when the tire is turned out. After drying, the flowerpot is painted, set in place and filled with soil.
Video instruction: