A garden at home or at a summer cottage is a free space not only for fruit trees and shrubs, but also for design experiments. On it, owners, together with their children, can create hand-made beauty that will delight babies, preschoolers and even slightly older children. To see this, look at photos of garden figurines made by other craftsmen.
This requires little: imagination, construction and available materials. But some knowledge of style, site layout, and design is also necessary. So that this exquisite plot of paradise greenery does not disturb the overall structure of the garden, does not introduce imbalance or chaos into it, albeit small, does not cause unnecessary associations, but brings joy. Below is our story about this.
Theoretical preparation
Garden sculptures have had a special meaning for quite some time now. Figurines for the garden or a completed small composition must be in harmony with the green landscape and the chosen style.
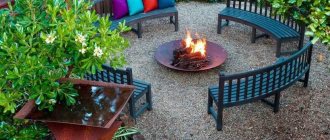
A great idea for a garden would be furniture with elements cast from epoxy resin. Such furniture will become a beautiful decoration and functional part of your garden.
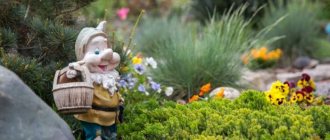
Their images are taken from the folklore of different countries: Lesovichki, or goblin, house-elfs, kind Shubin - the joker of miners (Slavic mythology), nymphs (Greek brides, good forces), gnomes (Western European dwarfs, guardians of the subsoil).
The latter had consonant or identical names - Gloin, Balin, Dvalin or Dori, Nori, Ori. Children quickly remember them like nursery rhymes.
And more often than others, it is gnomes who are “settled” in gardens. If you can’t make their own plaster figures, buy them at garden supermarkets.
Do-it-yourself gardening sculptures (ideas in pictures)
It’s a simple matter to buy any sculpture or figure you like; another thing is to build it yourself. Your own implementation of ideas is a great reason for pride. And the admiring glances of the guests are worth it! So to the question: “Is it worth making garden decor yourself?”, the answer is clear: it’s worth it. The main thing is to decide on the materials, choose a design and theme, and strictly (or not so strictly) follow the instructions.
What materials are best to use?
If earlier designers understood the word “sculpture” strictly as a person or animal in a certain pose, today the vision of this term has no boundaries. In European parks, sculptures are made from any materials, so we will put the maximum of available information and ideas into this broad concept. Let's look at the most popular materials for making garden installations.
Plastic and rubber . If there is no recycling center nearby, you should not throw away, much less burn, obsolete items. Turn them into interesting products. Rubber tires, old flower pots, dishes, plastic bottles and eggplants are popular options. Pros - easy to process, low cost, resistance to sun and precipitation.
Garden figurines made from plastic bottles and flower pots
Plastic bottles can be cut into pieces to create plastic birds and animals for garden decoration. Here are examples of the wonderful works of Oksana Abramova (row of pictures above) and Alena Zinovieva (row of pictures below) from the Country of Masters:
As for rubber garden figurines, they are mainly made from old tires.
How to make a goldfish from tires is shown in the master class below:
Gypsum . Products made from sculptural, building plaster or alabaster look very artistic. But there are disadvantages - plaster is difficult to work with, and finished figures are short-lived. But small products are easily obtained using molds. You can even take silicone baking molds to make small flowers or other elements.
How you can make plaster flowers using silicone molds is shown in the video below:
Once dry, paint the flowers at your discretion with any available exterior paint.
Concrete/cement . Quite strong things come out of a concrete base. Working with concrete is even more difficult than working with gypsum - it is heterogeneous and takes a long time to dry. But concrete is not afraid of frost and precipitation. It is easy to paint, and even without painting, concrete sculptures look stylish.
You can make these cute gnomes from cement, sand and water:
Polyurethane foam . A new movement among craftsmen is foam products. The composition can be applied to a finished base, or you can imagine yourself as a sculptor and cut out a figure from a ready-made solid piece of hardened foam.
The downside is the fragility of the foam - it dries out and deteriorates under the sun, so it is recommended to reinforce it with a plaster bandage and cover it with construction paint.
The craftsman shows how to make a sheep from polyurethane foam in the video below:
Tree . The most noble material. Cutting down old trees or trees that have fallen after a strong wind is a constant concern for the owner of a personal plot. Firewood is not the only product into which stumps and snags are turned. Even the most seemingly unsuitable sticks for decoration sometimes turn into a masterpiece.
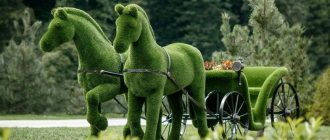
Almost untreated logs come to life. And from small logs and boards a fairy-tale hut on chicken legs grows. And if there are slats or small boards left after construction, harness the donkey or horse to a homemade cart.
How to make a small windmill yourself to decorate your garden is shown in the master class below:
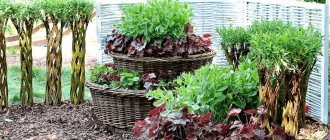
Vine. Not only baskets are woven from vines, but also garden and park sculptures. They look especially relevant in country (rustic) style.
An easy way to have your own mythical animal for fans of the movie “How to Train Your Dragon” is to order a sculpture made of wicker at the Crafts Fair or a similar site for hand-made craftsmen. And a wicker ball on a smoothly cut lawn will look just perfect. And even in winter, figures made of wicker look fascinating.
Straw. Short-lived, but so cute, straw dolls are a quick and easy option that can be made with children. A straw goby from a fairy tale will become an interesting garden decoration. Well, you can’t do without seals, which are made from everything, and even from straw, giving it the desired shape and wrapping it with thread. And the men in the family will appreciate the idea of creating a motorcycle from straw in just a couple of hours.
How to make a teddy bear from dry grass is shown in the following video:
Papier mache . Not the most popular, outdated, but still used option. Pros: availability of materials, variability (you can make anything you want). Disadvantages - does not tolerate frost and moisture, large products require time to manufacture. Externally, the finished painted figurines are practically no different from the plaster or concrete versions.
Street bas-reliefs made of paper will decorate a hunting estate or forest house. But fashionable ducks made from newspapers, which according to the designer’s idea were not even completely painted, but simply varnished, can be placed at the entrance from the garden to the house.
Laying hens, which are made on the basis of an inflatable ball and paper, are no worse. Paint the chickens, place them in the nests and the impromptu chicken coop is ready!
Install paper products in gazebos and protected areas so they will last longer.
Craftswoman Svetlana will show you how to make a matryoshka doll from papier-mâché:
The matryoshka doll can be made to any size. It all depends on your abilities and patience. Cover the finished product with varnish, and you can display the figurine in the garden.
Metal. If you have metal working skills, get out your tools, welding machine and create real works of art. In this matter, it is important to find an interesting idea and build something really worthwhile, and not funny and gloomy, because rusty iron skeletons that look like people and animals are just a “masterpiece.”
In some cases, even rust looks perfect, especially in combination with stone. And a kangaroo in steampunk style looks truly stylish, modern, technologically advanced and does not “smell” of bad taste at all, as is often the case. Also, with the proper experience, you can create something elegant and unique from wire, the main thing is to fill the void.
Those who master artistic forging have more opportunities - then the metal can take almost any shape.
Various rubbish . As a separate material, we will consider all sorts of rubbish - unnecessary things. There is definitely room for your imagination to run wild here!
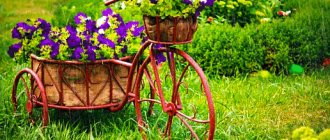
An old bicycle turns into a garden figure with a flowerpot. A leaky pan and an old kettle are used for the same purposes. Worn out clothes will get a second life as cute stuffed animals. Shoes that have been trampled and lost their appearance become extraordinary flowerpot figurines. Old chairs and unnecessary washbasins are an interesting element of decor and a non-standard flower bed.
Old suitcases can also be used. Don’t throw your plumbing fixtures into a landfill – they can be used in original ways for decoration. A leather sofa also has no place in a landfill - make it the hero of your landscape design. A mini-garden in an old basin or boiler looks interesting, unusual and stylish. In general, you can put together your grandmother’s entire attic into an interesting composition: a vintage typewriter, cans, kitchen utensils and much more. Your imagination plus a little free time, and you can turn anything into a garden sculpture.
Preparing tools
The set of tools depends on what you will be making the figurine from. This is an approximate list of tools, because ultimately the type of product plays a role:
- Rubber - chalk, sharp knife (stationery), jigsaw, drill, bolts and nuts, screws, wire, brushes and paints for external work.
- Plastic - sharp scissors, fasteners (bolts, stapler with staples, glue gun, electrical tape), tubes and wires for the frame, paints for external work.
- Gypsum and concrete - gloves, pomudina and spatula for thinning the mass, various molds and auxiliary items for creating certain shapes for the figure, hand sanding or for grouting the product, brush and paint.
- Wood - jigsaw, hammer and nails, screwdriver and screws, paintwork.
- Vine and straw - secateurs/scissors, rope or twine.
- Papier-mâché - old newspapers, toilet paper/egg tray cardboard (for making paper pulp), PVA glue, paints or varnish, etc.
- Metal - welding inverter and electrodes, hammer, pliers, metal scissors, etc.
Decide in advance what you will need to make the figure and stock up on all the necessary tools so that you don’t have to run to the store at the most crucial moment.
Background Definition
The bright background of the area for the composition plays no less a role than the figures themselves. If they are separated from each other even visually, change something.
A small sculpture or craft, say, the family of the old woman Tortilla (turtle) will get lost among the foliage. It is better for them to be in an open place, near paths. Place large items near the pond, among the non-spreading conifers.
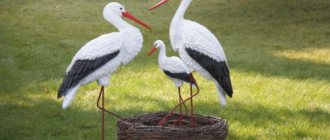
Remember where your site is less congested - near the fences. Decorate it, and it will become a wonderful backdrop for a nearby composition or a solitary sculpture, for example, snow-white swans (we’ll tell you how to make them below). Any thing should not stand out from the garden landscape and its style.
Specifics of materials
Each material has its own characteristics of use. They differ in the following parameters:
- resistance to atmospheric conditions;
- processing complexity;
- curing time;
- need for additional surface treatment.
The most unpretentious ones will be garden figures made from plastic containers and old car tires; their service life is almost unlimited.
Imagine yourself as a sculptor
The romance of the garden, even with an abundance of flower beds and a gazebo in the center, will be lost if you do not place monochromatic sculptures of people or elegant crafts with subtle contours.
Do you miss country life? Learn how to make figurines for the garden, and arrange wooden homemade livestock and birds.
Creative nuances
It is clear that before placing a decorative element on the site, you need to carefully consider which form will fit best into the concept.
If you need dimensional, volumetric ones, then molds will be relevant for implementation. In addition, you must first stock up on spatulas, brushes, varnishes, and paints.
Only after you have decided on the shapes and prepared all the necessary tools, you can start making your idea.
Avoid eclecticism
The figures should not be connected chaotically into a composition. A full-length replica of an anaconda hanging on the fence will scare not only your children, but also your neighbors.
Exclusive figurines will decorate any garden, already blooming or just beginning. Below is a selection of interesting stories.
Making a Floral Card
Before starting work, you should prepare a sheet of thick cardboard, colored paper, glue and scissors. Next you need to follow the step-by-step instructions:
- Choose a template for any flower you like: tulip, original rose, lush peony.
- Using the template, outline the main details: bud, leaves and stem.
- Fold a sheet of cardboard in half to make a simple postcard model.
- Paint the outside of the card with watercolors and let the paint dry.
- Glue the flower details onto the title page.
If the child wishes, you can decorate the card with additional icons or symbols, beads or rhinestones. Parents can help make a congratulatory inscription.
Scales in the wind
The wind can be a “composer” if you create an instrument for it. Find plastic flower pots at home, larger ones in the center, smaller ones around.
Paint it with bright colors, and wrap at least one with food foil - the sun will shimmer on it, and the thief birds of your harvest are afraid of this. Hang it all on a hook at a height of up to 2 meters. The wind itself will create music, shaking the pots and rattling them.
Nice price for prompt delivery of water to your home in Kharkov from the VodSnab online storeFavorable price for apartment renovation from a reliable Odessa company Stroy House
How to insulate a balcony?
Safety precautions at work
When working together with your child to create a craft, you should follow certain safety precautions:
- Avoid contact with parts that are too small.
- Work with scissors and glue only under the supervision of an adult.
- Do not allow paint, glue or other liquid components to get into the child’s eyes.
We recommend reading:
Crafts from plasticine: the best master class for children at school or kindergarten. 90 photos of the best ideas for creating plasticine figuresFelt crafts - the best patterns and templates. Step-by-step instructions and master class for beginners (130 photo ideas)
DIY crafts from egg trays - the best step-by-step master class, with description. TOP 100 photos of original ideas for crafts
If these simple conditions are met, the work will bring only joy and unforgettable impressions to the child.
Romantic swans
You need two tires with a diameter of up to 80 cm. Mark half the circle, cut out a long neck and an elegant head from its chassis. From the rest of the sides, cut out like leaves, this is an imitation of feathers.
Place two swans, painted with white acrylic, one after the other on a green lawn. It is better and easier to make cuts using a grinder.
Craft Frog
The Frog craft is designed for one of the parents to participate in the creative process. Prepare colored paper in yellow, white, green, red and black, scissors and a glue stick.
We make blanks: one large diameter circle of green paper for the head, one red circle with a smaller diameter for the mouth. For the eyes: two larger circles of green, two smaller circles of white and two small circles of black.Frog body: cut out two yellow stripes. We fold the strips together to form a rectangular spring.
From green paper we cut out 4 three-legged frog legs.
We assemble the eyes: glue white circles onto the green ones, and black ones onto them.
We bend the green circle, the base of the head, from the bottom and glue a red piece folded in half in its center - this is the mouth.
The frog should sit on a piece of paper: cut it out of green paper, and draw veins with a felt-tip pen.
Glue the frog's body in the center of the sheet. We attach the head blank to it with the bent side. The eyes should protrude above the head, so they must be glued in the middle of the workpiece to the top of the head. The final touch: glue the paws to the body.
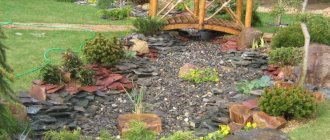
Flowerbed made of stone
Its secret is in a harmonious composition and the ability to occupy a currently empty plot of garden territory. Take a 2x2 meter square of land and draw several circles in it, spaced apart from each other. Fill each cone, no more than 20 cm high, with clay and crushed stone, and fill it with thick cement. Before it sets, line the cone with stones.
If there is a lake or sea nearby, it is better to use rounded pebbles. Plant so-called border flowers between the cones so that they do not cover the stones.
The fastest figures
The most pliable material for sculptures is gypsum. You can simply cast a large log from it, and then use a knife or a grinder to cut out the intended figure: a mushroom, a gnome, a pig.
Vertical gardening of an apartment: how to do it right- Dwarf conifers: types and benefits
Trash cans at reasonable prices from Plastic-Shop
But the finished product must be covered with a protective layer: gypsum absorbs moisture and collapses. Paint it with multi-colored acrylic as well. And there will be exclusive plaster figurines for the garden.
Foam decorations
Crafts made from polyurethane foam are becoming popular among gardeners. From the tube it can be applied directly to the prepared base, or cut from a large piece of material. Such products are light in weight, require minimal costs and are easy to implement.
The disadvantage of foam figures is that under the influence of sunlight they become loose and change color. Experienced craftsmen advise applying plaster or plaster bandage over the foam. Such figures can be painted with any construction paints.