A wooden fence is an excellent option for budget fencing, which is environmentally friendly and aesthetically pleasing. Moreover, its installation is quite simple. If desired, a regular wooden fence can be built in just a few days.
But you shouldn’t limit yourself to hastily driven wooden stakes into the ground. We have selected for you a variety of ideas that can be implemented on the site. Of course, the result depends on your experience and skill level. And if you have a rather large area, it may take more time for installation. Therefore, we advise you to carefully prepare for the upcoming work and study the advice of the experts. Then everything will definitely work out!
All wooden fences for dachas have the following advantages: they are environmentally friendly, easy to install, and depending on the type, they protect well from prying eyes, noise, and dust. But they also have disadvantages. Wooden fences are short-lived, require treatment to prevent rot and pests, are not resistant to significant mechanical damage and are easily flammable.
So, here are some fences that definitely deserve your attention.
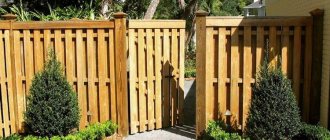
Picket fence
Perhaps the most popular type, it is quick to assemble, almost any boards will do, it can be made as a blank shield, or it can be made with a small distance between the elements. Not only does it cover the area from the eyes of passersby, but it can also perform a decorative function and, if desired, can be easily combined with other types or transported to a new location.
Territory marking
To determine the number of support posts and other elements for equipping a wooden fence, you will have to mark the area.
To mark the territory, stakes made of wood or iron are driven into the corners of the fenced area, between which a cord made of nylon or other sufficiently strong material is stretched.
Territory marking
When such pegs are driven in, the width of the hole must be taken into account to secure the support post on the outside. This makes it possible to leave the thread taut during the construction of the fence.
After the perimeter of the future fence has been determined, you need to mark the location for the upcoming installation of the gate. Since the support pillars in this place will be subject to heavy loads, they will have to be strengthened additionally.
The permissible distance between support posts may be more than 2.5 m. If the distance is greater, the crossbars may sag over time, and the stability of such a fence may not be sufficient in windy weather.
To ensure that the visual characteristics of the fence do not lose its aesthetic appeal, it is advisable to maintain the same distance between the support posts.
Fence palisade
One of the oldest types of fence, a wall of logs dug in close to each other, with a point at the top, labor-intensive to construct, but reliable. It is quite difficult to break it, and if such a waste of wood does not seem advisable, you can use bamboo.
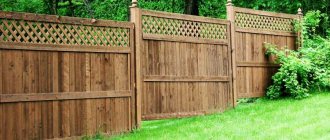
Checkered fence
An improved version of the picket fence, the boards are attached alternately from the outside and inside in a checkerboard pattern. You can also make a blind version or with small gaps, it looks difficult, but if you follow the order of fastening, anyone can assemble it.
Price
If you order the construction of a picket fence with a gap between pickets of 20 mm in length from 30 to 100 m to a specialized company, then for 1 m.p. you will have to pay the following prices:
- at a height of 1.5 m: 1140 rubles;
- at 1.8 m: 1220 rub.;
- at 2 m: 1280 rub.
For a length of more than 100 m, a discount and 1 m.p. are provided. will cost, respectively, 1070 rubles, 1150 rubles, 1200 rubles.
A solid wooden fence of the same height will cost 1280 rubles, 1360 rubles. and 1410 rub. for 1 m.p. with a length from 30 to 100 m and 1180 rubles, 1260 rubles. and 1310 rub. for 1 p.m. with a length over 100 m.
Ranch fence
Although the name and appearance hint at the American roots of this fence, it is used everywhere. An excellent option for temporary construction or as a decorative element, but it will not hide from prying eyes.
Wattle
The name of this type of fencing speaks for itself. It is constructed by interweaving relatively thin, untreated branches of trees and shrubs that have sufficient flexibility, such as willow or hazel. At the base of the fence there are thicker poles driven vertically into the ground, through which thin rods are threaded, like basket weaving. This fence looks very impressive, but is still decorative in nature, since it is quite flimsy and not durable.
You can see the manufacturing technology of such a fence in the following video:
Return to content
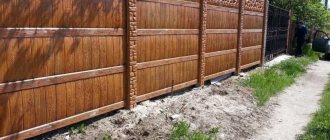
Fence blinds
It got its name from a famous office curtain. The boards are mounted on guides at an angle. The main difficulty in its construction is the need to use a foundation.
Wicker fence
This type of fence is made from branches or parts of a vine and looks rather flimsy, but it is not. There are some difficulties in creating it, many small actions, a couple of mistakes can lead to the need to redo part of the work.
From choosing a fence, we move on to choosing the material, and the most important thing here is the type of wood. It would be best to use Siberian larch; contact with water only makes it stronger, and this is very good for outdoor construction. A common option is pine, which is sold almost everywhere and is relatively cheap, but it is not advisable to make support posts from it. Oak, ash and walnut will also perform well. It is better to refrain from using birch; it is extremely unstable.
Care
At least once every two years, and preferably annually, the fence should be painted or varnished. It is best to use yacht varnish - it provides the best protection.
If you want to give the fence an unusual look, paint the pickets in different bright colors - then it will look like a picket fence made of colored pencils.
Another interesting option is to use white and black paint to make the fence look like a piano keyboard.
It should be remembered that the board or timber is most vulnerable in the place where the cut is made across the grain. Here the paint must be applied especially carefully and generously.
If somewhere the processing was not completed in a timely manner and the wood began to rot, the damaged area must be cut out. Next, a galvanized steel plate is fixed in this place.
If, for the same reason, any of the steel elements begin to rust, it should be treated with a rust-converting compound. If corrosion has had time to severely destroy the material, the element must be replaced.
If any of the pillars become loose, you need to dig a hole next to it and see if the wood has rotted. If not, do this:
- the pillar is supported by supports;
- dig it to a depth of 20 cm;
- pour broken bricks into the excavation and pour concrete on top.
The concrete gains sufficient strength in a few days - then it will be possible to dismantle the supports.
If the inspection reveals rotting of the support, you need to dig to its base, cut out the damaged area and install a column of concrete or brick in its place.
Wooden picket fence
Perhaps the easiest to build and unpretentious in materials. You can use a non-edged board for this, but it would be much better to use an edged one; it is cleared of bark and does not require pre-selecting locations for fastening elements.
First of all, you need to prepare wooden posts for the fence: select those that are suitable in length (remember that about a quarter will be in the ground), and immediately treat them with substances that protect against moisture.
Now we dig them in by a quarter, with a distance of 1.5-2 meters; some prefer to concrete them in the ground, but it is better to use special consoles on which the pillars are separately attached. We pull the rope tightly between the supports, this will help level the future fence. We drive a nail into the top of each post and stretch the string to control the height.
Note!
Do-it-yourself porch to the house - the best projects and construction ideas (125 photos of new products)
DIY brick barbecue: diagrams, drawings, photos, dimensions. Review of simple and complex structures on a summer cottage!
House with a bay window - 150 photos of the best planning and design ideas. Overview of all features of an architectural element
Now understanding what length and quantity of boards are needed, we prepare them, saw them off where necessary, and treat them with a special anti-corrosion solution. Protection can be purchased at the store, or you can make it yourself; the recipes are not complicated and are not a secret. The time has come to attach the horizontal guide boards, they must be strong, the optimal thickness is 25-30mm, they are located at a distance of approximately 30cm from each other.
For fastening, it is better to use screws of such length that they protrude slightly from the other side of the post. Now we attach the sheathing, depending on the desired result, the boards can be screwed close to each other, or with a gap. When doing this work, you should use a plumb line, then the fence will turn out smooth and beautiful. After complete assembly, the last important task remains, painting the wooden fence.
You can use any color and type of paint, as long as it is suitable for the street and weather conditions.
If someone finds this fence too boring, then you can always try to make something more complex. But keep in mind that different fences require different stages of work and preparation; in some cases you cannot do without concrete pillars or you will have to work not with boards, but with logs, which is quite difficult physically. By following the recommendations, you will definitely be able to make a wooden fence with your own hands, without the involvement of builders.
Maintenance of wood after several years
Even if fence wood is properly protected from fungus and moisture, it still needs to be maintained every few years. After several winters, the wood will be cracked, partially chipped, and the paint will begin to peel.
The first step is to clean the wood of dirt. Cracks and crevices are cleaned with a stiff brush. If the fence was previously painted, then you need to remove the peeling paint with sandpaper or a grinder. Severely damaged or cracked paint is removed to bare wood.
Then the cavities are filled. Small gaps are filled with putty. Large cavities can be sealed by inserting wooden patches. The most damaged boards must be completely replaced. The cleaned wood should be impregnated and then covered with paint, varnish or glaze.