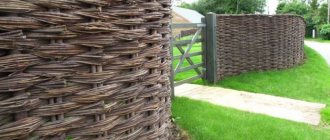
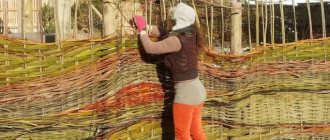
Not so long ago, wicker fencing was the main way to separate private property. The emphasized antiquity and natural origin of the raw materials allow the wattle fence to organically fit into the countryside landscape. For this reason, they are in demand in large areas near and between populated areas, as well as in parks and various natural sites. If you need to create a rustic ambiance or the atmosphere of an old courtyard, first of all you should take care of the appearance of the fence. Depending on the direction of the rods, wicker fences are divided into horizontal and vertical. The first option is usually denser and requires a lot more branches. Living fences are also popular. They look fresher, and sometimes are additionally decorated with a hedge of lush plants. The wattle fence is one of the types of structures that can be made without special education.
Peculiarities
An ordinary fence is a light barrier made of shoots and flexible branches. This type of fence features chaotic lines and a makeshift structure. The material is used in its natural form, almost without being processed. Wicker fences are mainly decorative structures, because they are rarely erected to a height of more than 1.5 m. There are also tall modifications, but this option is not always justified, since large dimensions do not solve the problem of the fragility of the material itself, and even in a large fence there will be more cracks and they will, in principle, become larger.
The above nuances imply frequent repairs of the fence, as well as greater openness of the area for viewing by strangers. The main advantages of wicker are the low cost and lightness of the consumables. Wicker fences are still relevant today and can be combined with many styles of site design.
How and where to use wicker fences in the garden
A small wicker fence created with your own hands has long been popular. Wattle is used in gardens, decorating restaurants and shops. This solution emphasizes the rural theme, creating a relaxed atmosphere. Correct use of such a wicker fence becomes a presentable accent to any garden area, decorating a flower bed or garden bed.
Most often, such decorative elements can be of three types, based on this, their purpose is determined:
- Low decorative fences, reaching a height of up to 50 centimeters. They usually act as borders for garden beds or flower beds.
- A tall fence acting as a fence, up to 1 meter high. It is used to divide the yard into several zones. For example, such structures enclose garden swings, benches or tables, and barbecues. If you have a pet, use a wicker fence to designate a place where animals are allowed to roam. Wattle can even be the main accent of a yard, used as a frame for climbing flowers.
- Tall. Two-meter wicker options protect from neighbors' eyes, creating a complete structure.
Another interesting option is to create baskets or boxes of different sizes, inside which flowers will be planted. This is an original solution when creating exquisite floral designs.
Where to use wattle
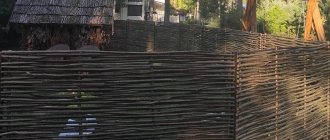
This is how small plots of land are fenced. The fences are also used as additional fences inside private property. Low variants are also erected along paths. They are often used to separate gardens, vegetable gardens and flower beds from the rest of the space. The fence perfectly demarcates the territory of two neighboring plots. Low and medium-high fences will not cast much shadow in any direction. The branches are excellent for constructing partitions used for zoning areas. This is how summer and children's playgrounds, gazebos, and terraces are set up. Fences are also used to decorate barbecue areas. Low wicker fences can be seen in themed restaurants. Pletni is an important element for expressing ethno-style. At dachas and other properties, a wicker fence goes well with other wicker items - chairs, rocking chairs and tables.
Purpose
Before you start creating a wicker fence, decide what its purpose will be. A wicker structure can serve as a regular fence, be used to place accents or divide personal space for more convenient movement, emphasize a certain style direction, or serve as an original mini-fence for beds and flower beds in the garden.
Based on the purpose, you need to choose from an assortment of materials used for the construction of such structures. If you need a durable and reliable fence, you can make a wicker fence from twigs, branches and vines of trees - willow, hazel, broom, etc.
Let's look at the main pros and cons of decorating a personal garden using such wattle fences.
Selection and calculation of material
Such fences are usually woven from willow or hazel. These plants have long, smooth and flexible branches with virtually no transverse processes. This raw material is symmetrical, which is an important plus. Sometimes reed stems are used, as they bend well, but the structure is fragile. Bamboo is especially durable, but you will have to order it. To create wickerwork, vines without bark are used. Calculation of the required amount of material is done “by eye”. One armful is enough for a fence 50 cm high and long. This value is not constant and can deviate towards decreasing or increasing, since the diameter of the rods varies, and the density of the weaving is selected individually. Tyn can be erected from young branches of many bushes and trees, but only at a certain length - from 1 meter. In this case, the work will be more complicated, and the weaving itself will be chaotic.
Other nuances:
- Large, even branches of 4 cm in diameter are used as support. It is appropriate to use metal rods, boards, round beams, if they do not spoil the overall picture and do not stand out too much.
- The step between the crossbars is usually 0.3-0.5 meters.
Materials for wicker fence
Along with easy assembly, the fence can, if necessary, be dismantled and moved to another location. To extend the service life of the fence and increase reliability, it is better to use PVC pipes and profile metal pipes as posts.
When a palisade is created, each of the sticks must be treated with impregnation or an antiseptic to remove moisture.
A fence assembled from separate sections will last many times longer than a solid wall of branches.
Let's take a closer look at what raw materials are best used for wattle.
Tree branches
Not all breeds are suitable. Dry branches or brushwood are not used. It's too brittle. This type of fence will not last long.
Hazel
A fence made of walnut branches is a durable design option.
The material is harvested in early spring before buds form. You need to cut off young shoots. They are easily intertwined due to excellent flexibility and rarely break. A properly assembled fence turns out to be a reliable wall of branches.
Willow, willow
Low bush-type willows are often found in wetlands. Their scientific name is talnik. They are also suitable for creating hedges.
Willow branches as raw materials have a number of advantages:
- The material is very flexible, which simplifies weaving and allows you to give the structure any shape.
- Wear-resistant. Subject to periodic treatment from moisture.
- All types of willow can be used.
- You can make a living and non-living hedge.
To make a living willow fence, you need to plant young branches in the ground. Willow is easily accepted. It is customary to weave shoots together vertically during growth. A beautiful wicker green wall emerges.
A dead hedge is pre-cut branches intertwined.
You need to prepare for weaving in advance. Willow trees can begin to be cut from mid-autumn to early spring.
The following are used as fence posts:
- thick poles;
- beam;
- fittings;
- PVC pipes, metal.
If the raw materials begin to break after storage in winter, then the craftsmen recommend that before constructing the fence, pour boiling water over the rods and leave it there for several hours.
Vine
Grapevine is an excellent raw material for making wattle.
Among the advantages:
- flexibility;
- long rod length;
- resistance to temperature changes and wear;
- moisture resistance.
Thanks to these advantages, the fence will last for many years. Grapevine fences enclose garden beds, flower beds, and children's playgrounds.
Due to its good flexibility, the vine will make a beautiful arch for the garden, a partition for zoning a summer cottage.
Birch
Birch branches are a unique material. The unique combination of white and black will turn the fence into an elegant decoration.
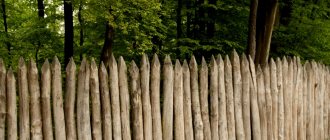
Thick birch twigs assembled together form a reliable palisade - a blank wall, which, along with a decorative one, also performs a protective function. To increase safety, the owners make the top part sharp in the form of a stake.
For the palisade, long branches are taken - from 1.7 m, with a diameter of 5 cm.
Plants
You can make a beautiful fence not only from tree branches, but also from reeds or cattails. We will discuss the nuances of such a fence below.
Reed, cattail
The reeds look like dense strips. This is free material, which is abundant near bodies of water.
The main disadvantage of reeds is low strength and fragility. When the rods dry out, they become brittle. A finished fence will last a maximum of a couple of years, then it will have to be replaced.
For weaving, reeds are formed into bundles and tied with wire or rope to wooden supports and crossbars.
A reed fence is made low, like a border, enclosing flower beds and flower beds.
Veneer
Veneer is thin strips of wood. It is made from different wood species. For wattle fence it is better to take oak.
The fence is assembled in sections. They are attached to the wooden frame with small nails.
Without experience, weaving will be problematic, so it’s easier to buy ready-made veneer sections. They are also perfect for street gates.
Boards
For braiding, use thin boards, preferably hardwood. Additional supports made of thicker boards are installed between the pillars in a vertical position. All lumber is treated with an antiseptic before installation.
The recommended board thickness for fence sections is from 2 cm.
Types of weaving fences
Weaving options are distinguished according to several criteria. Depending on the height, it can be high (fence height more than 2 m), medium (1-2 m) and low (below 0.7 m). The first type of weaving involves the creation of permanent structures, for example, an external fence. The second is used to separate zones and separate small summer cottages. The third type is associated with the creation of decorative partitions, fencing flower beds and paths. Depending on the principle of connecting the elements, horizontal, vertical and inclined weaving is distinguished, as well as the less common round and checkerboard. In the first case, we are talking about laying long rods perpendicular to the vertical supports. In the second, horizontal veins act as the basis for the vertical placement of branches. The inclined option implies diagonal placement in increments of up to 0.3 m. According to the installation method, weaving is divided into poles, which is done directly onto the supports, and in sections, when the canvases are woven separately and then placed between the pegs.
Weaving methods and technologies
There are a whole lot of them. The photo above shows fragments of popular techniques. Below we will look at the features of the three main methods.
Vertical
Wooden planks or branches (2-3 pieces depending on the height of the fence) are attached to the posts in a horizontal position. The slats are intertwined with rods in a vertical position. The bottom of the fence should start from the thick edge of the bars. The upper edge is fixed with wire or rope.
Horizontal
Every half meter it is necessary to drive supports into the ground.
Weaving begins from the thick edge of the branch. The branch is passed between each pillar in turn. The next row must be walked on the other side of the fence. After several rows, a figure eight pattern will be noticeable.
If the rods are thin, then it is better to collect them in bundles and only then start weaving.
Chess
A variation of the horizontal method. The difference is in the use of several rods at once. Usually thin ones are selected.
The result of correct application of the technique is a pattern resembling a chessboard.
Step-by-step instruction
The wattle fence is constructed in several steps:
- Preparation of materials: branches of various thicknesses separately for the base and for the canvas.
- Preparing tools.
- Calculations on the territory.
- Creating a foundation.
- Installation of rods on the base.
- Eliminate deficiencies immediately after creating the fence.
The first step is to resolve the issue of choosing raw materials. The final decision should primarily be influenced by the planned configuration and purpose of the wicker structure. Materials need to be collected or purchased. The first option is preferable, since collecting stems does not take much time. However, there are two small periods of time in the year for this. The collected branches are sorted depending on their thickness. Large branches for supports must be processed. Then the exact location for installing the base is determined. The pegs are driven into the prepared soil to the required depth. Further actions depend on the chosen weaving option. Two main ways: horizontal and vertical. The first one is used more often. When the wattle fence becomes dense enough, all that remains is to decorate it. There are few traditional decorative options, literally two or three, but there are many more ways to decorate a fence.
Materials and tools for building a fence
The first step is to decide which type of plant will serve as the basis for obtaining the elements of the future design. It is recommended to choose between willow and hazel. Smooth, flexible and long branches are required. The minimum permissible thickness is about 1 cm. The role of support is given to branches with a diameter of at least 4 cm. Instead, it is permissible to use round beams, as well as iron rods, although due to the disruption of the natural appearance, this option is undesirable. The twigs should be collected in early spring or autumn months. They will need to be softened in water and cleared of bark. In addition, you need to collect tools. To create a wicker fence, you need tools such as nails, a screwdriver, construction line or thread, wire, a sledgehammer or large hammer, tape measures, a wooden mallet, hacksaws and pruning shears.
Preparing the base
The base can be made from almost any type of wood. You will need to make sharpened pegs from the material to insert into the soil. Install them at the same distance from each other. The recommended depth for driving supports into the ground starts from 20 cm and increases depending on the height of the planned structure to 50 cm. The ideal structure will withstand strong winds and settlement of the ground. The minimum permissible diameter of support pegs is 4-5 cm. Larch poles are among the most durable. If the pegs are made in the classic version (i.e., made of wood), then they are treated with impregnations, antiseptics and varnishes. These measures are aimed against rotting and fragility. The cuts need to be additionally charred. Under the base it is necessary to make drainage from sand and crushed stone. The height of the fence is determined based on the purpose and individual wishes.
Preparation of rods
The material is harvested in autumn or early spring. The movement of sap at this time is minimal and there are not many leaves on the plant. Priority is given to the straightest and longest stems. If the fence will not be erected soon, the branches are dried. For a standard wattle fence, shoots within a 3-centimeter width are selected. Wider rods strengthen the fence. Shortly before weaving begins, the branches are soaked in water to make them flexible and remove the bark. The duration of this stage of work is approximately a week, but in the case of freshly cut rods it is reduced to several days. A pincher is used to process the branches. You can also use pliers or wire cutters. The end of the branch is placed between the clamps and pulled towards itself. If the shoot is well wet, removing the bark will be easy. It is better to cover perfectly cleaned branches with stain and antiseptic. You can adjust their color. However, if you plan to build a large fence, it will take too much time.
Horizontal wattle fence
The load-bearing elements of the horizontal version are pillars driven into the ground. The base should consist not only of pegs, but also sand and crushed stone drainage. Smooth, thick pillars are inserted into the soil with a gap of 1-1.5 m between adjacent elements. If the branches for forming a section are very thin, then a minimum distance of 1 m is selected. We take the rod by the thick edge and place it behind the second post, with the continuation of the branch we go around the outer stake and move along all the supports in a “figure eight”. It is advisable that one vine is enough to cover at least three pegs. Each subsequent row starts from the opposite edge. It is necessary to maintain uniformity in the placement of thick and thin rods, and so on throughout the entire fence. The thickness of the fence at different points should not differ much. When the structure reaches the desired height, you will need to trim the length of the rods.
To make the rows of rods more dense, they should be hit with a wooden hammer from top to bottom.
Vertical wattle fence
The method of installing the base is initially similar to the horizontal version. The support pillars are driven in the same way. Parallel to the ground, you will need to install at least 3 strips of twigs of approximately the same thickness as the pegs, or less. They are tied or nailed to supports. The total number of slats depends on the height of the fence - they should be placed no further than 25 cm from each other. To ensure that the fence has a neat appearance, a crossbar is placed along the top side, which is removed after completion of the work. Rods are vertically attached to the support strips, matching the height of the fence. With their thick edges, these branches rest against the ground and are then intertwined with horizontal supports. The rods need to be fixed at the top. Wire is designed for this task. Alternatively, you can use thin rope or weave several horizontal rods.
Decoration
Previously, sunflowers and cornflowers were planted near wicker fences. This type of decoration is considered classic. Modern options involve planting fresh flowers, as well as the use of artificial ones. A flower arrangement can be created from nasturtiums, chrysanthemums, asters, and daisies. The fabric of a wicker fence is a suitable place for climbing plants. A bench made of boards, sections and stumps will diversify the monotonous row. It is customary to hang pots on the tops of support posts. In the same way, you can use small stuffed animals, shoes, etc. You can approach decoration more thoroughly. For example, select and place several dozen large decorative stones of different colors near the fence, install 1-2 flowerpots with rich green vegetation and a wheel from an ancient cart on them. The result will be an effective and inexpensive composition. A wicker arch can be erected next to the gate.
Making a wicker fence for a flower bed
An excellent wicker fence, created with your own hands from scrap materials, will be an excellent solution for decorating a flower bed.
Manufacturing process:
- First, we stick the risers into the soil. We fix them with ropes. It is important that all bases stick out in a straight direction or at an angle. You need to gain the optimal height using simple weaving. Try to make sure that the number of bases is unpaired, this will allow you to immediately create an optimal weave.
- The top of the flower basket is decorated with a “fold”. This is the name for the weave of risers located along the upper edges of the products. Many baskets have just such a finish. Decorative fences of small height do not require “bending”, but it is better to do it to hide the protruding sticks.
- To build a bend, insert 1 additional rod on the right . First, the structure is bent higher than the fence itself, then they go around the upper riser, take it outside, then repeat the action from the inside and again from the outside.
- Thus, all the rods are braided in a circle, fixing the first on top of the last. Next, all protruding parts are removed. The way the fold will be designed depends on your imagination. The main rule is to observe the rhythm of weaving and stick to it.
Photo of a flower bed framed by wickerwork.
Without wanting to buy wicker PVC fences that imitate natural ones, it is easy and simple to form fences or wattles yourself. A few preparatory manipulations, a little creativity and you will be able to create incredible picturesque corners at home.
Planting a living wattle fence
Such a fence will grow upward and thicker. Branches that become too tall are cut off or sent lower. The living fence practically does not protect the territory, but it can be used as a zone separator within the site. To collect living vertical wattle fence, you will first need to prepare the soil. For this purpose, places for support pillars are selected. We select the distance between the elements within 1-1.5 meters. Then the supports (4-5 centimeters thick) are driven into the ground 40 or 50 cm. To facilitate this process, the lower ends of the supports should first be sharpened. Next, we attach the transverse joists. Using wire, we install thinner rods in several rows (3 are enough at a height of 1.5 meters). Then it's time to plant the branches. Shoots up to 3 cm thick are immersed in the soil by 30 cm. The distance between the stems should not be less than 10 and more than 30 cm. Living wattle will grow and make the composition denser.
The branches should be placed with a slight slope to make it easier to change the composition if necessary.
How to make a vertical fence with your own hands
The method of installing the base is initially similar to the horizontal version. The support pillars are driven in the same way. Parallel to the ground, you will need to install at least 3 strips of twigs of approximately the same thickness as the pegs, or less. They are tied or nailed to supports. The total number of slats depends on the height of the fence - they should be placed no further than 25 cm from each other.
A wicker fence will give your garden plot not only a rural look, but also a special soulfulness.
To ensure that the fence has a neat appearance, a crossbar is placed along the top side, which is removed after completion of the work. Rods are vertically attached to the support strips, matching the height of the fence. With their thick edges, these branches rest against the ground and are then intertwined with horizontal supports. The rods need to be fixed at the top. Wire is designed for this task. Alternatively, you can use thin rope or weave several horizontal rods.
Plastic wattle
An excellent alternative to a regular wicker fence is a plastic fence. This type of fencing is not afraid of time. They are also attractive to look at - they look modern and original. Plastic can have high strength, which will protect the product from minor mechanical impact. One of the most popular materials is polyvinyl chloride (PVC). Fences, partitions and other objects are made from it. PVC is resistant to corrosion, rotting, extreme temperatures and temperature changes, and direct sunlight. Dirt is easily washed off from a plastic fence; special solutions are not needed. Plastic structures are lightweight, so transportation and installation will be quick and without complications. An untrained person can install such a fence. A fundamentally important feature of a material such as PVC is its resistance to fire.
Disadvantages of installing a plastic fence:
- a strong impact on it will leave defects that will be clearly visible;
- high price.
Pros and cons of wooden fences Wicker
Before you make a wicker fence from wood, you need to learn more about its features and characteristics.
Pros:
- Saving on foundation. A lightweight wicker structure does not require a massive base, which means you can save on materials for the foundation and reduce the amount of excavation work.
- Environmental friendliness. Fences made from natural materials do not heat up in the sun, which is very important for plants and flowers planted close to the fence.
- Aesthetics. A wicker fence made of rods, peeled veneer or boards looks beautiful and original. Such a fence not only encloses the site, but also serves as a decoration for the landscape.
- Simple and quick installation. You can make such a fence yourself using a basic set of tools.
Minuses:
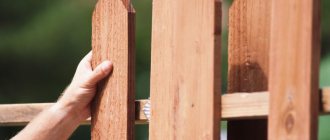
- The tree does not tolerate changes in humidity. To prevent the planks from twisting and becoming cracked, it is better to make a wicker fence made of boards from well-dried wood.
- Wood attracts pests. This issue can be resolved by treating the boards and rods with antiseptics. Impregnation protects not only wood-boring beetles, but also from the formation of mold.
- Wood burns easily and quickly. To increase the fire resistance of wood, it is treated with special compounds - fire retardants.
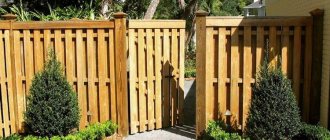
Wicker fence made of boards
Stages of creating a fence from boards yourself:
- Initial calculations;
- Marking and installation of support pillars;
- Installation of fencing;
- Finishing.
Weaving using boards involves creating various edges and transitions. The result is an interesting “designer” structure. To install a fence with your own hands, you will first need to make calculations. The first step is to mark the corners of the fence. You will need to install pillars in the corners of the plot and provide wicket and gate areas (they are usually combined). Then the step between the supports is calculated. If the pillars are concrete or wooden with a thickness of 8-10 cm, they can be placed at 3-meter intervals, thin supports (5-7 cm) - up to 2.5 m. Next, preparatory work is carried out: markings are made, pillars are installed. The main stage is the installation of the boards themselves. You need to mount it from below first, bending the boards one by one. This task will require two people. The boards are attached to the posts using galvanized nails. Work is carried out immediately along the entire perimeter: first, the first row is laid everywhere, then the second, etc.
Horizontal tyn
Having prepared all the tools and materials, you can begin building a horizontal fence. The process includes several stages:
- As in the first case, here, too, you must first make all the necessary markings, cut the rods into sizes of suitable length and prepare the foundation for support. In order for a fence that is too high to hold more firmly, it is necessary to dig deeper into the soil and fill the supporting pillars with concrete.
Having made the base of the fence by installing vertical posts, you can begin stringing the rods. To do this, you need to take the branches and begin to thread them through the vertical crossbars one by one. In order for the rods to fit together well and tightly, they should be immediately compacted with a hammer.- It is important to remember that each individual twig must alternately braid each vertical crossbar to the very top, as long as the height of the support posts allows.
- It is important to ensure that all the rods are evenly distributed throughout the entire fence.
- Once the required height of the fence is reached, the protruding rods should be trimmed so that the fence takes on a neat appearance.
- The ends of the rods remaining on the sides of the fence must be secured together using thick rope or wire.
- At the end of the work, the fence should be treated with a protective agent, which will allow it to maintain its attractive appearance and strength longer.
To prevent the parts of the fence that will be in the ground from rotting over time, they should first be charred or lubricated with bitumen . You should always use only wet twigs, since dry branches bend poorly and break quickly. And in order to somehow decorate the finished fence in an unusual way, it is enough to use a variety of elements of traditional decor - here you can use everything that your imagination suggests.
How to care for finished fencing
The service life of wicker fencing reaches 5-7 years. After this period, the fence will begin to quickly deteriorate. The main factor that worsens its condition is dampness and, as a result, rotting of the lower part of the fence and the base. Basic care will extend its service life by preventing the accumulation of water under the fence. Dense vegetation and tall grass are also undesirable in this place, since the humidity in the thickets is high. It is recommended to use matte varnishes and antiseptics as protection. They form a barrier against moisture for the above-ground part of the fence. Among varnish compositions, preference should be given to matte ones, because after using glossy varnish the fence will take on an unnatural appearance. Treatment should be carried out at least once a year - then the chances of increasing the service life will be higher.
Decorative elements
It is recommended to add attractive visual details to a wicker fence.
You can plant sunflowers nearby or place their artificial counterparts. Chamomiles, asters or chrysanthemums will fit perfectly into the ethnic style of a wattle fence. Any climbing plants will only emphasize the visual advantages of the structure. This is interesting: a wicker fence made from boards.
A bench made of stumps and boards will perfectly complement the colorful landscape. And shoes, galoshes or clay pots hanging on pegs will definitely lift the spirits of those around you.
When making wattle fence, the main factor for successful completion of the work is patience. The creator of this piece of wooden architecture will definitely be pleased with the end result.
Pre-treatment of the vine
In our work we use thick rods with a diameter of 15 - 30 mm. But it is better to cut them off immediately before work, since soaking rods of such thickness is very inconvenient. If this is not possible, then the rods should be dried. The rods are dried in the fresh air under the sun's rays. The twigs are considered well dried when the vine loses its original flexibility. After this, they are sorted according to thickness, size and tied into sheaves. In this form, they are stored in a dry, cool place (a barn, on a balcony or street, having previously been wrapped in plastic). The appearance of mold on the vine indicates its further unsuitability and violations during storage.
The dried vine is placed in a bath of warm water before use. You can also use a large vat, but in extreme cases, you can lower the workpieces into a river or stream. The main condition is that the material must be completely covered with water. When the rods become as flexible as freshly cut.
Willow
A product made from the twigs of this tree is characterized by flexibility and endurance. Any type of willow, of which there are many, is suitable for this. You can make a living or artificial hedge. The first option involves planting young shoots, from which a wattle fence is created as the trees grow. A dead hedge is a tyn made from pre-harvested branches.
It is best to use freshly cut shoots. Raw materials are harvested from autumn to spring. When branches from prolonged storage begin to break during work, they need to be soaked in hot water for several hours.
The best time to procure raw materials
The most favorable time for harvesting willow twigs is spring or late summer. In the spring, the main task will be to catch them before the sap flows, and therefore it is best to start preparing the rods in April and May. You can also make preparations at the end of summer and at the beginning of autumn - August, September, October - before the soil freezes. And it is in autumn that the color of the bark of the twigs becomes different shades - from milky green to burgundy, which combine perfectly. It is ideal to go shopping for workpieces on a sunny and dry day, since in such weather both the quality of the material and its storage conditions improve significantly and the work will be more enjoyable.