Making a forged fence can be considered almost jewelry work, since only attention, skill and accuracy can help a master or even a novice in this complex task. This task is very difficult, but if you have a desire to independently carry out the plan and fence your territory with an attractive fence, then it’s worth a try. To make a forged fence with your own hands, you need to select not only materials, but also special tools that allow you to realize your plans. A detailed description of the actions will be given in this article.
What kind of forging is there?
Depending on the method of creation, it happens:
- Stamped. Done in production. It is an automated process for manufacturing metal elements. You can buy ready-made identical fence sections and install them yourself. Much cheaper than a manual one, but such a fence will not be unique.
- Manual. Performed using hot or cold technology. Each forged element is unique. Masters create custom-made entire paintings that can tell about the tastes and hobbies of the owners of the site. The process is labor-intensive and time-consuming. Ready-made handmade sectional canvases are an expensive pleasure.
Let us examine in more detail the production of parts using hot and cold forging.
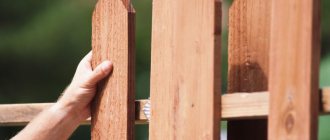
hot
Photo: hot forging using hand tools
The metal workpiece is heated to the required temperature so that it becomes soft and plastic. Next, the craftsman uses a hammer, anvil or hydraulic press to shape the part and cool it in cold water.
This is how exclusive architectural elements, artistic ornaments and designs are obtained. To speed up the work, many craftsmen purchase equipment that practically does not require forging by hand.
Cold
Not so popular. The workpieces are processed without heating. The shape of the metal is changed using a press and then annealed. Mainly used in the serial production of parts and gratings using welding. The elements turn out beautiful, but not elite. But for a country fencing, this is a good and inexpensive option.
Photo: cold forging using a bending machine
Material installation methods
If you are going to install a metal fence with your own hands, you need to decide in advance how to make the fence in the optimal way. Let's look at several ways to install this structure.
Vertical
The vertical installation method is considered the most common.
Its varieties:
- deaf;
- through.
This installation is carried out by attaching strips of picket fence to the logs lying horizontally (they are attached in a vertical position), or corrugated sheets, or a grid of rods.
Horizontal
You can build a fence horizontally; it involves installing metal elements to the logs that stand vertically.
The horizontal type assembly involves the use of sections; here pipes from a profile, masonry made of stone or brick can act as pillars.
By sections
Assembling a fence in sections involves putting together spans of fencing, which can be assembled manually or already purchased in this form. Here the sections are attached to the frame using welds, metal corners, self-tapping screws, and bolts. A specific fastener option is selected based on the type of source material.
Solid canvas
The following is attached with a continuous sheet of cloth:
- corrugated sheeting;
- welded mesh;
- fence;
- chain-link
This installation method is simple and convenient, it does not take much time, but it has a long service life. During operation, one sheet is placed on top of another, wave upon wave, after which it is fixed with self-tapping screws that have protective linings.
Where is it used?
Forging is widely used both in the exterior decoration of buildings and in interior design. Most often they decorate with forging parts:
- stairs;
- gazebos;
- fences, gates, gates;
- verandas, terraces;
- awnings;
- window and door openings;
- balconies;
- railings;
- fireplaces;
- chandeliers;
- dishes, vases, candlesticks;
- arches;
- barbecues;
- swings and more.
Photo: forging samples
Elements in the form of tips and peaks are used to decorate the top of fences to give them a finished look. Monograms, currency, and balusters are used to decorate stair railings, fireplace grates, and gates. Metal plants will beautifully complement a summer gazebo or balcony lattice.
Wrought iron goes well with wood, polycarbonate, corrugated sheets, and steel, so many owners try to combine several types of materials when building fences.
Thematic material:
- Metal picket fence
- Wrought iron fence with polycarbonate
Classification by manufacturing technology
Fences are made in three ways:
- Connecting elements by welding. The cheapest option. A welded structure is not a work of art, but the fence will be reliable and neat.
Photo: assembly and welding of forged elements into a single structure - Artistic (hot) forging. Allows you to create different patterns based on pre-made sketches. The master does everything by hand.
- Forged-welded method. They take ready-made strips and rods, give them the required shape and weld the parts to each other.
More often they make fences using the third method. By purchasing ready-made sections, owners significantly reduce costs and time for building a fence.
Plot
Owners of their plots are increasingly using wrought-iron rather than solid fences to enclose their territories. These fences are very attractive, reliable, do not require annual painting and look luxurious. They perform two functions at the same time - they protect your territory and make the site aesthetically very attractive. To make wrought-iron fences with your own hands and enclose a site, you will need considerable effort, you will need to buy additional equipment or tools, but then you will enjoy your work of art year after year and proudly show it to your friends and acquaintances.
Table of contents:
- Basic tools for work
- Materials for making a wrought iron fence
- The advantage of wrought iron fences
- Preparatory work algorithm
- Stages in making a wrought iron fence
- Work to prepare for the installation of a wrought iron fence, foundation
- Preparation work for the installation of a wrought iron fence, production of sections
Basic tools for work
A wrought iron fence can be prepared using several different methods, using different devices:
- welding is one of the easiest and least expensive methods;
- forging is a rather complex method that requires a lot of patience;
- combination is the most professional method, it involves a combination of forging and welding, it is better not to use it for a beginner.
In order to make a wrought iron fence on your own, you should collect many different tools. You must have:
- Bulgarian;
- spiral twisting device;
- spray gun with compressor;
- vice;
- measuring tool;
- painting materials;
- welding machine;
- basic tool from a locksmith's kit.
Materials for making a wrought iron fence
To make a fence, in addition to tools, you need to purchase material; you must correctly calculate the number, thickness and diameter of the components. As a rule, to work you need:
- a metal rod, the diameter of which should not be less than fourteen millimeters;
- metal sheets for tips;
In order for the fence to hold securely, you should approach the issue of pillars with great responsibility. The forged metal structure has quite a lot of weight and a large load will be placed on the pillars. Recommended materials for poles include:
- metal pillars;
- brick supports;
- concrete structures.
Types of structures
There are:
- Fences mounted as separate spans and supported on brick or stone supports. The pillars are connected by a ribbon-shaped plinth 15–100 cm high. An option without it is possible.
- Solid fence fabric. The racks are steel pipes. With the correct diameter, the structure has a holistic appearance.
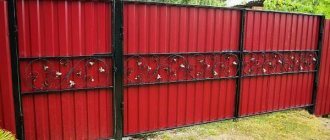
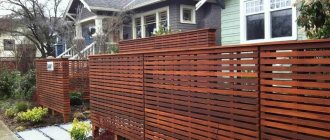
- Fences with a fixed screen, on which forged parts stand out. Thin iron sheets, cellular polycarbonate, and corrugated sheets are used as a shielding surface. Often this is how a wicket or gate is designed to shade the yard and provide reliable protection from strangers.
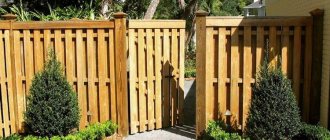
Photo: stylish fencing of the local area
To make the estate closed and not visible from the street side, you should choose a screened fence.
Let's look at the design of other options for wrought metal fences.
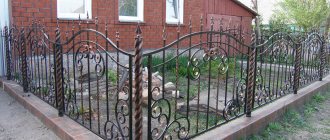
Decorative (low)
They are used to decorate the area, not to protect it. Have artistic elements. They protect flower beds, garden areas, and the area behind the house. They are made low - up to 1 m. They look elegant. They are painted in different colors. Made to order.
Photo: combination of stone and metal in the fencing of the site
Protective (functional)
Factory imitation of artistic forging, obtained by stamping. Implemented in sections. Popular types of pillars are brick and metal. This type of fence is used to enclose private properties, cottages, dachas, and parks. They often have a minimum of decorative elements. Very durable, they serve as reliable protection for the area. The price is affordable.
Combined
This structure combines elements of the first two types. The welded fence is complemented by simple forged parts. A screen made of polycarbonate and corrugated sheets is installed in the background. Standard parts are produced in the factory by stamping. This type of fence is reliable, has average prices, and has an attractive appearance.
Photo: the wrought-iron fence is complemented with profile sheets hiding the garden area from prying eyes
In the private sector, a wicket or gate for a wrought iron fence is often designed using a combination of materials.
Set for work
- Welding machine with a set of electrodes.
- Grinder with grinding and cutting discs.
- Equipment for the production of decorative elements. There are several types of machines that allow you to give metal rods different shapes. You will learn more about the main units below.
- Vise. A flimsy student setup won't do. You need a powerful locksmith unit. Additionally, prepare patterned yews to give the rods a spiral shape.
- Pliers.
- Roulette.
- Hammer.
- Building level.
- Corner.
- A spray bottle or several brushes of different sizes.
- Steel rods with a diameter of 12-14 mm.
- Sheet steel 2 mm thick. We will use it to make peak tips. We buy the material if peaks are present in the selected fencing design.
Elements of a wrought iron fence
Photos of artistic forging
Advantages and disadvantages
Advantages of a wrought iron fence:
- Strength. The reliability of metal cannot be compared with wood or plastic. Forging can withstand any load and is resistant to mechanical damage.
- Durability. The service life of such fences can reach one hundred years. It is not for nothing that many historical architectural monuments that have survived to this day have forged parts. An important condition for long-term operation is high-quality anti-corrosion treatment.
- Does not require special care.
- Can be repaired without harm to the entire structure.
- Beautiful patterns and ornaments look very expensive and elegant.
- Safety guarantee. Metal structures can be classified as burglar-resistant. They are difficult to overcome, especially if the top of the fence is decorated with sharp peaks or tips.
- Wide selection of design styles. To install budget fencing, buy ready-made sections. To get a unique structure, you should develop your own sketch and order forging from a master.
The following should be said about the disadvantages:
- The price of artistic forging of individual fence models can reach 50,000 rubles. for 1 square meter.
- The heavy weight of the structures complicates their transportation and installation.
- To install such a fence yourself, you need experience in construction.
- Fencing without shielding is almost transparent. Therefore, everything that happens on the site will be clearly visible from the street.
- Once every 3-4 years it is recommended to treat the metal surface against corrosion. This way it will last even longer.
If this is your first time encountering the process of building a fence, then it is better not to experiment with self-installation, but to order the services of craftsmen.
How to make a fence with your own hands
The procedure for constructing a fence involves the possibility of making it yourself, which allows you to significantly save your budget and also completely control the process.
If at any stage there are serious difficulties, you can seek advice from an experienced craftsman or hire a specialist only for a certain part of the work.
Project
The design stage involves drawing up a detailed plan for the location of the entire fence and passage areas. The drawing takes into account the local climate, soil type, landscape features, and possible elevation changes.
A detailed plan will help you calculate the required amount of raw materials and prepare all the required tools. If it turns out that some issues cannot be resolved on your own, there is still time to contact a specialist for advice. This approach will save the owner’s time and money: there is no need to correct or redo anything.
Foundation
The structure of profiled sheet metal and forged inserts is not too heavy, so a columnar base will be sufficient.
After clearing and marking the area, separate holes are dug. Inside each one, a sand cushion and crushed stone are poured, reinforcement is installed, waterproofing is laid and cement is poured in such a way that there remains an elevation above ground level.
Installation of pillars
Supporting elements are installed at the stage of foundation formation. The columnar base involves the use of hollow pipes, inside which supports are placed, which are pressed into the sand cushion.
Next, they are leveled using a building level and filled with cement mortar.
Frame making
To create additional stiffeners, it is necessary to weld transverse joists or you can assemble a metal frame.
To do this you will need several iron pipes and a welding machine. The dimensions of the structure are calculated to be slightly less than the width between the posts and the height of the entire fence. Optimally reduce by 5-10 cm.
Frame structureFirst, the main parts are welded, and then an additional pipe is laid diagonally from corner to corner inside the formed square or rectangle.
The last stage will be anti-corrosion treatment, which can be combined with painting if you choose the appropriate composition.
Fastening of profiled sheets and forgings
Plug-in sections can be assembled separately or placed together
If a metal profile with forged elements is used, then first the corrugated sheet is laid on the ground and the openwork elements are welded. Then everything is fixed together on the frame. The finished structure will be mounted between the support pillars.
Another option involves separate fastening. First, a frame structure is made from a metal profile, and forged parts are mounted to it.
Connecting elements
When a forged fence with a profiled sheet is built, corners for fastening the corrugated sheet are welded onto the forging, onto which the metal profile will be attached using metal screws.
Fastening finished structures to pillar supports
Installation of forged fencing is carried out by welding to metal supports. When stone or brick pillars are used, fasteners are installed during or after the laying process.
The corrugated sheet is fixed to the frame or using special corners on the forging. For fixing, self-tapping screws are used, the purpose of which is to fasten metal products.
The process of constructing the foundation is discussed in more detail in the following video:
Schemes and drawings of finished structures in different styles
To implement any of the patterns in practice, it is necessary to develop a sketch of the future section in advance. The drawing is selected based on the preferences of the owners and the design style of the structure.
Photo: various options for fence sections
There are plenty of forging styles to choose from. Let's look at the main features of the most popular of them. This:
- Russian. Convex shaped elements are used. Patterns are created with natural motifs.
- Russian-Byzantine. Very similar to the previous one. The parts also have a convex shape. Decorated with floral ornaments. But the main difference is that the composition is complemented by geometric shapes.
- Baroque. The fence is full of small patterned details. They can be flowers, baskets, crowns, figurines, ornate ornaments. All these elements create an overall picture of luxury and sophistication.
- Gothic. The fence turns out to be an elongated shape, directed towards the sky. Often the main detail is a pointed arched structure, which looks very impressive.
- Rococo. It acts as a continuation of the Baroque, but it has much fewer small details. The main emphasis of the style is elegance.
- Modern. Forging is full of abstract elements, evenly or unevenly spaced curved lines.
The style of the fence should be chosen in accordance with the overall picture of the architectural structures on the estate, so that it is in harmony with the entire composition.
Popular manufacturers of forged fencing
There are a number of manufacturing companies on the domestic construction market that have won trust with good quality and reasonable prices. Let us highlight the main ones.
Kovart
Experience in the field of creating forged products – 17 years. The skills of designers and craftsmen allow the use of artistic techniques that were used by blacksmiths in tsarist times.
The company provides the following services:
- creation of drawing projects to order;
- shot blasting of metal;
- 3D modeling;
- laser cutting;
- artistic patination - application of silver, copper, gold;
- chrome plating;
- coating of forged products with gold by electroplating.
Photo: elite product made
The list of products includes elements of interior decoration of premises and details for the exterior design of buildings and fences.
KovArt also puts into practice designs proposed by clients.
First Forging Factory
A Moscow enterprise that makes jewelry and metal products using artistic or stamped methods. The warranty for all products is 5 years.
Located 15 km from the Moscow Ring Road on the Minsk Highway.
Rowand forging
The domestic company was founded in 1997. Manufactures welded and forged structures of varying complexity and sizes:
- gates,
- railings,
- visors,
- ritual fences,
- furniture,
- fence sections and more.
Takes on any volume of work ordered.
Kreitmet
Russian plant. Mainly produces plastic, metal-plastic, forged products.
The technical capacity of Kreitmet allows us to produce up to 200 tons of metal structures per month.
Among the products:
- fences made of square and round profiles;
- swing and sliding forged and welded gates;
- forged, welded grilles for windows;
- railings;
- flower stands, stands;
- visors;
- chandeliers, sconces
In addition to producing custom goods, a team of craftsmen also performs installation work.
Insight
The plant is engaged in artistic forging. It has production workshops in Moscow, Voronezh, and St. Petersburg. Produces decorative elements, fences, furniture, lanterns and more. Designers will help you develop a design sketch based on the client’s idea or an individual project.
Construction of a forged fence from ready-made sections
If you have welding skills, you can try to make fence bars yourself by decorating the rods with elements using the cold forging method. But this process is labor-intensive and time-consuming. It's easier to install the factory sections yourself.
Required materials and tools
To install the fence you need:
- wooden pegs, rope;
- level;
- shovel or drill;
- roulette;
- plumb line;
- grinder with a metal disc;
- welding machine, mask, electrodes;
- cement, sand, crushed stone;
- material for pillars;
- hammer, file;
- anti-corrosion primer;
- dye;
- spray bottle, brush.
The area is cleared of vegetation and debris. Markings are made along the perimeter of the future fence. In the places of the posts, pegs are driven in at 2.5 m intervals, and a rope is stretched between them.
Foundation arrangement
There are several options for a base for a forged structure:
- Pouring a monolithic concrete strip.
- Column and point foundations for each rack.
- Pile-screw (on marshy soils).
The first two are most often used. Under massive fences with brick and stone pillars, a tape is poured; under lightweight fences, a columnar foundation is poured.
Let's look at the main stages of creating these foundations.
Columnar
Concreting of each support is carried out separately in a pre-prepared well.
The work order is as follows:
- Holes are dug or drilled under the pillars to a depth of 0.7–1.5 m. The recommended depth is at least ⅓ of the height of the future support. Diameter 25–30 cm.
- The bottom is compacted. A metal stand is placed into the well at a level. Another option is to fix pieces of asbestos-cement pipes in the wells so that their height looks 10–15 cm above the ground. The empty space around is filled with crushed stone and liquid concrete mortar. The metal stand is fixed at the top.
Builders do not recommend completely concreting the pillar until a section of the fence is welded to it, since if you miscalculate the spacing between the supports by even a centimeter, it is unlikely that the spans will be accurately secured.
Laying brick pillars
How long the forged span or brick fence will last and will not collapse depends on how correctly the brick supports are laid out and how the foundation is poured. Poor quality workmanship causes rapid distortions and blockages of the new fence. Let's look at the work step by step.
Marking
Before starting to build anything, a detailed drawing is drawn up. The diagram takes into account the location of the foundation, pillars, and the length of the fence. Fire safety requirements and other criteria for fencing construction must be taken into account.
A high-quality plan allows you to calculate the exact amount of material required and make the necessary stock. At this stage, we consider what tools will be needed, what is possible on our own, and where specialist advice or additional assistance will be required. The diagram helps to more clearly imagine the future structure, take into account all the wishes at once, so as not to redo it later or move the finished building.
Perimeter marking
Most often, supports for sections are placed maintaining a distance of 2.5-3 meters. If the fences are too long, a four-meter placement is allowed to reduce construction costs.
Next, the work site is cleared, freed from the old fence, various things, bushes, weeds, and the territory is marked. The most convenient marking option is driving in pegs and then pulling the rope. This approach will help to dig a trench and install the fence as evenly as possible, exactly in accordance with a pre-drawn plan.
Preparing the foundation for the fence
The best solution for brick structures is a combined foundation. Such a fence will withstand almost any load, will complement the cladding, and make the fence even more impressive.
For greater adhesion of cement and increased strength of the base, reinforcement is performed. Reinforcing bars are laid at the bottom of the excavated space, and metal rods are installed in place of the proposed pillar.
Excavation and installation of racks
Under the building, they dig a trench along the perimeter of the future foundation up to 50 cm, and in the support areas they dig even deeper, up to 90 cm. Sufficient deepening will protect the fence from falling and washing out the base with groundwater as a result of soil freezing.
Digging a trench
An iron or metal profile pipe is inserted inside the recesses under the pillars, which will reinforce them.
Base reinforcement
Next, the stand is filled with mortar, leveled using a building level, and left to cool and dry completely. The reinforced pillars will stand level, the impact on the position of the support from the outside is reduced, and the upper valve, which additionally performs decorative functions, will protect from internal damage.
Assembling formwork, pouring the base
The first stage of creating a solid foundation is completed by filling the recesses under the posts with concrete mortar, which must dry sufficiently before the next step.
Next, it is planned to fill the excavated belt space with laid reinforcement. Reinforcing rods are knitted and fastened by welding, assembling a checkered structure that is welded to the rods of the support pillars.
After laying the reinforcing layer, they begin to assemble the formwork. The most commonly used are wooden boards or panels that are installed at the bottom of the trench, but must also extend above ground level.
Wooden formwork
At the same stage, a layer of waterproofing is laid on the sides and on the bottom.
A cement solution is poured into the prepared recess. As the concrete is filled, it is loosened with a bayonet shovel or a special device - a construction vibrator. The main thing is not to overdo it with the technique: excess vibrations can shrink the foundation too much, which is also not good.
Now leave the base to dry. During the first 10-14 days, the base is periodically watered with water to ensure even hardening without cracking. After this period, the formwork can be removed, but complete drying may take a whole month.
The formation of a high-quality strip-column foundation is discussed in more detail in the following video: