Snow is a common occurrence in our country, especially somewhere in the Siberian outback, where there are often snowdrifts higher than cars. Naturally, the question becomes how to remove this snow, provided for this by the state. services do not work as always (but this is not certain).
Many people have the question of removing snow themselves, using a shovel, some want to get more creative, wondering how to make a shovel for removing snow with your own hands? Durable, massive, suitable for your hands.
Advantages of homemade shovels for snow removal
Undoubtedly, a factory-made snow removal tool is superior in its parameters to its homemade counterparts. Modern shovels are made of durable, lightweight plastic. Scoops are given a convenient shape and equipped with stiffening ribs. The same goes for cuttings. They are made folding, straight and curved, with anti-slip rubberized pads. At home, such a homemade snow shovel will not work. However, self-made snow removal equipment also has many advantages:
- The first advantage is the price. You will have to pay a decent amount for a good branded shovel. The equipment is used only in winter. The rest of the time it is stored in a barn. If we take the southern regions as an example, there is little snow here. You will need the tool a couple of times a year. There is no point in buying it for exorbitant money. It’s better to put together equipment completely free of charge from a piece of plywood or tin that will help clear a path or small area of snow.
- The second advantage is the individuality of the design. A person makes a shovel according to his requirements: the length of the handle, the size and shape of the scoop. You can even calculate the optimal angle of inclination of the handle in relation to the scoop to improve the ease of use of the equipment. This cannot be done with a store-bought product. You have to use what the manufacturer offers.
Homemade shovels are in many ways inferior to factory-made snow clearing tools, but they also have many advantages.
Of course, at retail outlets you can buy cheap Chinese-made equipment so as not to have to worry about making it yourself. However, the quality of such a tool is very questionable. The plastic bucket can break under the load when throwing away wet snow. In addition, the inconvenient position of the handle relative to the scoop while shoveling will affect back pain.
Aluminum
Universal snow removal equipment. In terms of their organoleptic properties they are not inferior to plastic ones. Has less weight and greater strength. By balancing the blades, the load on the bucket is distributed evenly, which significantly extends its service life.
They belong to the middle price category and are in great demand.
Types of homemade snow shovels
Factory-made equipment differs in shape, size, material, and design. The manufacturer equips some models with additional devices, for example, handles and anti-slip pads. If we specifically consider homemade snow removal devices - shovels for snow removal, then their main difference is in the material of manufacture and purpose.
Based on the material used, there are three types of tools:
- Snow removal equipment with a metal scoop is superior in strength. However, ordinary tin quickly rusts and freezes with wet snow. Galvanized or stainless steel is considered a good material, but there are disadvantages here too. When the zinc coating wears off, the same rust spots will appear. Stainless steel is expensive. Both types of metal have impressive weight. The best material for a scoop is aluminum. The metal is light, inexpensive, resistant to corrosion, and snow does not stick to it. Advice! It is optimal to even make a cutting from an aluminum tube. The tool will be light and durable. The metal scoop is bent from tin, aluminum, galvanized or stainless steel
- A plastic snow shovel is made with your own hands from a used canister. Alternatively, for the scoop, the workpiece is cut out from the wall of a used plastic barrel or a tray is used. However, the convenience of working with a primitive shovel is not up to par. It’s optimal to buy a ready-made scoop in a store and attach the cutting yourself at home. Plastic equipment is lightweight, resistant to moisture, and in addition does not freeze over with wet snow. The downside is the fragility of the scoop.
Advice! To prevent the plastic scoop from rubbing against ice and snow, its edge is framed with a metal strip.Plastic equipment is lightweight, convenient, and does not rust from contact with wet snow.
- The advantage of wooden equipment is its ease of manufacture.
To build it, just attach a wooden handle to a rectangular piece of plywood. The downside is the fear of moisture. Wet wood becomes heavy. Plywood delaminates from water. The material for a wooden shovel is plywood. Tip! Before each storage, a wooden shovel must be dried, otherwise the fungus will destroy the wood.
In addition to the material of manufacture, shovels differ in purpose:
- Ergonomic models have an unusual shape. Due to the bends of the handle, the load on the spine during work is reduced. A shovel can not only clear snow, but also be used for other household needs. An ergonomic shovel is considered universal in use
- Standard models are equipped with a long, non-folding, even handle. It can be made of wood or aluminum alloy. A regular rectangular scoop. There may be a handle at the end of the handle. The equipment is designed for clearing paths and small areas of snow. A standard shovel consists of a straight, long handle and a regular scoop
- There is a separate type of shovel for motorists. Their feature is a shortened or folding handle, which allows you to transport equipment in the trunk. The scoop is usually made of metal, which allows you not only to throw away snow, but also to cut ice. Car shovels are equipped with a shortened or folding handle
- An electric snow blower-shovel is made by craftsmen with their own hands. The equipment consists of a housing, inside of which an electric motor rotates the auger. The knives grab the snow and throw it to the side through the discharge sleeve. An electric shovel is convenient for servicing the local area. Works well on dry snow, but sticks when wet. An electric shovel is good for clearing dry snow from the local area.
- Copying factory tools, craftsmen assemble with their own hands a miracle shovel for snow removal, equipped with an auger. The mechanism is located in the bucket. As the shovel moves, the auger rotates spontaneously, which scoops up snow with its blades and throws it to the side. The shovel is convenient for cleaning narrow sidewalk paths. The snow should be loose, dry, and of small thickness. An auger shovel is convenient for clearing dry snow from narrow paths
Assembling a super snow shovel with an auger or an ergonomic handle and scoop with your own hands is difficult. Usually limited to the standard option. With this universal equipment you can clear any area of snow that has easy access.
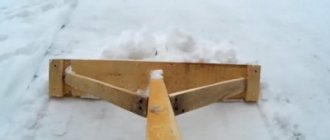
Making a blade for Niva
The device consists of 5 main elements. First
— factory-made “kenguryatnik”, the only purchased part.
We install it on the “nose” of the car. In principle, you can weld your own if you find pipes of the required cross-section. The second element
is a cross member with mounting axles
(Fig. 1)
.
Cross member assembly. We press the axles into the pipe (ST-3;5) with a hammer to a length of 100 mm. On the axle, close to the pipe, we put washers on both sides, which we then weld to it. The axles must have 6 2.5 mm holes for pinning the nuts after they are installed.
We weld the finished crossbar to the “kenguryatnik”, additionally strengthening it with 4 corners 30×30 mm, 40 mm long.
How to make a snow shovel
To make snow removal equipment convenient to work with, you need to assemble it in the right size. If the shovel is huge, and the handle is heavy, after a few minutes of using such a shovel, back pain will be guaranteed. The heavier the material, the smaller the bucket is made. The length of the cutting is adjusted to suit your height.
Tools and materials
To work, first of all you need a tool. Its list will depend on the materials used. If plywood and wood are chosen, then you will need a saw, a jigsaw, a screwdriver, a hammer, and a screwdriver.
The list of tools depends on the material chosen for assembling the shovel
If you make a metal scoop, then to the listed tools you need to add a grinder, pliers, and an electric drill. Nails, self-tapping screws, bolts and rivets are used as fixing elements.
DIY snow shovel drawings
There is nothing complicated about a shovel to make a detailed drawing for its manufacture. As an example, you can use the diagram shown in the photo:
The diagram is suitable for assembling a wooden or metal model
ATV plows
High maneuverability, combined with high traction force and powerful lugs, make a regular ATV an excellent base for installing a snow shovel.
The blade selection process includes four stages. First you need to decide on the installation kit - a structure that is attached to the frame and depends on the ATV model. Then a subframe is selected, after which all that remains is to select a suitable blade for it and a mechanism for lifting it.
There are two types of installation kits - front and central. The first ones are designed to be connected to the front base of an ATV and are intended for vehicles with low ground clearance. The advantage of the second type is to increase the rigidity of the tractor frame and improve the stability of its movement when clearing snow.
The blade mount is designed in such a way that it does not reduce ground clearance or reduce the vehicle's maneuverability.
The width of a snow shovel for an ATV depends on the engine power, the weight of the machine and ranges from 125 to 150 cm.
Inexpensive snow shovels that do not have a lifting mechanism are equipped with “skis” - a special sliding device that maintains a safe gap between the shovel blade and the surface of the coating.
The highest quality, but also the most expensive, blade systems for mounting on ATVs are produced by the American company Warn. A set consisting of a straight shovel, an installation kit and a frontal base along with lifting and turning mechanisms will cost the buyer 59,000 rubles. For comparison, prices for similar equipment from the Russian company Atvstar, but not equipped with a shovel drive, range from 15 to 20 thousand rubles.
An ATV with a mounted shovel can only be used effectively on loose snow no more than 50 cm high and not compacted into dense layers.
How to make a snow shovel from plywood
To assemble snow removal equipment, you will need a rectangular piece of plywood sheet measuring 400x400 mm, with a minimum thickness of 5 mm. It’s easier to purchase a handle or use a plane to make it from timber with a side size of 50×50 mm. You will also need a piece of board 400 mm long, 70 mm wide, 20 mm thick. A tin strip is prepared to frame the edge of the scoop.
The optimal size of a plywood scoop is 400×400 mm, but can be increased to 500×500 mm
Assemble a snow shovel with your own hands as follows:
- A square is cut out of a plywood sheet. The ends are treated with sandpaper. The front edge of the future scoop is framed with a tin strip. It is better to secure it with rivets, having previously drilled through holes.
- A backboard is made from the board, which simultaneously acts as a handle holder. Opposite corners are cut off from one end of the workpiece. They are rounded slightly to give the scoop a curved shape. The edge of the hewn board is applied to the edge of the plywood sheet and secured with self-tapping screws.
- A hole is drilled in the center of the resulting side. Its diameter is slightly larger than the thickness of the cutting.
- The cutting is inserted into the prepared hole. Its end is leaned against the plywood, an oblique cut is marked and the excess part is sawed off according to the marking. The obliquely cut end of the handle should be adjacent to the plane of the scoop without gaps.
- A through hole is drilled in the center of the plywood sheet. The same is done with the end of the cutting. The elements are connected with a furniture bolt. You don’t have to drill the hole, but simply fix the end of the handle to the scoop with a self-tapping screw, but such fasteners are less reliable.
- To strengthen the scoop, the junction of the backboard with the plywood can be sheathed with a thin metal strip.
Attaching the bucket to the walk-behind tractor
As a rule, all motor cultivators have a standard bracket for attaching attachments. It is quite suitable for attaching a front blade. If necessary, an adapter is made to allow the bucket to be rotated to the right or left.
The fastening is made in this way:
- A profile pipe is welded from the back of the bucket. To ensure secure fixation, it is advisable to duplicate the welding seam with several bolts.
- A semicircle with a diameter of 20-25 cm is cut out of sheet metal 10 mm thick. The workpiece is welded to the profile pipe. Holes are made along the edge at intervals of 20 mm to adjust the angle of the bucket.
- A holder in the shape of the letter “L” is made from a square pipe. The short side of the holder is fixed to the rotary sector, the second end is rigidly fixed to the bracket of the walk-behind tractor. To adjust the height of the knife, bolts screwed into the adapter are used.
A simpler connection method is a system of lugs and clamps made of thick sheet steel.
DIY snow shovel made of tin
If tin, aluminum or galvanization is chosen for the scoop, the manufacturing principle remains exactly the same. However, metal makes it possible to experiment with shapes. To prevent the snow from scattering from the shovel when thrown, the scoop is equipped with sides.
The sides allow for more snow to be captured by the scoop
To make the sides, the tin blank is cut out to larger sizes. For three sides, a tolerance of up to 50 mm is added. Three sides are bent at right angles. A hole for the handle is cut in the center of the rear shelf. The side sides are cut at an angle, reducing the height towards the working leading edge. The handle is inserted into the hole in the back bar. The end with an oblique cut is fixed to the center of the scoop. You can use a self-tapping screw, a bolt, or an overhead clamp bent from a metal strip.
Without sides, a tin shovel has a similar structure as a plywood tool
If stainless steel is chosen for the scoop, it is difficult to bend the sides. It is better to make a shovel using plywood tool technology. For the scoop, only one backboard is made from a board with a central hole for the handle.
Important! For a metal scoop, do not frame the end of a tin strip, since this is no longer necessary.
How to make a snow shovel from plastic
The easiest way to make a shovel is to buy a ready-made plastic scoop at a retail outlet. It is simply placed on a cutting of a suitable size. If you take a different route, you need to find a 10 liter plastic canister. It should be flat.
A durable scoop can be made from a thick-walled plastic canister.
One of the side walls of the canister is cut off. This is easier to do with a grinder. The canister shelf with a neck and handle will act as a tailgate. A hole is cut in the center for the cutting. The remaining shelf from the bottom of the canister is cut off entirely. There is no need for a bend on the working edge. The side boards are cut at an angle. The handle is fixed with self-tapping screws. The disadvantage of such equipment is its low strength. Wet snow can cause the scoop to bend and crack.
Six Scraper Roof Cleaner
You can make a bottle scraper without spending a single ruble. The principle of operation of such a snow blower is as follows: scrapers are attached to a rope and thrown over the roof, and then pulled in one direction or the other. The scrapers grab the snow and throw it down. To make such a device you need canisters and rope. Manufacturing procedure:
- Cut off the top of each canister.
- Make holes in the lids.
- Take a long rope (the length depends on the height of the roof). and find its middle.
- Mark the middle of the rope. The first canister must be secured at a distance from the mark equal to the length of one roof slope.
- Do the same at the other end of the string.
- Attach all other canisters at equal intervals.
This device can be used both by two people and alone. In order for one person to clear the roof with such a snow blower, you need to attach some kind of weight to the other end. He will pull the rope towards himself and clear the second slope of the roof.
How to make a snow shovel from a baking sheet
A used oven tray will serve as a good material for a scoop. It usually has an enamel coating that will protect the metal from corrosion. To make a shovel, first attach a wooden block to one side of the baking sheet with self-tapping screws. A small back edge will create a slope for the cutting.
It is better to use the entire baking sheet without bending or cutting it, since in place of damaged enamel the metal will begin to rust from moisture
The end of the cutting is cut at an oblique angle. They attach it to the scoop with bolts. You can use overhead clamps.