The structure on the garden plot will be light and airy if you use decorative grilles to build the walls. It is not difficult to purchase such products; various options are presented in markets and construction supermarkets. You can refuse to purchase not only for reasons of price (and it is quite high), but also for the following reasons. Every person can make gratings themselves, and the work is not burdensome, brings pleasure and saves money. Purchasing materials will be disproportionately cheaper than purchasing a finished product.
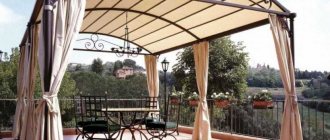
Trellis for the terrace
A self-made lattice for a gazebo will be exclusive, unlike any other similar product. The process itself is not complicated, and anyone can start it; the “extra” experience gained during construction will definitely come in handy in life.
Here you need to make a simple project that displays the desired result. On one sheet it is enough to draw all the sides of the gazebo, on the other - the design, that is, what the decorative part of the structure will look like. The project will also allow you to determine the amount of material, fastening method, and grid size. The decorative part of the structure is made from small-section timber; thin planks and tree branches are suitable.
Template for making gratings
A simple tool available in every country house will help you make this element of the gazebo:
- hacksaw;
- chisel;
- knife;
- roulette;
- square;
- wood glue;
- nails, wood screws.
A simple tool also requires the same simple work, but the ability to decorate the exterior with your own hands is another reason for pride.
Making your own grating
Before answering the question of how to make a lattice, it is important to understand what this design is. Essentially, this is a frame that is filled with crossed elements. Thanks to it, the structure becomes stronger and tougher. A “wall with cells” can be made not only from wood, but also from stone, steel, and plastic. However, the forged version will cost several times more than the wooden one. In addition, it is not nearly as light as wood.
As you know, the lattice for a summerhouse performs several functions:
- It serves as a fence for walls, allowing you to cover or decorate an unpresentable exterior.
- It is the basis for climbing representatives of the flora. This design is sometimes called a trellis.
- Increases the strength of the canopy, makes the structure closed and at the same time breathable.
- Protects from rays in sunny weather.
The dimensions of the cells and the method of installation in the gazebo may vary significantly. If this is a decorative type, the cell is made miniature, allowing the view to be hidden to the maximum. A larger option is suitable for plants to ensure their free growth.
Why is sheathing needed?
Making lathing for a gazebo can hardly be called a non-trivial task. The process requires accuracy and attentiveness. The design of the sheathing allows you to give the building a complete look by removing large openings.
At the same time, the sheathing provides a higher level of privacy, shielding visitors from the prying eyes of neighbors or passers-by. Fabric cannot replace the sheathing, since the latter does not prevent the flow of fresh air.
On a sunny day, the lathing will bring more comfort inside the gazebo, partially shading the area. It is easier to install an anti-mosquito screen on the grille, which will provide protection against annoying mosquitoes. In addition, this addition to the gazebo is perfect for climbing plants that can freely entwine the structure.
Selection of materials
Perhaps the most crucial moment is the selection of lumber for the future lattice. Absolutely all boards and slats must be absolutely smooth. Even the slightest cracks are excluded. If you see such wood, we advise you to refrain from purchasing it.
Since the decorative lattice for the gazebo is the “face” of the structure, the material must be selected with special care. When it comes to types of wood, they should be made from the best. Let's list them:
- Beech. A tree that has a delicate, slightly pinkish tint.
- Oak. It is famous for its strength and durability, and has a clear, pronounced structure.
- Larch. A unique type of wood that practically does not rot. Often used where the influence of the external environment is especially active.
- Ash. Characterized by durability and attractive appearance. It has a gorgeous light shade.
- Pine. Its trump card is ease of processing.
In principle, a do-it-yourself grill for a gazebo can be made from other species. However, in this case, it is highly advisable to cover the structure with a layer of paint instead of clear varnish.
How are lattice panels assembled?
Let's start with a more complex method of making a grill for a gazebo yourself. It will appeal to everyone who is interested in a beautiful and neat result of their work. Ready-made panels can be installed almost anywhere.
The tools you will need are a milling machine (a manual one will do), a surface planer and a circular table. Any of the listed items cannot be replaced. If they are not available, you can always contact a carpentry workshop and place an order for the grille.
In short, you need to sand the boards, and then cut transverse grooves into them at ½ depth. The boards are sawn into slats, each one is run on a surface planer. This will allow you to achieve the same thickness of the products.
Next, the slats are joined at an angle of forty-five degrees to create an absolutely even mesh. To ensure that the distance between the grooves is uniform, you need to screw a homemade plywood template onto the base of the cutter. Having retreated a distance equal to the cutting step, you glue the guide to the template. Subsequently, it will be possible to drive the cutter so that each new row is the same.
The further manufacturing process is as follows:
- Use clamps to secure the board firmly to the table. Make cross poses throughout the template. Each slat is cut from a board. The guide bar is installed on the circular saw. The board is passed along it and sawn.
- Make sure that the block is secured parallel to the blade. This way the slats will be perfectly even. Be careful not to place your hands near the sharp blade.
- The planks are passed through a thicknesser or sanded by hand to achieve the desired thickness. The finished structure is assembled perpendicularly - one groove into another. Additionally, the grooves are glued with PVA glue to ensure high-quality and reliable fastening.
Decorative techniques
Types of lathing for finishing
Decoration is carried out with waterproof paints and varnishes for external work, and wood impregnation preparations based on mineral and synthetic oils with the addition of wax are used.
Techniques are used to arrange cells on the lattice plane:
- Diamond-shaped links. The parallel stripes are placed at an angle, so this design looks impressive. Reducing the pitch between the parts leads to a thick curtain that is poorly permeable to daylight.
- Chevron. This is the name of an ornament when a pattern is obtained by combining inclined strips and vertical elements. The design is strong, but difficult to manufacture.
- Milked rhombus. In this option, diamond-shaped cells are used, but their boundaries are formed by adjacent parallel slats.
The strips are not only placed parallel, but placed so that their ends are connected at the bottom in the center, and diverge upward in the shape of a fan. This pattern is called a mill. It almost does not block visibility, but gives comfort thanks to the original style.
How to assemble a grille on a ready-made frame?
The method described above is considered complex and not everyone can do it, especially if the necessary tool is not at hand. In this case, you can try making a wooden lattice on a circular saw. Thin slats measuring 20 by 5 mm are sawed off, after which a sheathing for the perimeter of the gazebo is nailed under the railing.
Maintaining 45 degrees, you need to trim the corners of the frame for joining.
To secure the planks, markings are made on the sheathing with a simple pencil. The slats are nailed on the reverse side. Since the boards are quite thin, nails can damage the wooden pergola lattice. The problem can be easily solved by drilling holes or blunting the nail heads with a precise blow of a hammer. When the installation of the slats is completed, they are closed with a frame around the perimeter on the second side.
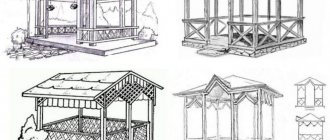
Types and their features of frames
Making a frame, or rather assembling it, is not difficult. Is it another matter when you need to decorate the gazebo with millet and taste. The easiest way is to make a wooden frame for the gazebo. It will serve both as a fence and as a decoration element. Although the element itself is simple, at the same time the gazebo will take on a finished look. It’s not difficult to make a frame for a gazebo with your own hands, so it’s worth a try.
Important! First, decide on the material from which you will make the sheathing, and only after that you can use your fantasy and imagination.
Light, neat lattice battens look beautiful and elegant, and will not block the light, which means they can be placed around the entire perimeter. Such parapets consist of two frames that support the structure, and between them there are inserts of slats folded crosswise.
In various ways, when combining planks and designing figures, you can make different types of wooden battens for the gazebo:
Open/closed type.- With groove-to-groove connection.
- With slats laid crosswise.
How to decorate a lattice?
That’s why they are called decorative grilles - they should not only be reliable, but also attractive in appearance. The easiest and fastest way to plant a climbing and necessarily lush tree next to the structure. Since summer in our country is relatively short, it is advisable to use fast-growing and easy-to-care vines. For example, actinidia, climbing rose, virgin grapes, ivy and hops. In spring, water from the roof should not pour onto the plant, otherwise it will not survive.
We also recommend reading
- Rose park
- Wooden well as a decorative element of the exterior
For added impact, the wooden trellis for your pergola can be painted in a color that best matches the plant. You will definitely guess if you take black, bronze, or a shade of “rust” as a basis.
Pink roses and bright yellow flowers look interesting against the background of a blue lattice of wood. Flowers of light shades are good on a dark background, dark red shades are good on a light background.
In conclusion, we want to give you this advice. When planting girlish grapes, pay special attention to fastening. The plant is absolutely undemanding in care, which is why it can grow even larger than necessary. With the onset of autumn and the ripening of the berries, the lattice becomes so heavy that it can simply break.
Carrying out basic work
Any product of this type is a wooden frame that can give the structure a certain level of rigidity, as well as fill the space with intersecting planks. The elements are connected using tenons or using an insert strip. Sometimes the components of the base are fixed with ordinary nails or self-tapping screws.
Frame making
First, a basic structure must be prepared, consisting directly of four bars with a cross section of 40x60 mm. However, the width is most often selected depending on the thickness of the installed racks.
In our case, we are considering the option of fastening with self-tapping screws.
Some versions with dimensions indicated.
- At the initial stage, the dimensions of the opening between the free-standing pillars are measured. The dimensions of the wooden frame must correspond to the width and height of this gap.
- After taking the dimensions, the purchased elements are cut out. It is necessary to understand that the distance on one side will decrease by the thickness of two bars.
- Properly prepared lumber is treated with some kind of antiseptic agent so that the wood is reliably protected from external biological influences.
- The individual components are connected to each other using 60 mm long self-tapping screws. If the size of the opening is more than one meter, then it is better to make two separate frames, connecting them together after assembly.
Filling space
To achieve the maximum aesthetic effect, it is necessary to arrange the lattice bars made of bars with a cross-section of 40×30 mm diagonally in two rows. Each element of one strip in this case must lie perpendicular to another component of the second line.
Fastening is carried out in the end part with 60 mm self-tapping screws.
The main types of drawings are demonstrated.
- First of all, the prepared frame made of wooden elements is temporarily fixed in one position so that the diagonal does not change. To do this, pegs are driven into the ground along the edges.
- Markings are applied to the side of the structure on one side with a simple pencil. The elements should be positioned parallel to each other, with the distance between them being the same.
- Using a hacksaw, wooden blocks of 40x30 mm are cut along the drawn lines. Each fragment is applied to the frame, after which a strip is drawn from below.
- After adjusting the dimensions, the wooden planks are completely treated with a protective compound. After the final fixation of the components, it will not be possible to produce high-quality coating with mixtures.
- When the wooden blocks are dry, they are fastened with self-tapping screws, which are screwed in from the end. All elements are fixed at the same level with the side of the structure.
- The resulting product is turned over to the other side, where the wooden elements will be installed. However, their fastening is carried out strictly perpendicular to the installed crossbars.
Display of the finished wood lattice measuring 180x180 mm.
Installation in place
After manufacturing such a structure, you will also have to install it yourself, so at least brief instructions for attaching a wooden lattice should be provided.
For fixing, self-tapping screws 70 mm long are suitable, which will be screwed in around the perimeter.
- First, the resulting product from wooden blocks is inserted into the opening of the gazebo, for which the lower part is driven inside. If necessary, tapping is done with a hammer directly through a piece of board so that no traces of the driving tool are left on the front surface.
- Next, the structure must be aligned with the supporting posts. During this operation, a regular hammer is also used. Tamping is done until the edges of the lattice are level with the face of the vertical posts.
- After leveling, the process of attaching the structure to the horizontal and vertical crossbars, which are the supporting components of the structure, begins. To do this, self-tapping screws with a length of 70 mm are screwed to the supporting beams through the side bars. The fasteners are recessed into the wood so that they can then be covered with a special putty.
Popular articles The most beautiful and reliable varieties of aquilegia
Finished products of different sizes for gazebos.
Lattice gazebos: a variety of shapes and patterns
There are dozens of ways to beautifully decorate a gazebo using a lattice. Moreover, you can come up with your own design. We told you about the technology for making the simplest design, but there are other decor options!
For example, diamonds can be made double or the slats can be placed in the middle of the frames more often than at the edges. An option is possible when the skin is made of slats with cut teeth. Looks aesthetically pleasing and original!
As for the shape, rectangular and square are not the limit. How do you like the top of the grille to be broken or curved instead of the traditional straight shape? As for slatted cornices, they are often made in the form of an arch.
Instead of output
A decorative lattice allows you to inexpensively and quickly close the gazebo with your own hands and plant cute vines around the base. Ultimately, this will protect you from the bright sun in the summer, and in the cold autumn it will weaken the gusts of wind. How to make a wooden structure as reliable as possible? The wood is coated with impregnation in several layers. Instead, you can use varnish - it is no less effective.
When an open-type gazebo has a self-made gazebo frame, its appearance is instantly transformed. Perhaps this is the most luxurious design option, which gives the garden building incredible lightness and delicacy.
To say that wooden gratings for a garden gazebo with your own hands are in great demand is to say nothing. They can be seen almost everywhere. The suburban building takes on an impressive and presentable appearance, and manufacturing does not pose any particular difficulties even for a beginner. Perseverance and hard work can bring their own “zest” to landscape design. You want to be proud of your gazebo, right?