The main elements of landscaping in layout are trees of various species, hedges, shrubs, flower beds, etc. What are these trees, shrubs, and grass on the model made of?
Let's list the main materials.
It is used in the manufacture of frames for small trees and shrubs. Depending on the scale and the task facing you, wire with a diameter of 0.2 to 1 mm is most often used.
For the manufacture of trees, stranded wires are most often used, because... they contain a bundle of several individual wires.
- Wooden skewers.
The next material used in making trees is wooden skewers. They are suitable for making tall tree trunks. For greater realism, the skewers can be covered with thin paper, such as napkins, and then branches twisted from wire can be screwed on.
Flock is often used to create grass on the layout. These are finely chopped or chopped textile fibers from raw materials of various origins - wool, cotton, viscose, etc. Flock is used to imitate grass on terrain, flower beds, etc. Sometimes for sprinkling trees.
There is a special flock for layout, which has a large selection of colors and sizes, which allows it to be used when working with different scales. Here are a few of the largest manufacturing companies: Noch, Auhagen, Faller.
For prototyping, a medium and finely crushed colored foam sponge is suitable.
Please turn JavaScript on and reload the page.
It is used to create trees and shrubs.
There are special sponges for layouts (Noch, Auhagen, Faller).
However, it is not at all difficult to make a sponge at home.
How to make a sponge for creating trees and shrubs yourself?
1. Prepare the adhesive solution. Mix PVA glue with water in a 1:1 ratio;
2. Using a color scheme, we will give the solution the required color. For example, dark green. Green can be obtained by mixing yellow with blue;
3. Mix the solution thoroughly;
4. Dip a piece of foam rubber into the previously prepared solution and wet it thoroughly;
5. Let the painted foam rubber dry for 24 hours.
6. Now the dried foam rubber needs to be crushed. This can be done using a mixer or coffee grinder. If they are not at hand, then an ordinary iron grater will help out.
Natural materials for creating trees, grass and shrubs on a model.
- Thin branches . Used for making trees and large shrubs.
- Crushed dried leaves. Used as a powder to imitate the foliage of trees, bushes and flower beds.
- Moss. Used to imitate small shrubs.
In our mock-up workshop, all employees undergo training under the guidance of a master.
Return to blog posts
Simple geometric shapes in the garden - cube, ball, pyramid and others
The easiest figure to make is considered to be a pyramid with 4 sides. Several such objects in the garden area will create the mysterious atmosphere of the Egyptian pyramids. Ball-shaped products are one of the most popular trends in garden architecture. They can even be used as hedges. They look great both on a pedestal and on the ground.
Pay attention to the length of the piles: if the figure is not too large, then 15 mm grass will be enough for it, and a large cube or ball will need a pile of at least 60 mm high. The frame can be either welded metal or fiberglass.
Crafts with children. Do-it-yourself herbalist
Do you want to expand your child's horizons? Then make your own grasshopper! Such an original craft with children develops responsibility, gives an understanding of the growth of a living organism, and is also ideal as a visual aid for independent study of natural history at home and for a living corner in kindergarten.
Read in this article:
The herbalist, or eco-man, is very popular these days. This is a craft, a toy, and a pet at the same time. This is such fun - three in one! In appearance, the herb is a small fabric bag or vessel on which grows a cute little forelock of grass, a kind of miniature green lawn.
Do it yourself!
A similar product can be purchased, but you can also make it yourself.
It's not as difficult as it seems at first glance. The lesson for “garden sculptors” is based on the example of a cute bunny figure. Visitors are strongly encouraged to pet the finished animal and even sit astride it - this makes it clear that this thing is very strong and pleasant to handle. The master class lasts two hours. During this time, it is impossible to create a hare from scratch and turnkey, but the presenter Evgeniy Sluchich managed to show all the most significant moments of the manufacturing process, including the subtleties developed through practice. Under his guidance, I tried to perform the necessary operations myself, and it was very exciting. For those who are interested in the idea of making such a sculpture, I will tell you about the technology for its production.
This is interesting: Birch leaf spirea: description, planting and care
What is the grass made from? From sawdust and grass, of course!
Such crafts fall into the category of “new is well-forgotten old.” Having seen what it is, people of the older generation would say that in botany lessons at school they also made herbal teas. Nowadays, the preparation can be purchased at a flower supply store or ordered through an online store, but it is much more interesting to invite children to prepare everything from start to finish on their own.
To make a grasshopper craft with your own hands, you need to stock up on the following materials: nylon stocking; needle and thread for sewing; sawdust; lawn grass seeds; water; plastic tray or plate.
Instead of a stocking, nylon tights, an old sock, a wide bandage or a piece of gauze will do. You can buy sawdust at a pet supply store or ask someone you know who has a guinea pig or hamster (sawdust is usually sprinkled on the “floor” of a pet’s cage). You only need a little sawdust, not a bag! Just a few handfuls.
Step-by-step instructions on how to make a grasshopper.
1. Cut the stocking with scissors so much that you get a piece of nylon in the form of a “sleeve” 10-15 cm long. You can immediately cut the material across into thin strips - these will be the ties.
2. We tie one end of the stocking and tighten it with a tie or strong thread. Turn it inside out to create a bag with a knot inside.
3. First pour grain inside the bag (it would be good to soak it for 5-6 hours in advance), and then sawdust. We compact it with our hands and form the “body” of the grass so that the grains are on one side of the bag. It is better to moisten the sawdust before doing this. We also tie the top edge of the bag.
Care, cherish and... Cut!
And now you have made a little herb with your own hands. And now your new friend is ready! How to properly care for it? Now you need to place the grass on a plate or tray, place it somewhere in a bright place and monitor the damp state of the fabric. Periodically, the fabric should be sprayed with water from a watering can or sprinkler. Children perform this task with great pleasure! And they run every minute to see when the grass starts to grow.
And small green leaves can be seen on the surface of the grass already on the 2nd day. The sprouts will break through the holes in the fabric forward, to freedom, higher and higher!
You can keep an observation diary (draw a sign in a notebook or on a regular A4 piece of paper) and note in the morning, afternoon and evening how many centimeters the stems manage to stretch. Be sure to take a photo and tell your friends what you did.
If the grass becomes very stretched, if the forelock begins to fall apart in different directions, that is, it loses its beautiful shape, then arrange a haircut. Don't spare the plants! You don't need a lawnmower here; use scissors or just carefully tear off the sprouts with your fingers, about 2/3 of their length. This will give the grass new strength, and the appearance of the lawn will improve after a while. Of course, your cat can cut your hair for you, because these cunning animals love to gnaw on fresh greens. Be on the lookout so that the grasshopper does not die the “death of the brave” from the cat’s teeth and claws.
Attention! Near the radiator, the grass will dehydrate faster. If you plan to leave home for a couple of days as soon as you make this craft, it is better to wrap the craft in a bag - this will reduce moisture evaporation. But upon arrival, remove the cover and care for the grass as usual.
And there are more than enough benefits from the herbalist! Let's count together. Firstly, this is a beautiful and unconventional flowerpot, it’s nice to keep it at home or give it to someone. Secondly, for children the joy and opportunity to be responsible for an important matter, almost like a military strategic assignment. Thirdly, have a fortified food for your cat, dog or parrot on hand. What else have we missed?
Imagine that now there are snowdrifts outside your window, everything around is white and white, the ground is frozen in a bitter frost. And on your table there is a little herb that you carefully made with your own hands. Little living soul. Emerald island of summer. A cheerful oasis. Just a miracle of nature!
Just a few years ago, artificial grass seemed truly exotic. However, now synthetic lawns are gradually becoming fashionable. It’s not difficult to care for them; the main thing is to know how to use them correctly to decorate your space.
Artificial grass for decoration: description, scope of application
Caring for the grass on the site is quite difficult. In order to keep it in exemplary order, the summer resident will certainly need a lawn mower. Therefore, recently more and more amateur gardeners are choosing artificial lawns.
There are situations when it is definitely worth choosing a synthetic grass surface. Experts recommend purchasing artificial turf if:
- Children and pets walk on the site every day, and livestock grazes. In this case, real grass will quickly be trampled, but a synthetic surface can easily withstand such a load.
- Real plants do not grow well in poor, infertile or rocky soil.
- The site is located in a lowland, the soil is very wet and moss rapidly multiplies on it. In this case, installing artificial turf is an excellent way to combat lichens, mosses and fungi.
- If the area is located directly under the sun, and real grass quickly turns yellow and dries out.
Varieties of grass for decoration
Grass for artificial turf differs in size, materials from which it is made, and scope of application.
Dimensions and height
Decorative artificial grass can come in different sizes. It can be high or low, and individual blades of grass can be wide or narrow, with a smooth or rough surface.
Traditionally, grass is produced from synthetic materials with a pile height of:
The standard height is considered to be the smallest - 20 mm. Lawns with such a pile height are used not only in summer cottages, but also on football fields.
Interesting! The width of a standard roll is 4 or 2 m, the length of the roll can vary.
Grass for decoration 20 mm
By area of use
The area, beautifully decorated with artificial grass, resembles a bright theater set. In addition, such a lawn is easier to care for than a real one. Therefore, plastic herbaceous plants are most often used to decorate the garden.
Main areas of use:
- grounds for sports games;
- interior design (in children's rooms, sometimes in living rooms);
- registration of summer cottages;
- landscape design.
When purchasing an artificial lawn for your summer cottage, it is best to choose a shade that is as close as possible to the color of real green plants.
According to the material of manufacture
Artificial grass for decoration can be made from different polymer materials. Most often, synthetic lawns are made from polyethylene. This material is truly universal: it is inexpensive, lasts a long time and lends itself well to painting in any colors and shades.
Important! The disadvantage of polyethylene is that it is highly flammable. If a fire is lit in the area and sparks accidentally fall on synthetic grass, a fire may occur.
The main advantage of polyethylene is its softness. This coating is perfect for an area where there are children.
Polypropylene lawns have a stiffer pile. They are rarely used in the country. Basically, polypropylene grass is used to cover sports fields and courts. The base of the lawn is usually made of high-quality latex, so it is resilient and elastic. “Blades of grass” can “grow” in different directions.
Advantages
Of course, plastic or polymer greenery will not give you the aroma of real nature, nor will it delight you with an unexpectedly appeared flower bud, but it has certain advantages over living ones:
- Virtually no maintenance is required other than dusting.
- The lighting that fresh flowers or ferns require is also not needed here.
- You can combine the most incompatible types of flowers, ferns or moss.
- You will always see a green and not a fading wall.
- The weight of the structure is less than when using natural materials.
- There are no costs for purchasing fertilizers.
- No maintenance is required for such walls - living wall irrigation systems require regular cleaning.
- You will definitely not have allergic reactions, which is possible if the greens are alive.
- You select the sizes as you wish and price will not be the most important factor.
Where can you use artificial grass in your summer cottage?
Artificial grass for decoration is very popular among Russian summer residents and landscape designers. Below are illustrative examples with descriptions:
- Synthetic covering for a cemetery. A piece of synthetic grass cut from a roll is placed in a rectangular stone cavity intended for planting flowers. The rest of the burial area is also decorated with artificial grass. After this, the green background is decorated with any artificial flowers. A bright green polyethylene grass “carpet” goes well with white granite, always looks elegant and well-groomed and saves the owner from the need to regularly weed out the grass.
Artificial grass in a summer cottage
- Synthetic coating in the country. For a summer cottage, you can take several rolls of different shades, cut them into pieces, and then lay out a simple geometric pattern from these pieces (for example, a “checkerboard” or zigzag pattern). You can also buy artificial grass already decorated with flowers. It’s good if the shade of the synthetic “carpet” echoes the shade of the foliage of fruit trees and berry bushes that are located on the site.
- Artificial grass on a children's playground. In this case, you can not cover the entire area, but create several “green islands” on the territory so that children can use them in their active games. On synthetic grass you can place figures purchased or made by yourself, depicting children’s favorite fairy-tale characters.
Important! In any case, you should pay attention to the reliability of fastening the covering, even if active impact on the grass is not expected.
Beautiful examples
By studying the works of more experienced craftsmen and adopting ideas for inspiration, you can make a topiary that will amaze with its beauty and grace.
Topiary shapes will fit perfectly into any style. So, for the Provence style, products decorated with burlap, lace, and braid are suitable.
Marine design can be supported by making topiary in a similar style. A product with shells, pearls and stones is suitable as an original souvenir that will remind you of a pleasant holiday at sea.
An original coffee tree will decorate any cafeteria. This is also a great option for giving a gift to a coffee lover.
Models with cute buds combined with lush flowers, made from corrugated paper, are often used as a wedding bouquet or other celebration. Brides often choose this option as their main bouquet. It is not inferior in its beauty to bouquets of fresh flowers, and such flowers will not wither or deteriorate.
Seasonal topiaries are especially popular. For each season you can choose a beautiful version of this craft. New Year's, autumn or flower topiary is made according to a certain algorithm, and the difference here will only be in the choice of certain materials.
For the New Year's tree, cones, sisal and tulle are used. They decorate it with spruce branches, serpentine, feathers or small Christmas tree decorations.
Spring mini-trees will look very gentle. More often, such products have a calm color scheme, but with the presence of bright touches. The combination of light green with yellow, orange and pink shades creates a special mood. Decor in the form of butterflies and ladybugs will ideally complement the spring composition.
A summer tree often looks brighter. There are a variety of colors and shades, and suitable decor in the form of butterflies, birds, and dragonflies is used.
For autumn crafts, dry leaves, tree fruits, berries or artificial flowers are used. Such compositions usually have a less bright and saturated color. Combinations of brown with yellow, green and red are appropriate here. A tree in contrasting shades looks no less impressive.
To learn how to make topiary with your own hands, see the following video.
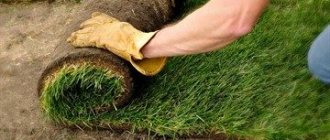
How to lay artificial grass: features of laying and fastening
Plastic decorative grass is firmly attached to the base and then rolled into a roll. Recently, artificial grass tiles have also appeared on sale. Laying tiles is more difficult than laying a roll: all the fibers must “grow” in the same direction, and the tiles also need to fit tightly together, without gaps between them.
Please keep the following in mind during installation:
- Before laying the grass, the area is dug up and leveled, debris, stones, old branches and leaves are removed.
- If the section is irregular in shape (for example, narrow and elongated), the roll is cut into two (or more) parts, which are laid overlapping each other.
- After this, you cannot walk on the grass for 24 hours. At this time, the villi are leveled, acquiring the most natural position.
- After 24 hours, pieces of the roll that extend beyond the boundaries of the area being designed are carefully trimmed. What remains is firmly glued or stitched so that one large canvas of the desired geometric shape is obtained.
- To ensure that the edges are always smooth and neat, nails are driven in around the perimeter. The perimeter can also be fenced with wooden slats.
The history of topiary
Descriptions of topiary are first found in literary works of the Roman Empire. There are mentions of them in the works of Pliny the Elder and the epigrams of Mark Valerius Martial. Military campaigns and the seizure of new lands contributed to the appearance of many slaves on the territory of Rome. The responsibilities of some of them included caring for the garden and green spaces. Among the gardeners there were real talents who created beautiful figures of the most incredible shapes from boxwood thickets.
Gradually, this skill turned into a new type of art, which aroused admiration among visitors to the parks of noble people of that time. Craftsmen engaged in decorative pruning of bushes were called “topiary.” After some time, the fashion for gardens with decorative plant statues, labyrinths and compositions passed away. Figures made from plants remained to decorate the gardens of only topiary fans.
The topiary craze resumed in the 16th century, inspiring designers to decorate French parks with green sculptures. The most famous of them is the park surrounding the Palace of Versailles. In Russia, this direction of floristry appeared in the 18th century, but did not find much support among the population. And only in recent years have green sculptures been increasingly used in garden design. Modern technologies make it possible to produce artificial materials that are not inferior in their decorative qualities to natural plants.