A small pond can decorate and diversify any suburban area. And it will be even more pleasant if you build such a pond with your own hands. This may seem difficult, but with good instructions there shouldn't be any problems.
Do-it-yourself pond at the dacha
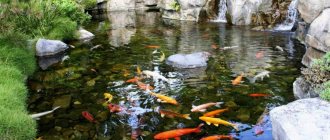
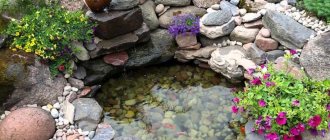
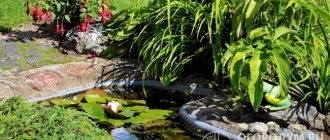
A floating school of decorative fish is the best decoration for a pond
Traditionally, work begins with preparatory activities.
Stage 1. Decide on the location and size
First, we decide on the place where the decorative pond will be located. To do this, we take into account the following points:
- there should be no trees nearby, as their roots can damage the bottom of the structure, and their leaves can clog the water;
- the place should be open and illuminated by the sun for at least 6 hours a day (this will increase the intensity of algae reproduction without infringing on terrestrial plants);
- if possible, it is advisable to leave space for future expansion of the pond;
- The area of the reservoir should not exceed 3% of the entire site.
Winding pond at the dacha
In a word, the smaller the area, the easier it is to carry out construction work. In terms of depth, we divide the reservoir into three levels:
- for plants near the shore;
- shallow water for winter-hardy water lily;
- a recess in which fish will winter (if we breed them).
Note! It is undesirable to make the reservoir too deep - it is enough to make a depth of 1.6-1.8 meters (that is, below the soil freezing level). The burial area should not exceed a fifth of the entire pond.
Pond
How to care for a pond
A properly organized artificial pond does not require serious maintenance. The more natural it looks, the less trouble it causes. Do not interfere with the natural process. Sooner or later, bio-equilibrium will be established in the system.
Spring Summer
- Clear the surface of the pond of floating leaves.
- At the end of spring, remove rotten parts of plants and excess algae. They can be placed in a compost bin.
- When the water warms up, separate large bushes and water lilies. Return the amphibians attached to them to the pond. Plant new plants.
- Check and install technical equipment at the beginning of summer.
- Weed weeds throughout the season and add fresh water. Well or rain.
Under the influence of warm sunlight, surface algae grow rapidly. It seems that the water is “blooming”. Wait a little, do not add chemicals. From the laid eggs of amphibians, duckweed-eating creatures will hatch and cleanse the reservoir. In summer, abundant algae growth is associated with excess nutrients in the water.
Hornwort and swampweed absorb large amounts of microelements and release oxygen, which blocks the intensive growth of algae.
Autumn winter
Foliage that falls into a pond sinks to the bottom. Together with dead parts of the pond flora, under the influence of microorganisms it turns into sludge. Siltation pollutes the pond. The fewer leaves that fall on the bottom, the less often it needs to be cleaned.
- Stretch the protective net during leaf fall.
- Do not trim aquatic or shore plants. Pond animals can hide in them for the winter.
- Leave any stems that rise above the water. They conduct oxygen into a frozen body of water and prevent its deep freezing.
- Remove technical equipment.
Do not try to break the ice with blows. This scares aquatic life.
Stage 2. Deciding on the material
There are quite a lot of materials that can serve as the basis for a decorative pond, but the most popular of them are the options below.
- A ready-made plastic mold, for which you only need to dig a hole of appropriate depth. A simple and fast method that does not require large financial costs. Its only drawback is that it is not always possible to give the reservoir the desired shape.
Ready-made plastic molds - A durable (often polyvinyl chloride) film 0.5 mm thick is ideal for a small pond. For larger structures, it is advisable to use denser material. What is typical is that when using film, the pond can be given almost any shape.
Due to the fact that the construction of a decorative pond from a mold is unlikely to cause any difficulties, we will consider in more detail the second construction option.
Prices for ready-made ponds and bowls for ponds and fountains
Ready-made ponds and bowls for ponds and fountains
Stage 3. Prepare consumables
The work will require:
- PVC film;
- roofing felt;
- round stones;
- rope;
- stone slabs;
- shovel;
- sand;
- bricks;
- fine gravel.
Having prepared everything you need, we proceed to the next stage.
Diagram of a pond with waterproofing
Causes of coastal deformation
Even the unpaved banks of a river, lake or artificial pond cannot resist the destructive power of water. Over time, the bottom silts up, the coastline erodes, and the reservoir itself loses its shape.
The reasons for these phenomena may be:
- soil instability, especially sandy and sandy loam;
- congestion of the coastal edge with decorative or other structures (sculptures, pumping mechanisms, bridges);
- increase in water level due to heavy rains or melting snow mass.
As a result, not only the decorative appearance of the reservoir suffers, but crops growing nearby may die and nearby buildings may become deformed. In this case, the coastline becomes a dangerous zone for humans.
Stage 4. Digging a pit
Step 1. First, we create a scale sketch of the future reservoir, indicating the size and width of the curtains (shelves for plants, that is, the upper stage of the structure). This will help avoid possible difficulties not only during construction, but also when planting.
We also think about the accent of the composition - a large original stone, for example, a sculpture or just a tree.
Step 2. Using a rope or sand, we outline the expected contour of the reservoir. We make sure to check that all the banks are at the same level, and then use a shovel to cut the turf along the perimeter of the pond.
Making the markings
Making the markings
Step 3. Now let's start the excavation work. First, we dig a pit to the depth of the first level (about 30-40 cm) and mark a line from which we will dig down to the second level (90 cm). Next, we create the deepest level (up to 1.8 meters, if we plan to breed fish), and extract the last portion of soil.
The pit for the pond is formed by characteristic ledges - curtains for planting plants
Note! It is recommended to regularly check the level of the banks while digging a pit. If there is no water level of the appropriate length, you can take a simple long board and attach a 50-centimeter device to it.
Step 4. To dig a reservoir, it is advisable to use the services of specialists in this kind of work, accompanied by a small excavator, because this work is quite difficult. But if you decided to do this stage of the work yourself, then you should be prepared for the fact that moisture will accumulate in the pit and you will have to dig in dirty slurry. To remove water, you can use a pump (but only one specifically designed for pumping liquid with solid particles). You can dig another hole nearby to dump water into.
We're digging
Multi-level artificial pond
Step 5. Carefully inspect the bottom of the finished pit for branches, sharp stones and anything that could damage the film. We check the horizontality of the banks and, if necessary, level them.
We carefully inspect the bottom
Step 6. We dig a ditch 20 cm deep along the perimeter of the pond to fix the film. Then, using a rope, we measure the dimensions to determine the required size of the film, add 0.5 m on each side.
When carrying out excavation work, you may encounter the problem of where to put the earth from the hole. An excellent solution to this problem is to raise the level of the site by evenly distributing the soil over the entire area of the garden. Another option is possible - to use the land to build an alpine slide.
Timing of bank protection works
To avoid negative consequences, shore strengthening should be carried out on time:
- artificial pond - immediately after the pit is dug;
- a natural lake or river - as soon as the first alarming signs appear (the roots of coastal plants are exposed, the soil is collapsing in places, decorative elements on the shore are shifting).
Strengthening measures are best carried out from late spring to early autumn, when the weather is consistently dry and there is no prolonged heavy rainfall. Winter is the worst time to carry out work: after the snow thaws, the fastening materials may shift, so everything will need to be redone.
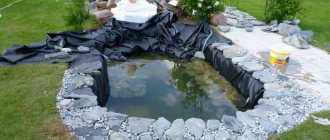
Stage 5. Lay the film
Laying the film
Step 1. Cover the bottom of the pit with a 15-centimeter sand “cushion” and compact it thoroughly.
Step 2. To protect the PVC film from damage, lay a layer of roofing felt (laying is done with an overlap).
Step 3. Cover the bowl of the reservoir with film. We do this freely, with a small margin along the banks. We press the ends of the film with bricks.
Butyl Rubber Pond Film
Note! To increase the elasticity of the film, it is advisable to lay it on a sunny day - under the influence of temperature, the film will stretch better and easily bend around all the protrusions of the pit.
Step 4. Fill the pond with water, but do not rush to cut off the excess film. It is necessary to wait approximately 24 hours for the polyvinyl chloride coating to take on its final volume. Then we cut the film, place its edges in a previously made trench, tuck it in and fill it with crushed stone.
We add individuality
Laying stones on the edge
Filling the pond with water
Filling the pond with water
Note! Often the width of the film is not enough for the whole pond. In such cases, several pieces are connected to each other by soldering.
Prices for different types of pond films
Pond film
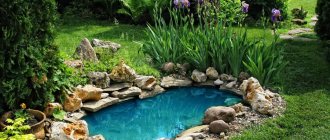
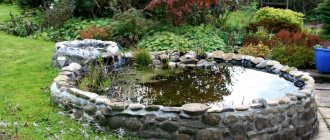
Stage 6. Setting up a decorative pond
Step 1. In order to prevent the earth from falling into the bowl of the reservoir, we strengthen the edge. This can be done using:
- stone blocks;
- plastic pipes nailed to pegs.
We line the edge with natural stone (although you can also use brick, tile, and other materials), decorate it with a group of boulders or one large block.
Step 2. Lay out the bottom of the reservoir with crushed stones or stones. Then we place the pre-prepared plants in plastic containers and arrange them in clumps. It is advisable to use plants that saturate with oxygen (such as hornwort, water lily, swamp grass, etc.). After this, the pond can be completely filled with water.
Note! To correctly select hydrochemical preparations and a pump, it is necessary to measure the volume of the reservoir. To do this, when replacing water, take water meter readings before/after the filling procedure.
Step 3. We can make a small stream for permanent circulation of water - this will prevent the latter from stagnation. To do this, we raise the source slightly above the level of the reservoir and install a submersible pump to supply water from the bowl. We are planning to decorate the mouth of the stream, for which we can use:
- stones;
- containers made of glass or clay;
- planting.
Step 4. We install a submersible pump at the bottom of the reservoir, stretch the pipes to the source and connect them to the cleaning filter. The latter must be pressure, that is, with reverse cleaning provided, since it is much more efficient than usual.
To ensure water circulation in the pond, a pump is installed at its bottom, from which water flows to the purification filter and returns back to the reservoir.
Pump installation
Pump installation
That's it, the pond at the dacha with your own hands is ready! All that remains is to regularly clean it of dirt, use special products that revitalize the water and prevent the excessive spread of algae, and also remove the plants for the winter.
Good advice on arranging a pond
When building a pond, it is difficult to avoid some mistakes, especially in the compositional plan. For this reason, you need to be aware of common mistakes that gardeners make.
| Plant growing zones | Plants |
| Coastal zone | Conifers, elderberries, ferns, meadowsweet, lilies of the valley, bergenia, etc. |
| Coastline | Lipstick, fluffy, marigold, speedwell, snake knotweed, forget-me-not, etc. |
| Plants for decorating shallow waters (up to a depth of 5-20 cm) | Calamus, reed, parasol, cattail, arrowhead, etc. |
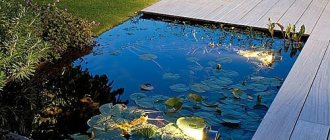
| Deep-sea plants 30-150 cm | Water lily, water lily |
| Plants to decorate the surface of the water (floating on the surface of the water) | Duckweed, water paint, telores |
Pond filter
- First of all, this is container gardening. Yes, this is the option described here because it is the most common, but the fact is that using plastic containers hinders the development of plants. Gardeners are afraid to fill the pond with soil, most likely due to the prospect of dirty water. But there is nothing to be afraid of, because the soil for aquatic plants contains a large amount of clay, which strengthens the roots and is not washed away by water. But if you still don’t like this option, then do as stated above.
How to make a decorative pond in the garden
Pond Plants - Also, the banks are often decorated with stones of the same diameter. It’s better not to do this, because such a body of water looks very boring. It is recommended to combine small stones with larger ones, but not to “go too far”, that is, not to litter the banks with them.
Pond - Ponds that are too deep resemble, so to speak, bags of stone. According to recent studies, it is more profitable for excavation companies to dig deep reservoirs, because their services are paid per cubic meter of excavated soil. But if breeding fish is not part of your plans, then a deep reservoir is completely useless.
Finally, when planning to build a pond yourself, first practice - make, for example, a miniature pond, and only then move on to larger compositions. This will significantly increase the chances of success.
Instantaneous water heater for pond
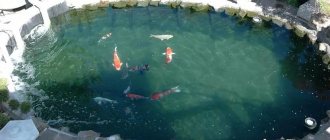
A living pond will not only please your eyes on warm summer evenings, but will also bring some benefits in the fight against insects
The most attractive corner of the garden
Pond at the dacha
Good luck with your work!
Options from the people
If all the ideas listed above do not suit you, then you can use other solutions. For example, you can take an old bathtub and turn it into something that will be the envy of all the neighbors around.
Everything here is extremely simple, since the bathtub was originally designed to retain liquid, so in this regard, when organizing a pond with your own hands.
If you are still interested in how to make a pond, then it is worth learning more about other landscape ideas.