Beautiful lighting plays an important role in the design of a summer cottage. A high-quality lighting system allows you to admire your garden not only during the day, but also in the evening. Moreover, properly designed lighting can transform an evening garden beyond recognition. Of course, you can purchase a street lamp in a store. Fortunately, there is plenty to choose from: the trade offers a huge assortment in different price categories. But making an exclusive street lamp with your own skilled hands is not at all difficult.
What is the secret to creating the right lighting?
Truly, garden lighting is akin to art - it can create unprecedented effects that are born from the union of plants and decorative lighting. You just need to bring to life some “educational” ideas for your dacha - with your own hands you can transform your garden so much that from being inconspicuous, no different from many others, it will turn into a fabulous corner that can touch you at any time of the day.
Evening lighting of the dacha will not only give the garden a certain mystery, but will also allow you to move around the site without fear
Your garden house and country landscape will look natural during the day and mysterious in the evening if you successfully combine the functionality of lighting with its decorative effect. What tasks are assigned to lighting a garden plot? Depending on the function and area of placement of external lamps, the following types of dacha lighting can be distinguished:
- home lighting;
- track lighting;
- lighting of stairs;
- accent lighting;
- patio lighting;
- festive lighting;
- security lighting.
An important condition for the correct organization of a dacha lighting system is the preservation of the aesthetics of the garden during the day, that is, lamps for night illumination should not disturb the harmony of the dacha landscape. To fulfill this condition, it is enough to select lighting fixtures with a natural shape and/or made from natural materials. A widely used technique for decorative garden lighting is luminous stones, which absorb solar energy throughout the day and release it at night in the form of a mysterious glow, flowing softly, as if from within a rock.
Original lighting placed in dense vegetation will create a cozy atmosphere in a secluded relaxation area
Aerial butterflies and dragonflies, glowing in the dark, naturally and unobtrusively coexist with garden plants
Or maybe you would prefer a group of bright butterflies on long twigs stuck into the ground, which will enliven the lawn during the day and glow at night? What do you think of a gnome with a lamp suddenly peeking out from behind a bush, or a glowing frog perched under a large leaf? Such original solutions will give your dacha individuality and originality, to your delight and to the good envy of your neighbors.
In addition to the artistic impression, it is necessary to think through the technical side of lighting the dacha. The use of alternative light sources based on solar energy is the most economical option for garden lighting. In addition, this type of lighting will not spoil the appearance of the site with long electrical cords stretching along flower beds and paths, since it consists of an autonomous battery pack and a group of lamps connected to it.
The unusual illumination of trees in the form of luminous wells is so mysterious that you inexorably want to look into this depth
Artificial flowers in the form of solar-powered lamps will harmoniously fit into the landscape design of the garden
It is more logical to place backlights connected to the electrical network closer to the house - to illuminate the facade, entrance lobby, terrace, since these areas require more active light, and laying a short wiring will not require significant labor costs and financial investments.
Garden lamp - 100 photos of simple, original and stylish DIY ideas
Garden lights not only illuminate the area, making it safer in the evening, but also decorate it. Many types are designed to illuminate flowers, bushes, and trees. In the latter case, pendant lamps are more often used, since they do not obscure the tree; they usually have special, inconspicuous clothespins. This type is also used for lighting a house, gazebo, fence.
Brief contents of the article:
Types of lighting for garden plots
Decorative focused lighting is the most expressive lighting created by an accent beam of light and directed at an original landscape composition - a flowerbed, pond, tree, or simply a beautifully shaped flower. With such directional lighting, it is important to correctly balance the intensity, color spectrum, pattern of the light spot and the location of the light source. An interesting idea for illuminating the garden could be groups of lighting fixtures located under trees with an unusual crown - in the evening, directed light will draw the silhouette of the tree and create a bizarre pattern of shadows on the ground.
Evening illumination of the garden depicts the outlines of plants so subtly that they sometimes take on a fantastic, unreal appearance.
Lighting garden paths does not imply an abundance of powerful lamps - these can be small spots or light sources built into the ground, giving only a hint of lighting on both sides of the country “fairway” and indicating the direction of movement. More careful “navigation” requires stairs, which can be illuminated by lamps mounted in the steps or in the railing of the flight of stairs. The main idea that can be applied is to illuminate the stairs with a large number of lamps in the form of improvised candlesticks made of glass jars or tins, grouped along the edges of the steps. Such a move will give the garden a romantic ambiance in the best possible way, and making such miniature light sources with your own hands is not difficult.
You can learn more about how to organize the illumination of paths in your dacha from the material:
Illumination of the gazebo in the garden and the path leading to it will be the key to a pleasant evening time with your family outdoors
Lighting your patio, terrace or gazebo is the way to keep your yard's recreational areas accessible in the evening, on rainy or cloudy days. Since lighting based on accumulated solar heat is not too bright, it is better to use electric light sources to illuminate common areas. These can be floor and table lamps, built-in and spotlights, or entire “garlands” of lamps suspended from the ceiling. Beautiful multi-colored bottles, complex lampshades made of plastic or wood, bright balls made of beads or an extravagant design made of shiny metal - the choice of design for central lighting in the recreation area depends only on you. Depending on what kind of atmosphere you want to give to the place of “social gathering”, the lighting can be intimate and cozy, or more festive and bright.
An unusual and slightly fantastic effect can be achieved by placing many ball lamps on long rods along the path
The main requirement for security lighting is its intensity and location in fundamentally important places for monitoring the security of the site - near the gate, at the entrance to the house, around the garage, along the perimeter of your property or in other places where valuable equipment or garden equipment is located. As a rule, security lighting systems are formed using powerful LED lamps and are subject to certain rules - both in placement and in terms of design, so in this case it is better to choose industrial options for light sources.
A comparative review of garden lamps will also be useful:
An excellent solution for illuminating a summer cottage is pots for plants that accumulate light during the day and emit it at night.
How to do it yourself
Some people don’t want to spend money on a purchase, and are curious to try their hand at it. Such people decide to make a lamp with their own hands. It is not difficult. And although the result will most likely be far from the ideal form, functionality and durability of the purchased item, it will definitely decorate the garden.
Secondly, you need to decide what exactly will produce light. It could be a gas-discharge lamp, LED strip, solar-powered light bulb, or just a candle. In the latter case, the lamp, of course, will serve an exclusively decorative role, but sometimes this is enough.
But in order to connect, for example, an LED, minimal electrical knowledge is required. If you don’t have such knowledge, you can make the “shell” of the device yourself, and ask someone who understands this to connect the wires.
The easiest option for making a full-fledged lamp yourself is a solar-powered lamp. It must be purchased at a household goods store and mounted in a pre-prepared form.
If it is, for example, a glass jar, then you need to cut a hole in the lid, insert a lamp into it with the battery facing up (so that it receives solar energy), with the lamp facing down. You can also install a similar lamp in old chandeliers, but in this case you will have to work a little.
Examples of hand-made lamps
A floor lamp that has fallen into disrepair, retired kitchen utensils, old plastic dishes and other seemingly unnecessary items will now be useful to you for the “production” of country lamps. Everything will be used - from glass containers to grandmother's sets - a little imagination, a little patience and all the rarities that have one foot in the landfill will turn into lighting fixtures that bring you light and joy.
In order to make a country lamp, you don’t need to spend a lot of money - look into your grandmother’s chest and you will find everything you need for creativity there.
Option #1 - from glass bottles
Fancy lamps made from unnecessary glass containers can transform your garden, and won’t cost a single penny. An ordinary glass container can be turned into an amazing lamp without any effort. Take a bottle of an original shape or an unusual color, pour multi-colored small beads, ground glass, and transparent balls onto the bottom that will reflect light. Wind the multi-colored wire around your finger to form spirals and place them in the container. Fix a small flashlight with silicone in the neck of the bottle - this will be a light source that can be conveniently turned on and off as needed.
When buying alcoholic beverages, take a closer look at the shape and color of glass bottles - because now you will need them to create homemade lamps
Interesting shades for a hanging chandelier can be made from glass containers of different shapes and sizes. But how to cut off the bottom of a bottle? Yes, easily! Tie the bottle with a thin rope soaked in kerosene or gasoline at the level of the desired cut, and pour cold water inside the bottle exactly to the line marked by the rope. When you set fire to the rope, the bottle will burst and a smooth cut will form, which you only have to sand a little so as not to cut yourself. Now you can thread the electrical cord into the lampshade and connect the light bulb socket.
By cutting the bottom of a glass bottle and attaching a metal plate to a pin, you will get a convenient candle holder for garden lighting
You can get a more powerful light source if you tie several colorful bottles with wire and hang them from the ceiling of a gazebo, patio or summer house. If the bottle colors seem a little gloomy to you, take stained glass paints and paint the glass, showing your imagination and your innate sense of harmony. And don’t be afraid to give yourself free rein - you can always remove a not entirely successful fragment of stained glass painting with a solvent and update it. It’s even better if you entrust the mission of coloring bottles to your children or grandchildren - it will be a joy for both you and the children.
With a little creativity, you can turn a glass bottle into an expressive wall lamp in the form of a stylized torch. To do this, a hole is drilled in a tightly screwed bottle cap, through which kerosene is poured inside and a wick made of natural rope or a stainless steel tube pre-impregnated with the same flammable mixture is filled.
Recent Entries
Lilac perennials that are beautiful, compact and do not crowd out other plants Why when buying seedlings you should not take the sellers’ word for it and how to determine the age of the plant using 3 signs Tomato seedlings have turned purple or whitish: why the color has changed and how to save the plants
By pouring a flammable mixture into a bottle and tucking the wick inside, you will create a lamp in the form of an improvised torch
The alternation of bottle-shades with candles and flowers gives the homemade chandelier on a metal frame an unusually natural look
Why should a New Year's garland gather dust in anticipation of the next New Year? Place it in a champagne bottle and you will have an expressive lamp for your garden. Too lazy to make something for a long time, but it hurts to be original? Wind a thread or rope around the bottle absolutely randomly, but so that there are gaps left, and apply paint of your favorite color from a can onto this kind of cocoon. When your “painting” dries a little, unwind the bottle. Unusual? Go ahead.
The candle holder bottle is unique due to the idea of a candle holder in the form of a spiral, fixed in the neck with a ring
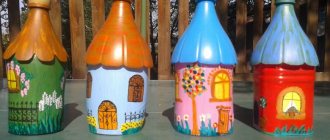
Option #2 – from glass jars
The main problem with a glass container as a base for a homemade lamp is that it has an absolutely transparent surface that does not scatter light. The task facing you in the process of making a glass lamp with your own hands is to fragmentarily decorate a transparent vessel in such a way that it, nevertheless, works in places for transmission - scatters and smoothes out the light from a candle or light bulb placed inside.
To make it easier to remove melted wax from the bottom of the candle holder, pour a little sand or pebbles into it.
What can be done with a prosaic, but beautifully shaped jar, left as a memory from the once eaten exotic pickles? It all depends on the style in which the newly-minted lamp is designed. If you want a country style, wrap the jar with jute rope, fixing it to the glass with silicone glue. Do you want vintage style? Cut long narrow strips of colorful chintz, cotton lace or guipure and “dress up” your jar in your great-grandmother’s outfit. Do you like techno style? Remove the voltage coils and diode lamps from the old TV or tape recorder - wrap the copper wire around the can. Glue cylindrical bulbs of LEDs as decoration - they will further refract and modify the flow of light, and the lamp will turn into some kind of object of alien origin.
Unlike bottles, glass jars are rarely multi-colored - paint them with bright stained glass paints
An original idea for decorating a lamp for a garden in the pop art style is to paint a jar with multi-color luminescent paints applied to the inner surface of the glass jar in the form of irregularly shaped spots. Accumulating sunlight during the day, at night the jars will emit a soft, unobtrusive glow, shimmering with rich shades of neon blue, pink or lemon. By arranging glass containers of different heights and diameters, painted with phosphors that match in color, you can create a bright compositional group in your garden, illuminating the path to your house, an alpine hill or a flower bed.
The jar, covered with a myriad of small phosphor dots, emits a soft, elegant light
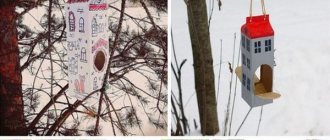
Option #3 – from tin cans
After drinking beer and eating sprat in tomato sauce, do not rush to throw the cans into the trash - everything will come in handy in the dacha farm. For example, to implement extraordinary ideas in creating country lamps that can give your garden an unforgettable look.
What is needed for this? A hammer, nails of different diameters and a cylindrical piece of wood. Sketch out the motif of the design on paper - preferably it should not be a very complex closed pattern. Now attach your sketch to a tin can, and put a piece of wood inside it - it will protect the tin from deformation. By punching holes at equal distances with nails, transfer the design to the jar - you will get holes through which delicate light will leak.
An ordinary beer can can turn into an exotic lamp due to the pattern formed by small holes
Who would have thought that such an unusual lamp could be made from the combination of a can of canned food and wooden clothespins?
Option #4 – from building materials
After the construction of a dacha, various building materials are often left behind - cement, plaster mixtures, liquid nails, etc. You can’t store such mixtures for a long time - they quickly absorb moisture and form lumps, but you don’t even dare throw them away. Don’t despair, here are a couple of fresh ideas on how you can use building materials to benefit your business, namely, to create country lamps.
By using unnecessary leftover cement and plaster mixtures, you can make a rather original lamp
Take a large and small plastic bottle, cut off the bottom and place one inside the other, securing them with a threaded pin. Turn the resulting structure upside down and install it, say, on a tin can of a suitable diameter. Mix the cement mixture and fill the space between the two bottles, shaking the mold occasionally to ensure even filling. After the solution has hardened, cut the bottles and release the lampshade.
Forming separate fragments from cement mortar, connect them together - you will get an unprecedentedly beautiful patterned egg-lamp
Option #5 – made of wood and ropes
Having selected small but expressive dry twigs, stick them overlapping in a chaotic order onto a children's inflatable ball. Once the glue has set, carefully remove your design from the balloon and deflate it. The eco-style lampshade is ready, you just need to refill the light bulb and connect the lamp to the network.
Unnecessary branches from cut trees will be an excellent material for creating a country lamp in the shape of a ball.
Using the same principle, using inflatable balloons, make a lampshade in the form of a hemisphere from jute rope. To do this, draw a border on the ball and, gradually gluing the intersections, wrap it with rope. After the glue has dried, carefully deflate the balloon and remove the rope shade from it.
Snow-white openwork rope lamps will create a festive atmosphere on your terrace or patio area
In order to make a lamp from wood, you do not need to know how to plan or saw - there are a lot of ready-made wooden semi-finished products that you just need to skillfully apply.
If you twist birch bark into a cone shape, you will get a very delicate and elegant lampshade for your lamp.
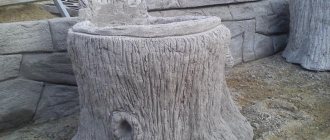
Don’t rush to get rid of stumps - you can use them not only to make a stool, but also an extravagant country lamp
Option #6 – made of plastic
Plastic bottles have been used for a long time both in tail and mane for a variety of country crafts. What our inventive people haven’t come up with, conjuring their “very skillful” hands over plastic bottles. Not wanting to lag behind the mass trend, we hasten to offer our version of “recycling” a plastic bottle by creating an extraordinary lamp.
This is an extraordinary lamp - either a hedgehog or an insect, which can be made from an ordinary plastic bottle
Plastic ball lamp. 1. Cut off the bottom 2. Glue it together 3. Bend it along the radius 4. Form a ball 5. Install it on the base 6. Connect it to the network
Lampshade for a lamp made of plastic leaves. 1. Cut out the rectangles 2. Cut out the leaves 3. Melt the edges with a soldering iron 4. Connect the leaves with wire
So, we cut the bottle into rectangles, from which we cut out leaves. We melt the edges of the sheet with a soldering iron, giving it a more natural outline. We burn 2 holes with a hot needle and thread copper wire through them without insulation. We collect branches from individual leaves and form them into a spherical shade.
You can make decorations and unusual crafts for your garden from plastic bottles, read about it:
Don’t rush to throw away disposable cups after receiving guests - it’s better to glue them together into a cute multi-colored lamp
Buy ping pong balls, glue several circles from them, and then connect them vertically - the futuristic chandelier is ready
An original chandelier can be made from other plastic products - disposable tableware, plastic cups and ping-pong balls. Due to the initially conical and spherical shape of these products, gluing them will steadily lead you to the creation of a spherical or cylindrical lamp.
Bright lamps made of multi-colored beads will help create a cheerful and relaxed atmosphere at your dacha.
String large plastic beads onto a wire, twist it into a spiral and form a spherical shade of small diameter. You can get a rather original chandelier for your garden if you arrange balls of beads of different colors and diameters, attaching them to the frame on long pendants.
Old CDs and records cluttering your closet are now very useful - they will make amazing lamps for the garden
Here is a unique idea for a lamp for music lovers - those whose home is littered with old music storage devices - discs and records. Surprisingly, old CDs can make a wonderful lamp. It is enough just to drill, having previously marked it with a marker, 5 holes at equal distances from each other around the circumference of the disk, not getting too close to the edge, and then fasten the disks together with wire. Such a multifaceted structure can have any diameter depending on the intended size or your patience. If the lamp is supposed to be a floor or table lamp, then glue 3-4 erasers to one of the disks that acts as a base. By hanging several disc balls on a metal plate, you will get an original futuristic chandelier to illuminate your terrace or patio area.
A corrugated plastic pipe can be perfectly transformed into a shell lamp - all you have to do is tuck the light cord into the pipe
What materials are suitable
When choosing a purchased copy, you should pay attention to the material. It is important that it be moisture resistant, so wood is not suitable in this case. It can only be used in summer varieties and must be well processed. The same goes for ceramics. The best option is metal, but impact-resistant plastic will also work.
Silumin receives not very good reviews, which, according to many, deteriorates too quickly. If this is a lamp for a pond or swimming pool, then, of course, it must be waterproof.
Source
DIY street lamp: simple models for “crazy” limbs
A summer cottage or country property is a large area that you want to arrange as much as possible. If we talk about design, then the dominant role here belongs to lighting fixtures. Since home lamps are not helpful in this case, skilled owners make a lot of street lamps with their own hands. This idea cannot be considered a real adventure, because the manufacture of such a design is available to everyone. The main thing is desire, patience and free time, which you don’t mind spending on a homemade light source. The master's reward will be an original, unique design, a radically transformed area and basic convenience.
"Lamp" made of building material
In this case, the master should have a small amount of cement on hand, as well as plaster. To make a street lamp, you will need two plastic bottles: one (2 liters) should be wide, the second should be a regular one, designed for 0.5 liters. Both containers must have lids. If there are bottles, then half the job is almost done, just a little remains:
This lantern can be left in its “pristine” form, or you can decorate it as you wish. The main advantages of the product are that it is free of charge, unique and an unusual approach to traditional building materials.
List of required parts
There are only 7 elements in this list; most of the parts can be found in an electronics store. But to save money, you can order components through Aliexpress or other similar sites. The main thing is to select all the parts according to the markings so that you end up with a workable design:
- 3.6 kOhm resistor.
- 33 Ohm resistors (depending on the number and power of LEDs).
- Diode 1N5391 or analogues (there are both imported and domestic options).
- Transistor 2N4403 (there may be other types with suitable characteristics).
- Rechargeable battery 3.6 V. It is better to choose lithium-ion ones, since nickel-cadmium ones are not reliable.
- Solar photopanel, monocrystalline options are best suited as the most productive and durable. Polycrystalline elements can also be used. The main thing is to choose products of grade A or B, do not take options C and especially D, since their characteristics are much worse and their service life is shorter.
- LEDs. You can use 1 element with a power of 3 W, but it is better to take 3 pieces with a power of 1 W. In this case, it is good to use DIP diodes as they perform better in open air conditions than SMD.
Parts you need to have on hand when assembling a garden light.
It is worth deciding in advance in which housing to arrange all the nodes. Any options that provide a convenient arrangement of parts are suitable. You also need to purchase a soldering iron and all materials for soldering if they are not at hand.
Mini flashlight keychain
Very convenient, portable, bright, able to work uninterrupted for several hours. It will help you open the door on a dark train, and will save you in any force majeure situation with a sudden blackout.
Schemes and drawings of how to make a flashlight with your own hands of varying complexity, this is the easiest way, so a verbal description is enough. Suitable for a beginner master.
For this we need:
- Light-emitting diode;
- Three tablet batteries;
- Heat-shrink tubing;
- Stationery needle;
- Soldering iron;
- Lighter;
- Tweezers;
- Pliers.
Find a minus on a 1-watt LED and solder it to the minus on the battery. The size of the battery must match the circumference of the LED.
Bend the terminal with the soldered tablet and place the LED on the pad. We apply two more tablets to the resulting structure and check our flashlight for functionality. If it is shining, then the scheme is working and we are on the right track, we can continue training.
Place the heat-shrink tube onto the product, leaving a free terminal, and heat it with a lighter to seal the structure.
Solder a stationery needle to the free contact and bite off the top cap with pliers.
Make a ring from the remainder of the needle, the end of which will be directed towards the positive terminal of the top tablet. Place a small ring on the curved part; it will later serve as an attachment to the key.
To turn it on, just press the body and the mini flashlight keychain will shine.
sky lattern
There is also a very interesting option that we have not yet considered - how to make a Sky Lantern with your own hands
Now this topic is in great demand, and a large number of meetings are held where such sky lanterns are released into the sky.
These are such interesting paper structures stretched over a bamboo frame. Believe me, it is not difficult to build such a product.
You will need to go through the following steps:
An ideal dome can be made from rice paper, but it is very expensive. Therefore, it can be replaced with an ordinary garbage bag.
Take two of these bags, preferably as large as possible, and cut off the bottom of one of the bags. After this we glue the packages. The dome is ready.
Next you need to make the frame. Find a special ring. Take a wire with a diameter of no more than 2 mm and attach them to the ring with a cross. You can also stick them with tape.
The lantern is ready! Now decide what will burn inside it and launch it successfully! Don't forget to make a wish!
Assortment for choosing a model
A street lamp has its own responsibilities, it:
If a classic street structure almost always has a leg with a device on it, then you can choose a model for a homemade lamp that will serve as a decoration for the area from several types of lamps.
Street "bottle" lamp
For the lampshade, you can take any glass bottle or jar of an original shape and unusual color, and the work itself does not foretell any special difficulties. For it you need to prepare:
The operation itself goes like this:
If the transparency of the can seems unsuitable, then it is painted from the inside with luminescent paints: a pattern is applied or it is completely covered. This material, which provides an original glow, is completely safe - non-toxic.
Outdoor materials
The choice depends on the owners, since different materials can be used for street lamps, the main thing is that they are not afraid of water. Popular plastic falls into this category, but it has one big drawback - fragility. For this reason, it is not the best solution, since sooner or later such a flashlight will definitely break.
Metal is the ideal material
The best option is to make a street lamp from metal. And here there are three worthy candidates: bronze, brass, copper. However, the first alloy will constantly darken, so the owners will have to sacrifice time cleaning the lantern. Copper will oxidize over time, and such a lamp will acquire an unsightly greenish tint.
Considering the important shortcomings of the two competitors, we have to admit that there will be one winner - brass - an attractive and durable material. There is another candidate - steel, ideal for street lighting, but when choosing this alloy you can only dream about the beauty of the product, because steel products are not too similar to decorative elements.
Candidate materials at hand
It is not always possible (and passionate desire) to make something designed to last forever. For example, in summer cottages it is more logical to build a structure from a simple material that does not require serious processing. Therefore, the owners, whose “bins” are full of all sorts of goods that are a pity to throw away, make street lamps from any raw material. Suitable for this:
Such street lamps have a great advantage: they almost always attract attention, as they turn out to be unusual and original. Another plus is the ease of their manufacture, because their creation does not require a welding machine or a lot of time. Yes, there is a minus - it is fragility, but to replace the old product, you can easily and quickly build a new one, but already having a completely different - “fresh” - look.
Sources of light
If you already have a lamp or have purchased a new one, then you should take care about choosing a light bulb. They differ in price, light quality, electricity consumption, and service life.
Incandescent lamps
This option is the most budget-friendly. But you should be prepared for the fact that these bulbs do not provide bright light. In addition, they consume a lot of electricity, and they only work for 1 thousand hours.
Halogen
Halogen lamps last longer than previous ones - approximately 5 thousand hours. They are more expensive, but the quality of the light itself is much better. They also consume less electricity.
LED light bulbs