Types and features
Before you begin choosing the design and selecting materials for the future product, you need to determine its location.
- It can stand separately, then it will be an isolated structure. It is often placed at the entrance to the garden, for example.
- Several combined structures will form a tunnel. But in this case, the garden area must match; in small areas it will look out of place.
- You can decorate an empty wall of the house, make a corner extension, then the decorative part will become its continuation. But still, more often pergolas - wooden canopies - are placed in this way.
Instagram @danisartgarden
Instagram @knightfencing
Flower Market
Design Rules
When designing a future product, it is also important to take into account a number of points.
- Its height should be at least 2 meters so that the support does not look squat and cramped. And more than 3 meters, otherwise it will be too bulky and high.
- Width - at least one and a half meters. Otherwise, when the flowers grow, the structure will have an unkempt, neglected appearance.
- The model can be mobile, without support, then it can be easily moved around the site. But in this case, carefully choose a climbing plant; it should not be heavy.
- Don’t forget about aesthetics; in winter, the structure will stand without plants, so its appearance should not clutter or spoil the landscape.
- Forged products are good in a classic garden, and wooden ones are suitable for simple areas decorated in rustic or Provence style.
- Country cottage area
Making a wooden gate with your own hands: instructions from choosing the material to assembling the parts
General recommendations
Where to start making a pergola?
Select an option
To master the construction of a pergola with your own hands, first of all you need to look at different design options:
- it can be in the form of a canopy, attached to the house or as a separate structure (like a gazebo);
- the roof can be made in a traditional style (square or rectangular), gabled, arched, sloped or as a promenade structure;
- the pergola itself can be built in the Japanese style or in the form of a rotunda; some people like corner options (one of the easiest to build with your own hands);
- You can also choose different style solutions: country, high-tech, modern, oriental, chalet, half-timbered, etc.
You also need to decide on the material. Everything will depend on your skills and finances. Stone and forged structures are one of the most fashionable, sought-after and beautiful options. However, they are mostly made to order by professionals. If you are not a mason or a blacksmith, it is better not to take on such complex structures. The best option is wood. It is easy to process, looks rich, and allows you to add some of your own flair to the building. Metal is more difficult to work with.
Pergolas:
Related article: Pergolas in landscape design
Preparation
The next step is selecting a scheme. Here a lot depends on your skills and abilities. If you have worked with wood or metal before, if this is not your first experience in construction, assembling a pergola with your own hands will not be difficult. Some people won't even need step-by-step instructions. But beginners should still find a detailed algorithm of actions.
When you finally have what you want in your head, calculate how much material you will need, what tools and fasteners you will need to use. Always take an order of magnitude more. As practice shows, it’s better to have extra left over than to go shopping several times to look for something.
A general list of tools that may be useful for constructing a wooden pergola:
- hand drill;
- drill and wood bit;
- pencil/marker;
- paint brushes;
- hammer;
- fine-grained sandpaper / sander;
- hand saw for wood / jigsaw;
- plumb line;
- roulette;
- chisel;
- clamps;
- square;
- building level;
- screwdriver
Tools for building a metal pergola:
- welding machine;
- Bulgarian;
- building level;
- roulette;
- square;
- pencil/marker;
- shovel;
- galvanized wire.
Selecting a location
Tips from landscape designers for placing a gazebo in the garden:
- a pergola in the middle of the site does not look good - it is better to choose a place on the edge;
- An excellent option for a small garden would be an extension to the house in the form of a canopy;
- those who want to build a full-fledged gazebo with a barbecue and a table with their own hands can choose a corner near a wall or fence, in the shade of large trees;
- it can be an arch to design the transition from one zone of the site to another (along a path or alley);
- if the site already has climbing plants that lack support, it would be logical to erect a supporting structure next to them;
- You may need to create shading over a parking lot or playground - in which case a pergola will also be an excellent solution to the problem.
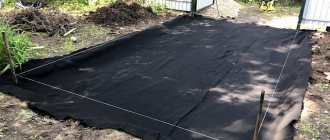
Try to plan for mostly sunny weather during the work. Always keep in mind the risk of rain in order to protect the material from it (store under a canopy or cover with a water-repellent film).
Metal arch
Almost every rose fan dreams of a forged flower arch in the garden, but making it with your own hands is very difficult. As an alternative material, corrugated reinforcement can be used.
Metal is stronger than wood and will last longer, plus it requires much less maintenance. However, keep in mind that in winter this design element does not look very picturesque.
Instagram @sambohjelm
Instagram @topgarden777
Instagram @topgarden777
Instagram @happy_inthegarden
Materials
- Reinforcement rods with a diameter of 10 mm and a length of 6 meters - 2 pieces. This is the basis.
- Reinforcement rods with a diameter of up to 6 mm and a length of up to 90 cm, depending on the distance between the supports. These rods are used to make jumpers that are attached between the arches.
- Enamel or primer for coating metal.
- A pipe bender will make installation easier.
Work order
- The first thing to do is bend two arcs. These will be the supports. The easiest way to do this is with a pipe bender. But you can try it manually.
- To do this, draw a circle on the ground. Drive the pins into the resulting circle; they will support the rod. The more pins, the smoother the bend will be. You can lay siding between the reinforcement and the pins, this will also make the process easier.
- You won’t be able to make an arc this way alone; you need an assistant. At the same time, start bending the reinforcement from the ends until the rod takes the desired shape.
- When the two support arcs are ready, drive them into the ground to a depth of approximately 45-60 cm.
- Align them using a metal strip that can be secured with wire. Control the level.
- Using this bar as a guide, you can weld transverse metal rods.
The procedure and features of the work are presented in the video below.
What is a pergola?
We recommend that you read
In simpler terms, pergolas are garden arches that were originally built to support climbing vines. They begin their history from the times of Ancient Rome, when emperors rested in the shadow of these structures. Pergolas have a lot of advantages, thanks to which they are so popular: practicality, ease of installation, the ability to refine the appearance of the garden and make it sophisticated.
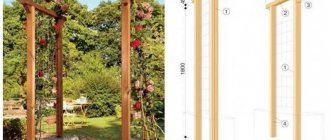
Today, more and more often, pergolas can be found on personal plots. The classic version of the pergola looks like an arch with lintels about 1 m wide. The structure can have different heights - it all depends on the capabilities of the plant for which the pergola is being built (whether it can braid the arch completely). And, as a rule, arches up to 4 m high are built for vigorous plants. A structure created from a series of such arches will look especially elegant if they are connected to each other by transverse beams. As a result, a real corridor of climbing vines or vines will appear on the site. This is exactly what a classic pergola looks like.
The garden gazebo will become even more comfortable if the pergola structure consists of several supporting arches. In this case, the gaps between them will act as additional entrances. Arches made of wooden slats look very expressive - they combine perfectly with the greenery of the leaves and help create exactly the atmosphere of comfort that a person so needs when looking for coolness and peace.
Another rather interesting option is canopies woven with vines. If you choose it, you will not regret it - a real courtyard from the era of Ancient Rome will appear on your site.
But you should not think that a pergola for climbing plants is an exclusively decorative element of a personal plot. It can also perform practical functions. For example, with its help you can zoning the territory, highlighting a recreation area, a utility area, a front entrance, etc. But even if you simply use the pergola for its original purpose, namely as a support for grapes, it can be of great benefit to the summer resident . A pergola will significantly facilitate the cultivation of such a widespread crop in our country, and in return for attentiveness in the fall, the grapes will thank the gardener with fragrant bunches that will look amazing against the backdrop of a dense carpet of green vines.
If decorative grapes grow on your site, then you can enjoy the view of a pergola intertwined with red leaves of vines all year round.
From the branches
How to make a flower arch with your own hands with virtually no tools? Using natural materials, or rather twigs. In addition, it will be the most environmentally friendly option. Only materials should be purchased in the store, and not collected in the nearby forest.
Flexible wood species are best suited - willow, birch. The frame is made of wood or larger branches.
Instagram @katya_landesign
Instagram @thedomesticatedgardener
In this case, the only tools you will need are pruning shears, scissors, regular and for metal, for cutting threads or wire. With their help, the rods are attached to the frame.
Instagram @burtiandscout
Instagram @burtiandscout
Instagram @burtiandscout
Instagram @burtiandscout
The process is presented in the video:
But keep in mind that such an arch will not last you more than one season, so you should choose annual plants so that the work of growing them does not go in vain.
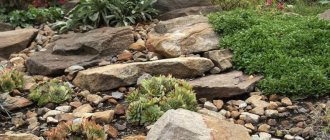
Stone structures
When planning the garden design and choosing decorations, the functional load of the elements should be taken into account. For example, a stone garden arch is practically unsuitable for climbing plants. It is chosen as an independent garden decoration.
To create such arches, wild stone, brick, or concrete pouring are used. It is not difficult to lay out a rectangular arch from brick or stone. If you want original or complex compositions, then you cannot do without the help of professionals.
Made of plastic
Not the most environmentally friendly option - made from plastic corrugated pipes. But it is definitely one of the cheapest, and in the photo it is almost impossible to distinguish it from metal.
Materials
To make such a structure you will need the following materials.
- Two pipes - to create longitudinal beams. Their length will correspond to the width of the structure, that is, it should not be less than 120 mm.
- Products made from PVC, polyethylene, and polypropylene are suitable. The last two types are easy to bend, so you can make a frame with an arc rather than a straight one.
- The shorter lengths will be used to create the support and cross beams.
- To connect the tubes to each other, adapters selected according to the diameter of the pipes are used.
Instagram @bland_design
Instagram @gabriana_nosyparker
Work order
- Long pipes are cut into several short ones to ensure connection with the cross beams and make the structure more stable.
- The pipes can be attached to each other either using glue or by heating.
- Since this is a very light structure, special attention is paid to the support and foundation. And then even a strong gust of wind will not be able to blow it away or overturn it.
- To strengthen the system, reinforcing pins are attached to the plastic support beams on the mounting foam. Allow to dry.
- These pins are deepened approximately 50 - 100 cm into the ground.
- The earth around is covered and compacted tightly.
The process of manufacturing such a structure from plastic can be studied in the video:
Other materials
The variety of options for garden arches amazes with many creative ideas. If desired, you can create compositions from natural stone, decorative brick, or intricate driftwood. A lantern, wooden or plaster sculpture can be built into the design.
Non-standard products can have the shape of a circle, an asymmetrical figure, or an intricate tower dome. Any owner of a plot of land is able to transform the territory with the help of interesting design ideas and the use of beautiful and unusual arched structures.
Combined arch
Very often you can find models made from several materials. The most popular is the combination of wood and metal. The supports are made of wood, and the upper arc is made of metal. Wood and plastic are combined using the same principle.
Instagram @justwood_krd
Instagram @justwood_krd
Structures with brick or stone columns - a base and a wooden top - look monumental. But such buildings are suitable for large plots with architecture in the same style. And heavy climbing plants. Selecting the right ones will be discussed further.
Wooden gates
Wood is rightfully considered one of the available materials for creating arches. If difficulties arise with creating a semicircular top, then a U-shaped one will be a replacement. Such designs fit into any garden design and add coziness.
Before construction, the wood is treated against insects. During operation, you should also periodically paint the support and take care of the material to prevent rotting.
Selection of plants and decorations
- The choice of colors should, first of all, be determined by the planting location and climatic conditions. The most popular climbing flowers are rose, grape, sweet pea, clematis and others.
- Be careful when choosing a climbing rose. Not all varieties grow upward; most increase their volume in width, and barely reach one and a half meters in height. At the same time, the rose looks best on metal and wooden supports. And plastic ones make these exquisite flowers easier.
- Climbing varieties of roses include: Excelsa, Dorothy Dennison, American Pillar, White Flat, Rosa Bleu Magenta Malvern Hills and others.
- Kobea and beans, grapes, hedera and other green vines can grow to a height of more than 2 meters. They create a nice antique effect on stone and brick columns.
- An interesting landscaping technique is to use plants in hanging pots or containers. Relevant when you need to decorate a structure in anticipation of the growth of the main crop. In addition, you can create interesting compositions with hanging flowers, for example, amaranth, and weaving flowers.
Instagram @danisartgarden
Instagram @rivaripihan_sanna
Instagram @lobeli_a
Instagram @smallwondergarden
In addition, the arch can be decorated with figured street lamps or stretch a garland along its perimeter. In addition to the decorative effect, it will also be functional: at night it will illuminate the yard of the dacha.
Step-by-step instruction
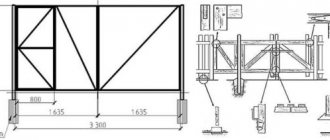
The arch assembly diagram is quite simple. At the first stage, it is necessary to cut the lumber based on the selected dimensions. It is important to sand all surfaces to perfection to make work easier. After cutting and primary processing, the wood can be coated with protective substances. This will protect the arch from the negative effects of the environment and possible infection with fungi and insect attacks.
The arch is assembled in parts horizontally, on the ground. First you need to make the side supports. Then the sides are connected using a crossbar. To install beams, it is better to use nails or self-tapping screws. There is no need to glue the joints, it is unreliable.
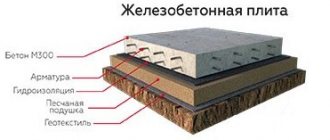
At the installation site, you should dig two holes for supports. Beams are installed inside. Lightly sprinkle the holes with crushed stone, and then pour in the concrete solution. If necessary, additional wooden supports should also be installed. The production time directly depends on the complexity of the chosen form.
With your own hands
Photos of these amazing compositions, pleasing to the eye, can be seen in many prestigious magazines. But don’t think that a flowering pergola or trellis structure is the lot of the elite. You can, of course, buy an arch for your garden or cottage in a store, but if you want, you can easily build it yourself. And, it should be noted that often a structure assembled independently looks no worse than the purchased one. The main thing is to know
At the dacha, for flowers, many people use the simplest building materials that are at hand. These can be metal pipes, wooden posts or beams.
It is always more pleasant to create beauty in your own area on your own. The arch can be placed either along the path or in the corner, separating a seating area with it.
Which flowers to choose?
An arrangement of living plants looks amazing in any garden. Housewives often use ivy or maiden grapes. This is a simple solution, because such plants do not require special care. An arch with clematis or climbing roses looks no less interesting.
If you choose flowering varieties, you can experiment with shades. You can create an interesting and bright composition. Quite often, a frame of morning glory is made on top of the arch. It usually blooms in bright red or purple. In this case, white roses can be placed on the supports to shade the morning glory.
If the arch is elegant and neat, then you should select plants with small flowers. This will allow you not to overload the structure, both physically and aesthetically. You can take no more than 2-3 varieties of plants per arch. Otherwise, the composition will be too colorful.
Watch the video on the topic.
Source
Top sheathing
In order for a do-it-yourself garden arch to look attractive and provide a small shadow, you need to make an upper sheathing for climbing plants. It is necessary to measure 11 cm from one edge of the top boards. On 6 slats, 1 m long, measure 25 cm from the edges. Next, attach the first transverse rail to the marked points, measure to the next 30 cm, and attach it to the boards. Repeat for the remaining 4 slats. On top of the formed “ladder” in the middle, attach a 1 m long rail, nailing it to 2-5 slats.
For a garden arch to have a truly oriental look, you can study a video on its design. But you can also limit yourself to hanging lanterns, which give it greater elegance. With proper pre-treatment, the product will last for many years, but in conditions of heavy rainfall it can be additionally covered with film.
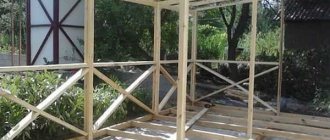
Beginning of work
It is necessary to make cuts on all boards to give the arch an oriental appearance. You need to retreat 5 cm from each edge of a separate board and make a mark. Then step back from the top by about 1/4 of the height of the material, make a mark and then connect the two points obtained. Sawing along the line.
Next, you need to dig all 4 beams to a depth of approximately 0.5 m. The distance from the extreme points (calculated with the width of 2 supports) between the left and right pillars is 1.5 m, and between the front and rear is 55 cm. After digging, you need to make sure at the same height of supports.