A pond is a wonderful decoration for a summer house. It can be arranged even in a small area without the help of professionals. If desired, you can put fish in it or grow plants.
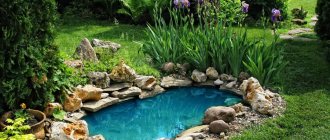
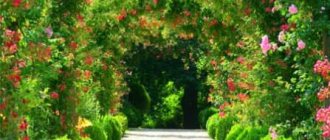
The first thing you need to think about when choosing a base for a pond is what its volume and shape will be. The pond can have the most natural shape possible, decorated with stones and aquatic plants.
Photo: Instagram nastya_shi_za
Or have a clear geometric shape. It all depends on the design style of the site.
Photo: Instagram _idei_dizainakrasoti
- Baths, saunas, swimming pools
How to make a shower in the country with your own hands: tips on installation and selection of materials
What could a pond be like?
First, it is necessary to determine the primary purpose of such a structure, and only then begin the construction of the structure and its further design.
So, according to functionality, an artificial reservoir can be divided into the following types:
Small ponds. They relate more to the landscape composition, complementing the overall picture. It won’t be difficult to create such a reservoir, but it won’t be possible to have active recreation nearby.
Decorative ponds. They have a slightly greater depth, and, as a rule, are subject to decoration with additional elements. These can be bridges, fountains, and much more.
For breeding fish. This pond will appeal to avid fishermen and will definitely please children, who will be able to watch colorful fish.
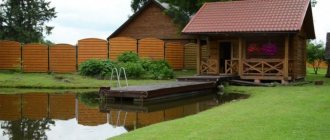
Swimming pools. An artificially created body of water that performs many functions, especially if its dimensions allow for swimming.
If you have already decided which option to choose, then it’s time to move on to the next stage.
The main mistakes of amateur designers
Having no experience in planning landscape design objects, I did not avoid a number of annoying mistakes. I would like to draw your attention to the following:
- a disproportionately large or, conversely, small pond compared to the site, residential building, plants growing in the garden;
- a poorly chosen location from the point of view of nearby unsightly objects: a rickety fence, a shabby barn;
- inappropriate style that conflicts with existing buildings on the territory;
- tasteless design: an overabundance of decor, plants, plastic toys.
With a thoughtful approach, the main flaws are corrected as the work progresses. The pit can be expanded or reduced. And if, for example, it was dug up against the backdrop of an old, ugly cellar, then why isn’t this a reason to put the building in order?
The discrepancy between styles can be corrected by zoning. As for decor, its main rule is: less is better than more. Professionals advise looking at your creation and removing the last added element.
Deciding on the installation location
The pond needs to be installed in a place where you can admire it, and not hide it behind seven seals.
Accordingly, when creating such a masterpiece, it is worth considering several points: area, light, relief, presence of groundwater, soil composition, reflection, landscaping, visibility, power supply (if necessary), the ability to further expand your creation.
The list of work on the construction of an artificial pond should begin in the spring. This is necessary so that the latter can “take root.”
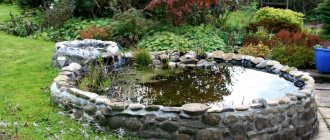
Stage 6. Setting up a decorative pond
Step 1. In order to prevent the earth from falling into the bowl of the reservoir, we strengthen the edge. This can be done using:
- stone blocks;
- plastic pipes nailed to pegs.
We line the edge with natural stone (although you can also use brick, tile, and other materials), decorate it with a group of boulders or one large block.
Step 2. Lay out the bottom of the reservoir with crushed stones or stones. Then we place the pre-prepared plants in plastic containers and arrange them in clumps. It is advisable to use plants that saturate with oxygen (such as hornwort, water lily, swamp grass, etc.). After this, the pond can be completely filled with water.
Note! To correctly select hydrochemical preparations and a pump, it is necessary to measure the volume of the reservoir. To do this, when replacing water, take water meter readings before/after the filling procedure.
Step 3. We can make a small stream for permanent circulation of water - this will prevent the latter from stagnation. To do this, we raise the source slightly above the level of the reservoir and install a submersible pump to supply water from the bowl. We are planning to decorate the mouth of the stream, for which we can use:
- stones;
- containers made of glass or clay;
- planting.
Step 4. We install a submersible pump at the bottom of the reservoir, stretch the pipes to the source and connect them to the cleaning filter. The latter must be pressure, that is, with reverse cleaning provided, since it is much more efficient than usual.
To ensure water circulation in the pond, a pump is installed at its bottom, from which water flows to the purification filter and returns back to the reservoir.
Pump installation
Pump installation
That's it, the pond at the dacha with your own hands is ready! All that remains is to regularly clean it of dirt, use special products that revitalize the water and prevent the excessive spread of algae, and also remove the plants for the winter.
Selecting materials
No repair can be done without building materials and tools that meet the requirements.
Construction companies offer a wide range of similar consumables in stores and markets, but you shouldn’t chase the cheap.
Give preference only to trusted intermediaries, and if necessary, check quality certificates.
In order to make a pond, you may need materials such as:
Concrete. An expensive but high-quality solution that extends the life of the pond for several decades to come.
Plastic. In specialized stores you can purchase a ready-made bowl, which will become the future pond if properly organized.
This option can also last for a long time, which largely depends on the quality of the element’s manufacturing.
Polyethylene film, PVC. This is the most affordable option in terms of finance, but the worst in terms of service life.
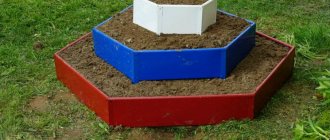
Stage 4. Digging a pit
Step 1. First, we create a scale sketch of the future reservoir, indicating the size and width of the curtains (shelves for plants, that is, the upper stage of the structure). This will help avoid possible difficulties not only during construction, but also when planting.
We also think about the accent of the composition - a large original stone, for example, a sculpture or just a tree.
Step 2. Using a rope or sand, we outline the expected contour of the reservoir. We make sure to check that all the banks are at the same level, and then use a shovel to cut the turf along the perimeter of the pond.
Making the markings
Making the markings
Step 3. Now let's start the excavation work. First, we dig a pit to the depth of the first level (about 30-40 cm) and mark a line from which we will dig down to the second level (90 cm). Next, we create the deepest level (up to 1.8 meters, if we plan to breed fish), and extract the last portion of soil.
The pit for the pond is formed by characteristic ledges - curtains for planting plants
Note! It is recommended to regularly check the level of the banks while digging a pit. If there is no water level of the appropriate length, you can take a simple long board and attach a 50-centimeter device to it.
Step 4. To dig a reservoir, it is advisable to use the services of specialists in this kind of work, accompanied by a small excavator, because this work is quite difficult. But if you decided to do this stage of the work yourself, then you should be prepared for the fact that moisture will accumulate in the pit and you will have to dig in dirty slurry. To remove water, you can use a pump (but only one specifically designed for pumping liquid with solid particles). You can dig another hole nearby to dump water into.
We're digging
Multi-level artificial pond
Step 5. Carefully inspect the bottom of the finished pit for branches, sharp stones and anything that could damage the film. We check the horizontality of the banks and, if necessary, level them.
We carefully inspect the bottom
Step 6. We dig a ditch 20 cm deep along the perimeter of the pond to fix the film. Then, using a rope, we measure the dimensions to determine the required size of the film, add 0.5 m on each side.
When carrying out excavation work, you may encounter the problem of where to put the earth from the hole. An excellent solution to this problem is to raise the level of the site by evenly distributing the soil over the entire area of the garden. Another option is possible - to use the land to build an alpine slide.
Butyl rubber as insulation
Undoubtedly, this is one of the most optimal options for organizing and strengthening a pond.
If the chosen option involves a rocky bottom and greater depth, then experts recommend using a membrane made of this material.
The service life of the structure in this case can reach over fifty years. In addition, an indisputable advantage is the fact that the material can withstand sudden temperature changes.
Build an artificial pond or buy a ready-made one
This question cannot be answered unambiguously. The choice should be made based on your goals, the capabilities of your site, the availability of time and funds.
Ready-made plastic container for pond
Ready pond
The finished pond is a plastic form that needs to be dug into the ground or installed on a special frame in your garden. Let's look at the pros and cons of buying it.
| Advantages | Flaws |
| Availability | Limited shapes and sizes |
| Durability | The fragility of the form itself |
| Easy to install | Lack of naturalness |
| Ease of maintenance |
Installing the container takes place in only 4 stages:
- pit preparation,
- leveling and fixation,
- filling with water,
- decoration.
In other words, such a container is suitable if you need to make a pond quickly and not spend a lot of time on its maintenance, while it will be relatively small. But the main problem with such forms is their fragility.
Despite the fact that manufacturers make them with the necessary safety margin, there is still a risk of damage. The resulting crack can be repaired in many cases, but it is necessary to dismantle and transport the mold from the workshop and back, which will require a lot of effort and money.
Options from the people
If all the ideas listed above do not suit you, then you can use other solutions. For example, you can take an old bathtub and turn it into something that will be the envy of all the neighbors around.
Everything here is extremely simple, since the bathtub was originally designed to retain liquid, so in this regard, when organizing a pond with your own hands.
If you are still interested in how to make a pond, then it is worth learning more about other landscape ideas.
Alternative methods of waterproofing
In addition to the popular options of films, bowls and concreting, there are other ways to retain water in the tank. Let's name just a few.
Liquid rubber over a layer of geotextile . In this case, the pit is prepared as usual, but it is covered not with film, but with special geotextiles. Liquid rubber is applied on top of it in several layers. This option is especially good for small reservoirs with difficult terrain.
Tamper with a clay castle device . The method is quite complex, requiring the use of heavy equipment for compaction and therefore used mainly for large ponds for economic purposes. You can just build a clay castle with your own hands, but even in this case you will have to work hard.
Gabions and gabion structures . Metal mesh filled with stone - gabions - can be successfully used to fence the banks of a pond. Waterproofing will be required in any case, but the rapid formation of aesthetically attractive banks is guaranteed. Another convenience is that you don’t have to dig a pit, but make the reservoir above ground level.
Tires on the move
Tires are a very affordable material that our people have learned to use in different ways, and the home pond is no exception.
True, in this case it will be more of a pond, but still. The creation principle is simple, and looks like this:
- We cut the wheel on one side;
- We cultivate the ground to remove weeds and debris, compact the soil;
- Place the film tightly;
- We decorate;
- Fill with water;
- We enjoy our work.
Decorating a pond at the dacha is a painstaking task, but worth all the effort and money. You can aim for a massive project or be content with a mini-copy of a pond; here everything depends solely on the mood of the owners.
In any case, you can be sure that the result will be an incredibly beautiful decor, near which you can gather for a picnic on a summer day, or just relax looking at the pond.
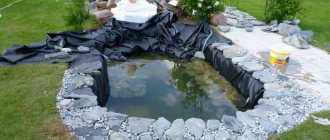
Stage 5. Lay the film
Laying the film
Step 1. Cover the bottom of the pit with a 15-centimeter sand “cushion” and compact it thoroughly.
Step 2. To protect the PVC film from damage, lay a layer of roofing felt (laying is done with an overlap).
Step 3. Cover the bowl of the reservoir with film. We do this freely, with a small margin along the banks. We press the ends of the film with bricks.
Butyl Rubber Pond Film
Note! To increase the elasticity of the film, it is advisable to lay it on a sunny day - under the influence of temperature, the film will stretch better and easily bend around all the protrusions of the pit.
Step 4. Fill the pond with water, but do not rush to cut off the excess film. It is necessary to wait approximately 24 hours for the polyvinyl chloride coating to take on its final volume. Then we cut the film, place its edges in a previously made trench, tuck it in and fill it with crushed stone.
We add individuality
Laying stones on the edge
Filling the pond with water
Filling the pond with water
Note! Often the width of the film is not enough for the whole pond. In such cases, several pieces are connected to each other by soldering.
Prices for different types of pond films
Pond film
Care and additional equipment
If you think that having built a pond you can already start having fun, you are deeply mistaken. You will need to take care of the “infrastructure” of the artificial lake. This is a very complex complex of different technical means that are aimed at cleaning, supplying air, treating with chemicals, filtering water, and improving its chemical composition. Let's take a closer look at what the fish need and how much the owner of the long-awaited miracle source of water will get.
- Filter. They may be different. Most often, a mechanical filter-washer is used, which is taken at 2-3 cubic meters per hour for a reservoir of 5 cubic meters. The full volume should pass through in 2-3 hours, then we can assume that the filter has been selected correctly. If you want perfectly clean water, then you need a special carbon filter, which often costs the price of a pond. But the cleaning quality is also excellent. It will not contain green algae or microorganisms.
- UV lamp. What is it for? This is perhaps the most basic element that should be present in any freshwater environment. The lamp kills microorganisms that affect fish and algae. You can adjust its power so that it kills different types of bacteria. With its help you can kill single-celled green algae, which are very often a big problem for any aquarium, and will also cause you unnecessary inconvenience in the pond.
- Oxygen system. If you have increased density of fish, you will need to think about the proper supply of oxygen so that it develops faster and grows more. To do this, it is necessary to install one compressor and 2-3 air outlets. This is not only useful and necessary for the outdoor “aquarium” itself, but also beautiful. As a substitute for a compressor, it will be possible to use a waterfall that will flow down the sandstone. The water will be saturated with air, and as it falls, the bubbles will saturate the pond itself.
Construction can account for up to 70% of the total cost of the project, so it is better to calculate financial resources immediately so that you do not end up with an unfinished structure. Just a container with water will bring very little joy; it must be comprehensively equipped.
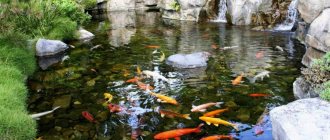
Fish pond
Beautiful, bright fish will add variety to your life. Small aquariums have long been out of fashion. Nowadays, reservoirs that contain various living inhabitants are gaining popularity.
These can be decorative fish species. They will help you relax and are sure to attract children and pets. Or you can set up an artificial pond with fish or crayfish suitable for fishing and further consumption.
Landscape
The depth at which groundwater flows. If they leak close to the surface, you will have to additionally strengthen the pond.
Opportunity for further growth. You or your children will likely want to change the design or make some adjustments to the size of the pool. Or add some entertainment elements nearby. Therefore, when considering the location of the reservoir, take into account the possibility of further redevelopment.
Availability of electricity. Lighting and fountains are powered by electricity, which must be taken into account when choosing a location. There are several options. You can place a recreation area next to the house.
If you want to make a pond in a remote area, you will have to bury the electrical cable in the ground. Appreciable depth is required to comply with safety regulations. But, if there are joints on the wires, then you will have to arrange the necessary access to them.
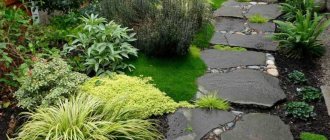
Plant selection
Similar aesthetic elements include plants:
- ornamental plants. They are installed on the water or near a pond. It is advisable to use those species that grow in the area where the land plot is located;
- you can use coastal flowers (lobelia, marigold, cotton grass), floating flowers (duckweed, water cabbage, elodea), such as water lily, or deep-sea flowers such as mulberry or water lily;
- flowers and other plants in tubs installed along the coastline; they are convenient because over time you can change the general decor near the water.
After planting the plants, the owner of the site is satisfied, but you need to remember that they need regular care and those located in the coastal zone require watering, as well as the removal of dried flowers. Then the composition will look neat.
How to choose a design style
This will seem like a daunting task. To get the desired result, you should read the relevant literature and our advice. The number of modifications is huge, among them you will find the one you need. For fans of classics and brevity, the formal style is perfect. Such a pond has a precise shape, simple design, and a minimum number of decorative elements and plants. Arrange it on a site in the Art Nouveau, hi-tech, minimalist style.
Romantic individuals should pay attention to landscape solutions for arranging a reservoir on the site. This is naturalness, irregular shapes
You are not limited by certain rules and can realize your ideas. Take into account the terrain and budget so that unpleasant situations do not arise during the work. On flat terrain it is possible to create all types of ponds, and for sudden changes, slides and bridges are suitable. Here you should be careful at every stage of work, to the choice of materials, laying the film and digging a pit.
This is interesting: Do-it-yourself pergola - a support for plants and a resting place