An alternative to metal products for preparing barbecue is a brick grill. It can be used as a separate device or with additional functions of a stove, smokehouse, or barbecue grill.
Masonry of massive structures is labor-intensive and requires knowledge and experience. If the owners want to manually master the principles of brick laying, then it is better to do this under the guidance of a master, following his instructions.
A brick barbecue will be a beautiful and practical addition to a summer cottage or estate in the private sector.
We recommend reading:
- How to make a tandoor at the dacha with your own hands
- How to build a tandoor from brick
Varieties by location
Installation is permissible both indoors and outdoors. Taking this factor into account, barbecues come in two types.
Street (garden)
It is mounted under a small canopy so that precipitation and moisture do not get inside the chimney, and you can cook in any weather.
Another option is to do it outdoors, in the garden, near a gazebo, near the house. In any case, a reliable foundation is poured under the structure. A monolithic slab is considered optimal.
The masonry of the barbecue is made of fire-resistant bricks, the cladding is made of moisture-resistant materials.
It is important to choose the right location for the garden structure, taking into account the direction of the wind, so that there are no dry trees or wooden buildings nearby. To avoid conflicts with neighbors, it is better to first familiarize yourself with the SNiP standards.
To the gazebo (veranda or terrace)
Installed in open and closed buildings. At the project development stage, fire safety requirements are taken into account, and the location for the chimney outlet is carefully considered. Requires pouring a separate foundation.
It is recommended to lay out the floor covering near the stove from non-flammable materials:
- paving, ceramic tiles;
- clinker bricks;
- artificial, natural stone.
An alternative is to place a sheet of iron or steel on the floor at a distance of 1.5 m from the stove.
Visually, the room is divided into zones: kitchen and dining.
Monstera reproduction
Monstera, like other members of the aroid family, is best propagated by cuttings. But you can use other methods of propagation - by seeds or shoots.
When monsteras are propagated by seeds, they are sown in a bright, warm room. Shoots appear in 2-4 weeks. The process of caring for seedlings includes picking, planting in pots and replanting every year. However, this method of propagating monstera is very labor-intensive, complex and rarely used.
A more popular method is propagation by cuttings and shoots. It is produced between March and June. For this, lateral shoots that grow in the lower part of each stem are used, as well as apical or stem cuttings, which are a stem fragment with one or two leaves. The cuttings are planted in a separate container filled with drainage and a mixture of sand and peat soil, after which they are covered, for example, with a glass jar to create a greenhouse effect.
The optimal temperature for growing monstera cuttings is 20-25 degrees Celsius; they need to be watered twice a day - morning and evening.
After the cuttings have given their own roots, they are transplanted into intermediate containers, and after 3-4 years, when the young plant has already fully developed, it is planted in a spacious tub or pot.
Furnace configuration
In any type of stationary furnace, it is necessary to have a reliable foundation, which will ensure long service life.
You should also be responsible when choosing fuel. It is unacceptable to use firewood from coniferous trees, resinous fruit trees (plums, cherries), lumber impregnated with resin.
To ignite, take matches and a special liquid. It is prohibited to use gasoline or kerosene to create a flame. There will definitely be no benefit from adding such components to food. But it can cause harm to health after consumption.
Simple design
Such buildings are often used in summer cottages. This is the most popular option for homemade structures, as they do not require in-depth knowledge of masonry techniques.
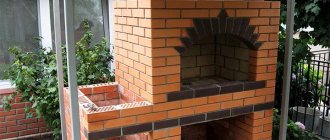
To protect against rain, it is recommended to supplement them with a dome-shaped smoke collector. For ease of use, a medium-sized tabletop is built in. The optimal building material is fireclay brick. Fuel – charcoal, firewood.
Photo: small barbecue with a rain cover
If you follow the step-by-step masonry technique, the fire will not come into contact with metal elements, which means that the walls and bottom will not burn out and the grill will last many times longer.
Such designs do not have holes for air access, which significantly saves firewood. They do not burn out quickly, but smolder.
The finished grill will not take up much space on the estate. This is a budget stove for seasonal use.
With smokehouse
Standard factory kits of fire-resistant brick barbecue stoves do not include a smokehouse. It can be purchased additionally if the product model includes a built-in wood-burning stove.
The smokehouse is made of stainless steel sheets with a thickness of 2 mm. Inside there are 2 levels of grates on which products for smoking are placed. Equipped with a groove for a water seal. If water gets in, the tightness of the shutter prevents smoke from escaping.
Layout diagram of a compact barbecue
The smokehouse is attached to the place where there should be a stove or cauldron on top of the stove. To start the device, the VFS (built-in wood stove) is ignited. Wood shavings smolder inside the smokehouse and hot smoke begins to form.
With cauldron, stove
A cauldron with a stove can be equipped independently with a built-in wood-burning stove or be part of a barbecue complex, complemented by a countertop and sink.
A red brick grill is laid out. The side, rear and front brick walls form the oven chamber. From the outside of the structure, only the firebox door and the ash pan handle are visible. At the top of the stove there is a round hole for a cauldron or stove, at the bottom there is a grate, an ash pan that extends.
Built-in wood stove - source of heating for the cauldron and stove. For the firebox, it is better to take firewood and chipboard briquettes.
The complexes are equipped with an 8-liter cauldron, but it is possible to install containers with large dimensions up to 12 liters.
The chimney is made from a double-circuit sandwich pipe of rectangular cross-section. The upper part of the pipe is discharged into the smoke collector.
With grill, barbecue
The usual grill shape is a deep, round frying pan with a barrel-shaped lid. If the lid is closed, the food is cooked evenly on the sides, bottom, and top.
Barbecue differs from grilling in that the product is fried only from below, and not from all sides. This is due to the lack of a lid.
The inside of the device is very similar. The main detail is the gratings. Fish and meat are laid out on the top grate, fuel is placed on the bottom grate. For comfortable cooking, the upper grill can be adjusted to 3 positions.
Unlike a barbecue, the grill has openings with dampers so that air access can be regulated.
There is a retractable ash pan where ash and ash accumulate. Many factory models are equipped with a spit and folding table. There are grills with double clamping grates.
Before the first use, the grill or barbecue is thoroughly lubricated with vegetable oil, pierced and allowed to cool.
With canopy (roof)
Photo: garden barbecue with a canopy made of metal and polycarbonate.
A covered canopy is an excellent protection from precipitation, especially in winter, when the water begins to freeze and melt. It is recommended to assemble the canopy from fireproof materials - metal racks and corrugated sheets, metal tiles.
If it is not possible to build a shed, then it is necessary, at least temporarily, during the period of precipitation, to cover the grill with thick plastic film.
Precipitation falling on the structure at an angle will not cause harm.
Angular
This barbecue design is becoming increasingly popular. Placing the device along the walls, adjacent to the corner, allows you to significantly save space. This is especially true for small summer cottages and gazebos.
The requirements for materials are unchanged - moisture resistance, fire safety.
Corner placement is an excellent option for barbecue complexes, where it is convenient to place a tabletop, sink, niches for firewood and utensils on the sides.
However, such a structure cannot be built by beginners. It requires competent calculations and knowledge of masonry techniques, so it is better to invite a specialist.
Fireplace-barbecue
Interesting type of combination. The fireplace is:
- built-in;
- free-standing.
The built-in fireplace is an element of the barbecue complex. The fireplace module is installed instead of a barbecue or vice versa.
When using a fireplace insert, a large load of firewood is allowed at one time. It is carried out into the firebox. When installed indoors, the fireplace barbecue will become a source of heating in cold weather.
With countertop, sink
The working surface of the tabletop is built-in or can be placed separately. Collapsible models are available.
Installation is carried out on the left or right side (at the discretion of the owners).
It is necessary to determine the location at the stage of developing sketches, so that the factory can make a high-quality product that will be closely adjacent to the structure.
By adjusting the length of the tabletop, the complex can be adjusted to specific room sizes.
Equipping the complex with a sink simplifies and makes food preparation comfortable. For installation, attention is paid to the correct water supply and sewerage.
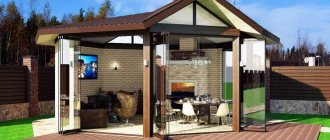
Barbecue complex
Multifunctional design. Difficult to build on your own.
It has several departments:
- built-in wood stove;
- plate;
- oven;
- barbecue;
- B-B-Q;
- smokehouse;
- cauldron;
- spit;
- tabletop.
The set of elements differs depending on the model.
It can be installed both for outdoor use and in closed buildings such as a summer kitchen or gazebo. With the right choice of material for cladding, it looks very beautiful.
Users often search for:
- How to make a patio
- Vertical barbecue grill
Canopy materials
To make a high-quality and durable carport made of wood with your own hands, you need to thoroughly prepare. To begin with, it is worth understanding what parts the structure consists of, usually it includes the frame and roof. The frame is considered the most responsible, so it must be made of durable materials.
The frame for a car canopy can be made from the following material options:
- Tree. This material is considered the most affordable and practical. It is easy to process and does not require the use of special tools for cutting and joining. But still, compared to other types of bases, wood is not durable. Over time, the material cracks, deteriorates, rots, and becomes covered with fungus. And to increase its service life, special care must be taken. Additionally, it is recommended to treat the wood surface with impregnations, varnishes, and protective paints;
- Steel profile pipe. In order to make a carport with your own hands from metal, you need a welding machine. But the finished structure can last for several decades. However, steel profile pipes have negative aspects - the creation of curved trusses is required for the roofing of wide canopies. If this is not done, the entire structure may collapse under the weight of snow;
- Combined options. Often, when constructing a carport, two types of material are used at once. Structures with a steel frame and cladding made of wooden slats look beautiful and stylish. They combine durability and stylish design.
The second part of the carport is the roof. It can be made from profile sheet or polycarbonate material. Both materials have good strength characteristics, durability and beautiful appearance. Polycarbonate carports will look more airy and aesthetically pleasing.
For areas where large hail frequently occurs, it is recommended to use more expensive types of polycarbonate that have a protective film.
Choosing a suitable location on the site to install the stove
To determine the installation location, it is recommended to consider the following points:
- The structure should be located near the recreation area (gazebo, veranda, summer kitchen).
- The terrain should be smooth, without sudden changes.
- Convenient approach to the grill. If possible, one or more paths are developed.
- Communications supply. If, according to the plan, the product will be equipped with a sink, then the proximity of water pipes and sewerage will be taken into account. In winter, the access to water in garden barbecues is blocked so that the pipes crack in the cold.
- Direction of the wind. Smoke should not be directed towards the recreation area. You need to build it so that the smoke goes to another part of the yard.
- Presence of a canopy. Let’s assume the option of combining outdoor stoves with a table and chairs standing next to them.
Compliance with fire safety requirements requires that the device be located at a sufficient distance from green spaces, dry trees, and flammable outbuildings.
Flower garden design
In large flower beds it is possible to plant not only flowers and plants, but also shrubs can be used for decoration. In the first year of creating a flower bed, it is better to plant annual plants. This technique will help identify design problems in the created flower garden. You can plant purslane; it blooms well almost all summer and does not require much light. Flowers can be white, yellow, orange, cream, red. They can make a flower bed bright and beautiful. Ageratum is very common. It blooms with double inflorescences and comes in blue and purple shades. Requires nutritious soil and abundant watering. It needs to be well looked after, fed, and pruned.
Low marigolds will also look good in a flower garden. We can say that this is the most unpretentious plant with flowers of yellow and orange shades. Loves the sunny side, but will also thrive in the shade; does not like too wet soil. Flowering continues until the onset of frost.
When planting perennial plants, you need to take care of their protection in winter. To create a more attractive look, you can use stone chips.
The photo shows several options for decorating flower beds:
Modeling a barbecue
The modeling process allows you to visually design the future product, depict the design in detail, and figure out how the elements will be connected.
With a correctly assembled layout, you get a mini-version of the barbecue. It can be conveniently made from polystyrene foam and other lightweight materials.
Depending on the model, the standard design can be supplemented (optional):
- fireplace cassette;
- countertop with sink;
- built-in wood stove;
- oven (Russian oven);
- a work surface that can be raised (folding table);
- tandoor;
- cauldron, stove.
Arrangement of the furnace complex
Each of the listed modules is built-in or, at the request of the customer, installed separately.
Where to make a flower bed from stones
You can choose a place for an original flower garden in any corner of the garden, regardless of the degree of illumination. Since the presence of stones will provide the flower garden with a share of originality, the composition will attract attention both in the front garden and in the backyard, near the resting place.
Particular attention should be paid to the choice of vegetation. If the flowerbed is located in an open space, sun-loving plants are planted in it, and if it is in a shady place, shade-tolerant plants are used.
In all other respects, you should adhere to the general principles of planting flower beds. They should not be placed in drafty places, in low-lying areas with stagnant rain and melt water. In addition, the location of flower beds should not interfere with movement around the yard and garden.
The most successful places for creating a flower bed made of stones are the front garden under the windows of the house, the space near the fence on the street side, along the wall of an outbuilding.
It will also look beautiful on the porch on either side of the steps.
Brick selection
Expensive, but the most suitable for masonry is clinker, another name is refractory brick. The main raw material is special clay, which is fired at high temperature.
Comes in different colors:
- red;
- sandy;
- dark brown;
- red with tan marks.
Clinker bricks differ from inexpensive ceramic bricks in their high strength and long service life. It is resistant to moisture and frost.
The good thing about clinker is that the finished structure turns out beautiful and does not require additional cladding.
It is allowed to use cheaper ceramic, red fireclay bricks. Feature article: “Brick for masonry stoves.”
It is important to take into account that silicate (white) brick is not suitable for creating a barbecue at home, because it begins to quickly deteriorate under the influence of moisture, temperature changes, and cannot withstand high temperatures.
Types of awnings
A carport made of wood is a convenient design that has many positive features. First of all, it protects the car from negative weather conditions. At the same time, it is quite easy to install; for this reason, even a novice home craftsman can make a canopy.
Carports made of wood can be of several types:
- Extension. One side of the structure rests on the wall of a house, garage or other building. A carport attached to a house can be made of wood; it can also be combined with metal products, brick, and slate.
- Stationary canopy. This is a stand-alone design. Its roof rests on free-standing posts. It can be made not only of wood, it can be supplemented with red brick, slate, and polycarbonate.
- Sheds with roofs without slope. This is the simplest design; many summer residents make it without much difficulty. But this type of canopy has some disadvantages - a large amount of debris, various branches, and dry leaves often accumulate on the roof surface. All this must be removed with your own hands, otherwise the roof can quickly rot.
- Structures with a complex roof shape. Making a carport of this type with your own hands is quite difficult; for this you need to be able to read drawings. It is not possible to build this structure without a diagram, because many mistakes can be made during the work process.
Brick cutting and chopping
A grinder with a stone cutting disc is perfect for cutting brick. During operation, a lot of dust is generated, so it is recommended to protect your eyes and respiratory organs with goggles and a mask.
The process takes place in the following sequence:
- Marking bricks with a pencil, ruler or tape measure.
- Cutting (splitting) elements to the required sizes.
- Teska (grinding) of the resulting blanks.
To speed up the marking process, experts recommend making templates. This is especially effective in cases where it is necessary to cut parts of the same size in large quantities.
Material for templates - pieces of roofing felt, parchment, thick cardboard.
To make templates of non-standard shapes, you need to use ingenuity. For example, to get a longitudinal half of a brick, it is enough to bend the template of an ordinary half lengthwise. This will reduce the number of templates and speed up the cutting process.
Parts for which templates cannot be made (bevels, oven appliances) are marked during preliminary dry laying.
When cutting, you need to work at high speeds, otherwise even a new disk will quickly wear out.
It is not necessary to make a full cut, just a cut is enough and then carefully split. But this applies to cases of obtaining parts of simple shapes. For complex elements, it is better to cut the workpiece to the end.
Experts recommend using a new disk to first cut off complex parts, then simple ones, since standard parts can be cut off even with a worn disk.
It is worth saying that cut parts have a smooth surface, chipped parts have a rough surface, sometimes even with defects. You can smooth out the roughness:
- processing with a grinding disc;
- grinding the chopped parts against each other;
- with a pick.
It is better to place bricks with chipped edges against a thick seam.
Preparation of the solution
The main components of the masonry mixture are clay and sand. The recommended proportion is two parts sand to one part clay. The day before mixing the solution, the clay is soaked in water.
An important feature of clay is that the fatter it is, the greater the sand consumption.
If the consistency is correct, the solution will slide off the trowel, leaving a small mark on it. If it falls off without any traces, then a lot of sand has been added; on the contrary, it smears a lot - there is an excess of clay in the mixture.
For laying the main parts, cement is not added to the mixture due to low heat resistance. But it is permissible to cover the grill with facing material using cement mortar.
Description of the flower
Monstera is an evergreen tropical liana. Its homeland is considered to be the southern and central United States adjacent to the equator. In the wild, the height of adult specimens reaches 45 m.
tropical liana
For your information! By giving the foliage slits, nature took care of the water supply for the tropical “monster”. During the rainy season, water easily penetrates its root system.
Modern plant growers from different parts of the world know how to grow monstera from seeds, cuttings and even leaves. But today we will talk about methods of transplanting vines.
Required Tools
To work you will need:
- shovel;
- Master OK;
- a trough for mixing mortar or a concrete mixer;
- buckets;
- building level, tape measure, plumb line;
- Bulgarian;
- reinforcing mesh;
- cement, crushed stone, sand, clay;
- fireclay brick;
- boards, plywood (for formwork assembly);
- metal corners, doors, grates, grates;
- hammer;
- mallet;
- rope and pegs (for marking under the foundation).
In order to save money, it is allowed to purchase fireclay bricks only for laying the firebox. For other areas of the oven that will not be exposed to high temperatures, you can take regular brick (not necessarily new).
We will analyze step by step the process of independently erecting a small outdoor barbecue, and clarify the nuances of each action.
Schemes and drawings
The work process reflected in the drawings
is developed at the planning stage. The drawing is a visual representation on paper of the future structure, where the shape, dimensions, and cross-sectional view are clearly visible. Created on a scale with a reduction several times from the actual dimensions.
For example, when specifying a scale of 1:10, it means that the design drawing is reduced by 10 times. For every 1 mm of drawing there is 1 cm in reality.
Corner barbecue diagram
It is customary to use a thick solid line to show the outline of the product. Thinner lines indicate the sizes of the elements.
Block barbecue diagram
Conventional shading in the drawing indicates the raw materials used for construction. For example, under an ordinary red brick, hatching is drawn at an angle; fireclay (fireproof) is marked with a check.
The drawing description includes the following details:
- general view of the product;
- outside view - facade;
- structure in a vertical section, where the internal structure is visible;
- horizontal section showing the principle of masonry.
Recommended oven dimensions
The width of the grill when folded should correspond to the width of the skewers - 47-62 cm. The height of the frying platform is made slightly higher than the waist, so it will be more convenient to cook. The length of the firebox should be such as to simultaneously accommodate from 8 to 10 skewers.
Preparatory work
They consist of clearing the construction site of debris, vegetation, and marking. For the last step, rope and wooden pegs are used.
Foundation installation
A brick barbecue is a heavy structure, so it is recommended to pour a monolithic concrete slab under it.
Briefly, the procedure for constructing the foundation looks like this:
- A hole is dug with a depth of 30 cm. The dimensions should be 20 cm larger on each side than the future product.
- The bottom is carefully compacted.
- A 15 cm thick cushion is poured from layers of sand and gravel. It's being compacted. Moisturized with water.
- The formwork is assembled from boards. The knocked down frame is placed around the perimeter of the dug hole.
- The bottom of the pit is reinforced with metal mesh.
- Cement mortar is being poured. The M500 brand is best suited for cooking.
- The poured mixture is pierced with a piece of reinforcement to remove air bubbles.
- The slab should extend above the ground level.
- Curing time is up to 4 weeks.
- In dry weather, to avoid cracks, the surface is moistened with water.
The frozen slab is covered with waterproofing (dense polyethylene, roofing felt) on top.
While the foundation hardens, you need to soak the clay for the solution. The finished solution should not crack when compressed.
You can get acquainted with other types of foundations for the furnace by clicking on the link.
It is important to think through the supply of communications even before the foundation is poured.
The day before laying, the brick should also be prepared. It is thoroughly watered so that it does not absorb moisture from the solution. The adhesion to the surface will be better.
Order of brickwork
The order should be carried out in the following sequence:
- It’s better to start by laying out the first row dry. This will allow you to adjust each brick to size if you need to trim it. The gap between the elements is 1 cm. The evenness of the diagonals is checked.
- Laying facing bricks can be done using a solution of cement and sand (in a ratio of 1:3). To improve the plasticity of the mixture, you can add a little lime. The recommended seam size is from 8 to 10 mm.
- In areas where bricks pass without dressing, it is necessary to carry out reinforcement with metal wire.
- Each subsequent row is shifted by half a brick. To adjust the elements to size, use a grinder.
- Every 3 rows, compliance with the masonry level is checked, and preferably more often.
- After 8 rows you need to create jumpers for the grill and countertop. To do this, take metal corners measuring 45*45 mm and set them up like an inverted letter T. Half of the shelf is sawed off. The metal should not come into close contact with the brickwork.
- Afterwards you can start laying the firebox. Fireclay bricks are connected to each other with clay-sand mortar. The thickness of the seams is no more than 4 mm.
- Metal corners are also used to form support for the bottom.
- The second row of bricks for the firebox completely covers the first. This way the seams will not burn through. Some craftsmen replace the first two rows of masonry with a concrete slab, but the creation will cost many times more, although it will be no less reliable.
- Parallel laying of the firebox and facing bricks is allowed. But between the lining and the firebox there is always a gap of 1 cm so that they do not touch.
To improve the decorative appearance, stove makers resort to constructing a combustion arch. To do this, a wooden blank is first made in the form of a semicircle and placed in the barbecue portal. Next is the masonry. Bricks are cut to the required sizes using a grinder.
The arch made of facing bricks must be covered from the inside with a fire-resistant lintel. Placed on a metal corner.
Preparatory stage
To make a strong and durable carport attached to a house or a permanent structure, it is important to prepare the necessary tools and materials. First of all, we mark out the place for the future structure - for this, a machine is installed in the construction area, and places for supporting elements are outlined. It is imperative to check that the supporting elements do not interfere with installing the car and opening the doors.
Usually the roof is longer than the canopy. It can extend beyond its perimeter by 50-100 cm, this is considered normal.
If polycarbonate carports are planned, the drawings will be the most important stage of construction. They are the ones who will help you do everything correctly and exactly according to the given parameters. You can make the drawings yourself or find them ready-made on the Internet.
When making it yourself, it is recommended to draw the planned structure on paper in several projections - from above and from the side. It is important to correctly calculate the required amount of material. It is advisable to add 10%, this will eliminate the need to purchase additional funds for construction.
For the frame, you can use a steel pipe or a wooden beam, it all depends on the desire of the owner. But if a tree is chosen, it will definitely need to be treated with special protective coatings.
Carports are manufactured using tools and materials from the following list:
- saw;
- hammer;
- if a canopy is being built from timber, then nails will be needed to secure it;
- to work with a profiled pipe you will need a grinder and a welding machine;
- level;
- plumb line;
- pegs;
- twine, any strong rope or cord will do;
- shovel;
- clamps;
- Self-tapping screws will be needed for fixing and fastening;
- screwdriver
Chimney device
When the chimney continues to be laid out of brick, the order of work is as follows:
- The top of the combustion and facing parts are brought out to one level.
- To lay the smoke collector, a solid brick is taken. The solution is cement-sand. Cement grade – from M150.
- The first row is flush with the inside of the firebox. All subsequent ones are shifted by ⅓ of the brick.
There is no need to shift it over a greater distance, otherwise the bricks will simply fall inside the firebox over time.
- The laying is carried out until a small opening remains (30*30 cm, 25*25 cm).
- The finished brick chimney is covered with a protective cap on top to prevent moisture and precipitation from getting inside.
There is an option for mounting a chimney made of heat-resistant concrete or a double-circuit chimney made of sandwich pipes.
Read step-by-step instructions for installing a chimney made from sandwich pipes.
Earthen (pit) tandoor
Another design of an earthen tandoor.
For the jug, a small pit is dug in the ground, and 10 cm of sand is poured onto the bottom. For the foundation, a grid is placed on top of the sand, evenly filled with concrete mortar. When the facade dries, the main work on the invention of the tandoor begins. Refractory blocks are laid in a circle, and a special pipe for air supply is installed. The next rows of bricks are laid along the edges of the desired tandoor, without gaps, and so that the top of the boiler is half the size of the middle of the stove.
When the stove dries, all its gaps and joints are sealed with kaolin clay. As soon as the first layer dries, the next one is applied, but straw is added to the solution. This layer serves as an insulating partition. The last layer consists of a cement mixture with clay. The free spaces between the bricks and the walls of the pit are filled with sand, salt and clay, after which the invention is hardened. Also, for a new stove you should prepare a lid - a metal sheet with a handle, so that the heat is retained for as long as possible.