Rules for the use of raw materials
There are rules for handling polycarbonate sheets established by experience:
- You should not store the material in the light; you should consider the way they are stored in the warehouse;
- the material should not crack from twisting;
- The protective film can be removed only after finishing work with the sheets;
- work on installing the flooring should be carried out quickly;
- The slabs must be laid with the UV-resistant side facing outwards, as indicated on the surface of the protective film.
Leaving cellular polycarbonate in the film in the open light will cause it to stick tightly to the plate, that is, a photochemical reaction, causing the material to become unusable.
"Weaknesses" of polycarbonate
When purchasing material, you should always be interested in the minimum bending radius for the selected thickness - otherwise you can irreversibly damage the fabric.
If there is no special protective coating on the surface of the sheet, its service life is reduced significantly. Such a protective layer is almost invisible to the eye, so the manufacturer puts markings on the surface of the plastic film so as not to mix up the side during installation (such protection will shimmer with a slightly bluish tint in the sun).
The material is also sensitive to chlorinated hydrocarbons, alkalis, and aldehydes, so when choosing compounds for sealing or cleaning such a roof, it is worth clarifying their composition and compatibility with the polycarbonate coating.
Attention! During installation, always leave gaps between the joints and use certain fasteners to take into account the thermal expansion of the material and eliminate deformation.
Advantages and nuances of construction
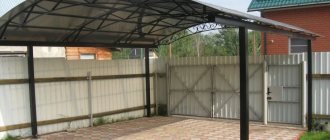
The photo of polycarbonate canopies shows universal outdoor structures that perfectly transmit natural light and have a wide range of colors.
The raw material is quite light, transparent and has a variety of convenient thickness formats, this helps to create any type of structure: from simple to curved parts. In addition, they easily and harmoniously fit into any interior and landscape of a personal plot.
Polycarbonate canopies are divided into the following types:
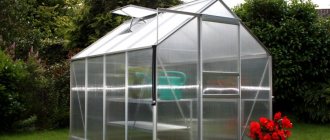
- separate, self-standing ones are most often acceptable for swimming pools, gazebos, greenhouses, carports in parking lots and over outbuildings;
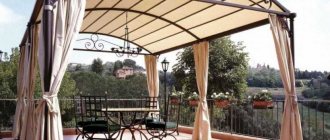
- the mobile type quickly moves to any selected point of the perimeter: barbecue roof, compact gazebo;
- as an extension to a garage, bathhouse, veranda, porch canopy.
These structures can be rectangular, curved, or two-story. They are also divided into open and closed models, for which the walls on the sides are usually covered with glass, gratings, lining, or thick textiles.
The building includes pillars for vertical support and the roof itself. To make frames, wood, metal beams, concrete, brick, and stone are used.
Features and Benefits
Creating a canopy with your own hands from polycarbonate is very simple, especially since there are ready-made structures on sale that you just need to assemble on the site, following simple instructions.
Such a canopy can be assembled alone, because the material is very light, does not require a massive and heavy frame, and is easy to attach.
The easiest way is to create straight structures that have no bends or convolutions. To do this, a simple canopy frame, square or rectangular, is created, which is then sheathed with polycarbonate sheets.
It is more difficult to create more sophisticated-looking designs, having, for example, a non-standard shape in the form of a circle or spiral. In this case, you may need the help of another person or a whole team of specialists.
Wooden canopy
The easiest to install and relatively cheap way to create a universal street roof is a polycarbonate canopy with a wooden support.
This work does not require professional equipment or special skills at all; an ordinary set of tools, which almost any owner has, will do.
You will need glued and profiled timber, rounded logs, and wooden posts. To build a rafter system, you will need edged boards.
Please note that the design has quite significant disadvantages:
- does not retain moisture well;
- susceptible to rotting and fungal diseases;
- quickly loses strength, reliability and aesthetic appearance, which leads to product failure.
To avoid these factors, it is recommended to treat the canopy and canopy with a fire-resistant composition, antiseptics and protective layers of oil and varnish.
Advantages of using polymer material
When choosing a frame for a canopy and deciding on the materials for its manufacture, you need to think about its covering.
Most often, the choice of site owners falls on modern polymers, which differ from traditional wood or metal in certain technical and operational characteristics:
- excellent light transmittance;
- flexibility and increased strength;
- long service life;
- ease of self-processing;
- affordable and low cost.
There are monolithic and cellular polycarbonate, the latter is a durable sheet material, quite light and reliable.
Processing a monolithic polymer will require the use of special equipment and tools, but cellular polycarbonate can be cut even with ordinary scissors.
Metal construction
Before making a metal canopy in the yard, you need to take into account the following parameters of the structure:
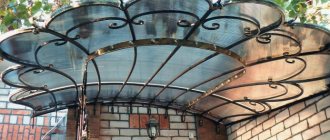
- A forged base will be the most elegant and attractive, but it will require significant expenses. If funds allow, it is better to make an exclusive product to order.
- The most common and relevant building is a canopy made of round or profile pipes. The size of the pipe directly depends on the size of the building.
- Prefabricated finished model made of aluminum.
The main advantage of an iron canopy is its durability, but despite this fact, it is easily susceptible to corrosion.
To avoid such a nuisance, it is recommended to first clean the product with a stiff brush from possible rusting and scale, then treat the entire surface with abrasive and wipe with a solvent. The next step is coating with primer or paint.
Please note that the railings of a porch or gazebo should be made of wood, since metal quickly heats up from the sun and cools down from frost!
- Lawn laying
A garage at the dacha is not a warehouse, but a modern and comfortable space!
Diesel generator for home: which one to choose?
How to choose?
To select the right plastic product, consider some nuances. For example, it is worth deciding in advance on the thickness, which is based on climatic conditions, design and purpose of the structure. You will be able to bend material that is too thick enough.
If you want to create a greenhouse, four-millimeter cellular polycarbonate will do. Double the thickness and you can create canopies at your dacha.
How to choose a phytolamp for indoor flowers- Flowers are the best gift
Advantages of corner kitchens with a sink and what to consider when choosing them
For a parking space and other spacious area, select a material 15 millimeters thick. In any case, the proposed tables will help you choose the right polycarbonate with the required parameters.
Do not lose sight of the transparency and color of the product. These parameters should be based on the characteristics of operation and location. For example, a translucent sheet is suitable for a greenhouse complex, but it will not fit into the recreation area. A diagram of the future design will help with the precise determination of all the listed parameters.
Stone and brick as a base
All types of polycarbonate roofing with a stone, brick and concrete base look very luxurious, rich, but at the same time do not lose their lightness, which is ensured by a transparent canopy. Such supports are easy to maintain, resistant to fire, cope well with natural precipitation and are resistant to mechanical damage.
However, their installation will require significantly more time, effort and financial costs. Moreover, this building is being built for a long time, since it cannot be dismantled, that is, moved to another place on the territory.
The process of assembling lean-to canopies for cellular polycarbonate
A lightweight polycarbonate carport can be easily made with your own hands:
- Use a hole drill to dig holes for the columnar foundation, covering them with geotextiles.
- Install the pillars, securing them with temporary supports, fill them with hot bitumen (for waterproofing).
- Fill the hole with medium grade crushed stone and compact it, then install supports, fill it with cement mortar and fill it with soil.
- Draw up the markings using a building level, marking the fixation line on the wall, and secure the connection with anchors.
- Install the beam on the front supports, which should hold the canopy.
- Attach the ceilings to the harness with fastening brackets. Treat the wooden parts of the frame with a fire retardant.
- For polycarbonate, prepare self-tapping screws and thermal washers, calculating the total quantity from the drawing.
- 8.Fix the sheets perpendicular to the surface without overtightening the screws.
- Connect the sheets to the profile, securing them with gaskets (one to the tree, the other should snap onto the first, tightly fastening the sheets).
- Complete the installation by sealing the cuts of the polycarbonate sheets with punched tape with a trim profile.
Light transparent canopies will transform your backyard area, protecting your cozy courtyard from precipitation and excess sunlight.
DIY polycarbonate canopy construction
The longest part of construction is creating the foundation. The frame itself and attaching the roofing sheets to it will take at most one and a half working days.
Installation of support pillars and installation of bindings
We install support pillars in the following way:
- We dig foundation holes - 50 cm deep and 30 cm in diameter.
- We install a reinforcement cage inside.
- Fill the holes with a cement-sand (3/1) mixture, cover with cellophane and leave to harden for several days.
- We fasten the supports to the foundation with anchors.
Concreting the supports
We tie the supports along the tops with a single beam; the front part of the canopy will then rest on it. This dressing is best done from a square or rectangular profile. The use of a round pipe is undesirable here, since the contact area of the elements during welding will be too small.
A polycarbonate canopy attached to the house: the photo shows the location of the supports of the front part. Please note: the attachment of the canopy to the wall is carried out on a beam attached to the surface with anchor bolts. At the required height, checking the building level, we mark a line along which holes for fasteners are then drilled. Next, screw the beam onto the wall, tightening the bolts well.
We make a canopy for the house from polycarbonate: the photo shows the installation stage of the binding
Bend the profile for the roof frame
If the polycarbonate garden canopy has an arched roof, then we will have to think about how to bend the profiled pipe. This can be done in several ways:
- Using a pipe bending machine. Such a device is expensive, and it makes no sense to buy it just for the construction of a canopy.
- By cutting (6-8 mm) the pipe and bending it in the opposite direction. The cuts are then covered with metal “patches”.
- Manual bending of a preheated profile. To prevent flattening of the pipe, sand is compacted inside before work.
Manual pipe bending machine
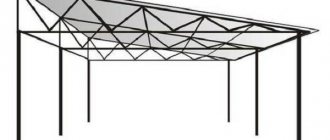
Welding the canopy frame
We begin welding the frame by assembling the trusses. This is done on the ground, with the obligatory use of a building level. We start welding the diagonal slats onto parallel profiles from the edges, gradually moving towards the center. Magnets for welding will greatly facilitate the work - they are good for setting angles between parts.
In the following video you can see how welding magnets are used.
We place the finished polycarbonate trusses for the canopy on the binding and on the support of the front part. We bait it pointwise and then weld it. All elements must stand strictly vertically, so after installation we check the correct installation with a building level. If necessary, we slightly adjust the position using a sledgehammer.
A canopy attached to the house, made of polycarbonate: photo of the installation of roof trusses
Across the trusses we make purlins from a thin profile of rectangular cross-section. The distance between the parts is from 50 to 60 cm.
Installation of purlins
Next, we proceed to the installation of the sidewalls. We weld sections of the profile to the bases of the outer trusses and screw them along the entire length to the walls. From the lower edges of the sections to the ends of the trusses we stretch and weld profiles of the same thickness. we make a couple of transverse jumpers. You can see what it looks like in the next photo. The frame is ready, you can begin installing the polycarbonate.
Sidewall work
Fastening cellular polycarbonate to the frame
And now about how to attach polycarbonate to the metal frame of the canopy. Installation is carried out using special fasteners - thermal washers. They consist of sealing and plastic washers, as well as a plug for them. All this is tightened with ordinary self-tapping screws. Particular attention should be paid to three points:
- Strict vertical screwing of self-tapping screws.
- Moderate tightening of fasteners. Insufficient application will not ensure the proper quality of installation, and excessive application can lead to damage to the surface of the material.
- There should be at least 4 cm from the sheet cuts to the boundaries of the hole for the self-tapping screw.
- The hole for the self-tapping screw should be 2-3 mm larger than the diameter of the latter.
Please note: new polycarbonate sheets cannot be left in the sun during the warm season. The adhesive on the protective film heats up and forms a very strong adhesion to the surface. As a result, the film will be very difficult to remove.
How to properly attach polycarbonate to a canopy: you need to use special thermal washers
In addition to thermal washers, the following fittings are used during the installation of polycarbonate:
- Detachable profile. Used to join two sheets of material together. It consists of a base and a cover - the base is attached to the frame with self-tapping screws, and the cover is fastened to it using a special lock.
- End profile and punched tape. They are used for finishing cuts on polycarbonate sheets. First, punched paper tape is glued along their entire length, and then the end profile is fixed to it.
Please note: the end profile is needed not only to complete the polycarbonate roof. This fittings protect the air channels of the sheets from moisture and dirt getting inside. This means that maintaining the original level of transparency of polycarbonate directly depends on it.
Additional accessories
Types, calculation and design of canopies, choice of frame material
The most popular options for canopies and canopies made of polycarbonate are arched, cascading, single- and double-sloped. They all have their own advantages and disadvantages.
Arched structures
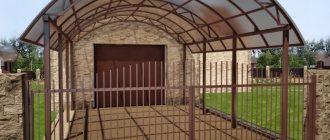
Arched polycarbonate canopies in the yard are considered the most popular today, especially for organizing parking lots and galleries between the house and outbuildings.
- The semicircular shape of the arch prevents snow from accumulating on the roof.
- When it rains, water drains only on two sides.
- Due to the downward facing sides, the likelihood of the canopy being damaged by wind is quite low.
- The arched design is equally suitable for both a small canopy over the porch and a spacious parking lot for several cars.
The arched polycarbonate canopy has one drawback - if you make it yourself, you may face the problem of bending the profiles.
Arched polycarbonate canopy: the photo shows an indoor parking lot
Cascade system
Cascading canopies are, in fact, a system of several arched ones. This design is chosen for installation above flights of stairs, where the roof slope is very large. And there are two reasons for this:
- When it rains, water pours from the solid arched roof, located at a high angle, into the space in front of the first steps, hitting those entering. With a cascade arrangement of roofing elements, water flows to the sides.
- The aesthetic side of the issue. Several cascading arched polycarbonate canopies look much more interesting than one solid one pointing downwards.
The disadvantages of such a system are the complexity of the design, high time and material costs.
Arched polycarbonate canopy attached to the house: photo of a three-stage system
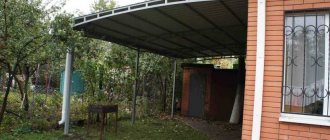
Shed roof
A lean-to polycarbonate canopy is the easiest option to build:
- No bending of profiles is required, as is the case with arched roofs.
- No bending of polycarbonate sheets is required. Accordingly, you are not limited in choosing the thickness of the roofing material.
- During construction, you can do without the use of trusses; only longitudinal and transverse beams will be sufficient.
Shed structures are often used when attaching a canopy to the wall of a house or garage. The disadvantage is that the roof has a slight slope; in winter, snow will accumulate on it.
Wooden canopy made of polycarbonate: photo of a lean-to structure
Gable canopy
In construction, it is a little more complicated than a single-slope one, since it requires two slopes to be brought together at a certain angle. However, this construction is also more convenient to use:
- Slopes lowered on both sides provide better protection from wind and precipitation compared to a single slope.
- The angle of the roof is greater here, which means less snow will accumulate on it in winter.
- The frame of a gable roof is rigid, so it can withstand wind loads well.
A gable canopy made of polycarbonate can be used for various purposes: for parking lots, barbecues, barbecue ovens, porches, pavilions between outbuildings.
Gable roof over barbecue oven
Calculation and design of polycarbonate canopies
Even at the stage of creating a project, before starting to calculate a polycarbonate canopy from a profile pipe, you need to find out the following for yourself:
- Size and location of the future building.
- Wind and snow loads - these parameters affect the shape of the roof structure.
- The design of a private house and outbuildings - the choice of frame design and the color of polycarbonate sheets depends on this.
- Specifications of available/desired building materials.
Armed with this information, we move on to calculating and drawing up a drawing of a polycarbonate canopy. Here we already indicate exactly: the dimensions of the building and the shape of the roof; technical characteristics of the material of supports, frame and roof; quantity and nature of fastening elements.
Please note: when determining the features of the structural frame, it must be taken into account that polycarbonate is produced in sheets of standard sizes. Their joints must necessarily fall on the transverse profiles - the sheathing.
How to make a polycarbonate canopy: the width of the purlins between the sheathing profiles depends on the parameters of the roofing material
And now about the height of polycarbonate canopies. In principle, it can be anything - it all depends on your needs and wishes. However, for comfortable use of the building, it will be better if the lowest point of its roof is at least 180 cm above the ground.
The parameters of support posts for the manufacture of canopies and canopies made of polycarbonate must be calculated based on the following figures:
- The minimum cross-section is 40x40 mm.
- Metal thickness – from 1 mm.
- The thickness of the foundation pillars must exceed the cross-section of the racks by at least 10 mm.
- The recommended depth of foundation pits is from 50 cm.
- For the sidewalls of rafter trusses, a profile with a cross-section of 20 mm is taken, for diagonal gratings - from 15 mm.
How to make a polycarbonate canopy with your own hands: the drawings must be very detailed. Please note: it is better to entrust the design of structures with an area of 8 m2 or more to specialists. The roof area here will be large, which means it will be necessary to accurately calculate the level of snow and wind loads. Errors can lead to deformation or collapse of the building.
Choosing material for the frame
Typically, the following materials are used to make polycarbonate canopies:
- Metal profile. Durable, easy to install and unpretentious to use. Requires minimal maintenance - only timely treatment with anti-corrosion agents. Disadvantages - heavy weight of the structure and high price.
- Metal pipes. The advantages are the same as metal profiles. The only thing is that the rounded cross-sectional shape is not so convenient for welding and other types of fasteners.
- Wood - profiled or regular timber, rounded log. A beautiful, lively material, suitable if the canopy should be stylized as something. When building a wooden polycarbonate canopy with your own hands, you will need certain carpentry skills.
Wooden frame
Fastening polycarbonate to a wooden frame
In this case, actions must be performed in the following sequence:
- First of all, you need to lay the sheet on the frame and use a drill to make a hole for fasteners (washers) and screws or bolts. The plate should protrude 25-30 mm beyond the structure.
- Next, you should secure the washers to the frame with self-tapping screws, using a screwdriver for convenience.
- Then you need to sequentially lay and fix the remaining sheets.
- In the same way, it is necessary to install polycarbonate at the ends and in the place where the doors are located.
- Next, it is necessary to seal the edges of the canvases using thermal tape, profile or other materials. If necessary, additional treatment of the joints with sealant is necessary.
The holes must be made strictly perpendicularly. On large sheets, specialists make oval rather than round openings, which are elongated along the length of the material. The distance between the holes for thermal washers and other fasteners depends on the thickness of the polycarbonate used and the coverage area. Often the distance reaches from 30 to 50 cm. The first and last holes should be made no less than 4 cm from the edge of the sheet.
The screwed washer should completely cover the hole that was made under it. When making a hole, you can resort to using a special cutter with a pilot drill. They make a hole and only after that should the self-tapping screw be screwed through the opening of the thermal washer. Then you need to put a cap on top, which prevents the penetration of water and gives completeness.
Wooden frames are erected for greenhouses, gazebos, sheds and a number of others, including utility buildings. It must have stability and strength, and all components of the structure must be well connected. The wood must be opened with a special agent that prevents the wood from rotting and being eaten by insects. Cellular polycarbonate and, less often, monolithic sheets are often used for frames made of this material for greenhouses and utility buildings. Light metal structures are also erected for such buildings.
Having learned how to fix cellular polycarbonate correctly with your own hands, you will be able not only to quickly carry out all the necessary work without outside help, but also to eliminate possible shortcomings that could cause a reduction in its service life.
Video:
Connection types
A very important point in choosing a canopy. The type of connection must be selected taking into account the purpose and design of the canopy.
Simple structures, such as a gazebo or carport, can also be made prefabricated (with bolted connections). They do not carry heavy loads and can be easily moved to another place.
For large and complex structures, only welded connections are used.
If you do not have welding skills, but you want to install the metal structure yourself, then your choice is a bolted connection.
Our prefabricated sheds are pre-equipped with all the necessary mounting materials and instructions. Assembling a simple canopy, even with no experience, does not exceed 8 hours.
Roofing fastening materials
Various materials are used to attach the roofing material to the sheathing of the canopy. The choice of fasteners depends on the shape of the canopy, the roofing material and its thickness.
Fasteners for polycarbonate
To secure the polycarbonate to the sheathing, special thermal washers are used.
Depending on the structure and design of the canopy, thermal washers can be either metal or plastic, with or without a leg and plug.
To connect polycarbonate sheets to each other, seal the joint between the polycarbonate and the wall, and also to protect the ends of the polycarbonate, different types of special profiles are used.
All fasteners and connecting profiles are matched to the color of the polycarbonate and remain invisible after installation.
Fasteners for corrugated sheets
The corrugated sheeting is attached to the metal structure with self-tapping screws and a sealing washer.
Such self-tapping screws allow installation of corrugated sheets without preliminary preparation of holes, and washers reliably seal holes in the material.
To seal the joints between the wall and the canopy, ridges and bends made of corrugated sheets of the same color are used.
How to prepare the panel for installation
All the benefits of the material can be reduced to zero if the sheet is not prepared for installation.
The following rules must be observed:
- When installed in single- or double-pitch structures, the stiffeners must be vertical; in arches, they must be parallel to the bend. Horizontal arrangement of channels is allowed only in dry rooms.
- Open upper cuts should be protected with sealing tapes, lower ones with perforated ones.
- The ends can be further reinforced with L- or U-shaped end profiles. To drain water, make holes with a diameter of 3 mm in the lower profiles in increments of 300-400 mm, and when installing, leave a gap of 3-4 mm to the edge of the sheet.
- Correctly orient the panel in relation to the sun.
- Remove the protective film after installation. You cannot overexpose it, because when heated it sticks firmly to the surface of the sheet. It will be very difficult to remove it later.
- Polycarbonate can be bent mechanically only to the cold bend radius recommended by the manufacturer. You should not reduce it because of the risk of breaking the sheet.
- Cut the panels with a sharp tool - a circular saw or jigsaw, firmly securing them to the work surface to prevent deflection.