- Laws and rules for the location of buildings
- How to take measurements correctly
- Location of the house on the site according to the standards
- Standards for the location of other buildings
- Other requirements and standards for site planning
- Penalties for non-compliance
Before starting active development, each owner needs to study the rules for the location of buildings on a land plot.
This will allow you to subsequently avoid conflicts with neighbors and all kinds of penalties from authorized bodies. Today we will talk about how to properly place structures.
Where to start developing a project
Any planning in construction begins with an assessment of the conditions in which it will be carried out. This stage describes the characteristics of the area being built. When planning a land plot, the owner is required to take into account:
- Surface relief. The latter can be flat, hilly, and also have ravines or large stones. All this affects the general layout of buildings and the laying of communications;
- Soil quality. It is necessary to determine the presence of a fertile layer. Or rather its depth. If it is less than 10 cm, then even lawn grass cannot be grown on such land. Additional soil delivery is required;
- Availability of groundwater. If their level is high, it is necessary to include a drainage system in the plan;
- Climate. Depending on the climate zone, the composition of plantings should be carefully selected;
- Size, shape. Depending on the shape and size, the landscape design of the site will be developed.
You can find out even more about private houses on the website https://masterinterera.ru/doma
Why know the wind rose, take into account the relief and groundwater level
If insolation is somehow taken into account, then the wind rose is conveniently forgotten, while this factor is no less important when planning a site.
Svetlana0604 FORUMHOUSE participant
From my practical female point of view, the compass rose is important. The prevailing wind direction must be taken into account when locating windows, especially when there are many and they are large. When placing the front door. When planting plants. Those plants that cannot withstand constant wind, especially in winter, should be placed on the side protected by buildings. And also smoke - baths, barbecues. It would be nice to place them so that the smoke does not go straight into your neighbor’s windows.
You can find out which winds prevail either by observing your site, but this will take more than one day, or through various online resources. Both global and regional wind maps are freely available, with the ability to construct a more accurate graph. You cannot specify a specific SNT or cottage community on them, but a schedule for a regional city or large regional center will give an approximate picture. Owners of low-lying areas can afford not to worry too much about the wind, but those on high ground should think about it in advance. To, if necessary, plan a blocking hedge, a closed gazebo instead of an open one, and turn the house with a blank wall towards the coldest stream.
The relief , especially pronounced, radically influences the layout and arrangement of the territory - it is advisable to locate buildings on a hill, otherwise you will have to be tricky with the removal of moisture that rolls down from above, from the foundations, and is absorbed into the ground. And this is not only a storm drain, including a drainage system and trays along the blind area and paths, but also full drainage. With a strong slope, terracing and the installation of retaining walls may be required, and they take up to 20% of the total area.
Groundwater level affects both the choice of construction technologies and the choice of planting material. In particularly advanced cases, when most of the year the water stands at a spade level, you will need not only foundation drainage for the dacha itself, but also radial drainage to drain the land on the site. The drained water needs to go somewhere; it’s good when there are drainage ditches, but in new areas they are very rare. If space allows, it is worth planning a pond in the lowest place of the yard, which can be interestingly designed and turned from a storage “tank” into an element of landscape design.
It is quite possible to do without soil analysis at the planning stage.
Alexander ZhukovLandscape designer, member of FORUMHOUSE
What's the point of doing a soil analysis? The soil in the Moscow region is practically the same, only the mechanical composition is different - this can be determined simply by looking at it without analysis. It is enough to add peat, for example, for loosening. And when planting, fertilizers are always added and also when caring for the garden.
Landscape design is carried out not only in the Moscow region, but throughout the country, but there are also plenty of sites with soil maps, including for each region, on the Internet.
Planning techniques
When developing a project, various methods are used. The most common are:
Geometric. Used on smooth surfaces. Distinctive features are the geometric arrangement of buildings and plantings, as well as clear, even boundaries of all landscape elements.
For example, trees, bushes, and flower beds are arranged in the shape of rectangles or squares with even borders. It is also possible to plant plants in the form of other geometric shapes that correspond to the general style of the plan.
Landscape. Used when the ground surface is uneven. The arrangement of buildings and plants does not follow clear lines. On the contrary, asymmetry is used in the design of the entire exterior. For example, ravines and hills are preserved or created, paths are laid in curved lines, trees and plants are planted according to the owner’s imagination, rather than geometric shapes.
With this site planning scheme, all artificial elements are organically integrated into the natural landscape, which allows you to create a more natural design.
Mixed. Combines landscape and geometric features in different proportions. It does not have clear rules of construction. Most popular among dacha owners.
Penalties for non-compliance
Current legislation provides for penalties for owners who do not comply with these norms and requirements. If they are ignored, penalties may be applied to the person:
- administrative responsibility;
- fines;
- mandatory demolition of structures that do not meet the standards.
Compliance with the rules is not just an obligation, it is an opportunity to develop a site comfortably and safely. Regulations are created to protect people from many problems. By ignoring the rules, you endanger yourself and your loved ones.
The Render House company is engaged in the construction of turnkey cottages in compliance with all norms and requirements. To get advice and choose a project, call the phone number in the site header.
Dividing the site into zones
After choosing a technique, you should start zoning. When creating a project, the following are usually distinguished: a residential area, a recreation area, auxiliary buildings, green spaces and a vegetable garden.
10% of the entire territory is usually allocated for residential buildings, 75% for plants and beds, the remaining 15% of the area is allocated for utility buildings, recreation areas, paths and decorative elements.
Leveling with a walk-behind tractor
To speed up and simplify the procedure for smoothing out uneven areas, you can rent any small-sized agricultural device, for example, a walk-behind tractor - a compact hand tractor.
It is not difficult to use - a person follows the unit, controlling the progress of work using control levers. The advantage of a walk-behind tractor is that there is no need to remove the top layer of soil. The disadvantage is that large holes will have to be filled with a shovel.
The order of steps is as follows:
- Attach the boards to the special holder of the hand tractor.
- Align the area into sectors. The walk-behind tractor will loosen the soil, and the board will level it.
Living sector
In a planning project, the most important thing is the location of the house. If the land plot has a simple rectangular shape, then the house is located based on the convenience of access or for aesthetic reasons.
With a non-standard shape, the choice of the optimal location depends on several factors. For example, if the plot has a narrow, long shape, then the house is built with its end facing the main entrance. And when the landscape slopes, the structure is placed on a hill. This prevents flooding of the foundation and basements.
Home or garden – which comes first?
Most summer residents first focus on building a house, then on arranging the territory. Our advice is to let the garden grow along with the house.
Gone are the days when a construction team destroyed a site during the construction of a building. When a garden design is created in parallel with a building design, certain elements (the terrace) are designed to blend perfectly with the surrounding environment. If you carry out major excavation work on the site at the same time as building a house, you will not have to wade through the mud at the stage of finishing the house, and you can soon enjoy a double effect.
If the house is built, it is worth planning the garden in the winter (you can start working right away in the spring). When the garden is small and some trees are already growing, the task is easier. If the site is completely empty, without trees, and there is stagnant water, creating a garden will take much more time, money, and effort.
Remember! There is no universal project suitable for planning each site. The design of a specific site must precisely correspond to the needs of users, habitat conditions, and landscape.
Plants and vegetable garden
After working out the building plan, you can move on to placing green spaces. It is better to locate the area for crop production on the south side.
But it is necessary to take into account that the buildings will provide shade. In such places it is not recommended to plant beds for vegetables and fruits. The placement of ornamental plants depends only on the owner’s imagination and the design project.
How to level the ground with a tractor
Photos of a level area clearly show the effectiveness of leveling with a tractor. But this is an expensive procedure, because you will have to pay a lot of money to hire a specialist and rent equipment.
Instructions on how to level a site with a tractor include two steps:
- Passage of equipment along the entire site.
- Transverse cultivation of the territory with equipment.
The tractor is equipped with a special type of teeth. They provide deep loosening of the soil and dragging layers of earth. The bucket allows you to move a significant volume of soil.
Drawing up a plan diagram
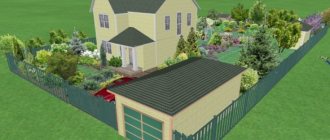
Now, having data on the nature of the landscape and using planning and zoning techniques, it is necessary to draw up a plan diagram. The latter is created for clarity of the entire project. To do this, you can turn to professionals, but it is recommended to make a plan yourself.
Take a piece of paper. If necessary, trim it to the desired shape. Then make out of colored paper all the buildings, plants and other elements that you want to see in your diagram. Don't forget to take into account the approximate scale. Next, start placing objects according to plan, move them, arrange them to your taste.
The plan must necessarily reflect:
- Location of living quarters;
- Outbuildings and auxiliary buildings;
- Fence;
- Schemes of communications and power lines.
New Year in the yard: how to beautifully decorate the yard with your own hands!- How to make a modern landscape design with your own hands?
Microgreens at home
The diagram can also be made from three-dimensional models. The latter are glued together from paper or molded from plasticine. Next, the layouts are placed on the plan and light is directed at them. Thanks to this, you can determine where shadows from objects will fall on a sunny day.
If you have any difficulties with the plan, we recommend that you contact specialized sites. There you will find photographs of various site layouts and accurate calculations of the plans.
Why is insolation so important?
In addition to boundaries with actual dimensions and distance to neighbors and roads, the layout of the site should reflect insolation - the amount of solar energy entering the suburban area.
Anton LyubavinForumHouse Member
Insolation is needed to understand how to position the house and other buildings, where to plant plants. It shows on which side of the site the sun rises, where it sets, and in which place the amount of light will be greater. By the way, for the home, it is very important that the sun comes into the kitchen in the morning.
You can find out how the luminary behaves in relation to the site either by observing during the day and making appropriate notes on the plan, or using a special service. To generate a master plan with insolation, you will need to enter a cadastral number, but if land surveying has not been carried out and there are no clear boundaries in the Rosreestr database, the service will not generate a plan. Like other similar resources tied to the base of this department. If there is data, it will look something like this.
Not taking into account illumination when planning the territory of a summer cottage is another mistake, the most destructive for gardening.
TimyCh Member of FORUMHOUSE
After a decade of gardening, it became clear that the main mistakes are associated with incorrect plantings. The mistake is that I did not take into account the illumination. Some plants grow well in partial shade, while others need lots and lots of light. Therefore, I think that in order not to drag plants around the site, it is necessary to draw up a lighting scheme for it, taking into account the house, bathhouse and other future or existing buildings.
Recommendations from experts
When planning, we recommend taking advice from builders and designers.
- To protect the backyard from prying eyes, you can locate the house directly on the border with the street;
- If the site has a slope, then the house is placed on a hill or in the middle of the slope, and it is necessary to make bedding;
- Trees are not planted close to the house. This is due to the fact that the house will be heavily shaded. There is also the possibility that, after a few years, the tree's roots could damage the foundation of the house;
- To create a favorable atmosphere, maximally protected from street sounds and dust, you should build a house in the middle or deep into the plot. And plant trees around the perimeter;
- When developing a plan, it is necessary to take into account fire safety and sanitary standards.
Planning is an individual and creative process. There are many layout options. Each of them depends not only on the landscape, geology, climate, but also on the preferences of the owner and his imagination.
The main thing to remember is that all objects and elements of the plan must be in the same style and harmoniously complement each other. Only then will your layout look like a single composition.
Your own landscape designer
Drawing up a layout diagram for a summer cottage on your own is an exciting creative task. Even if you have never done landscape design before, it’s possible to do a competent layout yourself.
If you are not confident in your abilities, but definitely want to create the layout of your summer cottage yourself, you can take training at the GeekBrains Faculty of Landscape Design
Landscape design training at GeekBrains will give you all the necessary knowledge and skills not only to create an impeccable style on your own site, but also the opportunity to acquire a sought-after promising profession.
GeekBrains teachers, landscape design practitioners, provide students with a unique opportunity to receive help and tips from top professionals in landscape design.
GeekBrains guarantees its graduates employment upon completion of the course. A professional retraining diploma opens the door to the fascinating world of creativity as a landscape designer.
Development of the territory
The very first thing you need to do when starting to develop a new site is to put it in order.
The following work is performed:
- clearing excess grass;
- cutting down and uprooting weeds and bushes;
- if necessary, planning and leveling the territory, eliminating unevenness.
Tip: Natural unevenness in the terrain may not necessarily be a hindrance. They can be used well when creating a unique landscape design.
Landings
20 – Blue honeysuckle. Since this culture loves the sun, the southeast side is just right for it. My imagination is already painting a picture of how I will pick large, tasty berries right from this “edible” hedge! 21 – Blackberry. In my opinion, the place is simply ideal for planting this light-loving crop! 22 – Raspberry. Perhaps, as a gardening experiment, I’ll plant, for example, raspberries here. 23 – Thuja. Along the rest of the perimeter the hedge will be represented by thuja. 24 – Alpine slide. Since the area of the site allows you to “swing”, I would like to make the rock garden large enough. 25 – Jasmine. Garden jasmine, also known as mock orange, grows well in shaded areas, so I will leave a place for it on the north side, in the shade of the barn. 26, 27 – Hydrangeas. I want to try to “plant” both tree-like and large-leaved hydrangeas on the site. Shrubs of these two species do not require a lot of sunlight to produce lush blooms every season. 28 – Pear. Why not make the most of a free corner? 29, 30 – Hosts. These plants are also quite shade tolerant, so the northern side of the site is ideal for them. 31, 32 – Climbing roses. The space under the window and near the terrace will be decorated with beautiful rose bushes. 33 – Blueberry. The southwestern side allows you to plant a light-loving highbush blueberry bush. 34 – Currants and gooseberries. What would a garden be without these berry bushes! 35 – Cherries. Initially, I had the idea to plant a self-fertile cherry seedling near the greenhouse in order to save space for something else, but after thinking about it, I abandoned the idea - what if there were very few berries. Still, let there be two cherries. 36 – Plum. 37 – Apple trees. 38 – Pear. 39 – Flowerbed.
40 – Track. It was decided to cover it with decorative slabs.
I can't wait to try out the capabilities of the first design program and show you what I did. Stay in touch!