Few people know that the borders of green fences that often catch our eye in city parks are a whole art, or rather, topiary art.
Topiar, or as it is sometimes called in the Japanese manner, topiary, is a change in the natural geometric shape of plants. In practice, this is the name for gardening work involving pruning and trimming trees and shrubs.
In our country, neatly trimmed ribbons of bushes are an indispensable attribute for decorating state public institutions. This urban element of landscape design has been preserved since Soviet times and has not lost its relevance at all, which is not surprising: the tradition of using well-groomed gardens from molded plants as a symbol of the inviolability of power, prosperity and wealth originated in the ancient Roman Empire.
Varieties
The art of creating sculptures from plants is varied in technique and style. There are two types of topiary figures:
- traditional;
- frame.
The traditional technique involves a finished tree, which is given the desired shape by trimming. Simple shapes for the garden (cubes, balls, cones) can be created by simple cutting by eye, without the use of other materials. Complex structures are obtained using a metal frame of a certain shape, dug into the ground near the plant. When the tree grows and begins to go beyond the boundaries of the frame, it is pruned, and in the end the desired shape is obtained.
Frame technology is more painstaking in nature. It differs from the traditional one by the presence of a special metal frame in which a tree or shrub is grown. A frame is first made, soil for planting is placed in it. Then the crop is planted. As she grows up, she fills the frame. Branches extending beyond its limits are cut off. The plant is cared for by regular watering and pruning.
From ancient times
Ornamental gardening was first mentioned in ancient Roman documentary sources dating back to 38 BC. e. The documents describe Italian villas, which were decorated with green figures of animals, birds, flowerpots, ships, as well as human figures created from boxwood bushes.
Mediterranean landscape design
But this type of landscape art presumably came to the Roman Empire from Persia and Ancient Egypt. When the Roman Empire began its conquest of the Middle East, the Romans brought in many slaves from Syria, Persia, Palestine and Egypt.
Among them were masters skilled in the technique of fancy haircuts, who became gardeners for Caesar and other noble people. And subsequently they began to pass on their knowledge to students.
House of the Vettii in Pompeii. Second half of the 1st century
Gradually, the Roman Empire expanded its borders and introduced some elements of its culture and traditions into each country. This is how the curly haircut spread throughout Europe.
And after the fall of the empire, the art of topiary disappeared for a long time behind the walls of monasteries, where monks created topiary gardens for their meditations.
The appearance of these gardens suggests that for the monks, topiary cutting had primarily a utilitarian meaning - they formed dense protective fences from bushes. However, this did not stop them from preserving all the secrets of curly haircuts for posterity.
Plants
Not just any plant can be used to create a green sculpture. A suitable one must have the following characteristics:
- resistance to winter frosts;
- unpretentiousness to growing conditions;
- the presence of replacement shoots;
- specific crown shape;
- slow growth.
Plants have the following properties:
- western thuja;
- common spruce;
- alpine currant;
- small-leaved elm;
- cotoneaster brilliant.
Of course, 3D shapes can be created from other plants. And these crops are most suitable for the climatic conditions of central Russia.
Nowadays, many owners of their own garden plots use topiary landscaping. We will look at step-by-step descriptions of creating figures below.
How to choose a topiary frame?
Choosing a frame should begin with studying the landscape features of the garden plot. A small figure may get lost among the surrounding plants. In addition, it is quite difficult to draw small details of a small decorative figure. A figure that is too large will be overgrown for a long time and unevenly and may look awkward against the background of smaller landscape features. When using plants for topiary, you need to take into account the color scheme of the entire landscape composition so that the outlines of the topiary element are visible from anywhere in the garden. An important fact is that the plant takes years to occupy all the planned space. In order not to lose the attractiveness of such a semi-overgrown wire frame, it is better to use a wire figure , which is an independent art object. This can be achieved by detailing the features. For an animal-shaped figure, it is enough to carefully draw the head. For a simple figure, this could be a stylish wire pattern.
Frame method
The required frame can be made from 2-3 mm wire or purchased at a special store. The finished frame has gaps for penetration inside. There is a lid on top for access to the inside of the sculpture, making it convenient to fill with earthen substrate or moss. By the way, before filling, the moss is soaked in water for about 30 minutes.
When filling the frame with substrate, you need to make holes where climbing plants, herbs or succulents are planted. Perfect for this:
- ivy;
- grape;
- stone rose;
- loosestrife;
- saxifrage.
When creating a topiary from climbing crops, plants with a clod of earth are transplanted from a plastic container into a metal frame, and the shoots are distributed over a stand and secured with paper clips. To make large topiary figures lighter, bags of foam balls are placed inside.
When caring for topiary, it is watered, trimmed, and pinched. For the winter, the figure is brought into a cool room or simply covered with a warm box.
Simple or complex geometry for the garden: what to choose
When forming a topiary from living garden plants, you can limit yourself to a simple form. This option is suitable for beginner landscape designers.
The first step is to choose the right plant. The tree or bush should not be too young. The optimal age to start creating a figure is 5 or 6 years. It is also important that the tree has a good root system. This could be, for example, hawthorn, spruce, boxwood or dogwood.
Important! The optimal time of year for cutting is summer and spring.
Simple form
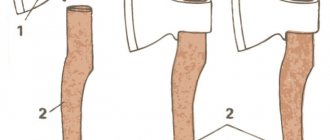
Simple forms of topiary include a cube (parallelepiped). In order for the figure to turn out beautiful and proportional, you must follow the following algorithm:
- You need to draw a square on the ground around the trunk so that the tree is clearly in its center.
- Bamboo slats must be installed perpendicularly in the resulting corners. They must be tall.
- Relying on the vertical slats, install the horizontal slats.
- Carry out a rough cut with trellis scissors so as to obtain an outline. The cutting direction should be from top to bottom.
- After clarification, carry out further finishing cutting.
- Check the form again. If you find protruding small branches, they should be cut off.
Advice! To evaluate the quality of cutting greenery, you need to move a few meters away from the tree and inspect the result of your labor from a distance.
The rectangular shape, despite its simplicity, looks very impressive and graphic.
Complex shape
More complex than the cube is the shape of the cylinder and cone. This work will have to be done with even more attention and accuracy than cutting straight edges. The operating principle is similar.
Procedure:
- A circle should be drawn on the ground under the tree around the trunk.
- Install slats around the perimeter of the figure that will serve as guides.
- You need to form a cylinder from the crown using scissors, without touching the top at this stage.
- Trim the top, gradually rounding the edges to create a truncated or full cone.
The conical shape of tree trimming can be complemented by the selection of individual tiers
For your information! Creating very complex shapes requires the use of frames, sketching and calculations.
Classic technology
To create a topiary using traditional technology, you will need a lot of patience, imagination, as well as the presence of sharp garden tools.
It is better to start with the simplest geometric shapes: a ball, a cone, a cube. It is best to trim plants in March-April or summer. It is not recommended to trim in the fall; this will undermine the plant before winter.
The figure creation scheme is as follows:
- A mature shrub or tree with strong roots and a lush crown is selected. It could be spruce, hawthorn, black maple.
- A shape is drawn on the ground surface under the tree, for example a square if a topiary figure is created in the form of a cube.
- Slats or sticks are placed in the corners of the square and secured with planks. This will be an indicative frame.
- The plant is cut with trellis scissors, giving approximate outlines. It’s better to start from the top, then work on the sides.
- Check the sides for evenness and gradually trim them.
- Small protruding branches are trimmed with pruning shears.
This is how simple figures for the garden are created.
Brief oblivion
Meanwhile, opponents began to appear in Europe, critics of artificially created nature, who began to accuse topiary artists and everyone who supports this art of mocking plants. As a result, regular gardens containing masterpieces of topiary art began to gradually turn into landscape gardens.
However, topiary was forgotten for a short time. Already from the end of the 18th century, topiary trimming of plants began to gain momentum again and more and more attract lovers of hedges, borders and original green figures.
Interest in topiary flared up with renewed vigor in England after the creation of the Mont Plaisir park in Derbyshire. And by the 20th century, new topiary masterpieces appeared, which had been formed over the course of 40 years! This is Hidcote Manor Garden in Gloucestershire.
Hidcote Manor. Photo 1
Hidcote Manor Garden in Gloucestershire. Photo 2
Complex geometric models
The ball is considered a complex figure in topiary art. It can be obtained from a cube by trimming its edges. The best plants for this purpose are: thuja, barberry, yew, boxwood and other plants. For example, you can create a “Globe” topiary figure using plants that differ in shades of green.
Cylindrical shapes are obtained from western thuja, larch, serviceberry, and linden. To get such a figure, adhere to the following scheme:
- A circle is drawn on the ground.
- Install wooden stakes.
- The cylinder is cut.
To create a cone-shaped figure, dig in three poles and fasten them at an imaginary top.
Next, you can begin to construct pyramidal forms, spirals, and tiers. Having learned how to make them, they move on to creating figures of people and animals.
Topiary art. Topiary art.
Today, the landscape art of topiary, forgotten for more than 400 years, is becoming increasingly popular. Topiary is defined as the art of trimming the crowns of trees to give them decorative shapes. With the help of topiary art, you can create an individual garden style that will combine various magnificent natural compositions.
Although the popularity of topiary peaked in the seventeenth century, the art of giving geometric shapes to trees has its roots in Ancient Egypt and Persia. Preference was given to a combination of external form and functionality. Thus, symmetrical geometric gardens, fountains, and neatly trimmed bushes became widespread. Let us remember that the popularity of creating geometric gardens was embodied in the greatest work of the ancient world - the Hanging Gardens of Babylon in Babylon. This is how the style, considered today exclusively British, was born.
In the art of topiary, there are different styles - from classic to avant-garde. The main elements of topiary are pyramids, balls, cones, and arches. Despite their simplicity, they are associated with the nobility of royal gardens. But, predominantly in art, topiary uses the contours of humans and animals to emphasize the connection between people and nature.
The process of growing topiary is a very long process. For example, in order to form the shape of a boxwood bush, it is necessary for it to reach the age of 30–40 years. But even then you won’t get the desired result. The artistic intent will appear when the bush grows.
Despite the sufficient complexity of topiary art, the offices of companies creating topiary are inundated with orders. Because everyone strives for original and individual decoration of green spaces.
Traditional technology using a frame
When creating topiary figures, the frame can be used to simplify the process of cutting the desired shapes from plants. To do this, you need a removable metal frame, which is installed on top of the wood. This technique is usually used by beginner topiaries.
The plant develops in a mesh frame, and the master only needs to trim off the stray branches. Once the crown is formed, the frame is removed. However, this is not always easy to do; often the tree grows together with its “frame”. You need to remove the frame very carefully so as not to damage the crown.
Technologies for growing and caring for topiary works
The technique of creating plant sculpture has remained virtually unchanged for centuries. A classic technique practiced since ancient Rome is shearing and pruning. Although these concepts sound synonymous, the methods of working with the plant are fundamentally different.
Making topiary begins with trimming. Removing the branches serves to initially give the green sculpture the desired shape. The procedure is carried out in early spring, when the plant is still dormant and does not suffer much from the damage caused. The gardener works with pruning shears or a garden saw, individually removing excess branches.
Pruning is done very carefully: in addition to the general shape, the quality of the branches, the location of the buds and the general condition of the plant must be taken into account. In addition, to prevent the culture from dying, it is advisable to sanitize the largest cut wounds. The process is akin to pruning and caring for fruit trees and follows the same rules.
Shearing is used to give a finishing shape to large volumes, and more productive tools are used for it. Large garden shears are used, and more often electric or gasoline hedge trimmers. Haircuts are carried out as needed to restore the clarity of the shape. As a rule, this happens several times a season, and all excess branches are removed indiscriminately.
[!] Trimming damages branches and removes leaves necessary for the life of the plant. In order not to cause irreparable harm, in no case should you remove more than one third of the crop crown at a time.
It is very convenient to trim large surfaces, such as the walls of green fences. It is worth mentioning that to simplify the process, special mesh frames are sometimes used to limit the range of action of the cutting tool. Using such a stencil, almost any gardener can give a bush a simple shape.
However, everything is not as simple as it seems at first glance. Even creating a simple green border requires a lot of time and effort. First, you need to plant and remove individual shrub specimens with a clearly defined frequency, and then, over the course of many years, carefully thicken their crowns by pruning, forming a solid volume.
If you decide to do topiary in your garden, keep in mind that not all types of shrubs and trees lend themselves equally well to artistic treatment.
The crown of the plant should be formed by many dense intertwining branches, retain its shape for a long time, and after cutting it should be covered with fresh green foliage. It must be taken into account that species with large foliage are suitable only for simple geometric shapes and rough shapes. Detailed sculptures can be created from plants with dense, thin branches and small foliage.
Types of shrubs and trees according to the type of topiary:
- For low borders, up to half a meter, common privet, dwarf euonymus, small-leaved honeysuckle, Japanese euonymus, common boxwood, shiny honeysuckle, evergreen boxwood are suitable.
- For hedges up to one and a half meters high, yellow acacia, common privet, European euonymus, squat elm, common dogwood, common honeysuckle, common cotoneaster, and common lilac are suitable.
- For hedges up to three meters high, the following are grown: hornbeam, field maple, Siberian berry apple tree, white mulberry, noble laurel, common fir, eastern thuja, yew berry, and western thuja.
- Trees suitable for crown trimming: common hornbeam, noble laurel, holm oak, common yew, prickly oleaster, alpine currant, boxwood barberry, common boxwood;
- Trees for the trunk with a moldable crown and a height of more than one and a half meters: Norway maple, hornbeam, linden, Siberian apple tree, white mulberry, camphor laurel, holm oak;
- Trees with a low trunk of up to one and a half meters, suitable for topiary: common hawthorn, common rowan, flowering ash, common bird cherry, common boxwood, Japanese privet, berry yew.
- Dwarf tree species for topiary in stamped form: common privet, golden currant, common lilac.
Of course, individual pieces of topiary art can simply be purchased at a specialized store. It can be a standard tree with a spherical crown, an exotic bansai or a bush in the shape of a funny animal.
The main thing is not to forget that the topiary specimen is more capricious than ordinary plants, and places increased demands on soil quality, site illumination and watering. Without regular trimming, the crown will very quickly lose its original beauty, which means it will have to be constantly looked after. In addition, removing branches weakens the plant, so all garden sculptures require protection from disease and regular feeding.
Landscape design is constantly evolving. New forms of plant art are constantly emerging. Among the interesting trends in modern topiary, it is necessary to mention trees grown on a trellis. Topiary masters, bending the branches and fixing them on the frame screen, form the crown of the plant in one plane. Such trees take up little space on the site and look very decorative.
Using a similar technology, plant architecture is created, or rather its small forms: arches, canopies, portals, gazebos. For example, to grow an arch on both sides of a garden path, you need to plant a couple of bushes or trees of suitable height, tying their crowns together as they grow and bending their branches in such a way as to ultimately obtain the required volume.
It also creates a living gazebo: the trunks of plants planted around the perimeter form support columns, and their crowns form a green roof-vault.
It is worth mentioning that in addition to the classic topiary made of bushes and trees, herbal sculptures that are similar in appearance, but differ in manufacturing technology, are often used in landscape design. The figures are formed from a wire mesh filled with a nutrient substrate in which grass or flowers are planted. This technique is used much more often, since it allows you to make a complex plant sculpture in the shortest possible time.
***
A garden plot, decorated with trimmed trees and shrubs, always looks well-groomed and neat, and topiary in the form of funny animals and cartoon characters will warm the soul and lift your spirits.
Artificial topiary
Not everyone can create natural topiary. An excellent alternative to them are topiary figures made from artificial grass. Their advantages are obvious:
- no constant care required;
- independence from climatic conditions;
- mobility – easy to move to any place;
- remarkable appearance, indistinguishable from natural compositions;
- affordable price.
The process of caring for artificial figures involves regular removal of dust and snow.
The elements of the figure are fixed to a wire frame. Imitation leaves and green fabric are used. In this case, the master’s imagination is not limited by anything. This creation can be installed outdoors or indoors.
The art of topiary is extremely diverse and attractive. No wonder it is gaining more and more fans. Starting with green figurines in pots, you can move on to real garden masterpieces.
How to make a topiary for the interior with your own hands
Mostly artificial materials are used for interior topiary decoration. They can be made from a variety of materials, showing creativity and imagination. The most popular models are made on the basis of a wire trunk, which is given a slightly curved shape, and a ball crown.
Base
The basis for this design is usually a flower pot. To strengthen and weigh it down, plaster is poured into it, but only after the trunk is inserted.
The top of the pot is decorated with elegant pebbles, moss, beads and other decorative elements, which are best placed on glue. A reliable option for fixing the decor is to use a glue gun.
The pot itself should be beautiful, corresponding to the general direction of the room design. You can also decorate it yourself. Painting, decoration with beads, decoupage, etc. are possible.
The rules for choosing a pot include the proportionality of its shape and size relative to the tree itself. According to classical canons, it should not exceed the size of the crown.
Advice! Pampas grass, moss or artificial grass can be used to decorate the top of the pot.
The base must be stable and relatively small
Trunk
The trunk must be reliable, capable of holding the “crown” with decoration. For it, a rigid, shape-retaining wire with a cross-section on average of 5 to 10 mm is selected. This parameter is determined by the size of the future figure. You can also use sticks.
Threads, floral paper, jute, art paint, cord, etc. can be used to braid the base of the trunk.
Crown base
The base of the crown is a ball-shaped frame. This could be a foam piece, a plastic ball, bent willow rods, etc. You need to choose a base taking into account the approach to further design.
If small objects are used for decoration, for example, coffee beans, beads, then the base should be uniform. This will prevent the decor from falling in and will maintain its shape. When choosing volumetric elements to create a crown, for example, large artificial flowers, you can choose a frame of any shape; even a ball woven from willow twigs will do.
For your information! Sometimes the design does not involve completely hiding the base, if it is beautiful in itself.
The base of the crown must be fixed to the trunk before decorating it.
DIY crown decor
The base of the crown on top can be pre-coated with paint so that it does not show through the decor in a contrasting color. Once the form is prepared, you can begin the decoration itself. It is best to use a glue gun to attach decorations.
For coffee lovers, a good option would be topiary, which is covered with coffee beans. They do not provide a tight fit, so gaps can be decorated with small beads and seed beads. As an option, paste the ball with grains in two layers or pre-paint it brown.
Coffee beans can be used not only to decorate the crown, but also to decorate the pot
A description of how to make a spectacular topiary from coffee beans can be seen in the video:
Topiary made of cones and nuts is one of the original decorative options
Topiary for the interior can be made from corrugated paper of one or several shades
A description of how to make such a decoration with your own hands can be found by watching the video:
Artificial flowers and bright ribbons are suitable for creating elegant holiday compositions
Unusual topiary - a spectacular decor option
May be interesting : Arrangements made from artificial flowers.
Topiary figure in winter.
With skillful pruning, the plant will keep its shape in winter. This can be seen in the winter photographs of my work. The peculiarity of the cold season is that it gets dark outside very early and the decorative effect disappears. In this case, you can use LED strips or garlands. It is necessary to secure such a garland along the main contour lines of the figure so that the silhouette is clearly visible in the dark. This modification of the wire frame will allow you to have an interesting decorative lamp on the site. My version of this use of a wire figure is on the page Glowing Figures.
What and how to make a topiary frame from?
You can make topiary frames or frames yourself. Of course, you need minimal skills in working with metal and some special tools. An approximate sequence of work on creating a topiary frame from wire is shown in sufficient detail in my master classes Topiary Frame Goose and Topiary Frame Pink Flamingo. To fasten the wire, it is best to use a welding machine, and if you don’t have one, you can get by with twists of thin knitting wire. However, such a frame will be less reliable and stable and can be deformed by actively growing branches. In my work I use steel wire with a diameter of at least 6 mm and reliable welded joints. The result is a durable anti-vandal option.