How to prepare materials to make crafts from branches for the garden
To engage in the creative process, you need to properly prepare the material. A prerequisite is to use dried branches, then they will hold their shape better and look presentable. Collecting twigs is possible in public gardens or parks. It is easy to independently dry branches that are collected in the garden after sanitary cutting. Thus, you can combine business and pleasure.
Before starting the creative process, be sure to examine the branches for cracks. If there are any, then it is better to refuse to use them. A prerequisite is sanding the areas on the bark that are peeling off.
To eliminate the occurrence of larvae and other insects that often appear on branches, disinfection treatment should be carried out. For such purposes, a potassium permanganate solution is used, only in low concentration. If the future project requires it, then another important manipulation will be the processing of branches using stain or varnish.
How to store branches and twigs?
It is extremely important to properly store branches that will be used for future creations. When wood dries out, working with it will be extremely inconvenient and you will have to spend a lot of time and effort.
To avoid this process, the dried pieces are placed in a plastic container and placed in the refrigerator or basement. If you didn’t have time to notice, the branches are still dry, then before work you will need to moisten them a little with water.
Links to thematic forums
Homemade items made from driftwood are in great demand, so authors often discuss their works on thematic forums and share their experience there on what and how to do.
We have prepared a list of the most authoritative forums where you can get a lot of useful information:
- Forumhouse;
- Aquaforum;
- International Aquarium Forum;
- Farm "Nut Orchard";
- Forum about repair and construction;
- Club of decorative gardening lovers;
- Forum of aquarists of the Primorsky Territory.
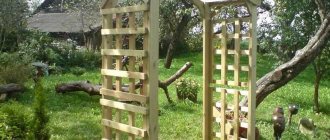
Wicker fence in the garden
Branches of willow, grapes or other woody plants are often used as raw materials for the construction of various types of barriers. Wicker fences not only fulfill their direct function of fencing, but also become an additional original element of garden decor.
This practical decoration of a garden plot is used by many decorators and landscape designers. Unlike stone, iron or concrete fences, a wicker fence is easy to erect and can be installed anywhere. This type of fencing is very practical and decorative. How to create such a hedge from branches can be found in our article. You might be interested in our articles:
- Interesting ideas on how to decorate your front garden with your own hands
- We create garden furniture from pallets
- We make original flower pots with our own hands
Other ideas
A properly cut and processed stump can become a chic decoration or a functional component of a garden or vegetable garden. If you want to beautify your plot, you can use hemp to make an original border for flower beds or flowers in pots, or make interesting animal figures (hares and owls are often made).
If you want to build from stumps not just a fence for a garden bed, but a more complex figure, for example, it could be an originally designed goblin, an owl, mushrooms and other “forest” objects, then for this the master must be able to work competently with wood. This is especially true when it is necessary to cut through small and detailed parts in a stump.
If you don’t have the proper knowledge and work experience, you can make an extremely simple, but very cute figurine from a stump. It could be a charming fly agaric. To make it, you only need to prepare an enamel basin or bowl, as well as an aerosol. The bowl should be cleaned and then painted with rich red paint in a spray can. When the paint layer dries, you will need to paint snow-white circles on the red background, like on the cap of a real fly agaric.
The stump itself should be painted white. To make the figure more original, you can draw a smiling face on the stump. After this, all that remains is to put a painted hat on top of the beautiful mushroom. After this, the homemade product will be ready!
You can also build a fairy-tale tower from a stump, which will certainly become a bright accent of the local area. To make such a decoration, you need to prepare a dry oak stump, for example. It will play the role of a basis for a hut or tower, decorated with various kinds of decorative elements. Decorative components for the tower can be cut from plywood or a piece of fiberboard. The decoration should be attached to the tower using self-tapping screws. The wooden components of the homemade product will definitely need to be treated with antiseptic compounds so that they do not begin to rot in the open air.
Often, in the trunk of dry trees, very close to the surface of the earth, there are small hollows or growths. These are elements of natural origin, but they can be safely used to create an effective composition. For example, from a hollow you can lower miniature toy ladders with cute gnomes holding on to them. On the growth that is on the stump, you can place various interesting figures.
There is another unusual option for crafts made from a stump. Otherwise known as the “green monster”. For such a solution, you should prepare a stump of enormous size and with a very powerful root system. If you have one in your garden plot, that's very cool. You just need to buy a variety of moss that suits your climate at a garden store. Then he is planted on a stump. It will need to be sprayed with water periodically
It is important to ensure that the moss grows well. Once this happens, it will be possible to fully appreciate the enormity of this natural craft.
Crafts from tree branches for the garden in the form of animals
It will take a little time to make original animals. For such purposes, wire and pruning shears are used. The wire is taken without braiding so that the fastening does not get lost among the branches.
Master class on making a hedgehog figurine
It is very easy to create original hedgehog figures. Let's take a closer look at the stages of creating a craft:
- We form a ball from the branches. We strengthen the structure with wire.
- We form a small panicle from a bunch of branches, tie the thick ends of the branches and insert the previously made “ball” into the middle. Then we tie the other end of the structure with wire. This is how the body of the hedgehog was created.
- We insert short branches into the body of the structure so that they resemble needles. From short, thicker branches, we create eyes for the figurine, as shown in the photo. Instead of branches, you can use small balls, buttons, etc.
Using the sector, we align the branches, remove the excess and give our “hedgehog” shape.
Making birds from branches
Another interesting crafts made from branches for the garden are bird figurines. The principle of creation differs little from the previous figure. You will need to use thin flexible branches from which 2 balls are formed. The first will be the body, and the second will be the head.
To secure parts of the figure you will need to use wire. A large ball must be covered with long branches. To get an elongated length, you should add a few more parts to the body - separately for the head and neck, and additionally for the tail.
Now you need to trim the branches using pruning shears. A rod is installed between the branches to simplify the process of creating a neck. At the end we form a ball-head.
The bird is fixed on high legs made of rods or slats of wood. In this case, there is no need to even install a stand. It is enough to simply stick your feet into the ground; the greater the depth, the more stable the figure will be.
Place such crafts in areas that are easily visible. Stone platforms, brick and stone areas will be an excellent place. You can also install them on lawns. Many decorators often use branches to create garden sculptures.
Due to the pliability of this material, it is suitable for constructing both small figures and large sculptures. Here everything depends only on the imagination of the creator.
DIY stump table: 10 stunning photos
A table is an important attribute of any home. The most important action takes place at the table - the meal. Scientists advise using wooden tables - they do not emit toxins like plastic ones. Glass tables are more dangerous and can be fragile. Good wooden tables cost a lot of money, and many people decide to make a table with their own hands. The cheapest and easiest way is to make a table from hemp.
It looks very beautiful and beautiful, but this is an ordinary stump.
They simply nailed the tabletop to the stump, and it turned out to be a good table.
This type of work will require significant time and carpentry experience, but it will be worth it.
A table can be made from small stumps and varnished.
It's not particularly easy to find such a large stump, but the coffee table turned out great.
To create such a small table, we took a small stump and an ordinary round timber from a tree.
You can also put a glass top on top, which will add even more attractiveness to your table.
You can also screw wheels to the stumps and the table will be movable.
A table with lighting can also be made from hemp.
The coffee table in the shape of a month is a beautiful piece of work.
Read in full (link)
Interesting decor from willow branches
An old vase decorated with willow branches is perfect for outdoor use. You can even make a vase from old plastic, tin and glass jars. Take such a container, and then cut branches so that they are slightly higher in height than it.
Then the branches are superimposed as tightly as possible to each other, positioned vertically. They are attached to the outside of the can, then secured with braid or tape. Sometimes branches are planted with glue. You can do the same with flower pots, which are also decorated with twigs.
To maintain the stability of the vase, do not glue branches to the bottom of the container. The creation process consists of several stages:
- First, the branches are cleared of bark. It is best to carry out such manipulations before the wooden elements dry out.
- Then the branches are cut into several small pieces with pliers. Their size is calculated based on the height of the vase.
- After the material has dried, you will need to glue each stick to the base to form a lathing.
- Now all that remains is to leave a little time for drying - up to 15 minutes.
Exactly the same principle is used to design other crafts made from willow branches, for example , candlesticks, which can be beautifully placed on a terrace or open balcony. Together with the vase they will look very harmonious.
Top 13 DIY stump products - only the best ideas
Unnecessary tree stumps are an excellent material for creativity and earning money. And imagination, as you know, has no limits or boundaries. With certain treatment, objects made from a stump will last a very long time. We have prepared a selection of the top 13 DIY stump products. Enjoy watching! These will be only the best ideas.
You can make glowing seats from a tree stump. Having painted them with luminescent paint, they are good to use in the garden.
Candlesticks made from a stump are a creative idea for the home.
If you carefully work with the tools, the stump can turn into a stand and a shelf for books: two in one.
A lamp made from a stump is an ordinary accessory made of an unusual material.
From a stump you can make a bar counter for several bottles of wine.
A coffee table made of stump and glass will fit well into the interior of the living room.
You can make a bird feeder from a small stump.
Mini - waterfall from a stump. But the stump is made from healthy dried wood, carefully treated with impregnations.
Crafts from a stump in garden design are a great idea.
A garden table made from a stump will decorate a terrace or winter garden.
Flower stands and flowerpots are made from stumps of different sizes.
The stump of an old tree will make a beautiful flower garden.
Stump figures can be placed in a garden, park, or playground.
Read in full (link)
Original crafts from branches and driftwood
Using twigs and driftwood, you can also create many beautiful decorative elements. We invite you to consider them in detail.
Flowers from willow branches
A simple and popular way to use willow branches in decoration is to carve flowers.
This decoration can be used both in the garden and at home. The process is quite simple. You need to pick up a willow branch, preferably a dried one. At the thick end of the branch, remove some of the bark as shown in the photo.
- Sharpen the point into a pencil shape. This will become the base of the flower.
- Starting from the opposite end towards the point, use a sharp knife to cut the wood as evenly and thinly as possible to create the first petal. If the tip of the knife is raised up, it will create a curl on the left side.
- Each time you cut a new petal, try to maintain the same knife angle as before.
- Turn the stick slightly to the left and start another petal. All petals should start at the same point. The end point for each petal should be slightly to the right, directly below the petal above.
- Continue the process until you have a flower bud formed. Cut off the excess part of the branch.
- Carefully drill a hole in the base of the flower and insert a branch, wire, etc. into it.
In this way, you can create several flowers and decorate a vase, flower bed, composition or installation in the garden with them.
Crafts from branches for the garden: bird feeders
If you are interested in wicker weaving or want to try yourself in this art form, creating beautiful and original bird feeders will be a great way to decorate your garden plot.
Such a craft will also be practical and useful - as it will attract birds to your garden. Feeding during the winter allows birds to survive. In turn, the birds become attached to your garden and in the summer they will become the main destroyers of caterpillars and other pests of your plantings.
If you want to build a bird feeder, check out how to create an edible feeder for your feathered friends.
Garden furniture made from branches
Many believe that tables and chairs made from such raw materials are impractical and have poor stability. But that's not true.
If you use branches of the appropriate diameter to create, such products can last quite a long time and become an excellent natural substitute for plastic furniture. The main thing in this matter is the correct selection and preparation of raw materials.
This video shows the process of creating a bench from rough branches
Creating a hut in the garden
A hut made of willow twigs is an ideal structure for children and an excellent shelter. How to create such a “house”? We will describe in detail how to build a hut for children.
- To create the structure, select an area with a diameter of 2 meters in the garden so that children can lie or sleep in it in the summer. So to speak, a natural tent. Prepare 40 freshly cut willow branches without leaves and 20 thicker willow poles for the base of the hut. First, dig a narrow trench around the future hut and 10 centimeters deep, leaving an entrance area about 70 cm wide.
- Then stick 20 willow poles into the ground with about 30cm between them and tie the ends together with wire.
- Stick 40 thinner branches into the ground and then weave them diagonally between the poles - 20 to the left and 20 to the right, as in the photo.
- Freshly cut willow branches planted in the ground can germinate within two weeks, sending out young leaves. Over time, they will provide additional shade to your hut.
You can also use dried willow branches, but they will not produce leaves.
Where to get material for work
The basis for creating furniture, souvenirs, lighting fixtures and other interior items can be either living or dead wood: individual branches, twigs and snags. The latter are formed after breaking off and splitting off trunks, branches or damage to roots. Under the influence of wind, precipitation, sun, and microorganisms, driftwood takes on a bizarre shape and unique appearance.
Snags and juniper branches
Material for decoration can be found in the forest, forest park, grove. Any fragments of trees that have separated naturally can be collected - this is not against the law.
Important! Oak, larch, and ash are best suited for crafts, although absolutely any natural material can be used.
We weave balls from branches to decorate the garden
Decorative balls of different diameters, woven from willow branches, look amazing on a personal plot. The weaving process is quite simple:
- First we create a frame for the future ball. Take a branch and bend it in a circle several times. We fix it with wire.
- By what method do we create a second circle of slightly smaller diameter (so that in the future it can enter the first circle). Then we also form the third circle.
- We insert the circles one into the other and separate them from each other at 90 degrees (as in the photo). We fix their location with wire.
- We begin to wrap this frame with branches until you give your structure the appearance of a ball. In this case, branches should be passed not only at the top, but also woven into others to add rigidity. If necessary, strengthen the branches with wire.
Balls can be created in different diameters for further use in the garden. How and where to place your branch crafts is up to you. They can be placed on the ground or hung from a tree.
Such installations will add originality to your garden. If desired, hanging balls can be decorated with garlands - this will be an effective option for illuminating your area in the dark.
Step-by-step instructions for making bonsai
Step 1. Find a small piece of driftwood that looks like an old tree. It should have a prominent thick trunk and crown branches on the sides. Do not pay attention to small branches; they can be cut off later.
Suitable driftwood
Step 2. Clean it from dirt, wash and dry it. First, use pruning shears to cut off all the excess and form a crown, work carefully, you won’t be able to glue anything back.
You need to cut off excess branches from the driftwood
Practical advice. Washing driftwood is much easier and faster with an old toothbrush. Its fibers remove dirt from even the smallest holes and bends.
Step 3. Stir the alabaster. The quantity depends on the container in which you plan to fix the driftwood. Alabaster will hold it and imitate the earth.
Fine-grained gypsum
The larger the snag, the larger and heavier the base should be to ensure the stability of the structure. In our case, approximately 0.7–0.9 liters of finished mass is sufficient.
Remember that alabaster hardens very quickly, first prepare a container for the composition, then you won’t have time to look for it.
The driftwood is fixed with alabaster
Step 4. Hold the driftwood upright with one hand and level the alabaster with the other. If dirty stains of the mass appear on the surface of the driftwood, they must be immediately and thoroughly removed with a slightly damp cloth. After drying, white alabaster is deeply absorbed into the wood, making it almost impossible to clean the surface.
Use a cloth to immediately remove spills and drops.
Wait a little until the solution begins to set; the driftwood should hold on its own. Leave the solution alone until it sets completely, this will take about 10-20 minutes.
Step 5. Prepare special artificial pine or spruce branches, they are then cut into small branches and inserted into the driftwood. To make holes you need to have an awl or a hand drill. The surface of the wood is impregnated with stain; it emphasizes the structure. Prepare small pebbles and a glue gun. It is better to use modern hot one, it is easy to work with, and the adhesion indicators are quite sufficient for our craft. To improve the designer look, a final varnish coating is applied. All these materials must be prepared in advance.
Step 6. Using a small brush, paint the alabaster with stain. The material absorbs a lot of water, you will need to cover one place at least three to four times.
Step 7. Saturate the driftwood with stain; here you need to be careful and achieve the most natural color of the wood. Don’t make it completely one tone, let there be areas with different shades.
Applying stain
Step 8. Using a small hand drill, carefully make holes in the driftwood, fill them with hot glue and immediately insert the pieces of artificial pine needles. Work carefully, do not leave thin strands of glue. They can be removed immediately or after the composition has hardened. The second option is preferable; the threads come off easily at the base and your hands don’t get burned.
Step 9. Gradually form the crown of the tree. Make every effort to make everything look organic.
Applying hot glue
Gluing twigs
Step 10. Cover the alabaster with moss and attach part of it to the driftwood. The fact is that in Japan such trees have been growing for many decades, and the trunk is always covered with living moss.
Gluing moss
At this point, the production of the craft is completed, you can install it in the designated place and enjoy the results of your labors.
Artificial bonsai made from driftwood
DIY stump table: 10 stunning photos
A table is an important attribute of any home. The most important action takes place at the table - the meal. Scientists advise using wooden tables - they do not emit toxins like plastic ones. Glass tables are more dangerous and can be fragile. Good wooden tables cost a lot of money, and many people decide to make a table with their own hands. The cheapest and easiest way is to make a table from hemp.
It looks very beautiful and beautiful, but this is an ordinary stump.
They simply nailed the tabletop to the stump, and it turned out to be a good table.
This type of work will require significant time and carpentry experience, but it will be worth it.
A table can be made from small stumps and varnished.
It's not particularly easy to find such a large stump, but the coffee table turned out great.
To create such a small table, we took a small stump and an ordinary round timber from a tree.
You can also put a glass top on top, which will add even more attractiveness to your table.
You can also screw wheels to the stumps and the table will be movable.
A table with lighting can also be made from hemp.
The coffee table in the shape of a month is a beautiful piece of work.
Read in full (link)