Options for handmade dolls for the garden
To populate your dacha with cheerful people you will need imagination, patience and some available materials.
Example #1: fashionista
Stylish young lady with a sly look
Before making a garden doll, collect all the necessary material, which will mainly consist of old children's things:
| Name | Purpose |
| Jean jacket | Torso |
| Shoes | Lower legs |
| Hat | Decorating the head, giving the figure an extravagant image |
| A piece of thick knitwear | Palms and head |
| Tights | Upper legs |
| Fabric cut into thin strips | Hair creation |
| Foam rubber | Filling the doll |
Tip: It is recommended to immediately stock up on a large plastic bag or an old umbrella so that you can hide your handicraft from the rain.
Any old umbrella will save the craft from getting wet and will complement its surroundings
The instructions look like this:
As you can see, the price of such a doll is minimal, but children and adults are guaranteed to enjoy it. (See also the article Decor for the garden: features.)
Example No. 2: wicker man
This option is even easier to implement; you will need the following things:
| Name | Purpose |
| Long elongated basket | Torso |
| Ball of thread | Head |
| Round basket with handle | Headdress |
| Bow | Decoration |
Advice: it is also recommended to equip this doll with a special place of “service” made of wire in order to achieve maximum resemblance to a sentinel.
An example of a suitable “nest” for a doll
Next we do this:
That's it, now a real sentry is keeping order in your area. (See also the article Figurines for the garden: features.)
Example #3: painter
If you have been doing painting work and you still have some tools left over, then they can also be used to decorate the garden. Prepare:
| Name | Purpose |
| Paint brushes, 4 pcs. | Arms and legs |
| Roll of rope | Torso |
| Decorative bird nest in the shape of an elongated house | Head |
| thick wire | Upper legs |
| Colored paper | Bow decoration |
A set of necessary materials for the doll
Manufacturing proceeds as follows:
Example #4: Gypsy
Gypsies have always been famous for their colorful outfits
A great way to give a second life to grandma's old rugs. You will need:
| Name | Purpose |
| Two old rugs of different sizes | Outfit |
| Iron flower girl | "Skeleton" figure |
| Coat hanger | shoulders |
| Colored threads and buttons | Design of individual elements |
| A piece of foam rubber measuring 40 by 60 cm | Head |
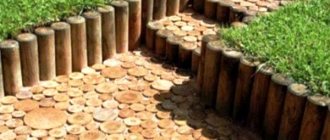
A few logs - and Pinocchio is ready
If we recall the well-known fairy tale, the doll was made from just one log, but we will go further and use as many as may be needed to make the figure look most impressive. So, we take a large block of wood, which will serve as the body for our future garden sculpture. We nail 2 strips or 2 thick cuttings of poles to it in the lower part, they will serve as legs. If you want your legs to bend at the knees, it is better to use a beam or round timber, carving a deep groove at its end, and a ridge in the section that will become the shin. All that remains is to align, drill a through hole and insert a pin or regular bolt.
Logs can make a cheerful family
Now we place the figure on a bench or on a stump in the garden and continue sculpting - we saw a small piece of wood, cut 2 holes in it and attach it to the legs as feet. In the future, you can lightly plan and paint them in the form of galoshes or fashionable shoes. We make the hands in the same way, only we attach palms cut from a plank to the ends (you can make them from plywood by outlining your hand and cutting it out with a jigsaw). We nail them to the shoulders or fasten them with screws, and fasten the elbows with pins or bolts.
All that remains is to make the neck and head. The first will be a small piece of thin round timber 3–5 centimeters long, for which we drill a proportionate cylindrical groove in the block of wood. For the head, we take a log, the diameter of which is 3-4 times larger than the “neck” pole; the height should be appropriate so that in the vertical section you get a square or a very short rectangle. We cut a cylindrical groove in the same way and place it on the round timber, if necessary, first lubricating the latter with glue. The figure is ready, you can decorate it with clothes made of oilcloth or banner material (or simply paint it with paint).
Conclusion
Decorating a suburban area is easy. This requires ingenuity and a little patience. We have given you some options for creating little people from available materials.
Sat down to rest after excavation work
The video in this article will provide you with additional materials. Garden dolls made from nylon tights, old rugs, used clothes and other unnecessary things will require minimal investment and will bring a lot of pleasure to both children and adults.
Source
Garden fountain with leaves
We will not talk about the principles of creating a fountain in the country. This is a topic for a separate article. We will make leaves from cement.
We need a fairly large sheet, and with the help of cement, we form a copy of it.
After drying, the sheet can be worked out in more detail and painted.
And you will become, almost free of charge, the owner of such a beautiful fountain.
Wooden garden figures
Such a grandfather made from logs can be planted on a log, stump, barrel, tires stacked on top of each other. The figure for the garden is made in the same way as the previous ones - we fasten the pieces of logs with nails.
A good goat made from logs! Send him to graze on the lawn or any flat area in the garden.
Three little pigs made from pieces of logs and branches. They look great.
Grandfather Mazai saves the bunnies - but it’s a good picture! We knock down large parts of the figures with nails, and glue small ones (for example, eyes, noses of bunnies) with wood glue.
Musicians made from logs are a whole ensemble.
Flower man on a ladder made of polished round bars.
Plaster and cement - feel like a real sculptor
Having tried all the listed options for making garden figures, and not finding satisfaction from any of them, get down to really serious work - make sculptures from plaster or cement. For example, among the greenery, openwork balls, inside of which you can place lamps, will look very organic. To make them, stock up on inflatable balloons, ropes and, of course, impregnation material, which can be used as either plaster or cement.
Balls of rope and plaster (cement) are made according to the principle of lamps made of threads
Inflate the balloon to the desired size and tie the valve. We dilute the material chosen as impregnation and thoroughly soak the ropes in it, which we then methodically wrap the ball in different directions so that the turns constantly intersect. From time to time we lubricate the overlaps with the material with which the rope was impregnated in order to secure our structure as securely as possible. After finishing the work (wrap the ball not too tightly to create triangular openings), leave it to dry, then deflate the ball, remove it and take the figure to the lawn.
In the same way, using inflatable balloons, you can make your own figures for the garden that resemble dinosaur eggs. You don’t need ropes for this, just take a balloon filled with air and coat it with a little more than half of the solution, making a jagged edge. After the material hardens, we blow off the ball and paint the resulting “chipped” shell. Inside you can put lamps or candles in transparent lantern cases.
You should choose a material based on its properties: cement is more durable and stronger, but hardens for a long time, gypsum dries quickly, but is fragile.
Piglets from pots
We read interesting and detailed material: Fun crafts for the garden: figurines from pots
From pots for growing flowers you can create any figures for the garden. You can fasten with universal construction glue or glue for plastic (if the pots are plastic). It is better to paint garden crafts with plastic or acrylic paint.
Source
How to make a scarecrow for your dacha with your own hands
How to protect spring crops from birds?
How to scare away entire flocks that are ready to literally ruin days of work planting flowers, herbaceous plants and vegetable seedlings in literally an hour? You can solve the problem using the classic method - building a scarecrow for your dacha. A scarecrow in a garden or vegetable garden is a tool to intimidate birds, but from our own experience we can say that an originally designed and installed scarecrow in the right place is also a fear for country robbers. Therefore, we believe that the time has come to talk about creating such a figure from improvised means, because it can perform several functions at once in the country.
Making a scarecrow for the dacha will not be difficult, and for many, this kind of activity will be an interesting experience and a fun thing to do.
What is needed for work
- You should immediately determine where the figure will be installed, and it is likely that it will be portable. In this case, we immediately think about a light frame so that the scarecrow can be moved periodically, installing it either in the garden, or behind the house, near the seedlings in the greenhouse.
- Next, we must definitely decide what size the stuffed animal will be and in what mood it will be made, because it is important for us to scare the birds, and maybe robbers, but not our grandparents and small children.
- The design of the figure and finishing can be done at a professional level or from improvised means - a set of bars and fittings, wire and bags, old clothes and even tin cans and bags.
DIY stuffed bird (video)
Scarecrow from a mannequin
An interesting and very cute option. It can be used for several purposes at once - to scare away birds from the beds and to decorate the territory with the image of a summer house owner with a basket in her hands or with special gardening tools.
It’s not difficult to make such a stuffed animal, it’s not difficult to dress and put on shoes, but you’ll have to tinker with the installation. When installed on the ground, the center of gravity may shift, and the wind will quickly turn the dummy over. Therefore, it is better to drive a couple of posts made of wood or metal nearby and tie the figure to them.
Metal scarecrow
The only problem with such a stuffed animal is its special appeal to metalheads (as many summer residents call them). That is, if the dacha is located in a cooperative with a large flow of people, or it is a cottage community with security, then it is possible, and easy, but if it is just outside the city, then they can steal a metal product very quickly. We are talking about a scarecrow made from metal parts. It can be a whole robot made of corners, fittings, wire, wheels and gears, which is connected or welded together and then simply painted. Surely each of us has a lot of metal waste at our dacha for the production of a frightening “robot”.
Fun scarecrow in the garden
The scarecrow does not have to be with a scary face or in a threatening pose; it can also be the figure of a working man, tired and sitting on a chair or bench. We present to you an interesting option, the creation of which requires only imagination, a little time and old things.
Important points
In specialized stores, the range of garden decorations is very large. The photo of garden figurines shows only a part of the whole variety.
The harmonious combination of the territory with country interior compositions depends on their style and purpose.
Depending on their purpose, decorative elements for the garden can be divided into several types:
- For original placement of flower pots. These are various options for stands, floor-mounted or wall-mounted flowerpots.
- For decorating an artificial pond.
- For decorating beds and flower beds.
- To illuminate certain areas of the land.
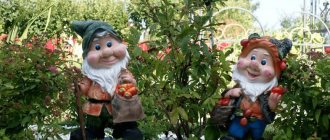
If we proceed from the style orientation, then the characters play a role here. So, in a garden decorated in a country style, figurines of gnomes and elves look good. Decorative lions and dragons are used to decorate the Chinese garden. A country-style dacha is perfectly complemented by figures of people and animals, such as a cow, ducks or piglets.
It is also important to guess the colors of the decorations. In a flower bed with bright flowers, black, gray or white figures look advantageous. It is better to place bright items of unusual shape on a tiled path or wooden platform.
“Live” scarecrow at the dacha
If we are already talking about modernization, then you can always revive your old knowledge of physics or simply buy the necessary parts at an electronics store. Fortunately, in our age, for pennies you can buy diodes of different colors, special software devices, remote controls, rotary mechanisms, motion sensors, sound devices, etc.
Here are interesting ideas for embodying a scary image:
There are a lot of similar ideas, but they require knowledge, time, and, of course, investment. But even if you don’t have the time or the mood to create masterpieces, you can always make a stuffed animal of the simplest type with your own hands, dress it in old rags and place it in the middle of the garden.
Grandparents from plastic bottles: we tell you how to make an unusual amulet and souvenir
In the cultural center of the village of Kuzmichi, Lyubansky district, several dozen children are engaged in creative work. More complex work is undertaken by masters. In the “Central Region” program we will talk about dolls that have already become the hallmark of the institution.
The idea to gather such a cheerful group of toy pensioners came a couple of years ago. Initially, they were conceived as ordinary crafts from scrap materials: leftover paper, fabric... During this time, grandparents attended more than one competition and were even among the winners. It's hard to believe, but every character in the collection is made from an ordinary plastic bottle.
Raisa Valkova, artistic director of the Kuzmichsky rural cultural center: The paper remains somewhere. It doesn’t take one minute to put together, but it does create an image. We can say that they made something out of nothing.
We pour sand into a plastic bottle - this is for stability, and screw it on. In the upper part of the bottle there are holes for the hands - here you can see the hangers. We seal the slots with tape so that the sand does not spill out. Then we form the hands - everything is like a person’s.
We fully dress, make all the accessories that a person has. This is how our Kuzmich grandmothers are dressed. They've been wearing this for a long time - one skirt is so beautiful, the second is like this. Like a corset. An apron, a shirt - maybe embroidered, or maybe something like that.
The head is where the wire is inserted into the bottle cap. And cotton wool is wound around it. The head is molded from salt dough. We put it on a potato. We'll eat the potatoes and leave this. When everything has hardened, we begin to paint: add PVA glue to ordinary gouache. Then we glue the face on a rag, and the hairstyle on top. This is what a grandmother looks like. So are grandfathers. Only with grandpa it’s more complicated that the bottle needs to be cut in half and then tied with tape to put sand in there so it doesn’t spill out.
The more new characters appeared in the doll family, the more interest visitors began to show in them. Many locals even recognized themselves and the faces of their loved ones in them.
Anna Silivestrova, head of the Kuzmichsky rural cultural center: Of course, when the dolls were made, it was not planned that the doll would look like anyone. But everyone who comes sees some similarities. Now, if this doll is similar to my dad. Not really, because he is darker, but here he is gray. He's not that gray yet, but I think in a couple of years he'll be a copy. And in each face of the dolls you can see someone you know. Reminds me of many of our residents.
Initially, no one looked at any photograph to convey the image. It just comes out that way. Strangers recognize people we don’t know: the chicken is the housewife, of course. A pear tree means it takes good care of the garden. Flowers are some kind of gardener. Everyone has their own purpose. All dolls are made from the heart and for the soul. They are made in folk style. We can say that they are also a talisman.
Source
Car tires - a new form of old treads
The most common way to decorate a landscape is to make garden figures with your own hands from worn-out and often torn car tires. The easiest way is to turn them into a kind of flowerpots by cutting off a strip on one side to make something like a bowl, turning them inside out and cutting the edge with cloves or in some other way. But it is much more interesting to make sculptures. For example, cut the tread crosswise and twist it into a spiral. You will get a very cute and very large snail. You can make several of these figures, paint them and place them among the bushes.
If you cut the protector crosswise and twist it into a spiral, you will get a very cute snail
Let's look at a few more options for funny insects. For example, by digging several tires into the ground in a row so that they form a pipe, you can make a wonderful caterpillar of 8-10 knees out of them. You can make a pretty cute bug out of two tires. Lay one on the ground, and cut 2 segments from the second, which will make excellent elytra if you attach them across the first tread. Now paint, attach antennae from wire, as well as eyes from the bottoms of plastic bottles, and the beetle is ready.
It’s very easy to make garden figurines of various animals from tires with your own hands; all you need to do is have a few logs, long and short. We dig in the first ones one by one along with the protectors, close to their surface in contact with the road. We get the torso and neck. Next, we attach a log to a vertically installed wooden piece to get something like the letter G and paint the resulting structure as a zebra or giraffe. Ears can be cut from plywood or plastic containers.
And finally, a favorite topic for many is birds. From old protectors you can make not only swans, which no longer surprise anyone, but also tropical birds hung on trees (or fixed on dry branches). To do this, mark the diameter of the tire and cut off a strip with a tread pattern from mark to mark, leaving rings on the sides. Next, we divide the separated strip across exactly in the middle, on one side we extend the side cuts by another 20 centimeters, turn it inside out, the longer part will hang down, we divide it lengthwise into separate strips and get a tail. From the short one we separate a small fragment about 15-20 centimeters long and cut out a beak from it. In the remaining part we make a longitudinal cut of the appropriate depth, insert the beak and clamp it, and then fasten it with a bolt and paint it.