Hi all! Today we have an unusual topic, since we will talk about a home fountain with our own hands. Not every person even thinks about such an interior element.
But in reality, organizing a fountain at home will be very original, beautiful and sometimes useful.
Organizing an indoor waterfall for your home or apartment is not as difficult as it might initially seem. It can be homemade, collected from shells or bottles, or ready-made from the manufacturer.
It’s worth noting right away that this is a decorative waterfall, the purpose of which is to decorate the room. Additionally, the pleasant sounds of water make it possible to relax and calm down.
What do you need to prepare for work?
In order to make your own fountain from improvised materials, you need to prepare a number of basic components:
- A reservoir into which water will flow in the future.
- Waterproof glue.
- Decorative elements.
- Silicone pipes.
- Pump.
We must not forget about the selection of the main element - a special pump. It is impossible to say unequivocally which device is better to purchase, because everything is individual and depends on the wishes of a particular person. The required pump power varies depending on the desired height of water lift. A universal option is a high-power pump with a regulator. To do this, you can use an aquarium pump to filter the water.
Assembly method
At the very beginning, of course, you need to prepare the tank. To avoid problems in the future, it should be quite roomy. It is advisable to try to leave extra space that can be decorated in the future. This is much better than wiping the water off the table and throwing away the unsuccessful product. The depth of the reservoir must be sufficient to completely submerge the pump in water. A good material for making a homemade fountain is to use two ceramic pots as a base.
To do this you need:
- Prepare 2 ceramic pots and 5 trays. In the center of the large and small pallets you need to drill a hole for the pipes, and then cover all the items with waterproof varnish. You can also make several cuts along the edges of the pallets, which will ensure beautiful drainage of water.
- Install a pump at the bottom of the created tank and cover it with a pot, then pull the tubes out through the hole.
- Nearby you need to install a slightly smaller pot, on which another tray will find its place.
- The next tier is 2 more pallets, which will be arranged in decreasing order. It is important that the holes in the trays are positioned correctly and allow water to flow from one to the other.
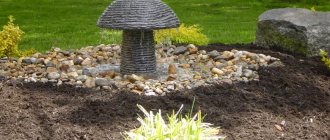
- After assembling the main structure, you can safely decorate the fountain with various stones and shells.
Decoration of the structure
It is not so important where the homemade fountain will be located:
- country house;
- garden plot;
- apartment or house.
It should still look attractive. In its original form, this design looks very unsightly. Therefore, it is advisable to take care of decoration.
If the fountain is planned to be installed on a site (as happens most often), a small recess needs to be made in the planned location. About thirty centimeters will be enough
It is important to level the bottom of the hole so that a couple of eggplants can be installed there. The recess itself at the end can be covered with pebbles or similar decorative material
On the contrary, you can lay out a pile of stones above the elevation, and place a decorative fountain bowl on it. You need to try to direct the flow of water correctly - so that it flows directly onto the hill. It will look much more impressive this way.
To add variety to the design, you can create a backlight for the water. To do this you need to use LED lamps. You can even have different colors.
In the end, you can completely make your task easier and choose special decorative tanks that simply do not need to be hidden from prying eyes. Otherwise, everything depends on the imagination of the master.
Pros and cons of creating
A decorative fountain is primarily an element designed to decorate the surrounding space. It has several key advantages:
- Bright and elegant appearance. The fountain will transform and refresh any design, perhaps becoming its main element.
- The fountain will do an excellent job as a source of coolness and will be able to maintain fresh air in any place where you install it.
- Falling water is a very beautiful action. The sight of a seething stream or streams of water rushing down promotes relaxation and helps to distract from bad thoughts. Additionally, the sounds of water allow you to achieve harmony and unity with nature.
- If you choose the right location, a fountain can help give your area a complete look. Such structures can help hide unattractive objects, for example, utility rooms.
But artificial fountains also have certain disadvantages:
- The need for special care and periodic monitoring. This structure must be cleaned regularly to prevent debris from clogging the pump. It is also necessary to monitor the serviceability of the equipment and promptly resolve any problems that arise.
- Given that the pump requires electrical power to operate, the fountain will incur certain costs to operate, which can be particularly high if the installation will be in operation for a long time.
Shapes and sizes
Although the fountain can have any size and shape, when choosing them it is recommended to use common sense and remember that it will be somewhat more difficult to care for an installation with a more intricate shape and large dimensions.
The bowl of the fountain can have a symmetrical or non-standard asymmetrical shape. For example, it can be made in the form of an oval, square, circle, triangle, as well as any other geometric shapes, including those that follow the contours of the silhouette of an animal or a person.
Also, fountains can be complex multi-level or made of several interconnected containers. In this case, each element can be equipped with its own nozzle, being an integral part of a more complex installation.
Type of placement of indoor fountains
Installing home waterfalls helps you calm down and relax after a hard day. Indoor fountains have different types of placement:
- Desktop. This type has a distinctive feature - it is small in size and affordable in cost. Although there are models reaching one meter in height. Tabletop structures are placed in a ceramic or polyethylene flowerpot. They are decorated with artificial flowers, green moss, installed with wood or covered with stones. An LED backlight is installed in the middle. Equipped with silent motors.
- Floor-standing. Installed on the floor. They can have a straight, curly or angular shape of different sizes.
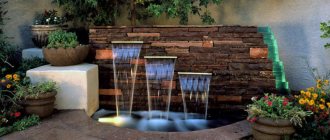
- Wall-mounted. They are attached to the wall. They are made of stone, copper, plastic, cast iron, ceramics, and other materials. They have a lot of weight, so before fastening it is necessary to determine whether the wall can withstand the load of such a structure. Fasteners to the wall must be selected that are strong and reliable. Today, fountains in the form of paintings equipped with a frame, and “wet fountains” in the form of falling streams are popular. Such products require a water inlet and floor waterproofing.
- Ceiling. They are made in the form of lampshades having a round shape. Water streams flow down them and enter the water inlet. A sculpture or green tree is installed below.
Which device to choose for the interior
The first thing you need to think about before purchasing a structure is its size. In large rooms, a large floor or wall fountain looks great. For a small room, it is better to choose a neat tabletop display. In the form of decorations, you can decorate them with a palm tree, deciduous tree, or liana.
It is desirable that the design of the waterfall matches the interior of the home:
- for the classic style, products made of copper or gilding are well suited;
- figurines of Buddha, frog, and lotus look great in Asian motifs;
- a modern loft fits perfectly into a stone bowl, imitation of mountain streams, waterfalls, fantastic and extraordinary designs.
When purchasing a design, you need to check the noise threshold of the pump; it can have a great impact on your rest with its hum and noise.
Many models of home waterfalls are made from polystone - an artificial stone based on acrylic resin. It is durable, heat-resistant, durable, and resistant to household chemicals. It is safe for health.
Stylistic design
Fountains used for decorative purposes can be made in a wide variety of styles. Whether a design belongs to one direction or another depends on various factors - appearance, shape and size, material of manufacture.
There are several design options applicable to decorative fountains:
- Classic option. The installation can be made in the form of an asymmetrical bowl made of ceramic, plaster or stone with a stream of water falling in the shape of a bell or jet.
- Fountain in English style. In such designs, the bowl has a non-standard shape and is necessarily supplemented with stucco.
- The design is in the form of a sculpture with gilding or decorated with bronze elements, made according to all the rules of such colorful styles as Baroque or Rococo.
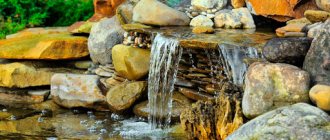
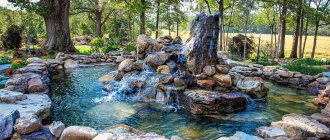
- Installation in eco-style. This fountain is made in the form of a natural waterfall, giving it the most natural look. An installation that is a container buried in the ground complete with a nozzle disguised with stones, associated with a rock from which streams of water fall down, can best cope with this role.
- Country style fountain. A structure made from an ordinary wooden barrel or cart will be an excellent decoration for a personal garden.
- As part of the Provence style, you can use romantic sculptures made in the form of angels or sophisticated girls. Moreover, the sculpture can be specially made slightly flaky or cracked, which will give it a special flavor.
Designs and decoration
Abutilon or indoor maple: varieties with photos
With a creative approach, the dacha landscape will acquire a stylish image, conducive to relaxation, if you choose a fountain design that is in harmony with it, made by yourself:
- A modern solution is a vertical fountain, which takes up little space and fits perfectly into a variety of landscape styles.
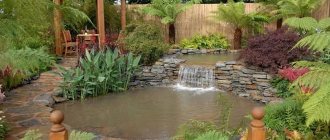
- Garden waterfalls remain a classic option. Flowing streams or wide streams are mesmerizing, looking stylish and natural.
- Water flowing in streams symbolizes the awakening of nature. The unobtrusive murmur is mesmerizing, creating an atmosphere of peace, serenity and tranquility.
- The pyramidal design of the fountain looks mysterious, noble and majestic.
- If you wish, you can create a charming relaxation corner by arranging a fountain against the wall. It usually looks like streams of water flowing from simple structures.
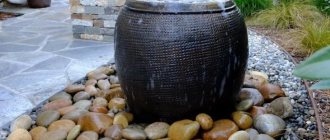
Decorative original finishing allows you to enhance efficiency. A material is selected that allows you to stylize the fountain in a certain direction. You can use artificial stone, brick, marble, granite, colored stones, shells and other interesting varieties.
Backlighting is increasingly being used, which can be used to equip fountains of different sizes and configurations. Lighting can be both above-water and underwater.
When turned on in the dark, sparkling fairy rays of light create a fantastic effect. The shimmer of moving sparkling streams of water, painted in changing colors, is especially beautiful. They use LED strips, spotlights, and spotlights, providing hermetic protection from moisture.
Even a miniature fountain or a fountain designed in strict lines at a summer cottage becomes a recreation center. A calm, peaceful atmosphere is immediately established here, conducive to relaxation.
dizlandshafta
Helpful3Not Helpful
Installation location
In order for a decorative fountain to successfully cope with its role, it is necessary to correctly approach the location of its placement.
- It is advisable to choose a prominent place for the fountain so that it is clearly visible from all sides, otherwise such an installation will lose all decorative meaning.
- It is recommended to choose an elevated location for the fountain, otherwise water will accumulate and stagnate in the bowl.
- Try to install the fountain in an area where it will be protected from direct sunlight, which can cause flowering and the associated green tint and unpleasant odor.
- Don't place the fountain too close to trees if you don't want their leaves to fall into the bowl and clog the pump.
Where to put it?
The installation location directly depends on the design parameters. In large houses and spacious rooms, wall or floor models of fountains and waterfalls are often installed. Although they are quite expensive, they look incredibly impressive and attractive. Before purchasing a waterfall, you need to calculate the load. The heavy weight of the structure can cause certain problems. Apartment residents often prefer tabletop fountains and mini-waterfalls, which do not require much space.
At the same time, they are easy to move and install where you want or correspond to the design intent. Considering that the range of tabletop variations is extremely wide, choosing a home waterfall in the desired style will not be particularly difficult. If there are pets or small children in the house, the installation of a fountain should be given special importance. It should not be within their reach.
DIY decorative fountain
It is not necessary to pay money to a craftsman to make an original decorative fountain. Any owner can handle this task independently.
Materials and tools
And first of all, you need to prepare the tools, materials and devices necessary for the work:
- container that you will use as a bowl. This could be an old barrel or a bathtub. The main thing is that the product is strong enough without damage to withstand the volume of water;
- a pipe or a sufficiently strong and dense hose for supplying water;
- pumping unit;
- materials for waterproofing;
- filter;
- nozzle;
- shovel.
Manufacturing process
Once you have everything you need prepared, you can proceed to making a decorative fountain:
- The process begins with digging a pit, which must correspond to the size of the selected container.
- The bottom of the pit must be filled with sand in a layer of 10-15 cm, and then thoroughly compacted.
- Place the bowl in the prepared recess so that its edges protrude 2-3 cm above ground level. Place waterproofing material on top of the container to prevent leakage.
- Now you need to install pumping equipment, a filter for water purification and a nozzle to obtain a jet of the required pressure and shape.
- Remove the wire from the water and connect the installation to the electrical network.
- Turn on the equipment and check the fountain in operation. All errors identified at this stage must be corrected immediately.
The fountain you make will last longer if you regularly check the condition of the devices and promptly eliminate any malfunctions that arise, as well as clean the bowl of any debris that gets into it.
A decorative fountain can become one of the main elements of your site and change its design for the better. You just need to approach its production correctly. With a little imagination and using unnecessary materials, you can certainly create a creation with your own hands that will look no worse than products made by professional craftsmen.
While landscaping their backyards, some owners at some point realize that there is not enough fountain on their property. You shouldn’t give up on this idea if you have everything planned out long ago and there is no extra space left. After all, it doesn’t have to be a large structure. Even in small areas you can find a place to arrange a compact decorative fountain, which will give you coolness and become a wonderful relaxation area.
If you decide to create it yourself, then you need to thoroughly prepare for this work. And first of all, you must understand what type of installation this installation should have, what material it should be made of, and how water should flow in it. These and many other factors will determine whether you will be satisfied with the end result.
If this is your first time making your own fountain at your dacha, then you should not build a complex configuration installation. This will not only require more time, money and effort from you to create it, but will also create certain difficulties for you in the future during care. It is best to build a small fountain of a standard shape, which can be made from the most common materials and which will not be more difficult to care for than any other object on your site.
Tabletop waterfall
This is the most common type of waterfall that is installed in their homes.
Connect the pump pump to the container. To do this, make a hole.
Connect the water supply hose to the pump.
Important! It should be smaller in diameter than the hose for an airtight and tight connection!
Place the container and pump on the stand. Next, put a hose on the tube from which water will be supplied. The pump is placed in a cardboard box or decorated at the end of the work.
The hose can be passed from the side, pulled into the recess on the edge of the pot, and pulled out through the hole in the center.
Cut off the excess part of the hose and treat the hole with liquid silicone.
Additional Information! At this stage of work, it is important to check the operation of the pump, since it will be more difficult to dismantle the finished waterfall later!
They create a relief at the waterfall using construction foam. Here I do everything to my liking; it is important to consider the size of the slide being built up. Let it dry.
The home waterfall is assembled after the construction foam has completely dried. Glue is applied to the artificial slides and covered with the material to be decorated.
Decorate the fountain with rocks and plants.
When decorating, small indentations are made for water so that it flows beautifully. This is done using a hot gun.
The final stage is to treat the entire surface of the waterfall with a protective layer and check the operation of the pump. Decorate the pallet.
Just remember to change the water from time to time.
You can enjoy an indoor waterfall created by yourself!
Let's create a decorative indoor fountain with our own hands for the joy of the whole family
Every year, millions of people spend huge amounts of money to visit exotic places on the planet. You can recreate natural beauty in miniature by making a decorative indoor fountain with your own hands. The lively murmur of water has a beneficial effect on a person’s emotional state. Moreover, it is impossible to take your eyes off her.
The design not only gives the room a luxurious look, but also humidifies the air during the hot season. To create a decorative indoor fountain with your own hands, it is not necessary to purchase expensive installations. The main thing is to be patient, use your imagination, pick up the tools and create miracles. First, let's look inside the structure to understand how it works. Then we will get acquainted with the types of indoor fountains. And finally, let's look at step-by-step instructions for creating a natural miniature for your home.
The fountain is not only a decorative element. Since it wonderfully humidifies the air, it should not be installed near wooden furniture.
Types of indoor waterfalls
Waterfalls are distinguished by their shape, how high the water rises and how it flows. The following varieties are distinguished.
- Exotic - it uses artificial stone of various textures and shapes, living plants, shells, jugs, mirrors. As a rule, this type of waterfall always has a fence.
Important! The design of such a waterfall is always large, so this factor is taken into account during installation!
- Classical. This design represents a continuous stream of water flowing over the glass. Another name is “waterfall on glass.” They don’t use any decorations, it’s a simple waterfall look.”
- Combined. The principle of pouring water is similar to the previous type, but the waterfall itself has decor in the form of stones, plants and other elements.
It is important to have a pump and a place to turn it on.
You can do everything else yourself. Also, according to the type of installation, decorative waterfalls are divided into continuous and collapsible, those that move, and those that sing. The type of design depends on the location in which it will be located.
Kinds:
- floor;
- wall;
- desktop;
- columns;
- partitions.
A DIY indoor waterfall is a worthy alternative to expensive factory products.
Why does water flow
“All rivers flow into the sea, but it does not overflow.” This is what it says in the most ancient book of humanity. We see confirmation of these words every day when snow or rain falls from the sky to the ground. The Great Designer launched the water cycle in nature. Imitating him, experienced craftsmen created with their own hands a decorative indoor fountain that pleases the heart all year round. How does this system work?
Materials and tools
How to build a fountain at your dacha with your own hands?
So, if you don’t yet know how to make a mini fountain in your apartment, then read our step-by-step instructions. Before you begin this work, you need to purchase the necessary materials and tools.
- Fountain container. This could be a basin, a flower pot, or something else at your discretion.
- The hose used to clean the aquarium is about 10 cm long.
- Polyethylene in dimensions slightly larger than the container.
- Waterproof glue, expanded clay.
- Pump used for an aquarium.
- A medium or large sink, as well as stones or pebbles to strengthen it.
- Small shells and colored soil used for decoration.
The bowl for the fountain that we choose must be checked for cracks and holes to prevent future leaks.
Materials for the fountain
How to create a decorative indoor fountain with your own hands: step-by-step instructions
Before you get started, you need to think about the size and location where the structure will be installed. For example, it is inappropriate to place a huge fountain in a small room. And, conversely, in a spacious room, a miniature structure may go unnoticed. The decorative fountain is installed on the floor, wall or table. Much depends on the overall design of the room and the number of household members.
Depending on the movement of water, fountains are:
- Cascade - liquid falls along decorative steps or ledges.
- Closed - water moves in flasks or flat containers attached to the wall.
- Fountaining - the stream is directed upward, after which it falls into a miniature pool.
There are backlit options in the form of wall paintings that create a unique atmosphere in the room.
When choosing a location for the structure, you should take small children and pets into account. The main thing is that the structure does not disturb anyone.
But how to make a fountain at home with your own hands to fill it with exquisite exoticism.
Of course, you first need to understand how the structure works, and then collect the necessary items:
- suitable container;
- aquarium pump;
- flexible hose;
- waterproof glue;
- decorative elements (expanded clay, shells of various sizes, colored soil, wood, ceramic products);
- backlight (optional).
A vessel of any shape is suitable as a main bowl. The main thing is that water does not leak out of it. The upper part of the pump for a small fountain is equipped with a sprinkler. Since the dimensions of the structure are very small, there is no need to put on the tip. Otherwise, water will flood the surrounding area of the room.
It is quite possible to construct a miniature pump yourself, since the unit has a relatively low power.
Let's start the creative process
Those “who despise the day of humble beginnings” never achieve success. Therefore, having collected the necessary tools and materials for the construction, the wise guys get down to business.
Let's consider a traditional master class on creating an indoor fountain with your own hands at home:
- A piece of about 10 cm is cut from a suitable hose (can be an aquarium hose). Its diameter should coincide with the tip of the pump.
- A pump is attached to the bottom of the tank using suction cups and connected to the tube.
- The resulting space is filled with expanded clay or stones, placing a tube between them.
- To give the fountain a presentable appearance, all elements of the device are carefully masked using all kinds of shells, pebbles or glass.
- Depending on the preferences and interior of the room, the design of the structure is carried out using various objects.
Waterfall on glass
This type of waterfall is more difficult to install, but it looks very stylish and original. To create such a design you will need:
- cellular plexiglass;
- hose;
- pump;
- check valve;
- lighting system.
The first step is to make a stand from a material that does not allow water to pass through.
A compressor and a check valve are installed on it, and a power supply system is also placed.
The plexiglass is firmly fixed to the base, and water is poured into a container placed on a pallet. A hose is lowered into the water. In order for air bubbles to flow in the water, you will need an acrylic spray. It is also installed on a pallet.
Dishes for collecting water are mounted behind the podium so that they are not visible.
Note! The water that will be in the waterfall must be distilled!
Plexiglas is degreased before use. The decor of the waterfall is made with stones or other natural materials.
Indoor glass waterfalls can act as a dividing partition.
This is a great design solution! In addition, such a living wall will not get boring even after a long time.
Making a home waterfall with your own hands is not difficult, and the end result is especially pleasant, since you put your own strength into the process!
Stylish exoticism in the interior of the bedroom
A small tabletop fountain can be made from a flower pot with a diameter of approximately 25 cm.
To work you will need:
- durable container;
- pump;
- translucent balls or pebbles;
- aquarium plants;
- paints for painting on ceramics or glass.
A flower pot is used for the base of the fountain. To give the structure a stylish look, the container is painted with special waterproof paints. To circulate the liquid, install a pump, make a hole and bring the tube up.
The bottom of the fountain is decorated with decorative balls, shells or pebbles. After filling the system with water, aquarium plants are placed inside. They give the design an exotic look and uniqueness. A simple design creation scheme opens up wide opportunities for beginning craftsmen.
A stream gurgles in a fountain and without a pump
Perhaps only a few have seen natural geysers in all their glory. As you know, there are no pumps there and no electricity. But such a release of water causes unprecedented admiration. Of course, it is impossible to create such a phenomenon at home without electricity. However, there is a way out!
To build a miniature fountain without a pump, use:
- several containers;
- thin tubes;
- connecting adapters;
- sealant (if containers are made of plastic);
- decorative elements.
First of all, drill a small hole at the bottom of each bowl. Thin tubes are pulled through them, and then sealed with cold welding. The procedure will protect the system from fluid loss.
The container used for the base of the fountain must contain the entire volume of liquid used. Several holes are also made in it for the adapter and tubes connecting the higher vessels. Since the system operates without a pump, the lower bowl must be removable to return the liquid to its original position. The final touch is the decorative decoration. For this, artificial plants (vines), transparent balls, seashells, glass and pebbles are used.
Photo selection of indoor fountains
Practice shows that maintaining mini fountains is quite simple. To do this, you need to regulate the level of liquid in the system, since it tends to evaporate. It is important that the pump is always under water. Otherwise, there will come a time when the pleasant murmur stops and the device fails. Let the water flow like a spring for happiness in every home.
Sources:
https://www.asusfone.ru/svoimi-rukami/samodelnyj-komnatnyj-fontanchik-iz-podruchnyh-materialov https://sotka.guru/dachnye-sooruzheniya/izgotovlenie-dekorativnogo-fontana-dlya-doma-svoimi-rukami .html https://glav-dacha.ru/dekorativnyy-komnatnyy-fontan-svoimi-rukami/
Processing shells before starting creativity
We bring back from our vacation a reminder of the sea in the form of a whole scattering of various shells. Shells can have different shapes, colors and even patterns - this depends on the glands that the mollusks have. The surface of the shells can also be different - rough, smooth, twisted, with stripes, fan-shaped, etc.
How to clean shells from foreign odors and shellfish residues
Processed shells can be bought at the market or in a store.
If you brought them from the seashore or ocean, or found them in a lake or river, then the shells must be processed.
If there are no shellfish remains in the shell , simply soak it in a chlorine-containing solution (water and “Whiteness” in a 1:1 ratio) for half an hour. If the shell is not clean, you can keep it in the solution longer. Next, scrub the sink with a small brush to remove the dark layer.
If the shell contains mollusk tissue and there is a foreign odor, then it is necessary to thermally treat it: boil the shell for 5 minutes or heat it in the microwave for 30-60 seconds. After these procedures, you should remove everything unnecessary from the sink with scissors or tweezers. Next, you can proceed to the above-described procedure for processing the sink.
There is another way to clean the shell from the remains of the mollusk. Place the shells in a bag in the freezer for several days. After the freezing procedure, it is necessary to remove the mollusk tissue from the shell.
Post-processing of shells
After cleaning and drying, the shells have a dull matte surface. You can give them an artificial shine (this will be discussed below), or leave them as is.
Use them as decoration for baskets, boxes, etc.
Photo from homedecordesigns.info
And also as independent interior items, such as stands, vases and flower pots:
Spectacular vases made of shells
Flowerpots
Decor with glass
Stands for small items
Using the universal Moment glue, it’s quite easy to create various interior compositions with shells and starfish...
...decorate mirrors:
Shells look especially organic in tandem with natural materials, such as wood and twine:
And children can take part in creating simple crafts from shells. In this work you will need glue and thick cardboard for applications:
Author: BeachDaisyJewelry
Varnishing shells
Seashells that have dried out from water look a little dull and lose their attractiveness. Glossy varnish gives them shine and a certain gloss, so they look brighter and more impressive.
With the help of mother-of-pearl coating, shells are transformed and shine as if they had just come out of the water.
Pearlescent gloss
Very impressive presentation
To cover the shells, you can use acrylic varnish (transparent or with mother-of-pearl), which is applied to the shell with a regular art brush. Acrylic adheres well and dries quickly, making it great for decorating shells.
When covering the shells with acrylic varnish, you can simultaneously cover them with loose sparkles (glitter), they will stick to the varnish and will stick well, giving the shell additional texture and volume:
Spray varnish is also suitable for covering shells. Aerosol varnishes are colorless, as well as with golden and silver glitter.
It is better to work with aerosol varnishes in specially designated, well-ventilated areas or outdoors.
Photo from seathingsventura.com
Photo from dekorella.hu
An alternative to the above varnishes can be nail polish . Even the one that doesn’t fit well will do.
In order not to stain your hands and the surface of the table, and also to avoid sticking the shells to the kaolin surface, it is best to paint and dry by placing the shells on pencils or knitting needles standing in a pencil holder.
Galina Pchelka demonstrates in her video tutorial how you can transform the most ordinary shells using nail polish:
In your crafts, you can combine both matte and varnished shells.
Initial letter
Photo frame
Turtle
How to make a through hole in shells
When making crafts, it becomes necessary to make small holes in the shells. This work is almost like jewelry, since the shell is a fragile material and can crack or delaminate during the drilling process.
One rule must be observed: the thinner the wall of the shell, the smaller the hole and the accessories used (thread, fishing line, wire, etc.) should be.
A hole in a shell can be made using automated and manual methods.
When using a drill or screwdriver, you must select a drill with a diameter of 0.8 - 2 mm. The shell should be placed on a wooden or plastic board and secured with masking tape. The hole must be drilled directly along the tape. This will help the shell not break.
The hole can also be made using a nail and a hammer . To do this, secure the shell with masking tape and apply a mark on its inside. Next, place the nail against the mark and gently tap it with a hammer to create a starting hole. Next, move the nail back and forth until you get a hole of the desired diameter.
If you don’t have a nail and a hammer at hand, you can replace them with a needle , knitting needle or other improvised means.
It is necessary to follow safety rules and protect your eyes, as shell fragments can fly in your direction and cause injury!
Having learned how to make holes, you can create very beautiful jewelry from shells, for example, pendants, earrings, bracelets:
Author: KaliaKaiDesigns
Massive earrings in a marine style
Original pendant
Accessories for jewelry can be bought at a handicraft store.
Posted by Prim Rose Hill
Author: HappyEverythingElse
Chips on the shell can be cleaned with sandpaper or a sanding block and an original decoration can be made from such elements.
Author: Wildestier
To make a sea “breeze” or a dream catcher, all you need is the shells themselves, fishing line or rope, as well as a base made of driftwood or other material. In this case, you can combine shells of different colors and shapes, complement them with other elements:
Mini curtain for home
Island Dreamcatchers
To liven up your interior decor, “build” beautiful sailboats from shells:
Author: Irina Smolkova
How to make a cross section of seashells
Both whole shells and their cross-section are used in decoration. Of course, without having certain skills, it is difficult to make such a cut yourself. To do this, use a stone cutting machine.
Photo from seathingsventura.com
Oleg Yaremchenko shows in his master class how you can make a cross section of a shell using a machine:
The cross section of the shell resembles the outline of a snowflake, which is why they are used to create Christmas tree decorations.
And also in the manufacture of jewelry: earrings, pendants, pendants and even wedding accessories.
Author: SimpleHearted