- June 1, 2020
- Hairstyles
- Tamila Gresko
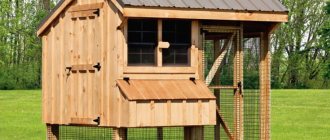
This gorgeous, evocative hairstyle gets its name from the strands of hair flowing down through the intricate weaving, reminiscent of streams of water flowing down from the mountains. The “waterfall” hairstyle (the implementation diagram is presented in the article) allows you to leave the bulk of the hair loose, while the braided strands give the image originality and a certain charm. Hair is removed from the face and does not interfere with work or household chores.
At first glance, weaving a waterfall hairstyle may seem difficult to perform. However, it is not. Performing a waterfall hairstyle with a braid is quite accessible even for novice stylists.
This may require a little practice, but very soon your hands will perform the necessary actions automatically. How to make your own waterfall hairstyle? How to braid such a pigtail for a friend? We'll talk about this in our article.
On what hair is the “waterfall” performed?
The most effective weaving will be made on strands of the same length. The optimal minimum length is up to the chin. Hair should be wavy or straight, without a cascade or ladder. On very curly strands, it will be quite difficult to braid a waterfall braid; it is better to straighten your hair before starting work.
Thin and sparse strands braided into a waterfall will receive additional volume; the “waterfall” hairstyle (the diagram is presented later in the article) in the “inverted braid” version will be especially lush.
Before starting work, you should definitely wash your hair; if necessary, apply a little suitable styling product to your hair. For waterfall braids, only healthy hair without split ends is used. To mask defects, use hair oil or spray.
Necessary materials
In order to understand what and how much material will be needed, first determine the type of waterfall and its size. But there are three main components, without which not a single waterfall on the site can do.
The design of a site is rarely complete without constructing a reservoir.
- Storage capacity.
- Pump.
- electrical power source. Additional elements are stones for creating a cascade, hoses, sand, crushed stone, waterproofing, concrete mixture.
Additional Information! Construction film is sometimes used as a storage vessel!
How to weave a French waterfall step by step (classic version)?
With this hairstyle, the look is romantic and playful. This option is very simple to implement.
How to do a classic waterfall hairstyle? The scheme is as follows:
- Comb your hair into a parting (side parting), making sure that there are no knots left.
- Separate a small part of the strands at the parting.
- Divide it into three identical strands and braid them into a three-row braid.
- 4. Then begin the second weaving of the waterfall braid: the lower strand is released, and instead of it, a strand of the same thickness is selected from free hair that has not yet been used in the work.
- 5. Continue weaving in the same way: the top strand is woven into the “waterfall”, the bottom one is replaced by a free strand.
- 6. Reach the ear on the opposite side and secure the pigtail with an elastic band.
Alternatively, the braid is gradually lowered down.
Photos of wedding, evening and everyday hairstyles
Our selection of photographs will help you decide on the most suitable option for a special occasion - a wedding, graduation or romantic date.
A mandatory addition to festive braids is decoration. It could be one large or a bouquet of small flowers, a hairpin with crystals, or any other thing you like.
You don't have to go to the hairdresser to get such a luxurious hairstyle. With the help of our master classes, you will learn how to create different variations on the theme of the French “waterfall” braid with your own hands.
Don't be afraid to experiment, whether you have straight locks or wild curls. The result will always please you!
Nuances
Loose, unbraided hair can be left straight, but if desired, it can be curled using a flat iron, curling iron or curlers. The finished curls are not combed, but slightly separated with your hands. With curls, the styling looks very elegant - it is recommended to do it for a holiday or celebration.
You don't have to have long hair to perform this option. Medium length strands are ideal for this style. You can also braid a “waterfall” on short hair, cut like a traditional bob or bob. Fix the hairstyle with varnish.
Master class on creating a cascading waterfall with your own hands
I. Choosing a place for a waterfall
We choose a place for the waterfall and build a base - a bunker in which all communications, pump and filter equipment will be located. It is better to make it from cinder block (the most affordable option), but you can also use ready-made structures made of plastic, metal or wood. Water will not get there. The foundation should be built close to the pond basin.
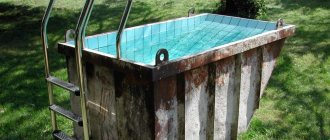
The next stage of creating a waterfall, after marking, should be digging a pit for the pool. You can use a ready-made plastic mold as a bowl for the pond.
II. Communications
We install the necessary communications into the constructed base for the waterfall: pipes for the water filtration system in the pond, a skimmer (a device for supplying the top layer of water to the filter), electrical wires for lighting and operation of all equipment. We build the electrical panel into the wall of the bunker.
Equipment for water purification and circulation is installed at the bottom of the pool bowl. You need to carefully consider the location of the pipes and the electrical supply system. Pipes can be carefully covered with decorative stones
Trimming the water supply hose is done using a regular construction knife. All necessary communications must be connected to the panel, which is located near the waterfall
Before connecting, the pump and filter must be carefully checked, test assembled and connected. The volume of water distilled and the strength of the waterfall jet depend on the choice of pump power
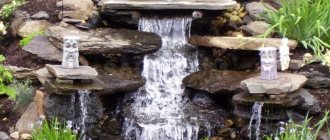
III. Basis for the cascade
We lay out steps from concrete blocks, which will serve as the basis for a cascade of water. The steps can be fastened together with a central fiber structure, but then it will be difficult to disassemble them if you want to change anything in the design of the waterfall. For greater mobility, you can leave them without securing them.
The top step of the waterfall can be made of flat stone, such as sandstone. Lay the slab on blocks with a slight slope towards the pool to facilitate drainage of water
Before laying waterproofing on the bottom and steps of the waterfall, it is necessary to carry out a control installation of all stages of the cascade. To achieve the desired position, check the position of the slabs with a tape measure and level
We form the steps like this:
- We lay out the main step (bowl), which can cover the bunker with communications by half (the other half should be open for access to the reservoir equipment);
- We lay out several upper steps of ever smaller size to form a cascade;
- We fence the lower step with a curb to contain water (threshold). Thresholds can be made from concrete mortar. In the future they can be decorated with stones;
- We lay out concrete fences taking into account water drainage. In the planned places of the spout, the walls of the thresholds should be lowered by 2-3 cm (more is possible, their height is then compensated with the help of a decorative cornice).
IV. Making a water spout
You can buy a ready-made bowl, but it will be much more economical to make a spout yourself. To do this, purchase a rectangular plant pot made of plastic, use a grinder to cut a longitudinal window in its wall so that one side remains uncut. Now bend the window outward. Water will flow down it. To supply it, make a hole at the bottom of the flowerpot for the hose.
The bottom and walls of the waterfall pool can be lined with large pebbles. Stones can be planted on cement-sand mortar. A combined waterfall with a fountain could be a good option.
V. We lay the waterproofing of the thresholds
As in the case of the pool bowl, the thresholds need to be insulated with two layers of fabric - agrofibre and waterproofing fabric. If you have some film left over from insulating your pond, great! It can also be used for a waterfall. We glue the remaining pieces together and lay them overlapping on the curbs.
After you have laid the thresholds and decorated the waterfall with stones, you can begin installing the necessary communications. When everything is done, do not forget to test run the water.
VI. We form cornices from stones along which water will flow
To form the waterfall cornices you will need: flat wide sandstone slabs, about 30 mm thick; good installation sealant; grinder with diamond blade.
We will glue the slabs onto the waterproofing. It is very important here not to make a fatal mistake when choosing glue. You cannot buy water-based glue; it will dissolve and be washed off with water. Use a high-quality sealant that is resistant to water!
Fastening process:
- We lay the stones on the curbs, starting from the bottom bowl on top of the waterproofing. We trim the joints with a grinder to ensure reliable contact of the plates and obtain a more even and high-quality surface;
- We use a level to level the surface of the slabs along which water will flow;
- We level the stones using scraps of geotextile fabric, placing them under the slabs;
- The outer stones need to be moved out by 5-10 cm and lowered slightly below the level (by 0.2-0.3 cm) so that the stream of water does not rush under the slabs, but flows in a beautiful cascade;
- Before gluing, the surface of the waterproofing sheet must be degreased using a sponge moistened with gasoline;
- Apply sealant to the underside of the slabs in even stripes and lay them on the steps. We press each one on top with a weighting agent (you can use a large stone);
- We coat the edges of each tile and the joints between the tiles well with sealant.
VII. Installing equipment
We immerse the pump in water, to the bottom of the pool. Place the skimmer on the surface of the water. We hide the hoses and electrics in the built bunker. We remove the hose from the waterfall pump.
Another option: with a bun
French waterfall braiding can serve as the basis for a wide variety of hairstyles, including styling with an elegant bun. They work like this:
- The French waterfall is braided using the method described above. Weaving should be done along an oblique line.
- The ends of the strands are lightly combed, placed in a loose bun and secured with hairpins.
- The styling creates a feminine, stylish, aristocratic and elegant image.
Pump selection
The building materials market offers its customers a huge selection of pumps of various technical characteristics, power and energy consumption. The purchase of a pump in each specific case depends on a number of factors:
- The size of the waterfall.
- Estimated power of water flow.
- The size of the niche for the location of the motor.
- Financial capabilities of the owner of the garden plot.
Valuable advice on this purchase can be given by landscape design specialists who specialize in the construction of decorative waterfalls.
Romantic version of the “waterfall” hairstyle: diagram
To perform this weaving, you will need to make a straight parting, which will give the appearance a delicate romantic note. They work like this:
- Comb your hair in a middle parting, getting rid of knots.
- A thin strand is separated from one side and a three-row braid is made to the opposite ear.
- Then the lower strand is released and instead, a strand from the free mass of hair is picked up.
- Continue weaving the waterfall diagonally towards the back of the head. The end of the braid is secured with an elastic band to match the hair.
- On the opposite side, similar weaving is performed. The end of the braid is secured with an elastic band.
- The weaving rings are easily stretched by hand. As a result, the braid should turn out to be openwork.
- Both braids are secured with a bobby pin. Loose hair is left straight or curled.
At the end of the work, fix the hairstyle by sprinkling it with varnish.
Options and techniques for weaving a circular braid at home
Instructions: Weaving a regular braid around the circumference of the head
- To make your hair look neat, you need to wash and lightly dry your hair. Then apply foam on it and straighten your hair with an iron.
- We comb the hair from left to right so that it lies neatly and in the right direction. Then we separate three strands above the left ear, and slowly weave the spikelet towards the right ear, alternately grabbing thin strands of hair on the left and right and weaving them into the main braid. Having reached the right ear, we begin to weave a regular braid without grabbing the strands.
You can finish this type of hairstyle in different ways:
- secure the hairstyle with a hairpin at the right temple, hiding the tip under the loose hair;
- braid the entire length of the braid, secure with an elastic band that matches the color of your strands, and carefully secure with a hairpin at the right temple where you started braiding;
- braid it just below the right ear, and from the remaining curls form a beautiful bun or a fashionable ponytail.
Braiding pattern: French braid around the head circumference
In fact, the pattern for weaving a French braid around the head is quite simple. By following these instructions step by step, you will learn how to weave beautiful, slightly careless and airy-looking French braids. The weaving technique is that the strands need to be woven not overlapping the main (central) one, but woven under it. Having practiced quite a bit, you will see that there is nothing complicated about it. So, let's look at this braiding method step by step.
- Comb your hair, taking the entire bang from right to left. On the right side, we do not touch the hair that grows from the temple for now.
- Select a strand of the required thickness, divide it into three parts and begin to weave an inverted braid. At the same time, we pull the hair from the parting to the right strand, and do not tie up the left strand at all.
- When we reach the ear, carefully pull out the strands from the beginning of the braid, making them more airy and beautiful. We secure the hairstyle with an elastic band near the left ear.
- We return to the right temple and in the same way weave an inverted French braid from it, which should pass just below the back of the head and to the left ear.
- We pull out the strands in order to make the braid voluminous.
- We hide the tip of the first braid, the one we braided from the bangs, under the strands of the second, and secure it with a bobby pin.
- To make the “French braid around the head” hairstyle more elegant, you can decorate it with accessories in the form of various kinds of flowers. Also, if a small gap has formed in the place where the braids meet, you can attach a flower-shaped hairpin there, or some large beautiful hairpin with rhinestones.
Braiding pattern: Original braid around the circumference of the head
This is the simplest braid around the head that you can do yourself. So:
- We divide the hair with a straight parting across the entire head. We fasten the curls on the left side with an elastic band so that they do not interfere with you.
- We divide the right part of the hair into three parts and weave a regular braid from the neck to the middle of the forehead, after which we secure it with a simple elastic band.
- We unravel the ponytail on the left side and begin to weave the same braid, grabbing strands from the back of the head. But we start weaving from the bangs and finish it at the back of the head. Further down we braid a regular braid along the entire length of your hair.
- The final touch is to place these two lovely braids around the circumference of the head and secure them with bobby pins.
Weaving a braid around the head is light and original. A braided hairstyle around the head will add a special twist to any look. By gradually following all the advice that our instructions give you, you will save on the services of a hairdresser while emphasizing your individuality and originality of thinking in the image you created with your own hands.
How to braid a “waterfall” of two “flagella” for a friend?
If weaving is being done to someone, such as a friend or sister, it may only take a few minutes. The option in which the braid is braided in several rows looks more interesting. The finished styling looks like an original basket or mesh, from which loose strands hang spectacularly. They work like this:
- They begin to do their hair by combing the strands. After combing, they are treated with a fixative.
- Then two thin strands are separated from the main mass of hair and crossed.
- After this, a wider strand is separated and passed between the crossed “flagella”.
- The “thin flagella” are crossed again. In this case, a wide strand is fixed between two thin ones, as if crossed out by a crossbar made of hair.
- Then separate the next wide strand, the same width as the previous one. It is passed between thin “flagella”, which are crossed again.
- The operation is repeated until the installation is completely ready.
- The remaining strand is secured with an elastic band, which can be hidden under the hair or disguised with a decorative hairpin.
This weaving can be complicated by sequentially performing the described operations in the opposite direction. This multi-row styling of “flagella” will look especially beautiful in combination with curled ends of loose hair or a fluffy bun.
Beautiful examples
The imagination of hairdressers allows you to create real masterpieces based on a waterfall. They can include several elements at once, such as braids, buns, curls, and ponytails. With them, any girl will shine and attract everyone's attention.
We bring to your attention more complex versions of this hairstyle.
A two-tier waterfall consists of two diagonal parallel weaves. The hairstyle looks modest, but at the same time unusual. It is suitable for girls with smooth hair who appreciate a discreet style in clothing, but at the same time love to add some zest to their look.
- And here is an even more complex hairstyle, which is braided using the twisting principle. The hair seems to be decorated with a net of thin strands - a stylish and sophisticated option. It is suitable for slender girls who do not like too flashy outfits and massive jewelry.
- This evening hairstyle is difficult, but it is worth the time and effort. Ornate weaving is her main accent, so it is better to make her hair perfectly straight. It will be an effective addition to the wedding look and will be appropriate at a formal ceremony or at a solid buffet table. A waterfall look paired with a lace braid with a loop knot will make you the queen of the evening.
- In this example, the waterfall braid has a twisty shape. In addition to a ribbon or braid, the color of which can be any, it looks even more original. In addition, this hairstyle allows you to slightly fix your loose hair behind your back, which is very convenient - you don’t need to constantly move it back from your face.
- Hairstyles based on braids remain at the peak of fashion from season to season. They endow the girl’s image with femininity and romance, which makes her attractive to the stronger sex. The good thing about the French waterfall is that you don’t need to braid all your hair, but only part of it.
At the same time, luxurious curls do not hide anywhere, but, on the contrary, attract even more attention.
Perhaps every woman should try this hairstyle at least once.
We weave a “waterfall” from two “flagella” for ourselves
It is also not difficult to make such weaving for yourself. To do this, you can use one of the following methods:
- Starting above one ear, weave diagonally.
- Braid the hair horizontally around your head.
- Make a combined braid.
To perform one of the most popular options - diagonal weaving - proceed as follows:
- Hair is combed and smoothed.
- On one side, high above ear level, two thin strands are separated, which are twisted into “flagella”.
- The “flagella” intertwine with wide strands, gradually moving diagonally downwards.
- Then the weaving is repeated on the same side. In this case, the ear should open and the hairstyle should take on an asymmetrical shape.
- The weaving ends at the back of the head.
- Loose hair is curled into curls.
A hairstyle that combines curling and braiding turns out to be very beautiful and original.
Some tips
You cannot braid the waterfall braid too tightly, this will not only lead to the fact that it will not look very beautiful and natural, but also to possible headaches that will cause a lot of inconvenience. In order for the image to be perfect, it is best to use two mirrors, one in front and the other in the back, then you will be able to completely control the entire process.
How to make a “waterfall” with bangs?
For those who love bangs, you don’t have to wear them in your braid. A waterfall hairstyle with bangs will become even more mysterious and feminine. The latter will help correct any flaws in appearance, for example, an elongated face with straight bangs up to the eyebrows becomes fuller and wider.
Those with a wide face are advised to have long, oblique bangs. Girls who want to grow long bangs can weave them into a “waterfall”. This option is somewhat more difficult to achieve than the basic hairstyle. They work like this:
- part your bangs;
- pull out a small strand from it, add it to the main mass of hair and begin braiding;
- moving from the face to the ear, one half of the bangs is braided to the level of the back of the head;
- these actions are repeated on the other side;
- two finished braids are connected at the back.
About the secrets of weaving
When creating a waterfall hairstyle, there are some important points to consider:
- The tight weave adds a stern look to the look.
- If the strands are not pulled tight, the hairstyle will turn out a little sloppy;
- To add brightness to the braid, you can weave braid, satin (or other material) ribbon, leather lace, etc. into it.
- An excellent decoration for your hairstyle can be a flower, a beautiful bow, hairpins or a hairpin with rhinestones;
- Clean hair in the process of weaving a “waterfall” will most likely become magnetic and frizz. To prevent the hair from falling apart in the hands of the master, it is recommended to use mousse or gel during the styling process.
- Highlighting or coloring gives the “waterfall” additional volume and interesting tints of color.
- Strands cut in a cascade often vary in thickness. To fix this, it is recommended to curl the ends with a curling iron.
Waterfall" is a universal styling suitable for any style of clothing. It can be safely done for work or school, parties, dates, social events and business meetings.
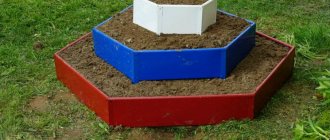
Beginning of work
The whole process of building a waterfall is easier than you might think and you don't need any special skills. First you need to dig a hole 2.5 * 3 m and about 0.5 m deep. This is the only truly hard work.
The cost of such a fountain is about 10 thousand rubles, but you can make a smaller and simpler version. All you need is one large boulder set among decorative stones. You can buy it or find it somewhere on the river bank. Before you start, pour some water on the stone you like to get an idea of how the water will move.