Almost every owner of a country house wants to have a swimming pool on their property. And if this desire is dulled in winter, then with the onset of hot summer days, the desire grows with irresistible force. But many people think about how to make a swimming pool at the dacha , that it is expensive, “unaffordable”, which is what they are mistaken about.
If you draw up a plan correctly and calculate the amount of materials needed, and even do this work yourself, then your financial expenses will be reduced significantly
To answer the question posed, you need to figure out, initially, what type of water structure is more acceptable for a country house or cottage.
Types of pools
Water, artificially created space at the dacha can be very different from homemade pools from a tire from a dump truck , from a bathtub to concrete structures with a built-in bowl.
- Inflatable – small in volume, easily folded for the winter and inflated at the required time. Virtually no personal care required.
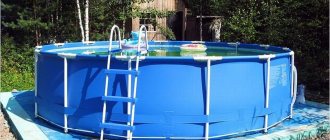
Inflatable structure installed on a summer cottage - Frame - installed on the ground, but not folded for the winter.
Frame pool option for children - Concrete pools are large pools for which a hole is dug, concreted, and reinforced. They can come in various shapes and sizes. This type of pool is mainly indoor, with heated water for use in winter.
In order to decide on the type of construction, you should choose a location. The main factor is the size of the plot. An inflatable rubber pool on a beautiful green large lawn with a landscape design will look ridiculous, as well as a huge concrete pool on a small piece of land where there will be no room for proper relaxation.
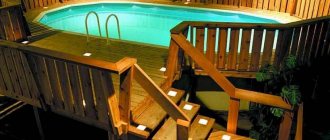
Podium made from decking boards
Another design option is a frame pool with a podium made of more expensive and durable material - deck boards. It does not rot, does not fade, is easy to clean and has an anti-slip surface. It has different colors and textures. In any case, such a podium will fit beautifully into any interior. The decking board can be laid independently, using stainless steel screws or wooden logs. And be sure to leave gaps between the boards at a distance of 1 cm. So that the tree can breathe. Nowadays, decks made of artificial materials are used, which do not require additional treatment to prevent rotting and can be secured with a secret lock.
If you are planning a podium for an inflatable pool that will serve as a Jacuzzi, then the structure should be of such a height that it is convenient to hide the entire filtration, pumping and heating structure. And convenient access in case of repair and maintenance.
Criteria for choosing a place for a water space in a country house
To choose a place, you need to be guided by rules that will prevent you from making a mistake. Often these errors are irreparable.
Selecting and preparing a site for installing a swimming pool
- The water feature should be a decoration of the area, but on the other hand, there should be few trees and bushes in this place, since splashing in the pool turns everything into a wet place.
It is not recommended to install a pool near trees and bushes - Shrubs and trees also shield the water from the sun—the water warms up less. The roots of green spaces can reach towards the water, thereby destroying the structure of the water structure.
- Frame outdoor pool structures are installed on a flat surface, where the water will quickly warm up and it will be easy to access and relax. Concrete structures are best installed where there is clay soil. It acts as a natural additional waterproofing agent.
Frame type of pool, consisting of several tiers
As for the overall appearance and size of the pool, this is a personal preference. Some people want to go swimming every morning, so a long structure is needed, while others need a small pond with a place for sunbathing and yoga.
Indoor model on a summer cottage
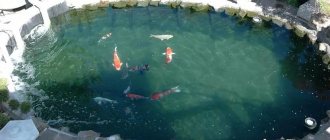
The most favorable depth of the pool is 1.5 m. But if there are children, then it is better to make a stepped pool from shallow to deep. If you have the desire and the means, you can install a slide or a springboard. In this case, the depth must be at least three meters.
Swimming pool in the country with a slide for children
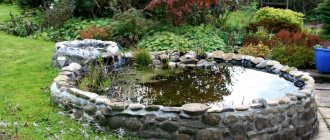
The bowl installed in the pit can be made of concrete, fiberglass, lined with foam block or brick and trimmed with ceramic tiles.
Pool design option with moisture-resistant mosaic tiles
Ground-based structures are of the frame type: collapsible and non-collapsible, as well as inflatable type. Shape: round, oval, rectangular. These options do not require large expenses and a lot of installation time. The main factor is the evenness of the surface. Naturally, concrete or soft green grass is better (but not bare soil that turns into mud).
Model for children and adults in the garden
What's better to bet on?
There are models equipped with substrates. Stores also offer a wide range of pool decks, but they may not always be suitable in size, price or brand.
The choice of available materials for homemade substrates is great. All that remains is to choose the one that suits you in terms of labor costs, cost and installation time.
Sand
Available material with low cost, it is easy to work with. Before working with sand, you should remove the soil at the installation site to the thickness of the lining (10-15 cm), level the surface and clear it of stones and branches. It is recommended to make a layer of geotextile; it allows water to pass through and does not allow it to stagnate, but you can avoid the transfer of sand into the ground and a decrease in the thickness of the substrate. The filled sand must be moistened, compacted and leveled. For leveling, use a wide board or aluminum profile.
The disadvantages are that it is constantly necessary to check the condition of the sand substrate and, if necessary, correct the situation, add more sand and trim it. Over time, it can become deformed (eroded) due to rain, and then dents appear on its surface. Also, its initial filling and arrangement takes a lot of time and effort.
Linoleum as bedding
The main qualities of linoleum practically coincide with the characteristics of special substrates. It is durable, waterproof, durable. It can be selected according to thickness. A plus can be considered the absence of material costs when using a piece left after repair. The main disadvantage is the property of becoming slippery when wet.
How to build a swimming pool at your dacha
After a plot of water has been allocated at the dacha, it is necessary to proceed with drawings, dimensions, and construction of a plan for the output of communications.
You should draw a plan:
- with wiring - where the water will come from and where the drain will be;
- electricity - connecting lamps for lighting at night, hydromassages, water heater, filters and so on;
- a diagram is also drawn with the exact dimensions of the pool bowl - length, width, depth, dimensions of the sides.
- The plan indicates where the filter will be located, where the water is supplied from, and where the drain is.
Pool installation diagram with dimensions and necessary materials
Attention! You cannot dig a pit for a pool without a plan and marking the surface. This may be in vain; as a result, the desire to have a swimming pool will disappear.
Rules for stationary structures
Installing a permanent pool at your dacha implies a significant increase in material and time costs. But it is the most durable.
Main differences:
Design documentation, drawings and estimates for construction work and equipment are required.- It is necessary to dig a pit, install reinforcement, pour concrete and connect communications.
- We need finishing of the pool walls, installation and adjustment of complex equipment.
Attention! It is better to entrust such work to highly qualified specialists.
How to properly install a frame pool in a country house
Installing a frame pool at your dacha is not difficult. A platform for a swimming pool should be made. It should be smooth, without sharp objects, stones, or roots. These species can even be buried a little in the soil. If you install these species on the lawn, then over time the grass will begin to turn yellow and rot. After removing the structure, the entire area will lose its original attractive appearance.
Installed frame pool on a garden plot
Suppose the frame structure should be buried a little to make it convenient to swim. So, in order to install a swimming pool at your dacha with your own hands:
- A pit should be made 50-80 cm deep (with a side height of 130 cm), with a minimum of 50 cm and a maximum of 1 meter on the sides of the pool in all directions. You can do this yourself.
- At the bottom of the pit, all roots and stones are removed. It requires a flat surface.
- Sand is poured into the hole, everything is leveled and compacted. This layer is 15 cm, evenness is checked by level.
- Afterwards, a special material – geotextile – is laid on the sand. It will prevent roots from growing and will also protect the bottom of the pool from bugs.
Preparing the surface for installing the frame structure
The frame of the water structure is installed on the surface. In some cases, the pit is insulated with expanded polystyrene, which can withstand sufficient loads. After laying the insulation, you should follow the instructions for assembling the frame of the water structure.
To properly install a frame pool at your dacha, you need to follow a clear algorithm and take advice.
Cleaning the area and installing the cushion
The place where you plan to install the pool should be chosen away from living quarters and garden beds, so that in the event of an emergency release of water you will not get into big trouble. It is better to choose a flat area on a hill so that water does not accumulate near the structure when swimming. The surface must be horizontal; even with a slight inclination, the pool may tip over. There should be sources of water and access to electricity nearby. Positioning under trees will result in constant blockage from leaves and branches.
Important: you should determine in advance how and where to drain the water from the pool.
The area for the pool is cleared of grass, stones, roots and branches. The cleared area is covered with loose earth or sand and compacted. Then the substrate is laid. It protects the bottom. The substrate is made larger than the bottom of the pool in order to create a surface for cleaning feet, so the water will remain clean longer.
How to build a concrete pool
Building a concrete water structure takes more time, effort, and financial resources. Basically, this is the capital construction of a body of water, which can be dismantled by using technology and calling in a team of builders.
It all starts with the foundation pit. The bowl is completely sunk into the ground. When drawing up the drawing, you should take into account the wall thickness of 0.4 meters. The shape of the pit should exactly follow the outline of the bowl. You should also take care of insulating the pit.
Emerging problems with concrete structures and their solutions
- Water supply system. Problems arise when the water supply and drains are installed incorrectly. The water supply system should be carefully considered.
- Water leak. To avoid this problem, you should initially apply several layers of waterproofing, as well as high-quality concrete mortar.
- Tiles or mosaics do not stick - you need to use glue specially designed for such purposes, as well as purchase material from a global manufacturer.
- The appearance of fungus - to prevent this problem, you should regularly clean the surface of the bowl, and also treat it with special protective agents.
Choose a place to install the pool away from bushes and trees, this will prevent leaves from getting into the water
Attention! Regular cleaning of the surface of the bowl will prevent the appearance of fungus.
The choice is yours
All pools can be divided into seasonal and stationary. Each owner of a country plot decides for himself whether he wants to dismantle the pool in the fall and install it in the chosen place in the spring. Or there is a desire for a pool to decorate the interior of the site all year round. After you have chosen the type of pool, decide:
- What kind of structure will the pool be: frame or with a concrete bowl.
- What material will it be made of?
- The most important thing is choosing the location of the pool.
Is a permit required to build a water structure made of concrete?
A swimming pool on the site can be built without permission from the authorities, in accordance with Article 51, paragraph 17 of the Town Planning Code of the Russian Federation. But there is some nuance here: if the bowl is small in size, say, for children, no questions will arise. And if this is a large construction (length, depth, width), indoor pool, then you need to draw up documents. This construction is included in the technical passport. Let’s say that when selling a dacha there will be no questions about this.
A permit will be required to build a large concrete pool.
How to choose a place, is it possible to place the bowl on the ground?
It is necessary to ensure a horizontal, stable position of the bowl on a level surface . In addition, the pool should be turned with the drain valve towards the drainage system, and there should be a power cut-off device (RCD) nearby.
In a small dacha there are few options, but in large garden areas the choice becomes more difficult.
The pool cannot be installed directly on the ground. Even for small children's bowls that do not require the creation of a platform, bedding is used to cut off the bottom from the ground.
Large bowls are always placed on a prepared platform, covered with one or another material (or several layers of protection).
Preparing the site for a future water structure
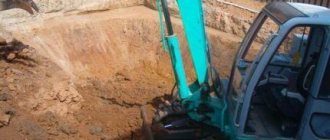
The area should be cleared of grass and bushes, and tree branches that may interfere with construction and block the sun from the pool should be trimmed. The pit is dug using two methods: with your own hands and with the help of a tractor. This depends on the size of the bowl as well as the depth. If you hire workers to dig a pit and compare this with renting a tractor, you will get the same price, but a difference in time.
A pit for a bowl of water space, dug by a tract
Preparing the base
There are also some criteria that need to be met.
They will help you accurately select a site:
- The presence of trees nearby will complicate the maintenance of the pool, since leaves (petals) will fall into the water. Also, you should not choose an area where power lines or similar communication means are located.
- The site for installing a pool should not be perfectly level, since difficulties may arise in the form of the necessary drainage of water associated with any circumstances (for example, in the spring season, floods are most common, this will significantly complicate the process of getting rid of excess moisture).
- A pleasant plus is that you can easily approach the artificially constructed reservoir - none of the sides are barricaded by any structures.
- The designated area should be located as far as possible from the house or other buildings, since any accidental damage to the container does not bode well for the most favorable circumstances (including flooding).
Construction of the pit
How to properly dig a pit for a bowl? There are rules for this:
- The dimensions of the pit for the bowl should be larger. This is done to place formwork there, insulation for the concrete structure, placement of equipment and pipe supply.
- When digging a hole, you should monitor the angle of deviation from a strictly vertical strip by 5 degrees. This is done to prevent soil from falling into the hole from above.
- Provision should also be made for draining the water that spits out of the pool during swimming.
- A place is provided for laying a pipe to drain water. To do this, you need to prepare the place at an angle so that the water drains.
After all the rules have been taken into account, you can begin arranging the pit.
Schematic illustration of a heated swimming pool
It consists of several stages.
- creating a drainage cushion. It is created from 15 cm sand and 15 cm crushed stone. The sand and crushed stone should be compacted well. It is needed for pouring concrete. The height of the pillow is 30–40 cm;
- concrete waterproofing. To avoid bottom leakage, waterproofing is created in 2-3 layers. Ruberoid is used. It is laid with an overlap of 20 cm, and bitumen and other compounds are also used;
- the next step is reinforcement. For this purpose, reinforcement with a cross section of 1.2 cm is used, which is tied with wire. The cell is 20 cm in size. Reinforcement is carried out in two tiers.
Attention! For an oval-shaped pool you will need 10 mm reinforcement. The cell is 20-25 cm.
It is necessary to place a brick under the reinforcement. This is done so that during pouring concrete it does not move from its base.
Installation of reinforcement for a concrete base
- Next, concrete solution is poured into the bottom of the pit. The solution should completely set and dry;
- The next step is the reinforcement of the walls. It is carried out in the same way as at the bottom;
- Next, the formwork is built. For this you will need a board and plywood. This makes it easy to follow the contours of a bowl that has an oval or shaped shape. To ensure the strength of the installed formwork, spacers (stiffening ribs) made of wooden beams are used.
Ready-made formwork for a concrete bowl
Using plywood (laminated, moisture-resistant) will require investment. But, it will create a durable surface of the concrete bowl, which will turn out perfect.
- pouring the walls with class B 25 grade W concrete. With this method, when the bottom is poured first, only after the wall, “cold joints” appear. To prevent this from happening, the foundation pit should be poured monolithically, that is, both the bottom and the walls are continuous. This assumes an uninterrupted supply of raw materials. Workers should not interrupt their work. This, unfortunately, is not always feasible;
- After the concrete has hardened, the formwork is removed, the bowl is plastered, and finishing work is carried out.
Concrete pool bowl without interior finishing
What should not be used as a base?
Do not use fabrics made from natural materials that can absorb moisture and rot. Such substrates not only cannot fulfill their tasks, but also have a negative effect on the material of the bowl and destroy the platform.
These include:
- natural wood;
- tarpaulin;
- organic types of thermal insulation (ecowool, cellulose, etc.).
In addition, it is not recommended to use thermal insulation made from granulated polystyrene foam (foam) . It has a good set of working qualities, is resistant to moisture, and retains the heat of water well.
However, polystyrene foam usually becomes a haven for mice and other garden rodents. They make passages in it and build nests, which is why the pool sooner or later sags.
Creating steps in the pool
If you plan to dive smoothly into the water, then steps should be made. They are also made from concrete. Formwork of the required dimensions is created: the height of the step, its width. Using plywood it is possible to create shaped steps.
The absence of sharp corners in an artificially created reservoir means health safety.
Before starting finishing work, the concrete surface must be completely dry.
Step-by-step installation of a swimming pool bowl
In order to install a pool, it is important to follow some rules that will allow you to do it correctly. There are several steps:
- The first step is to select a location for subsequent installation. It should be as comfortable as possible, and also have enough space for the impressive dimensions of the bowl.
- Next comes the careful preparation of all the required tools and materials, marking the boundaries.
- After this, you should begin leveling the ground surface and then laying the substrate.
- Next is the installation of the pool itself.
Finishing and cladding
Finishing and cladding are divided into several stages of work.
- Grinding the concrete surface. It is best done using a special grinding machine.
- Second layer of waterproofing. This is the application of a special liquid composition to the walls. Application is carried out in two layers. A reinforcing mesh is laid between them. Particular attention is paid to “cold seams”, places where pipes are installed and various devices (massagers, filters, water heating) will be installed.
- Checking waterproofing. After drying, the bowl is filled with water. The level is outlined, wait 12 days. The level is being measured again. If there is less water, then it should be drained, the bowl dried, and waterproofed again.
Laying waterproofing in a concrete bowl
Attention! To prevent the water from evaporating during measurement, it is covered with film.
- Pool lining. Tiles, PVC, mosaic are used. The appearance of the pool will depend on the applicable material option.
One of the options for finishing the bowl, using color film
Inflatable pool care
In order for swimming to be comfortable and for everyone to enjoy the pool, care is necessary. The freshly filled water must be treated with a chlorine-containing substance. Exposure and evaporation of free chlorine will occur within 8-12 hours. Also during this time the water in the pool will reach the desired temperature.
In the future, water care is carried out using technical and chemical methods.
- Physical ones include: collecting large debris with a net and purifying water from small particles using filters.
- Chemical cleaning is carried out using special means. Recently, the cleaning method using active oxygen has become popular.
The bottom of the pools also needs to be cleaned. It is produced using bottom vacuum cleaners. If the water is drained from the pool, the bottom and walls are cleaned with a brush and rag.
Installation
Frame pools, as well as varieties made of steel, require strict adherence to all rules. When installing them, it is also necessary to properly fix the load-bearing profiles in the ground.
As an example of installing this structure, you can take the installation of a small inflatable pool that can hold water weighing up to one ton. Even such a structure will require premature determination of the drainage location.
Installation of the inflatable prototype will not take much time - about 1 hour.
Step-by-step instruction:
- The first stage is preparing the automated pump and carefully studying its instructions.
- The decomposition of the material (mainly PVC - polyvinyl chloride) in the separated and marked area must be carefully straightened out.
- Laying out the bead ring and then inflating it with air.
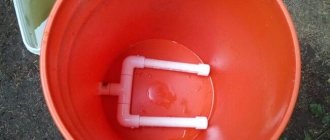
- Installation of a filter and a special device - a skimmer - for water purification, which provides for the further connection of a hydrovacuum cleaner, which is used to remove contaminants from the bottom of the pool.
- Filling the bowl a few centimeters and then checking for possible tilting.
If the entire structure is in good working order, it is filled.