Today, purchasing a landscape lantern is quite simple; the market is saturated with offers and amazes with the uniqueness of their shapes and sizes.
But economical, highly reliable lighting devices have a fairly high cost and therefore not every owner is able to purchase the required quantity on the market to illuminate the entire local area.
Therefore, many home craftsmen make LED lighting with their own hands. How to choose the right design for self-production, purchase consumables and assemble an electrical circuit, all about this in this article.
Is it possible to make a park lantern yourself?
A garden lamp is not structurally complex; it can be made with your own hands , either from scrap materials or from parts purchased in a retail chain. To do this, you will need a schematic and electrical diagram of the device, experience with the tool and knowledge of simple electrical circuits.
Lamps for landscape lighting work outdoors throughout the year, in hot weather, in cold weather, and in rain and snow. Therefore, it must be made with protection from moisture and dust of at least IP 64 -65, especially at the junction of electrical contacts, so that the electrical wiring does not short out in a humid environment.
Before starting work on the production of landscape lighting on the site on your own, you will need to evaluate the following parameters :
- Select the type of lamp: LED, halogen or regular incandescent lamp.
- Develop a power supply diagram for lanterns.
- Draw a plan for the location of lamps, determine their number.
- Choose a structure that will hold the lamps.
- Select the power type: 220 or 12 V, from the electrical network or battery.
What types of outdoor lamps are available for manufacturing?
At home, you can make quite a few types of landscape lamps, from the simplest in the form of an incandescent light bulb and a lampshade to LED automatic lamps with a long range, operating automatically from motion and light sensors.
The preferred options for making your own landscape lamp are:
The light source is an LED lamp, the most modern energy-saving model, which provides a high level of luminous flux and saves electricity, since it consumes 2-3 times less than halogen lamps.- Functionality – automatic switching on based on a signal from a motion or light sensor.
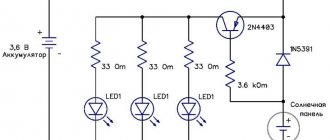
- Power options are non-volatile from solar panels and batteries and energy-dependent from a 220 V household network.
- Technical lighting – for illuminating roads, gates, stairs and parking lots.
- Decorative – for illuminating bushes, gazebos, pools or ponds.
- Accented – illumination of the facade of the house.
- Accompanying lighting and running lights along the path, luminaires react to movement with built-in motion sensors.
- Mechanical protection – high-strength glass and metal case.
- Mounting method - support, bracket and wall type.
- The type of lantern is landscape, floor lamp or façade.
- LED lighting power is 5-50 W, depending on the lighting area.
Varieties of patterns
From volumetric rolled metal, blacksmiths create various designs, which include several components:
- Spiral. The diameter of the spiral sometimes decreases downwards and changes its direction to the opposite. The result is a very original pattern, in which the direction of the spiral is regulated by artistic design.
- Double-row spiral. The middle part has the largest diameter. This ornament is called “Chinese lantern”. To obtain such a pattern, large cross-section wire is used.
- Volute. The pattern has the shape of a curl, located in different directions. The volute has a unidirectional concavity, while the curls have one bending axis. When the curls are on both sides of the center of the workpiece, they speak of multidirectional volute.
- Cool. To form such an ornament, part of the rod is twisted around an axis. Twisting always occurs in one direction, since being in a plastic state, when twisted in different directions, the rod can collapse.
- Top. These details decorate window grilles, as well as various fences. The element is a small piece of rod, the end of which has a sharp edge. Several curls are attached to it.
https://youtube.com/watch?v=TPeIWRxpMmQ
Additional artistic forging parts are made from sheet metal. These include:
- Spatial spirals. The appearance is similar to an auger. The width of the spiral decreases in the direction of rotation. The part may have a relief appearance. To do this, artistic marks are made on the edges.
- Flat curl. The element is similar to the three-dimensional one, only a metal strip is used for manufacturing.
- Coinage. To obtain a pattern, spot processing of the flat surface of the part is carried out. The operation is performed on non-ferrous metal.
- Punching. A special stamp is pressed into the sheet. In this way, you can make a monogram, give the image a three-dimensional appearance, and also form an inscription.
- Headings. A bowl-shaped container is rolled up from the strip. It can have several forms depending on the pattern being created.
Materials for landscape lighting in the country
These outdoor lights can be made from a wide variety of materials, many of which can be found around the home. The most popular materials at hand that are used to make landscape lamps with your own hands:
- Glass and plastic products: bottles, jars and other glass vessels, any are suitable. With this type, it is very important to choose a special light bulb with a high level of light dispersion. An unusual design for a glass lantern will be to cover its walls with patterns of special luminescent paint.
The coating will accumulate solar energy throughout the day and create a very attractive glow in the evening. Advantages: low costs and a wide variety of shapes. Disadvantages: low dispersion and high fragility.
- Tin cans with patterns over the entire area, it is better to paint the inner surface with a white background, and the outer surface is covered in a tone that matches the landscape design. Advantages: low costs, high design characteristics, variety of shapes. Disadvantages: low strength and durability, low anti-corrosion characteristics.
- Lanterns made of wood or wooden rods, which are assembled into a certain shape, such as a ball. Advantages: simple production, special appearance, you can use scrap materials, low costs. Disadvantages: massive structure, they are afraid of a humid environment, require special antiseptic treatment.
- Silumin is an aluminum alloy, molded and powder coated. Advantages: light weight, various shapes, low cost. Disadvantages: high fragility in the cold and a tendency to damage in an aggressive environment, for example, when salt and fertilizers come into contact with them.
- Metal the most reliable material for street lamps, especially for poles, fasteners and lamp housings. It is better to use for these purposes: cast iron, copper, steel and brass. The techniques used to process metals are welding, bending, forging and cutting.
Advantages: durability, many different shapes, resistance to mechanical damage and climatic influences. Disadvantages: high price, heavy weight, need for a foundation, susceptibility to corrosion if the external coating is damaged.
Purpose of forged products
Do-it-yourself artistic forging has firmly taken a leading position in the modern market. These products can be found not only on fences and gates, but also on beds in ordinary apartments. There are several types of products where forging is used most often:
- Gates.
- Fences.
- Lattices.
- Stairs.
- Gazebos, barbecues.
- Furniture and its accessories.
Due to such a great demand for forged products, one can’t help but wonder why people like elements of artistic forging so much. After all, metal is a cold, heavy material that is susceptible to corrosion in the environment. In contrast to these negative factors, there are many favorable ones:
- Durability.
- Exquisite beauty.
- Increased protective functions.
- Possibility of production according to any dimensions and sizes.
- Full possibility of imagination in manufacturing.
- Forged products combine well with other materials.
And this is not the entire list of advantages of forged elements. If we combine all the above expressions, then metal objects are durable, strong and very beautiful products.
Rules for choosing lamps for the garden
The quality and cost of lighting depend on the type of lamps that will be installed in landscape lamps. Acceptable modifications of lamps that can be used for this type of street lamps:
Regular incandescent lamps. Advantages: low purchase price, availability in retail chains, continuous emission spectrum, “warm” color tones.
Disadvantages: low level of color rendering, high costs of electricity for lamp operation, high heat transfer rate.- Halogen light bulbs . Advantages: more economical, longer service life, stable luminous flux, smaller external dimensions, high thermal and mechanical resistance characteristics, high power, lower power consumption to operate the lamp. Disadvantages: you need a transformer for operation, sensitivity to voltage changes, strong heating, which requires the use of heat-resistant materials for the lamp and housing.
- LED lamps – the most popular devices for landscape lighting. Advantages: very economical, do not contain harmful substances, high level of color rendering, can be used for lamps made of any materials, even paper, long service life up to 100,000 hours, belong to low-voltage equipment, and therefore have an increased degree of safety.
Disadvantages: susceptible to power surges, high price, emit uneven light.
According to all characteristics, the best option for street lighting of the local area is LED lamps.
Corrosion of metal
Metal corrosion is one of the important factors affecting the product. Elements of artistic forging of metal should be treated with painting oils so that corrosion does not appear for a long time.
On more expensive products, a special metal cleaning machine is used before painting. Despite the cost of such work, this is one of the best means for cleaning metal from rust and corrosion.
If the budget allows for expensive metal cleaning work, then you can afford expensive painting. Typically, for such work, zinc-containing oils are used, which can penetrate the top layer of metal and prevent moisture from affecting it.
Selecting a Power Source
For landscape lighting, a 220 V household power supply is used, autonomously powered by rechargeable batteries or solar panels. Unlike a traditional incandescent lamp, an LED lamp can only be powered by direct current.
To operate them, you will need a special current source that produces a constant voltage at the output. All power supplies differ in the type of assembly and voltage conversion option.
They are divided into the following groups:
Transformer .
The composition includes: transformer, filter, rectifier and stabilizer. Advantages: simple installation, withstand idle function. Disadvantages are vulnerable to overload and carry a lot of weight.- Pulse . Advantages: light weight, compact and able to work with increased impulses. Disadvantages: they do not tolerate idling and overload conditions well.
- Driver . Rectifies stabilized current, capable of operating at frequencies of 30-50 Hz. Wide range of output parameters adjustment.
There are 3 options for connecting the LED lamp to a 220 V household network :
- Consistently. When all the lamps are connected with one wire, a phase is applied to the beginning, and zero is applied to its end. The advantage is low installation costs. The disadvantage is that if one lamp fails, the entire lighting line will not work.
- Parallel. Each lamp is connected to a phase and a neutral or grounding. The advantage is the high efficiency of the circuit, even if one or more lamps fail. The disadvantage is the high consumption of wires for connection.
- A beam circuit is a particular type of parallel system, when the sources are installed around the perimeter, 2 or 3 grounded wires are supplied to each lamp.
Thus, for LED lighting in the local area, the best effective constant current source is considered to be a 220 V household network, with a parallel circuit for connecting lamps, with the installation of a driver for rectifying the current.
To illuminate objects on the site, non-volatile LED lamps powered by solar batteries or batteries can also be used.
Backlight options
How to illuminate the lights from the inside so that it is safe? The option with candles will not work here. Traditionally, a simple paper lantern is equipped with the following types of lighting:
- LEDs of compact size, battery-powered, without wires;
- mini-candles on diodes with a stand;
- garlands for the New Year tree, a lantern is hung from each light.
Note! Real candles can only be used for standing lanterns, and the fire source is placed in a glass cup.
Any artificial source will do, as long as it fits inside and does not require constant manual activation.
Diagram and photo of the design
Before making a landscape lamp, you will need to develop a design diagram of the garden lamp itself, an electrical circuit for powering the lamps and a plan for installing devices on the territory.
The composition of the latest documents will depend on the area that needs to be illuminated and the landscape project. These indicators determine the type of lamps, their power and quantity, as well as the volume of consumables :
- wires;
- cable;
- switching equipment;
- automatic start sensors;
- automatic protection of power lines from voltage overload in the network.
The first document, a design diagram of a garden lamp, determines the appearance of the lighting device, the specification of its parts and the assembly procedure.
For example, to produce a metal lantern in an antique style, the design diagram will look like this:
In order to make such a lantern with your own hands according to the diagram, you need to make 4 side walls, a top cover and a bottom, cut out glass for the sides, preferably with matte patterns. Decorative finishing of metal parts can be painted with regular paint or with imitation of antiquity.
The assembly of metal parts is carried out by cold welding. Next, the side windows and cartridge are inserted. After assembling the housing, begin connecting the power supply.
The assembly of the electrical power supply circuit from a 220 V household network must be carried out by a specialist with the appropriate electrical safety clearance group, so if the home craftsman does not have such qualifications, you need to invite an electrician for this work.
To lay the power line, it is better to choose an underground option, then hanging wires around the site will not spoil the landscape project.
You will first need to purchase a two-core copper electrical cable VVG with 1.5 mm2 conductors along the length of the laying determined according to the power supply diagram for lighting fixtures on the site, a corrugated pipe or metal hose D from 18 to 25 mm to protect the cable from rodents and terminal blocks with drain load 5 -10 A to ensure reliable electrical connections.
With an underground power supply circuit for landscape lighting, the owner of the house must save the executive circuit for future construction and excavation work on the local area.
To lay the cable, dig a trench at least 70 cm deep , with a distance from objects on the site of at least 60 cm. For floor lamps, you will need to install supports, which can be steel pipes, including used ones. In this option, they are thoroughly cleaned of corrosion products and treated with protective compounds.
Then a cable with leads sufficient to connect a 10-15 cm lamp is pulled through them. After this, the cable is placed in a corrugated sleeve with a 15 cm exit to the outside. The second piece of cable from the trench in the corrugated pipe is connected to the cable in the support using terminals.
If the lantern is of a wall type, then the connection is made through junction boxes. All contacts must be securely soldered, insulated and hidden in the box.
Assemble the connection diagram for the lighting device in such a way as to exclude the possibility of electric shock.
The connection point can be a simple protected outlet or terminals on an electrical panel .
After assembling the power supply circuit, it is checked for functionality and the wires are covered. If the circuit is assembled incorrectly, the LED lamp will not light up or will “blink”.
Assemble the body
1. Cut out the glass for the three walls and the door (Fig. 2 and “Detailed view”). Cover the glass on both sides with masking tape. Apply glue to the tenons of the two body crossbars (C). Assemble the crossbars and two posts (B) by inserting a piece of glass into the tongues (Fig. 5). Align the crossbars with the tenon shoulders on the posts.
2 Apply glue to two more crossbars, add glass, a front post and glue these parts to the previously assembled back wall (photo P). In the same way, assemble the remaining crossbars, glass and front pillar. Make sure the bottom and cover (A) fit easily onto the studs of the posts.
3. Assemble the door by gluing the posts (D) to the crossbars (E) and inserting the glass into place.
4. Finish all parts with 220 sandpaper.
5. Glue the lid and bottom to the body.
6. Drill holes in the tenons (photo E) and insert round dowels into them. Apply a clear coat (we used a nitro varnish in an aerosol can, spraying it three times).
Link by topic: DIY decorative lantern-candlestick with stained glass
Step-by-step instructions for creating
To select the type and materials for making landscape lamps, you can use DIY projects , which are presented on the pages of online publications and have detailed instructions. Most often, such crafts are made from ready-made wooden, metal or plastic objects. For example, you can use ordinary wooden hangers for this.
Made of wood
A very stylish lantern can be made from pieces of edged board . To do this, it is sawn into five identical parts, 20 cm long. A rhombus is cut out in the center of all the boards. Using a drill and a drill bit D = 8 mm, cut out 4 holes at the same distance from each other. For the base you will need a circle and an equilateral pentagon.
In order to give a beautiful appearance to a wooden lantern, the outer surface is fired with a gas burner and then brushed on the annealed surface with a metal brush. As a result, all defects and irregularities are removed from the wooden surface, and the lamp acquires a warm brown color.
The manufactured parts of the landscape lantern are assembled, the circle is fixed on the pentagon, the side parts are attached to it with small nails, these parts are tied with a rope “crosswise”, so that the knots remain inside.
A hole for an 8 mm cable is drilled through the center of the circle and pentagon.
To attach the flashlight handle, drill two holes from the end of the circle with a 4 mm drill. The handle is made from a piece of rigid wire , giving it an elegant shape, the socket and lamp are installed, the body and electrical circuit are assembled, and the operation of the finished product is tested.
For such a lamp design, it is necessary to decorate the cable so that it does not spoil the “antique” look of the lamp with its modern look; for this, the cable is wrapped with twine and secured with a glue gun. The lamp is powered from a 220 V home network from a separate circuit breaker in the electrical panel.
LED Strip Light
You can easily make an unusual landscape lamp in the form of a flowing light stream from an old teapot yourself using an LED strip.
This lamp is energy efficient and
consumes little electrical energy, so it can be powered by solar panels and made portable for installation in any part of the garden or recreation area in the local area.
To form a jet, the ICE cord is folded in half, and a bundle of such cords is secured inside the kettle. To do this, insert a metal washer into the spout and thread a cord through it. They assemble a circuit powered by a solar battery, which can be bought in a retail chain or taken from a faulty lamp.
A drop
If you install a glass flask, which is used for watering flowers, on an old water tap, you can get a unique lamp in the shape of an amazing drop of light.
In order for the flask to be filled with uniform light,
the LED strip is wrapped around the wire and filled with a glass vessel .
The tape can be purchased with a control panel and a unit, which will allow you to choose colors and shades of lighting, creating an extravaganza of color, bringing a unique style and novelty to the landscape design of the site. The lamp can be powered from a 220 V network, batteries, solar or conventional batteries.
Made of plastic
This outdoor LED lamp is made from ordinary disposable white plastic spoons. For the base, a 5-liter plastic container with the bottom cut off was used.
The handles are broken off from the spoon, and the remaining parts are fixed to the base with an imitation of pineapple peel using a glue gun.
For this model of a homemade lamp,
only a low-temperature LED bulb is suitable . The lamp can have either an independent power supply from batteries or be connected to a 220 V power supply with a special electrical circuit with a choke.
Advantages
People often have the desire to do something with their own hands. Especially if you can show off your creation to your loved ones. A street lamp for a summer house is ideal for these purposes. A homemade lamp will have the following advantages:
- will allow you to illuminate the necessary part of your personal plot, gazebo or garden;
- will give you the opportunity to express your creative nature;
- will add color to the dacha;
- surprise your family and friends with your ability to create beautiful things with your own hands;
- such a lamp will cost much less than purchased products. You will save money, since the lantern can be made from almost any materials that are just lying around your house;
- a prefabricated lamp can be decorated in any style, giving the dacha the desired appearance;
- The lantern can be made in unlimited quantities, illuminating the entire garden or gazebo.
Installed lantern
As you can see, a homemade street lighting device has a lot of advantages, and you will spend a minimum of time, effort and money on its construction. As a result, your dacha will sparkle with new colors, and the garden will take on a new look. In addition, a lantern in the dacha can:
- ensure proper lighting of the area;
- used as decoration of a personal plot using a light composition;
- participate as an element of the security system.
In any case, a lantern made by yourself will be the best option for the dacha.
Possible difficulties and errors
Technically, making the lantern itself for landscape lighting does not seem difficult; for this it is permissible to use both new parts from the store and those that can be found in any household. To do this you just need to use your imagination.
Difficulties with landscape lighting are caused by power supply schemes, choice of power and number of lighting devices. All 220 V power lines are classified as dangerous, the calculation and installation of which can only be carried out by specialists.
The main mistakes that users make when installing landscape lighting:
- The power, type and number of lamps are incorrectly selected. The installation does not perform its lighting functions or is energy-consuming to operate.
- Violation of underground cable laying standards.
- The cable characteristics do not correspond to the connection power of lighting devices.
- There is no protective grounding and no automatic safety system in the electrical network.
- The connection of lighting devices is made using twists without the use of terminal blocks.
- The cable is laid in the ground without metal hoses.
- The incandescent lamp is hermetically sealed in the lamp; there is no ventilation to cool it.
How to Install a Lamp Post
The method of installing a lamp post depends on its design and can be done in two ways:
- If the lamp post has an installation platform at its base, then the work is performed as follows:
- a pit is dug with a size larger around the perimeter than the installation site, and a depth equal to the depth of freezing of the soil at the installation site of the outdoor lamp;
- the pit is filled with rubble concrete with the installation of reinforcing layers;
- in the upper part of the poured foundation, an embedded metal plate is mounted, equal in size to the base of the lantern;
- The lantern is installed on a mounting plate, after which its base is welded to it.
For your information! Attaching a lamp post to the foundation can be done in another way - using anchor bolts mounted in the foundation and drilling holes in the base of the post, onto which the entire structure is attached.
Installation of a street lamp using anchor bolts
- Directly into the ground.
This option is used when the base of the lamp post is a pipe. To install it, a hole is drilled in the ground with a diameter larger than the pipe used. After this, the lamppost is placed in a dug pit, and the voids on the sides are filled with rubble concrete.
Installation of a street lamp in the ground
Pros and cons of homemade decorative light
For those who are planning to make landscape lighting with their own hands from scrap and store-bought consumables, the main advantage of the finished project will be its low cost, which can be either zero or several times less than that of a new landscape lamp.
In addition, a homemade economical lamp gives its owner the following advantages :
- lighting of the local area, gazebo or recreation area;
- realization of creative potential;
- creating a colorful landscape in the local area.
The disadvantages of this type of landscape lighting include the low protection of home-made structures from atmospheric and mechanical influences, since they are mostly made of wood, plastics and old metal forms.
To create more reliable waterproof metal lamps, you will need metalworking experience and special welding equipment.
From building materials
As you can see, you can make a decorative street lamp with your own hands from any objects, the main thing is to have a great desire for it.
So, sometimes after renovations there are remains of cement and plaster left in the house, let’s try to use them in the direction we need.
Take a bottle with a capacity of 2 liters. Cut off the third part from the edge, and cover the neck hermetically. Now insert a 0.5 liter bottle into the container.
The narrow neck should be pressed against the neck of the large bottle. Fill the empty space between the bottles with cement. After some time, the cement should dry and then you will have a lantern for your flower garden; all that remains is to thread the light bulb with the cord.
Average expenses
They can be zero, since to create them you can use improvised materials that are at the disposal of the home craftsman. In this case, the main costs may be for underground cable laying and hiring electrical installation personnel.
Average costs for creating a 4-arm landscape lantern “grater”, with laying an underground two-core copper cable 1.5 mm2 10 m long:
The cost of a 10 m cable is 75x10=750 rubles.- Corrugated pipe 10 m – 14x10=140 rub.
- Cable laying 10 m (without excavation work) – 120x10=1200 rub.
- Connection to a house panel with a protection system – 1,500 rubles.
- LED lamps E27 4 pcs. - 4x96=384 rub.
- Lamp sockets 4 pcs. – 4x62=248 rub.
- Wooden base (waste) – 0 rub.
- Graters 4 pcs. – 130 rub. x 4 = 520 rub.
- Fasteners – 50 rub.
- Household electric circuit breaker – 480 rubles.
- Total: 5272 rubles, including underground installation and in-house power supply circuit - 4120 rubles, lamp - 1152 rubles.
Making lanterns with your own hands
So, how to make a flashlight on your iPhone when you make a call? Here are examples of work and various creative ideas that anyone can implement. The simplest option is a paper tube with slots or patterns, inside which a light source is hidden. But you can do without internal lighting. It all depends on the tasks for which the craft is created.
Classic paper lantern
The simplest way is to roll up a sheet of paper or thin cardboard and glue it along the width. You can also make figured slots - in the form of flowers, birds, geometric patterns. The main thing is that the slots do not separate parts of the product. If desired, the outer side is lightly coated with glue and sprinkled with gold sand or sequins.
Paper Product Options:
- lantern-house or castle;
- basket or basket;
- bell.
Curly lampshades can be cut in any way, depending on your imagination or the properties of the paper. If there is a house, then first you need to draw or print a template. Any sketches can be taken from the Internet or magazines. The finished souvenir decorates window sills or interior shelves and consoles well.
Sugar cube lantern
An interesting solution is to assemble a lantern from refined sugar. This very unusual design embodiment is easily formed from cubes and assembled into an object of the desired size, similar to a fortress.
- First, a cardboard base is made, a layer of cubes is laid along the edge.
- Place a small candle (for example, a floating tea light) in the center of the lantern; it will give a pleasant light.
- The fortress is collected to the top; you don’t have to cover the top (this will cause the natural candle to go out).
This lantern can be placed on a shelf or on the floor, on the porch. The light from it will be soft and pleasant.
Cage Lanterns
The basis is a cage for birds or small animals - hamsters or mice. You can also make an analogue cardboard template. High-density office paper is useful for this.
The result should be a shape for the lantern with contours. It can be painted as desired, decorated with chains, and decorated. It’s good to involve children and the whole family in the process, this will diversify family leisure.
Lamps made from boxes and tetrapack
Every home inevitably accumulates unnecessary cardboard boxes - from sweets, toys, equipment, as well as milk and yogurt. Baking parchment may be required here - it additionally strengthens the product from the inside.
- Select several identical boxes, rinse and dry (if it is a washable tetra pack, juice or milk box).
- Cut off the top with a lid using a knife or scissors (it is better to use a sharpened bread knife).
- Place the box on one side, mark the holiday symbols - Christmas trees, stars, snowflakes.
- Seal the inside walls with parchment.
- Place diodes or spark plugs inside the box.
- The outside of the lamp can be painted in beautiful colors.
From dense boxes you can make beautiful New Year's garlands and lanterns of any size. A lot of lanterns on a string or garland look very elegant. It is also possible to glue or staple colored ribbons, fringe, and beads (not heavy) to the lower arc; they will gracefully flutter in the wind or when air moves.
Lanterns made from tins
You can also use simple tin cans - from soda, canned food. They are convenient to decorate a garden or windowsill, because they will be durable and are not afraid of humidity and weather conditions.
For illumination, rows of holes are punched around the perimeter or in the form of a certain pattern or figure with a hammer and a small nail. This could be a star, a snowman, a bell, a snowflake, a berry, etc. The surface is painted with acrylic paints or an applique is glued on, and a candle or battery-powered light bulb is placed inside.
Fragrant lanterns
A very original and effective mosquito repellent is to place a light source in an orange or lemon peel. Take the fruit and remove the peel so that you get a hemisphere. Half of the hollow “ball” is placed on a heat-resistant stand.
A tea light is placed inside. It will slowly warm the peel and release a soft citrus aroma - this is very good for health. You can put spices inside: cardamom, cinnamon, lemongrass, you get a real aromatic potpourri. You can stick clove stars into the outside of the peel.
Caution: Do not allow the peel to burn, as this may cause a fire or an unpleasant odor.
You can also place the flashlight on the porch or near an open window to scent the room and disperse insects.
Photo gallery of lanterns
To see examples of work, you can look at a photo selection of different models. This is an inexhaustible source of inspiration that will lead to creative development.
Now you know how to make a flashlight on an iPhone when ringing 7. This is a simple and useful entertainment that will help you decorate your home for the holiday and get creative with your children.
How to make spectacular wall lamps from PVC pipe. Beautiful spots for pennies
Hi all! Today I will show you how to make wall lights (spots) from PVC pipe. These are very stylish and simple lamps and anyone can make them. I made these lamps for my work area.
Tools and materials
- PVC pipes D-50mm.
- Ventilation grille D-50mm.
- LED lights.
- A can of black paint.
- Hot glue gun.
- Hacksaw.
- Screwdriver.
Making lamps from PVC pipes with your own hands
I used PVC pipes and LED spotlights.
To insert the lamp into the pipe, you need to cut off the protruding “ears”. The lamps are a little smaller than the pipe, so I had to make spacer rings.
I sawed off the ring from the pipe with a hacksaw.
Then I cut out a small section with a utility knife. Thus, I ended up with a spacer ring of a smaller diameter.
Together with the ring, the lamp is securely fixed inside the pipe.
I made the legs for the spots from wood. Attached to the pipe using hot glue.
When the glue has hardened, I cut off the remains.
And I drill holes for electrical wiring.
For decoration I used a ventilation grill. It will not prevent hot air from escaping from the lamp.
I trim the edges with metal scissors and clean them with sandpaper.
Now the grille fits perfectly.
All that remains is to paint the spots and wait until the paint dries.
I connected the wires to the light bulb using quick connectors.
I insert the light bulb with the spacer ring into the pipes and the lamp is ready!
When I made a feature wall out of wood slats, I used the same piece of wood that I used for my lamp base. Therefore, the lamps are ideally attached between decorative slats, and due to their low weight, they hold securely and do not fall out. Thus, the lamps can be adjusted in height.
I used only 3 watt bulbs. They do not get very hot and cannot melt the PVC pipe.
I hope you liked the homemade product! See you later!