Unusual DIY street lamp: 10 master classes
How to make a beautiful street lamp yourself? We will show you unusual and simple options on how to decorate your yard with beautiful outdoor lighting.
Street lamps made from natural materials
An unusual and stylish street lamp can be made from grapevines in the fall. We will need an inflatable beach ball as a template. We wrap the vine around the ball, securing the intersections with wire to strengthen the structure.
After our improvised ball of vine is ready, we deflate the ball and carefully pull it out.
Inside such a ball you can place either a solar lamp or wrap it with LED strip for outdoor lighting. Such strips often have a color switch, then using the remote control you can change the color of your street lighting.
Beautiful DIY street lamp
A beautiful street lamp in the form of a stream of light can also be made using LED strip.
For greater convenience in the garden, it is better to use solar-powered LED strip.
We fold the light cord in half - this is how we form “the jets of our stream.” We fix the bundle of light cord inside the kettle using a large metal washer and thread the cord through the spout of the kettle.
This wonderful outdoor lamp can decorate your entrance to your house or gazebo in the garden.
How to make a street lamp from a log
Natural materials such as logs are one of the most harmonious materials for garden decor.
Cut the log into rings, making a hole in the middle. We will install a transparent plastic pipe or plexiglass pipe inside. Add an LED strip and a stylish garden street lamp is ready to decorate your garden.
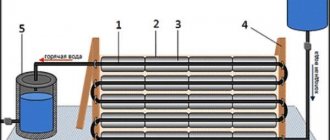
Electrical diagram
Shown here is the simplest diagram that even a novice craftsman who has never created garden lamps and other similar products can figure out. The system has only 7 components.
Using this diagram, assembling a garden lamp will not be difficult.
To understand the diagram and understand why certain parts are needed, you need to consider how the finished product works:
- When sunlight hits the surface, the transistor is in the off state. Therefore, the accumulated energy is supplied to the battery and charges it.
- After sunset, when no light reaches the photocell, the transistor opens and voltage is supplied to the LEDs. That is, the equipment is charged for as long as possible during the day, and turned on at dusk.
- The operating time of the lamp directly depends on the battery capacity and the power of the LEDs used in the design. Usually the components are selected so that they are enough for 6-8 hours of work.
Beautiful DIY garden lanterns: 22 interesting examples
You can unsubscribe at any time.
Examples of decorating beautiful garden lanterns with your own hands.
DIY garden lanterns are an excellent option for garden decor. They will decorate any area and add beauty to the decoration of the space around the house. These methods of decorating a garden plot will help create a magical atmosphere.
Hanging lanterns for the garden
Hanging lanterns - which will fit perfectly into any beautiful garden and will certainly please the eye.
Extraordinary flashlight
A beautiful visually large lantern that will fit perfectly into the garden setting.
Lovely shiny lanterns
Excellent and incredible DIY lanterns, very creatively designed.
DIY New Year's lantern
An interesting option for decorating a lantern with your own hands, something that lovers of needlework will love.
Wooden lanterns for the garden
A great option to design lanterns for the garden from a wooden texture.
Flashlight made from a bottle
A good and practical option is to create a lantern from a bottle - creative and beautiful.
Convenient lanterns made from cans
Practical, convenient design of lanterns made from cans with a wicker handle.
Flashlight "Star"
A nice DIY flashlight in the shape of a star, which is truly wonderful.
Decorative lanterns made of thick thread
An excellent option for decorating lanterns made of thick thread for garden decoration.
Portable lantern made from tree branches
An interesting design option for lanterns made from tree branches is suitable for garden decoration.
Hanging lanterns in jars
Beautiful DIY lanterns made from jars for garden decoration.
Garden garland
A garden garland of handmade lanterns is a wonderful addition to the overall decor in the garden.
Lanterns made from tin cans
Openwork lanterns made from tin cans are an excellent option for decorating lamps for the garden.
DIY wooden lantern
An interesting DIY carved lantern, something that will truly decorate any garden.
Beautiful glass lantern for the garden
A beautiful green glass lantern is an excellent decoration for a garden plot.
Creative colorful lanterns
Beautiful multi-colored lanterns are the best decoration for the garden.
Wicker wooden lanterns
Cute wicker wooden lanterns to decorate a beautiful garden near your home.
Magic lamp
A transparent lamp made from a bottle is well suited for garden decoration.
Wooden candle holder for garden
An interesting wooden candle holder for the garden is a beautiful and simple solution for decoration.
Garden lantern made from a tin can
A beautiful design option for a garden lantern made from a tin can.
Cute lamp for the garden
A lantern that will decorate any garden area and add a pleasant atmosphere.
Newspaper lanterns
Lanterns made from newspapers are a beautiful, at the same time simple decor for the garden.
Lanterns made from different materials are perfect for decorating a garden plot. In addition, when decorating your garden, you should pay special attention to the Beautiful spring garden: 17 great ideas for garden beds.
Step by step instructions
Regardless of the DIY craft option, the wood needs to be prepared. For this purpose, the following are used: fungicidal impregnations, which protect against the development of mold, impregnations to protect against moisture absorption. After treatment with impregnations, the workpieces are well dried.
Simple wooden chandelier
To create a pendant ceiling lamp with your own hands, you can use straight, thick sticks. The main requirement: the diameter must be sufficient to pull the cord. For a do-it-yourself wooden chandelier we will need:
- thick sticks;
- LED Strip Light;
- water-repellent impregnation.
Sequencing:
- drill each stick in the middle;
- cover with impregnation and dry for 24 hours;
- insert LED strip into the holes;
- connect the contacts of each tape to the cable and insulate;
- hang from the ceiling with staples or a hook.
Interesting video on the topic:
Board lamp
To create a lamp from boards you will need:
- Four plank blanks to form a rectangular frame;
- Rectangular mirror as a reflector;
- Varnish, glue;
- Drill.
Sequencing:
- We make a groove on the edge of each board for installing a mirror element.
- We make a rectangular blank from four planks, into which we insert a reflector on one side. Secure with glue.
- We make a hole with a drill in one block, insert a cable with a socket.
- Varnish or paint.
Another option is to insert darkened or multi-colored glass on both sides instead of a mirror. Then the lamp will produce multi-colored light or a muted diffused glow.
Making sconces
For a DIY wall lamp, it is better to choose geometrically correct shapes in the form of a rectangle or square. To create a wooden sconce we will need:
- flat rectangular blanks 2 pcs;
- corner block;
- self-tapping screws;
- drill;
- varnish, glue gun.
What to do:
- We treat the workpieces with fungicidal and water-repellent impregnation. After drying for two days, varnish or paint.
- We connect two blanks in the form of the letter “G” with self-tapping screws.
- Between them we install a corner with glue to impart rigidity.
- We drill a hole in the upper part for the wire and install the base.
The wooden sconce is attached to the wall with self-tapping screws or on a bracket.
An additional lamp can be installed in the L-shaped wall lamp. The color and texture of the wood will be emphasized by the warm, amber shade of the lampshade, and silver-coated glass will add contrast to the texture and color.
Features of making a floor lamp
You can make a wooden floor lamp with your own hands. For the floor lamp, wooden elements will serve as a stand. If you have a lathe, the stand can be made from cut timber. If there is no processing tool, the base for a floor lamp can be the trunk of a small tree.
In this case, dry the workpiece, remove the bark from the trunk, and sand the surface with sandpaper. Treat with anti-fungal and anti-moisture impregnations. Make a recess on the back side for the wires.
Place the trunk on a stable base. Make a frame on top with wire to install the base. On top you can put a lampshade made of fabric, paper or wood.
Wooden lampshade
You can make it yourself from thin branches. Due to their small diameter they dry faster. Small branches are more suitable for a ceiling chandelier because they have less weight than timber or solid wood. With a combination of thin elements, the lamp has an airy silhouette that does not weigh down the interior and makes the light diffuse, giving it an intimate feel.
For the lampshade you will need:
- branches;
- thick wire;
- glue gun;
- pruner
What we do:
- We sort out the sticks. Depending on the shape, we select either identical and even ones, or, conversely, with a large number of bends.
- We treat the branches with an antiseptic. If there are no special impregnations, soak for a day in a solution of potassium permanganate, dry at room temperature for a week.
- We make a frame from thick stainless wire. The shape can be any: classic trapezoid, ball, rectangle.
- We attach the sticks to the frame with glue. Don't forget to leave a gap for installing the base.
- We coat the wooden lamp with varnish. It will protect against moisture and fungus.
- We insert the lamp socket and secure it with wire.
How to make a garden lamp
“I am sitting in my garden, the lamp is burning. No girlfriend, no servant, no acquaintances. Instead of the weak of this world and the strong, there is only the harmonious hum of insects,” the hero of this poem wrote to his metropolitan friend from a remote ancient Roman province. Over the centuries, ideas about serenity have not changed: a garden, and in the garden there is a lamp.
The coolest idea, in our opinion, for a garden lamp is to use old insulators. The lantern is somewhat reminiscent of a kerosene lamp. Its soft, warm light creates some kind of kind, nostalgic atmosphere. And most importantly, making such a lantern is very simple.
Step one: wrap a thick wire around the insulator.
Step two: make a large loop from the same wire - it will be the handle of the lantern. Screw the handle to the wire on the insulator.
Step three: pour a little sand on the bottom of the insulator, place a standard round candle in a sleeve on the sand, they are also called tea candles. Hang the lantern on a tree branch. The project has been completed.
A lamp made from a wine bottle - why not, especially if you like to sit in the garden in the evening with a glass of good wine. You can use any glass bottle: wine bottle, water bottle, lemonade bottle, etc. Lanterns in transparent bottles shine brighter, in colored ones - softer, and in general they turn out more interesting. These lamps, of course, only decorate the garden at night - during the day they make no impression. The most important part of making this lantern is cutting off the bottom of the bottle, and no matter what method you use to do this, wear safety glasses!
It is recommended to make a paper lantern for everyone who has children. Surely, the kids will not forget it, and it will become an important memory, one of those impressions that people return to throughout their lives.
For this lantern, we will need a plastic water bottle - flat, without grooves, or a tall, even glass, at the bottom of which we will place a candle or LED light bulb. You can draw a template according to which a flower is cut out on paper yourself, or, if your hands are not adapted to art, download it on the Internet - there are different options and they are easy to find.
The stems and leaves are cut out with an office knife, and then carefully folded upward, and the image becomes three-dimensional. The paper is attached to a glass or cut bottle using double-sided tape.
Read tips on installing landscape lighting from FORUMHOUSE designers and users. Watch a video that talks about a smart lighting system for a country house. Get acquainted with ready-made solutions for making lanterns for garden paths from users of our portal.
Materials
The chosen concept should help you decide on the choice of material for the lamp. What is your room like, what lamps are suitable here, where will they be located (on the wall, ceiling, floor)? In this case, the material for the lampshade can be completely different things: threads and veneer, bottles and branches, paper and basin, cup and lace, wire and disposable spoons, fabric and beads. From the frame and available materials you can make real beauty.
Lace lampshade
To make it you will need about 10 knitted identical or different napkins of one or more colors (optional), a balloon, wallpaper glue and a container for it, a brush, threads, a light bulb socket, a light bulb, oilcloth or newspapers for bedding. The exact number of napkins depends on their size and the size of the ball.
The sequence of our actions:
- Dilute wallpaper glue (one pack should be enough).
- Inflate the balloon and tie it.
- Tie it so that it is approximately in front of your eyes or below. For example, on a clothesline or stepladder.
- Spread one napkin on the mat and coat it generously with glue.
- Carefully glue the napkin onto the ball.
- Spread the next napkin and glue it so that one napkin lies slightly on top of the other.
Glue all the napkins, lightly connecting them to each other. Leave a small hole at the bottom without a napkin so that you can install the socket and light bulb later. Your ball should dry for about a day. After a day, making sure that the glue has dried completely, pierce the ball and remove it from the lampshade. If you want to give the lamp a different color, before piercing the ball, paint the napkins with acrylic paints and leave them to dry again. Thread an electrical wire through the center of the napkin at the top of the lampshade, to which the socket will later be connected
f31e931ff123afe05888e64de785a88c.jpe b79ceb7a27786cc6d8f2af6d253191c3.jpe
Attention! Don't forget to disconnect the power supply from the wires! Install the cartridge. Screw in the light bulb.
If you are installing such a lamp on an already hanging socket, you can do the following:
- at the top point of the lampshade, leave a circle with a diameter of approximately 10 cm;
- hang a circle of cardboard on the cartridge to match the napkins with a diameter of approximately 15 cm;
- Carefully pass the cardboard inside the lampshade and fasten them together with a stapler or double-sided tape.
Lamp made of plastic bottles
Most likely, no one will name how many options for lampshades made from plastic bottles exist. But there are two principles of use: the bottle is decorated with other materials, or elements for decoration are cut out of the bottle.
To implement the first principle, we need a three- or five-liter bottle. Its neck will be put on the cartridge, and the bottom needs to be cut off. If the bottle is made of colored plastic, then the simplest chandelier for a simple country house is already ready. But plastic can be painted with designs, and small elements such as buttons, pieces of mirrors, and shells can be glued with liquid nails. Or cover it with acrylic paint of one color, and apply an uneven layer of paint of a different color on top using a comb. In a more complex version, plastic disposable spoons without handles in the form of scales are glued throughout the bottle.
To implement the idea of the second principle, you need bottles of any size, but of different colors. Cut out any shapes from them: leaves, flowers, geometry. The main thing is that there are a lot of them. The lampshade will need a frame in the form of wire rings. Connect the different levels of the frame together with a vertical wire. Using fishing line or thin wire, attach a huge number of cut out figures to the frame. They can fit tightly to the frame or hang freely from it.
Paper lampshade
Cardboard, rice paper, self-adhesive, corrugated - whatever kind of paper is used for homemade lampshades. For the Art Nouveau style, we suggest you make a lampshade from multi-colored cardboard ribbons. Choose colors. Prepare strips 2-4 cm wide, a stapler or good glue. Randomly thread the strips into each other, fasten them in such a way as if you have a lump of remnants of different threads in your hands. It should not be tight so as not to interfere with the light bulb.
Size is at your discretion. By slightly spreading the strips, you can easily hang the ball on the cartridge.
Grapevine lampshade
To make a lampshade from wood, you need to select suitable driftwood or branches and process them properly. In the case of a vine, almost any one will do, with stepsons and even dry leaves. Such a lamp can be wall-mounted, floor-mounted, or ceiling-mounted. It requires a metal frame of any shape through which the branches will be passed. When the lampshade is ready, cover it with furniture varnish - it will be very beautiful.
DIY garden lamps
You can decorate your garden in a variety of ways, but the best way to do this is with a good lamp.
Of course, not every piece of lighting is suitable for such purposes.
This review contains examples of those garden lamps that you can make with your own hands.
Rope lamp
Magic lamp made of ropes.
Fantastic garden lights made from cotton rope and garlands will fill your backyard with soft light and create an atmosphere of romance and mystery.
Sun in a jar
Solar powered lamp.
Stunning lamps that can be made from small glass jars and miniature light bulbs that charge from sunlight.
Garden lantern
Beautiful garden lantern made from a plastic bottle.
You can make an elegant garden lantern that looks like a flower yourself from a wooden tripod block, a plastic bottle or canister and an ordinary light bulb.
Airy design
Lamps decorated with fabric.
Magnificent candle lamps in glass jars decorated with thin fabric will become an exquisite garden decoration.
Colored lanterns
Colorful lanterns made from glass jars.
Decorate your yard with rainbow lights using glass jars, colored paper and candles.
Origami
Origami style flashlight.
An origami-style paper lantern will become an original decoration for your country yard.
Paper bags
Garland of paper bags.
Colored paper bags can be turned into a charming garden garland.
Candles
Fence lighting.
Glass jars with candles will become an exquisite decoration for a wrought iron fence.
Glasses
Homemade mini floor lamps.
Candles in tall glasses decorated with neat paper lampshades will become an original decoration for the holiday table.
Magic flower beds
Turn ordinary flower pots and tubs into glowing flower beds by painting them with luminescent paint.
Shells
Garland of shells.
An elegant garland of sea shells filled with wax will remind you of the sea and decorate the garden with a subtle glow.
Balls
Glowing balls.
Round lampshades painted with luminous paint are a wonderful idea for illuminating flower beds and garden paths.
Glowing jars
Ordinary glass jars painted on the inside with luminescent paint, filled with glowing stones and decorated with succulents are perfect for decorating a table, porch or yard.
Small light bulbs
Garland of light bulbs.
A garland of small light bulbs will be a practical and stylish decoration for a gazebo or summer patio. You can make such a garland from ordinary light bulbs or from tennis balls placed on the bulbs of a Christmas tree garland.
Chandelier
Chandelier made of glass bottles.
Chandelier on the porch - why not? It can be made from a wooden frame and glass bottles filled with garlands.
Cans
Candles in tins.
Tin cans and candles can make stunning pendant or table lanterns.
Stools
Use old stools and colored thread to create unique garden lanterns.
Did you like the article? Subscribe to the channel to stay up to date with the most interesting materials
Average expenses
They can be zero, since to create them you can use improvised materials that are at the disposal of the home craftsman. In this case, the main costs may be for underground cable laying and hiring electrical installation personnel.
Average costs for creating a 4-arm landscape lantern “grater”, with laying an underground two-core copper cable 1.5 mm2 10 m long:
The cost of a 10 m cable is 75x10=750 rubles.- Corrugated pipe 10 m – 14x10=140 rub.
- Cable laying 10 m (without excavation work) – 120x10=1200 rub.
- Connection to a house panel with a protection system – 1,500 rubles.
- LED lamps E27 4 pcs. - 4x96=384 rub.
- Lamp sockets 4 pcs. – 4x62=248 rub.
- Wooden base (waste) – 0 rub.
- Graters 4 pcs. – 130 rub. x 4 = 520 rub.
- Fasteners – 50 rub.
- Household electric circuit breaker – 480 rubles.
- Total: 5272 rubles, including underground installation and in-house power supply circuit - 4120 rubles, lamp - 1152 rubles.
DIY outdoor country lighting: 10 basic ideas for garden lamps
Lighting a summer cottage or country house is especially important at night. That’s why it’s worth thinking through all the details and making the lighting yourself. To do this, you will need minimal knowledge of electricity and wiring, and you must also adhere to all basic safety rules.
Options for lighting fixtures for exterior home lighting
First of all, you need to understand the functions of lamps. Their main task will be to illuminate the local area and harmoniously combine with the overall decoration and design of the house.
Lamps for summer cottages are divided into several types, from which you need to choose the most suitable one.
Wall lanterns
This option is best suited for lighting at the entrance to the house, as well as the area in front of it. Alternatively, you can also hang them near the gate or gate. They are completely different in appearance and shape. The most popular options are the “antique” ones.
Beautiful lanterns made by hand
Floor lamps
This type of lamps is installed directly in the ground, or on the veranda. The classic version of a floor lamp is a flat stand with a round ball on top. But there are various modified models that are made in a modern style.
Basically, floor lamps differ from each other in the height and shape of the shade.
Ground lamps
They are mounted directly into the ground itself and serve to illuminate green spaces and illuminate country alleys on the site. Swings, gazebos, summer pavilions and other buildings complement the area very nicely. Typically, lamps of this type have a round or rectangular shape.
Ground lamps in the interior of the territory
Hanging lanterns
They are mainly attached to ceiling beams on verandas. With their help you can decorate trees or bushes. Pendant lights are a long, strong chain that ends with a shade.
Ideas for garden lamps
If you want to decorate and illuminate the territory of your summer cottage in a beautiful and unusual way, here are a few ideas that you can turn into reality with your own hands.
Fairy lights
This item can be bought in absolutely all hypermarkets for the home. The pricing policy is affordable, and the beauty of the design is simply indescribable.
You can improve it a little and make garlands with your own hands. Create your own unusual version from beautiful lampshades made from threads, white rope and twine.
Garlands in the design of a gazebo A variety of shapes of garlands in the interior
The process is quite simple:
• First, we inflate the balls of the required sizes and wrap them with rope, which we first lubricate with PVA glue.
• After the glue has completely dried, you need to burst the ball and carefully remove it.
• The final touch is to thread a wire with a light bulb and hang lanterns in your area.
An alternative to this option would be glass shades made from jars. They are especially good for garlands that have large bulbs.
The process of working with a garland with your own hands
Candles
This option is not capable of providing a lot of light, but its highlight will be the creation of a romantic atmosphere.
Decorating the area with candles to create a romantic atmosphere
Making such lanterns with your own hands will not be any problem. Just take some rope or wire and glass jars. You can optionally add pebbles or sand to the bottom of the jar, which will make the process of changing candles much easier, and the wax will not stain the bottom itself.
Lanterns
Lanterns of this type will already require some financial investments, but at the same time they will look colorful and unsurpassed on the site.
Making lanterns with your own hands Beautiful lanterns with a forged base
Bottle lamp
Another creative idea would be a kerosene lamp from a bottle. It will take a little more time and effort to create, but it will be cheap and look incredibly impressive.
Unusual lamp made from bottles in the interior of the site
Lamps on trees
This is a combination of simple objects, namely a lampshade from an old chandelier and an ordinary street light bulb.
DIY tree lampBeautiful lampshade in the interior of an area with a treeBeautiful combination of trees and lighting
LED lights
A fairly simple and practical option for accent lighting of a particular area of a summer cottage.
LED lighting in site design
A big plus is that such a tape is waterproof; it can be used to illuminate steps, facades, benches and other elements.
Home staircase lighting
There are backlights with different colors and operating modes.
Creative fountain lighting
To achieve the most beautiful and colorful fountain lighting, professional designers recommend using both above-water and underwater lighting.
Creative lighting for a country fountain
Use solar-powered lamps as general lighting to highlight the contours of the fountain. They are not only able to illuminate the structure with a pleasant soft light, but will also save you significant energy costs.
In order to illuminate the jets in the fountain, you can use lamps made of fiber optics.
To change the illumination zone of the fountain, you will need to install mobile underwater lamps that can move chaotically across the entire area of the water.
Fountain jet illumination
If you plan to use surface floodlights, it is best to install them on a rotating platform. Then the lighting area of the fountain can be changed without any problems.
The most creative way to achieve unusual lighting is to install an underwater lamp. It is best to place it near the water supply nozzle, then the spraying streams of the fountain will look very unusual and fascinating.
Underwater fountain lighting
Installing fountain lighting yourself
If you have basic electrical knowledge, you can easily install the lighting yourself.
Here is a short plan of action to follow:
• First, draw up a diagram of the lamps and think about options for arranging the lighting fixtures themselves. At this point you should think about how powerful they will be, their quantity and the desired effect.
It is also worth deciding whether they will be multi-colored or monochromatic, underwater or surface, and possibly combined. The end result should be a fountain project with all its details.
• After this, purchase the necessary materials for the job. You can buy everything in a hypermarket or specialty store. Remember that the cable must have a protective corrugation. Pay attention to the tightness of the wire and other items.
• Additionally, you will need a transformer, screws for fastening, cable fixing brackets, a screwdriver, pliers and electrical tape.
• It is recommended to install underwater lighting first, and only then move on to above-water lighting.
• If you think that you do not have enough knowledge in the electrical field, during the period of underwater lighting installation, it is best to contact a specialist in this field.
• Create a chain of lamps that will surround the fountain area and illuminate it from the side.
• We make markings in the places where our lamps should be.
• We fix underwater lighting if it requires installation. In the version of floating lamps, we simply lower them into the water and attach a small weight.
• For above-water lighting, we will need to dig a shallow trench into which the cable is carefully laid and at the end everything is covered with earth (except for the fastening points).
• When the work is done, we have to connect everything to the transformer, which is ultimately connected to the power grid. To do this, we use wire cutters to expose the ends of the cable and securely fasten them to the input bolts on the transformer.
• The transformer will need to be mounted on a wooden pole that will be stuck into the ground. Alternatively, it can also be mounted on slats to the wall of the house. Be sure to make a grounded outlet nearby that connects to the transformer.
Simple DIY lantern
It is not at all necessary to have any special knowledge to make a lantern with your own hands.
DIY lantern for home
For work, use the usual available materials:
• Glass or tin jar.
• Plastic cups or a bottle that can be used instead of lampshades.
• Old kitchen utensils.
Such crafts will undoubtedly have an original idea and colorful appearance, but usually their service life is not very durable. In any case, the work process is quite interesting, and the products come out very original.
Did you like the article? Subscribe to the channel to stay up to date with the most interesting materials
Features of connecting the flashlight to the network
When you make lanterns for a summer cottage, you need to pay due attention to the wiring connection procedure. To connect the lamp to the network, we need:
- electric cable VVG;
- terminal blocks for fixing connections;
- metal hose or corrugated pipe for protection.
, a cable with two cores 1.5 mm thick is most often used . It is better to immediately purchase a bay where the length of the wire will be equal to 100 meters. And the diameter of the corrugated pipe should be from 18 to 25 mm. It will be needed to protect the cable from rodents or damage when digging in the soil.
The holes in the terminal blocks should have a diameter of 2.5 to 4 mm and consist of one or two strips, it all depends on the number of connections and lampshades. The pads must be selected based on the current strength from 5 to 10 A.
Installation involves the following steps:
- we dig a trench for laying the cable with a depth of about 80 cm and a distance from the ditch to the house of a maximum of 60 cm;
- When installing floor lamps, you first need to install metal knives and then pull the cable through them one by one. Where it is placed in the trench, we place it in a corrugated sleeve. After passing through all the devices, the cable is cut so that the length of its tail is a maximum of 15 cm;
- we prepare the second piece of wire and also pass it through the pipe and at the top of the device we connect the two cables with terminals;
- if the lights are placed on a wall or facade, you need to reliably insulate the junction boxes. It is best to connect the wires in the boxes with clamping nuts; you can also use pliers, but then each connection must be soldered. Wrap the twisted areas with electrical tape;
- installing the electrical circuit. Since it has two wires, one “zero” and the other “phase”, you need to make sure that the switch can open the phase wire. Then, in the off position when changing a burnt-out lamp, there will be no risk of electric shock. The phase wire is determined using a special indicator;
- A simple socket will also work as a connection point, then you can turn off the power to the entire system quickly by just pulling out the plug. The cables can also be connected directly to the terminals on the switchboard, which is equipped with an automatic fuse that cuts off the voltage in case of an emergency;
- when installing the switch, you need to check whether its specified power corresponds to the load in this network;
- Before digging a trench, make sure all lights are working and reinforce the posts by tamping around the clay or small crushed stone. If the soil is light, then it is better to fill the supports for the devices with concrete.
DIY garden lamps
You can decorate your garden in a variety of ways, but the best way to do this is with a good lamp.
Of course, not every piece of lighting is suitable for such purposes. This review contains examples of those garden lamps that you can make with your own hands.
Rope lamp
Sun in a jar
Solar powered lamp. Stunning lamps that can be made from small glass jars and miniature light bulbs that charge from sunlight.
Garden lantern
Beautiful garden lantern made from a plastic bottle. You can make an elegant garden lantern that looks like a flower yourself from a wooden tripod block, a plastic bottle or canister and an ordinary light bulb.
Airy design
Lamps decorated with fabric. Magnificent candle lamps in glass jars decorated with thin fabric will become an exquisite garden decoration.
Colored lanterns
Colorful lanterns made from glass jars. Decorate your yard with rainbow lights using glass jars, colored paper and candles.
Origami
Origami style flashlight. An origami-style paper lantern will become an original decoration for your country yard.
Paper bags
Garland of paper bags. Colored paper bags can be turned into a charming garden garland.
Candles
Fence lighting. Glass jars with candles will become an exquisite decoration for a wrought iron fence.
Glasses
Homemade mini floor lamps. Candles in tall glasses decorated with neat paper lampshades will become an original decoration for the holiday table.
Magic flower beds
Glowing flower beds. Turn ordinary flower pots and tubs into glowing flowerbeds by painting them with luminescent paint.
Shells
Garland of shells. An elegant garland of sea shells filled with wax will remind you of the sea and decorate the garden with a subtle glow.
Balls
Glowing balls. Round lampshades painted with luminous paint are a wonderful idea for illuminating flower beds and garden paths.
Glowing jars
Glowing jars with succulents.
Ordinary glass jars painted on the inside with luminescent paint, filled with glowing stones and decorated with succulents are perfect for decorating a table, porch or yard.
Small light bulbs
Garland of light bulbs. A garland of small light bulbs will be a practical and stylish decoration for a gazebo or summer patio. You can make such a garland from ordinary light bulbs or from tennis balls placed on the bulbs of a Christmas tree garland.
Chandelier
Chandelier made of glass bottles. Chandelier on the porch - why not? It can be made from a wooden frame and glass bottles filled with garlands.
Cans
Candles in tins. Tin cans and candles can make stunning pendant or table lanterns.
Stools
Lanterns made of threads and stools.
Use old stools and colored thread to create unique garden lanterns. Did you like the article? Subscribe to the channel to stay up to date with the most interesting materials
Garden lights not only illuminate the area, making it safer in the evening, but also decorate it. Many types are designed to illuminate flowers, bushes, and trees. In the latter case, pendant lamps are more often used, since they do not obscure the tree; they usually have special, inconspicuous clothespins. This type is also used for lighting a house, gazebo, fence.
- they are invisible;
- beautifully illuminate the plant from below.
Brief contents of the article:
Columns
Garden lamp posts, on the contrary, rise above the ground. They are made so diverse that it is necessary to distinguish several subspecies. First of all, they are high and low. Low ones do not attract much attention, allowing the eye to focus primarily on the plants. They cost from 500 rubles.
In contrast, tall people immediately attract attention. Therefore, they should be beautiful regardless of the style in which they are made. In shape they can be either in the form of a luminous pillar or box, or in the form of a classic garden lantern.
The last type looks very noble. Costs from 3,000 rubles to several tens of thousands. The price depends on the design and size. Perfectly illuminates the surrounding space. But there is also a minus - it is almost impossible to do it yourself.
Solar powered
Solar garden lights are among the most popular. They do not need to be connected to an electrical network or power supply, since they shine due to the light energy they accumulated during the day.
Some people think that recharging only happens on a sunny day. However, it is not. The battery is enough even on a stormy day to then provide energy all night long.
If such a lamp has been left in the room for a long time, it may not work at first. To correct this situation, you just need to place it on the street.
But, despite the efficiency, such a specimen has one significant drawback - it does not shine very brightly. Therefore, if you need bright light, you will have to choose a different type. However, this type copes perfectly with the decorative role of highlighting paths.
How to do it yourself
Some people don’t want to spend money on a purchase, and are curious to try their hand at it. Such people decide to make a lamp with their own hands. It is not difficult. And although the result will most likely be far from the ideal form, functionality and durability of the purchased item, it will definitely decorate the garden.
The first thing to do is choose a design. On the Internet you can find photos of garden lamps in the shape of butterflies and flowers, integrated into a tree trunk, hanging, in classic and modern style, fabulous. As materials for production, you can use old tin cans, glass jars, used chandeliers, twigs, hemp.
Secondly, you need to decide what exactly will produce light. It could be a gas-discharge lamp, LED strip, solar-powered light bulb, or just a candle. In the latter case, the lamp, of course, will serve an exclusively decorative role, but sometimes this is enough.
But in order to connect, for example, an LED, minimal electrical knowledge is required. If you don’t have such knowledge, you can make the “shell” of the device yourself, and ask someone who understands this to connect the wires.
The easiest option for making a full-fledged lamp yourself is a solar-powered lamp. It must be purchased at a household goods store and mounted in a pre-prepared form.
If it is, for example, a glass jar, then you need to cut a hole in the lid, insert a lamp into it with the battery facing up (so that it receives solar energy), with the lamp facing down. You can also install a similar lamp in old chandeliers, but in this case you will have to work a little.
What materials are suitable
When choosing a purchased copy, you should pay attention to the material. It is important that it be moisture resistant, so wood is not suitable in this case. It can only be used in summer varieties and must be well processed. The same goes for ceramics. The best option is metal, but impact-resistant plastic will also work.
Silumin receives not very good reviews, which, according to many, deteriorates too quickly. If this is a lamp for a pond or swimming pool, then, of course, it must be waterproof.
Types of lighting
Usually the gazebo is located away from the main housing, since the installation sites of such buildings are distinguished by isolation and privacy. When twilight sets in, such a place needs to install lighting fixtures. For complete and correct lighting, you need to know that it happens:
- external;
- internal;
- decorative
There are several types of lighting.
The farther your gazebo is from the main residence, the more lighting devices you will need for outdoor lighting. Usually the paths leading to the resting place and the entrance to the gazebo are illuminated. For autonomous operation of outdoor lighting, the use of various sound or motion sensors has become very popular. Their use allows you to save energy.
It is important that the light does not irritate you. To do this, the correct location of the lighting fixtures will be above head level with the direction of the light rays downwards
An example of an interior lighting solution is to install a chandelier suspended in the center.
If desired, you can install decorative lamps on the walls, on the table or in other separate places to emphasize the aesthetic shapes of the building: ceiling, columns.
We make a simple LED garden lamp from PVC pipes
To fully illuminate garden plants, paths and gazebos, you need at least a dozen lamps. Although they are inexpensive, buying them in large quantities is not cheap. To save a lot of money, you can make the required number of garden lamps with your own hands.
Materials for 1 lamp:
- PET bottle 2 l;
- sewer pipes 50 mm and 90 mm;
- Super glue;
- adhesive coupling for 50 mm pipe;
- white spray paint;
- masking tape;
- PVC glue;
- sifted sand;
- LED Strip Light.
Lamp manufacturing process
A tube cut from a 2 liter PET bottle will be used as a light diffuser in the lamp.
It needs to be put on a 90 mm sewer pipe and carefully seated with an installation hairdryer.
Then the workpiece is removed and trimmed evenly.
Next, you need to glue a transparent tube from a bottle with a long and narrow piece of sewer pipe with superglue.
Then you need to make the top cap. To do this, a wall is cut out of a section of a large pipe and leveled using a hair dryer.
A coupling for 50 mm pipes is glued in the center to the resulting round blank with a diameter of 90 mm.
White spray paint should be used to paint the inside of the transparent part of the lamp body made from a PET bottle. After this, the previously made plug is glued to hot glue.
The transparent part of the lamp body is wrapped with masking tape.
Then all surfaces are coated with PVC glue and sprinkled with sifted sand. Next, the tape is torn off and the workpiece is dried.
From a 50 mm pipe you need to cut a piece of the same length as the lamp body. A hole is made in it at the edge for entering the power wire, after which the LED strip is glued. You will need 1 m of tape. This will be enough for almost 7 turns. You can take 220V tape, it is cut in multiples of a meter. When using it, you do not need a 12 V power supply.
Next, the tube with the tape and the connected power wire is inserted inside the lamp body. There it is put on the coupling glued into the lid. Ready-made lamps can be mounted on poles or simply dug in along garden paths. The result is a very beautiful backlight, from which it is impossible to determine that everything in it was made by hand. It does not take much time to assemble it, so making lamps is quite justified.
Watch the video
Light sources for street lamps
For country lamps, different light sources , for example:
- classic incandescent lamps. They are inexpensive, but as outdoor lighting they are not always economical, since they consume a lot of energy and are too bright;
- halogen lamps. Such light sources are more economical and will last much longer than conventional ones. They also differ from incandescent lamps in their reasonable light intensity. Their disadvantage is strong heating and sensitivity to sudden changes in voltage and dirt on the bulb;
- LED bulbs. They will save up to one hundred percent of electricity compared to previous options. Such lamps are not cheap, but they will last as long as possible. In addition, they do not contain mercury or other harmful components. And the durable body of such a lamp is almost impossible to break;
- solar panels. Lanterns based on them can be installed even where it is not possible to lay electrical wiring. They operate using a battery that absorbs natural energy. When fully charged, the lamp will operate continuously for 12 hours. However, they can only be installed where the sun provides maximum heat during most of the daylight hours.
Useful tips
And finally, I would like to provide you with some useful tips on how to properly make lighting in your dacha with your own hands:
- Illuminate garden paths using solar lamps. They are inexpensive, beautiful and practical, and can also decorate the area both at night and during the day.
- Never use incandescent lamps. These light sources have long lost their practicality, because... have low efficiency, short service life and high energy consumption. Opt for LED lamps.
- The degree of protection of electrical appliances must be no less than IP 43. This index means that the products are reliably protected from raindrops, accidental splashes and small debris entering the housing.
- Take your cable cross-section calculations seriously. Even small errors will lead to the conductor not being able to cope with its task. As a result, under overload, the insulation will begin to melt, which will soon lead to a short circuit.
- You can save a lot of your own money by creating a street lamp with your own hands. Today on the Internet you can find a lot of different ideas, the creation of which will require a minimum of money, time and effort.
- Once again we remind you about safety. Where possible, install 12-volt lamps with a step-down transformer. Typically, this option is used when creating illumination for a swimming pool and other bodies of water on the site.
- Take care of the high-quality connection of wires in the ground and in the air. Twisting with insulation, which summer residents love to use, is prohibited by the rules of the PUE. The conductor contacts must be connected in special terminals and couplings, which must additionally be protected by a junction box (in turn, its body is insulated with sealant).
- Be sure to make autonomous lighting for your dacha using LEDs and a car battery. In this case, if your home is left without electricity, you can continue your vacation by connecting light bulbs from a 12-volt battery. In addition, in this way you can provide lighting not only on the street, but also inside the house, because... LEDs are, of course, portable.
Making a wall lamp from flexible metal-plastic
This type of pipe is mainly used for water supply.
If there are pieces of metal-plastic pipe left after laying plumbing, underfloor heating or heating, you can use it to create sconces. This is done like this:
- 3 or more light sources are used, sockets for the lamps are selected, it is better if they are small in size. You also need pipes with a length of 25 to 50 cm, wires and a base made from a cut of wood or a piece of plywood.
- Holes for pipes are drilled on the base, which can be secured with adhesive, and then the wires are pulled through. For convenient mounting of cartridges, you can cut out small elements from plywood or simply glue them to the sealant, after connecting the cable.
- After installing the lamps, lampshades of suitable size are added from any available materials so that the light is directed to the right place.
The position of the lamps is easy to adjust due to the flexibility of the metal-plastic material.
Preparation
Sand the pipes to remove any dirt or paint markings. Determine how tall the lampshades will be. I recommend starting with a small, wide piece; this will make it easy to master the technique and even find your own design options. In general, you need to catch the inspiration and drive of creativity. Grind the ends of the pipes; if you plan to further install the lampshade on the stand, then check the level of inclination of the lower part of the workpiece.
Failures in personal life, conflict with Fedunkiv: the fate of Svetlana Permyakova
“No Joseph Kobzon, no Vali Gaft”: Sadalsky showed a photo from 3 years ago
With the help of a huge balloon, tourists can begin to be sent into orbit
Draw a lampshade pattern with a marker, thanks to it the lamp will diffuse light in space. It’s worth imagining a little, for example, you can draw a schematic flower, leaves, letters, symbols or the silhouette of a building. There are a lot of possibilities in this process, but the first experience should be simplified a little, so I decided to make squares and narrow stripes, and the end result was beautiful.
Main conclusions
The main advantages offered by self-production of lamps from tubes are:
- Low price of the finished product.
- Availability of components.
- Easy to install.
- Reliability and durability.
During the production process, as a rule, difficulties arise such as fastening the socket, grounding the housing, fastening the ceiling, correct selection of components according to parameters, fastening the lamp to the surface, compliance with fire and electrical safety.
Before assembling such a device, it is advisable to create its schematic diagram indicating all components and their characteristics, based on the rules for electrical installation work. The most common options for such lamps are a pendant chandelier made of copper or brass pipes, sconces made of metal-plastic pipes and a table lamp made of sleeves.
Forged version
Sometimes, looking at a photo of a street lamp made by yourself, it’s hard to believe that it was made by hand. Let's consider just this option. Let's take a corner, steel rods, strips and a welding machine for them.
Let's get started:
- We decorate four steel frames with a rectangular shape or trapezoid as a base.
- We weld gratings from the rods and cover the body with them.
- We cover it all with a cap-lampshade made of iron.
- A square steel bar will act as a bracket.
- Using narrow steel strips we form curled patterns. We attach them to the bottom, weld the ends and connect them with interceptions.
Assortment for choosing a model
A street lamp has its own responsibilities, it:
- plays the role of a decorative element, without at the same time depriving the area of its harmonious appearance;
- provides sufficient lighting so that owners feel comfortable on the premises even in the dark.
If a classic street structure almost always has a leg with a device on it, then you can choose a model for a homemade lamp that will serve as a decoration for the area from several types of lamps.
- Ground lamps-pedestals. These devices, installed directly on the ground, are often located along the perimeter of pedestrian paths. Other suitable places are beautiful flower beds, swings, gazebos or other recreation areas. Such ground structures are usually made either round or square.
- Wall lanterns. Such lamps are the optimal solution for illuminating the entrance to a house, veranda, or at the gate. Wall lighting comes in a variety of shapes, but the most popular are those in a retro style. Quite unexpected “raw materials” are often chosen as materials for them.
- Suspended structures. These are the most undemanding devices that can be attached to roofs, on verandas or directly to tree branches. The most popular, simple option is a long chain on which the lampshade is attached.
- Floor lamps. They are attached to the ground, and the appearance is often no different from a home device. This is a stand that ends in a round lamp. There are also more original models, when the shapes, sizes and number of shades are far from the usual classic floor lamp.
What problems arise during the manufacturing process?
When implementing a project, many difficulties may arise, the most common are:
- Different threads on fittings or mismatch in diameter.
- Instability of the structure with a small base size.
- Difficulty in attaching cartridges to thin pipes.
- Strong heating of the lamp in plastic structures.
- Poor quality insulation of wire connections.
Master class: Divine lamp made from ventilation pipes.
Assembling a craft from pipes is not difficult if you have the necessary materials on hand. The main thing is to comply with safety standards and reliably insulate the wiring to prevent short circuits. It is important to find a suitable model in advance and select lamps of optimal power.