Making a mill
There is no single instruction on how to properly assemble a mill made of wood; it all depends on the size of the product, its purpose and the chosen project. In any case, it’s worth starting with preparatory work. The surface of the beams and boards must be carefully processed with a plane, leveled, and burrs removed. Lumber, especially that which will be used to create a children's house, is additionally sanded using a grinding machine, and, if necessary, the surface is finished with sandpaper.
Foundation: necessary or not
The support of a stationary structure is the foundation. It provides stability and distributes the mass of the building over a large area. It is easy to guess that for a simple decorative mill it is not needed. Moreover, it is better to make a small wooden mill portable. If you need to fix it in place, it is enough to provide four pointed legs and press them into the ground.
In the case of creating a capital structure that will be used as a change house, a room for tools, especially as a children's playhouse, you cannot do without a foundation.
There is no need to dig a deep pit; it is enough to make a shallow strip foundation around the perimeter of the walls. The same foundation is needed when constructing a mill, the walls of which will be completely or partially made of stone.
Support platform
The manufacture of the mill itself begins with a support platform, this is the lower part, it ensures the stability of the entire structure. There are several options for the design of the support platform; it all depends on the dimensions of the future structure.
The support of a small wooden mill, which serves a purely decorative function, is a square or hexagon made of multi-layer plywood. If the plans include a children's playhouse or utility room, then plywood or other sheet material is not enough. You need a timber frame that will rest on piles or a foundation.
Case manufacturing
In most cases, the body will consist of a frame assembled from slats covered with sheet material.
The body shape is arbitrary. It can be a square or a polygon in cross section, it can be a cylindrical tower, it all depends on the owner’s idea.
When planning to create a unique polygonal design, you should be aware that the more corner joints, the more difficult it will be to achieve assembly accuracy.
The first step is to assemble the frame. The slats are cut into pieces of the required length and twisted together using self-tapping screws. When assembling a large structure, it is worth using tenon joints at the joints to add strength to them; steel angles will come in handy.
Roof
As a rule, the roof of the mill is made of a gable roof. If desired, there can be four or more slopes; a conical roof also looks good. The material for it can be the remainder of the roofing iron. If there is none, a sheet of plastic or plywood impregnated with drying oil will do.
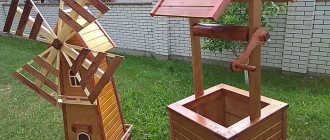
Blades
The last thing that needs to be done is to manufacture and install something without which a windmill cannot exist - the blades. Their configuration can vary; the easiest way is to make an impeller with four blades intersecting at right angles. Its main, supporting part is the slats; a wing is created at their edges. In the simplest version, these are several thin planks of different sizes.
The configuration of the blades is selected in such a way that the impeller rotates under the influence of wind. This is not difficult, you just need to fasten each board at a slight angle.
The blades are attached to a shaft - a metal rod (for a small decorative mill) or to a pipe (for massive structures). A hole of the required diameter is made in the housing, the shaft is inserted inside. For a large mill, it would be useful to strengthen the shaft entry point, or even install it on bearings.
Site preparation
To build a building, the first thing you need to do is choose a suitable location and prepare it. The area should be cleared and the location of all parts of the water mill should be planned. The ideal place to install a water mill is the bank of a stream or river: flowing water creates a constant torque for the wheel.
But since our mill is decorative, it can be built on any garden plot. A small pond is enough for the wheel to function.
If the reservoir is already equipped, then there should be no problems with installing the building. But if you are just going to build a pond and a water mill in it, then the following tips will be useful to you:
- You should not locate a pond with a mill in places with a large concentration of trees and bushes;
- the place should be well ventilated;
- if there are uneven places on the site, then it is better to build a mill on them;
- It should be taken into account that there will be high humidity and wet soil near the water mill.
An artificial waterfall is an excellent solution for a summer cottage. Read here how to make it yourself. Trellis for climbing plants will decorate your summer cottage and divide it into zones.
Model selection, evaluation and description of the designed product
My choice Model No. 3. Stylish and quite original. Available material.
The most successful product that deserves attention and respect, as it gives free rein to the imagination and freedom in solving design problems. It can serve as a good gift, as it is aesthetically pleasing and will fit well into any home interior. Can be installed anywhere in the house or room.
The main material for the manufacture of plywood of various thicknesses. I have the material and tools, and as a mechanism for driving the mill, I use the water pump of the aquarium cleaning filter. During production, an electrical device with a voltage of 220 volts is used. This option suits me.
Making a mill for the garden with your own hands
First of all, you need to draw a sketch of the future device or find it on the Internet. You can use various objects as a base, for example, wheels from a bicycle, car or toys. But you can make a mill wheel with your own hands using the following materials:
- solid wood or moisture-resistant plywood;
- metal tube;
- nuts and screws.
Half-timbering is a unique style in which the frame of the building is visible from the outside
To begin with, you need to create 2 wooden disks of equal diameter, between which blades are attached, which can be made from plywood, attach them at equal intervals. In the center of the wheel you need to install a piece of metal tube for the axle, with the help of which it will be attached on one side to the mill body, on the other - to the support, it is assembled from wooden blocks. They should be installed firmly enough using fasteners.
Instructions
A water mill is a hydraulic structure that uses the energy of water movement. To transfer the force from the water flow to the working element, a water wheel was invented, usually equipped with a gear drive. To make the water flow more powerful, the river on which it was installed was blocked with a dam. A hole was left in this artificial obstacle through which the jets penetrated. Water fell on the wheel blades, causing it to rotate.
Apparently, the prototype of the first water mills were irrigation machines, through which water was raised from reservoirs to the fields to irrigate crop areas. The first such devices were wooden rims on which scoops were mounted. When a wheel mounted on a horizontal axis was placed in the river, it began to rotate. The scoops were successively immersed in the water and rose to the top, after which they were tipped over into a special chute.
The described principle was the basis for the operation of a water mill. Only now the rotating wheel did not supply water, but set in motion a special mechanism. Powerful jets of water acted on the blades of the wheel, it rotated at a constant speed, and the force was transmitted to the shaft. This shaft ended with a device that directly grinded the grain.
One of the most critical components of a water mill is its transmission mechanism, designed to convert rotational energy. Mechanics of the past used a wheel drive for this purpose. It consisted of two wheels, the axes of rotation of which were parallel to each other. When the drive wheel began to rotate, friction arose between the elements of such a system. At this moment, the driven wheel was also set in motion.
Subsequently, instead of smooth wheels, gears began to be used in transmission. This solution increased the traction force and prevented slippage. Such an invention was made quite a long time ago - about one and a half to two thousand years ago. The biggest disadvantage of gear transmission at that time was the complex technology of its manufacture, which required high precision when cutting teeth.
Solving the difficult problem of inventing a transmission mechanism made the water mill efficient and easy to use. This mechanism was further developed and for many centuries was used not only in agriculture for grinding grain, but also in industry, where it powered a variety of tools. Historians consider the invention of the water mill to be an important step towards advanced machine production.
When a dacha plot is needed not only for hard work, but also for relaxation, there is a desire to arrange a pool or fountain on the plot (at the dacha or in the yard), decorate them with stone figurines, night lamps, and install a garden swing. The quiet murmur of water on a hot summer afternoon creates an unusually pleasant sensation. A decorative water mill will be a wonderful addition to the design of your garden plot. How to make a water mill with your own hands? We will make it in two approaches.
A water mill can be built of any size. It all depends on the dimensions of the site, but a small mill up to one meter high will look best.
Medieval hydraulic structures
The first water mills in Europe, according to historical data, appeared during the reign of Charlemagne (340 AD) in Germany and were borrowed from the Romans. At the same time, such mechanisms were built on the rivers of France, where by the end of the 11th century. there were already about 20 thousand mills. At the same time, there were already more than 5.5 thousand of them in England.
In the Middle Ages, water mills were widespread throughout Europe; they were used for processing agricultural products (flour mills, oil mills, fulling mills), for lifting water from mines and in metallurgical production. By the end of the 16th century. there were already 300 thousand of them, and in the 18th century. - 500 thousand. At the same time, their technical improvement and increase in power growth took place (from 600 to 2220 horsepower).
The famous artist and inventor Leonardo da Vinci, in his notes, also tried to come up with new ways to use the energy and power of water using wheels. He proposed, for example, the design of a vertical saw, which was driven by a stream of water supplied to the wheel, i.e. the process became automated. Leonardo also made drawings of several options for using hydraulic structures: fountains, methods of draining swamps, etc.
A striking example of a hydraulic power plant was the water supply mechanism for constructing fountains and water supply to palaces in Versailles, Trianon and Marly (France), for which a dam was specially built on the river. Seine. From the constructed reservoir, water flowed under pressure onto 14 bottom wheels measuring 12 m. They lifted it using 221 pumps to a height of 162 m to the aqueduct, from which it flowed into palaces and fountains. The daily volume of water supplied was 5 thousand m3.
Water mill design
Construction will be completed only after the house and its surroundings are decorated. There are many possibilities for designing water mills. Let's look at the most common of them.
Country
This is a rustic design. Wooden details dominate.
Next to the mill you can build a mini-bedroom made of solid wood or logs, an orphanage, a decorative wooden cart with flowers and various wooden figures.
Flowers should be simple, nothing exotic (chamomile, sunflower, etc.).
Half-timbered
This type of milling machine requires metal tiles, white and brown (instead of brown, you can use wood-look impregnation) for walls and decorative thin slats (need to be treated with the same color or impregnation).
The house is painted white, with decorative strips glued on top that divide the surface into small squares and triangles. Thanks to this, the facade looks very picturesque.
Next to the tiller you can place a dark (brown or black) bench with a back, a brown or white flower bed. Flowers are planted in light shades of flowers.
Japanese style
The design is simple and unnoticeable. This style is based on stones, plants and water. The house is decorated with dark stones. The mill wheel can be decorated with sand, pebbles or pieces of shell.
If desired, you can build a stone tower with tall slender windows. The benches are made of stone, the flower beds are also made of stone.
Plants use suitable ones - cherries, low-growing cherries, dwarf trees.
Interesting decorative water mills:
Watch this video to see how a water mill works from a natural stream of water - a river:
Page 2
Various design solutions help make a country house beautiful.
One of them is a decorative mill that fits harmoniously into any landscape and is a wonderful addition to the garden.
You can build your own decorative windmill very quickly and inexpensively.
Selecting a style match
As a decorative element, a water mill can decorate a garden in any style. Once upon a time, this building became part of not only European culture, but also Russian culture. It is associated with the aroma of freshly baked bread, home comfort and a fairy tale, so it is an excellent find for those looking for a colorful landscape design detail.
The mill is a symbol of comfort and prosperity: where it is, there can be no troubles or surprises, it always smells of fresh bread and fresh milk
Depending on the decisions we make in the process of constructing a water mill, it can look fabulous in the Russian spirit, have a medieval Gothic look, or acquire futuristic features.
This feature of the structure must be taken into account and thought in advance about how to make a water mill so that it meets the general idea of landscape design.
The water mill must fit harmoniously into the overall style of the site and fully comply with its landscape design
A massive wooden mill will be in dissonance with elegant fountains and openwork bridges in the style of classicism. And a fairy-tale gazebo in the Russian style will simply visually crush a neat Japanese mill. Let's think about how we can use this structure for different style solutions.
Country or rustic style
Typical elements of the country style include wooden benches and gazebos, wickerwork, bridges made of logs and houses for children, also made of wood. A mill in the same spirit, equipped with a wooden wheel, can perfectly maintain stylistic unity.
You can learn more about decorating a garden in country style from the following material:
A country-style windmill harmonizes perfectly with its specially aged wheel with other design details: for example, a fence or a bench
The color of the old manor in the Russian style is emphasized by wooden sculptures, a flowerbed cart and a log frame of a well. Plants that fit the theme will complement the picture, so take care of reeds and primroses, sunflowers and daisies. The artificially aged wheel of the structure will complement the picture of patriarchal village life.
Recent Entries
Lilac perennials that are beautiful, compact and do not crowd out other plants Why when buying seedlings you should not take the sellers’ word for it and how to determine the age of the plant using 3 signs Tomato seedlings have turned purple or whitish: why the color has changed and how to save the plants
Noble Japanese style
The main idea of Japanese design is that there should be nothing superfluous in sight. Only stones, water and plants, which are so pleasant to admire. A mill wheel can be an addition to a stone castle with loopholes and towers. Stone benches will give you the opportunity to relax while looking at the water and the measured rotation of the wheel.
The Japanese mill harmonizes perfectly with the given style, in which the eye should not cling to unnecessary unnecessary details
The general atmosphere of peace will fully comply with the canons of Japanese philosophy, in which the melody of a stream is considered more beautiful than the sounds of musical instruments. Arizema, dwarf Japanese maple, low-growing sakura and wonderful Japanese quince can successfully complement the overall feeling.
The rock garden has become an integral part of Japanese style. Read about the rules for creating it:
Symbolism of the Dutch garden
If in other cases a water mill serves as a unique highlight, then when creating a garden in the Dutch style it can become the main element of landscape design, around which compositions of garden roses, daffodils and tulips will unfold.
The Dutch-style mill is colorful and laconic at the same time: daffodils, tulips and roses will wonderfully complement the overall picture
If the decorative structure is a miniature, a kind of model of a working water mill, it can be made in the form of a half-timbered house, typical of Holland and Germany. Garden gnomes, water gnomes or an elegant weather vane are an excellent addition that emphasizes the style of the building.
Construction Features
To build a mill, you need to take into account a number of nuances.
Selecting a location
It is important to consider the rotation of the blades. Therefore, there should be no foreign buildings or structures nearby
It is advisable to choose a flat area, otherwise the building may be skewed. The area is cleared of all vegetation and other disturbing things. They also take into account how everything will look externally.
Tools and materials
You can even build a windmill from plywood, durable plastic or metal. Nobody forbids combining them either. But still, the classical approach is optimally matched by the use of wooden boards, timber, and plywood. Polyethylene is used for waterproofing, and roofing material is used for the roof. Therefore, we also need hammers and nails, drills, saws and other tools for wooden construction: planes, angle grinders, buckets and brushes.
Foundation
Despite the decorative nature of most windmills, the construction scheme still involves preparing the foundation. Digging a hole and pouring mortar is not necessary. It is quite enough to use a laying of timber or logs. Usually the design is close to a trapezoid in shape. The inner and outer frames are connected using vertical posts placed at a given angle.
Walls and roof
When covering the structure, pay attention to the openings of windows and doors. The point where the blades are mounted is also critical.
Doors are installed with auxiliary fastenings. Beams with blades can be supported with timber. Upholstery can be done with any material that provides a hermetically sealed surface; wood covering is the most colorful.
The shape of the roof is chosen individually. A smooth and straight coating is no worse than one installed at an angle. A layer of roofing material will provide sufficient waterproofing. The front roof is made using boards or plywood. There is no need to use more decorative finishing options.
Wind generator installation
The mill must be placed on a dry, prepared area. Anchors are used as necessary to ensure rigidity of the fastening. You should definitely check the laws and regulations to avoid problems. In any case, the recommendations for electrical safety and grounding are also followed. It is necessary to connect the generator through wires of a certain cross-section and in “street” insulation.
Use of water energy in the East
The use of water wheels in China was first described in detail in a book by Sun Yingsin in 1637. It details their use for metallurgical production. Chinese designs were usually horizontal, but they were powerful enough to produce flour and metal.
The use of water energy was first started back in the 30s. n. e., after the invention of a reciprocating mechanism based on water wheels by a Chinese official.
In Ancient China, several hundred mills were built along rivers, but in the 10th century. the government began to ban them because they interfered with river navigation. The construction of mills gradually expanded in neighboring countries: Japan and India, and Tibet.
Making a water mill yourself
A water mill mounted on a garden plot must correspond to its size. Agree that on the traditional six hundred square meters, an epic structure made of logs will look funny. But a working miniature will come in handy. A medium-sized mill house can be used to store equipment or children's toys.
To begin with, you can build a model of a mill. For this you will need:
- paving slabs size 75x50 cm;
- paving stones, which look like cubes in the picture;
- wooden slats;
- bitumen shingles;
- plywood;
- threaded brass rod;
- bushings;
- screws and dowels;
- glue for woodworking;
- protective impregnation.
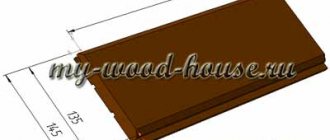
All dimensions of the structure are shown in the figure below.
All dimensions of this model are given in centimeters; by carefully examining the diagram and reading the instructions for creating the model, you will not be mistaken when performing the work
We attach cube stones in the shape of the number “9” along the edge of the paving slabs. We cover them on top with a solution, which we level with a damp sponge. Use a jigsaw to cut the slats to size. From these we assemble the frame of the structure. To make this connection, we glue the racks together, and secure the corner parts with a “half-wood” notch.
In order for the result of the work to cause satisfaction, it is necessary to complete it without haste and consistently, moving from one stage to another.
We attach the resulting frame to the base through the struts with dowels and screws. We fill the frame with tiles. To do this, we cut it to size with a circular saw and glue it with silicone. We apply the image of the wheel rims to a sheet of plywood, and then carefully cut out the parts with a jigsaw.
All wooden parts of the structure should be thoroughly impregnated with an antiseptic solution: the structure will be located outdoors in snow and rain
We glue pieces of aluminum corner to one half of the wheel at distances that correspond to the intervals between the spokes. The corners imitate wheel blades. We make a support for the wheel, gluing it and connecting it with screws to be sure. A glued piece of aluminum pipe will strengthen the hole for the axle.
The wheel is the working part of the mill, the quality of which should be given special attention, because the overall life expectancy of the structure depends on its service life
A brass rod is used as an axis. A spacer sleeve and an aluminum tube are placed on it as reinforcement for the wall. Another spacer is needed to provide clearance between the support and the wheel. A nut is screwed onto the thread of the brass rod.
The finished mill looks great and is pleasing to the eye; check again how securely all its elements are fastened, and you can start testing on the water
The upper part of the structure frame is sheathed with slats. Wooden corners that are glued to the corners of the lower part allow the individual structural elements to be correctly aligned. The tiles are cut with a wallpaper knife and glued with bitumen glue. The structure is ready.
Even a full-size structure, placed in the right place, will decorate the site and make it even more comfortable. See for yourself.
Safety precautions when performing work
When sawing with wood saws, hacksaws and other hand tools, keep the following in mind:
- You can only use serviceable, well-sharpened saws with correctly spaced teeth. Saws that are dull cannot be used.
- It is necessary to firmly clamp the material being processed in a workbench vice or other means.
- Maintain the correct position and hold the tool correctly; be attentive and careful in your work.
- It should be especially taken into account that the most dangerous moment when sawing is when the saw blade is guided along the risk using the thumb or second joint; Do not allow the saw to jerk, especially forward, when cutting.
- It is not allowed to keep your left hand close to the cut.
- The full swing of the saw can be made only after the formation of a deep cut in which the saw is well held.
- Thin material should be sawed with a fine-tooth saw; The position of the saw should be inclined. Normally, there should be at least 4 - 5 saw teeth in the cut.
- Sawing carefully without jerking or bending the saw blade in the cut to avoid tearing the saw blade.
- The end of the twist is not allowed to extend beyond the beam spacer, since the protruding end of the twist can get caught in the material being cut and come off the spacer.
- At the end of the work, the saw blade of the bow saw is turned with the butt outward and the teeth inward of the bow. The string is loosened by turning the twist in the opposite direction two or three times; When storing the saw, hang it on a nail by one of the beam posts.
Safety rules when working on a drilling machine
- Drilling can only be done on a working and grounded machine. All belt and gear drives must be protected by a durable casing to prevent worker hands or clothing from getting into them. All exposed rotating parts with protrusions (bolt and key heads, screws and nuts) must also be protected. It is necessary to ensure that all barriers are in good working order and in place;
- The workpieces must be firmly secured to the machine table or fixtures.
- It is strictly forbidden to hold parts with your hands, as well as to change and install tools in a rotating spindle or to use faulty devices and tools;
- the drill must be secured correctly and accurately;
- It is prohibited to transfer belts from one pulley stage to another while the electric motor is running;
- It is prohibited to blow chips off the table and out of the hole. You should remove shavings from the table only with brushes or hooks, but not with your hands (even with protected mittens);
- The sleeves of the worker's overalls should be tied with short ribbons or fastened with buttons. A headdress must be worn on the head, under which the hair must be tucked away;
- When drilling brittle metals, you must use safety glasses.
Finishing work
- Before performing work, ensure that the parts to be painted are securely fastened and cover unpainted areas with paper.
- Painting should be done in a well-ventilated area using an aerosol can.
- Be careful not to get paint in your eyes or face.
- After dyeing, wash your hands with soap.
Economic and environmental assessment of the project
The market value of my product can be calculated as follows: RS = C + 3T (where RS is the market value, C is the cost, 3T is labor costs). 1. I calculate the cost:
- Spray paint 130 rub.
- Self-tapping screws for wood 50 rub.
- Hanging hinges 60 rub.
- Bearings 100 rub.
Total: 340 rub.
2. I calculate labor costs:
- An hour of student work is 15 rubles.
- The product took 12 hours to produce. 15 x 12 = 180 rub.
Total labor costs – 180 rubles.
3. Market value is equal to: RS = 340+180 = 520 rubles.
Conclusion: in a store such a product will cost at least 1000-1200 rubles.
Having calculated the initial cost of the product, we come to the conclusion that our model is significantly less than the cost in stores and on the market. The product is justified from an economic point of view. This means that it is profitable to make a working model of a water mill with your own hands.
Environmental justification for the project
In the manufacture of the water mill model, environmentally friendly and safe materials and technologies were used. The main material used for this work is multilayer plywood. In the manufacture of the product, manual processing of wood is used, which is accompanied by a small amount of waste.
Waste can be easily disposed of. Other parts of the product are not processed, i.e. standard parts are used (self-tapping screws - used when connecting wood materials; plug, electrical cord, switch - common electrical fittings). After the end of its service life, the product can be easily disposed of, and many of its parts can be used for other purposes.
Self-assessment and aesthetic assessment of the product
Positive aspects of the project:
- The goal has been achieved.
- Materials are available.
- Manufacturing technology is feasible.
- It fits into the range of needs presented for my project.
- Much cheaper than at the market or in a store.
- The experience gained from making it will be useful in the future.
- I developed the form and originality of the project myself.
- It will be easy to repair if it breaks.
- No instructions for use required.
Negative aspects of the project:
- There may be problems related to the overall dimensions of the product.
- Problems may arise during the manufacturing process because tools with cutting or piercing ends are used.
Conclusion and conclusion on the topic
While working on the project, all the tasks were solved :
- an economical and technologically advanced, fairly durable design has been developed;
- based on the studied technologies, a technological process for manufacturing the product has been developed;
- according to the developed technical documentation, the product was manufactured on time;
- In the process of working on the project, educational material for grades 5-9 was repeated.
Therefore, I believe that the goal of developing and manufacturing a water mill has been achieved.
The results obtained during the project show the possibility of producing this model in other educational institutions, using it as a visual aid in physics lessons, art, etc. The developed technical documentation can be used in technology lessons and in technical creativity circles.
Today, when industrial goods have filled our everyday life, I propose to make a product with your own hands, introducing elements of creativity and individuality into the world around us. And most importantly, you will get great pleasure from the thing made by your labor combined with original imagination.
Construction of a water mill model
Figure 4. Diagram of a submersible pump for a water mill.
Before building a full-size mill, it's worth considering whether its dimensions are appropriate for the amount of space available. On a standard garden plot that is not particularly spacious, a huge structure will look ridiculous and out of place. Instead, it is recommended to assemble a smaller miniature model that will fit perfectly into the design of a not too large yard. A drawing with exact dimensions (in centimeters), according to which the building can be accurately assembled, is shown in the diagram (Fig. 5). To build a model of a water mill, you may need the following materials:
- paving slabs with dimensions 75x50x5 cm;
- cobblestones for the pavement (gray cubes in the diagram);
- bitumen shingles;
- brass threaded rod;
- aluminum corner;
- bushings, nuts, screws, dowels, nails;
- wooden mounting rails;
- plywood;
- special glue and protective impregnation for wood.
The following tools will also be useful:
Figure 5. Drawing of a water mill.
- jigsaw;
- circular saw (grinder);
- hammer, screwdrivers;
- damp sponge;
- knife;
- pencil.
Stone cubes (pavement cobblestones) are laid in a row along the edges of the sidewalk slabs, and the solution is applied on top and smoothed with a moistened sponge. Wooden slats are cut to size using a jigsaw, then the supporting structure of the structure, similar to a frame, is formed from them. The joints are adhered with wood glue, the corner elements are fastened with a half-wood notch. All wooden assembly elements must be impregnated with a protective solution so that the building can withstand many years of inactivity in the open air, washed by rain and snow. The formed frame, supported by braces, is attached to the base with screws. Then the frame windows are filled with pieces of bitumen shingles, cut to appropriate sizes with a grinder and secured with silicone glue. The design of the wheel rims is drawn on the plywood sheets with a pencil, then the required shapes of the parts are cut out with a jigsaw.
Pieces of aluminum corner cut into equal parts are glued to one of the two wheel rims, simulating water intake blades.
Next, you need to make a support for the resulting water wheel. It must have high reliability, so after gluing it is recommended to strengthen the structure with screws and drive an aluminum bushing into the axial hole. The wheel should also be made carefully and reliably, since the durability of the entire structure depends on its quality.
The mill axis is a brass rod onto which a spacer sleeve should be placed along with an aluminum tube, which will strengthen the fastening to the wall. Then the previously assembled wheel sits on the axle. The same bushing is necessary to separate the wheel from the support so that there is a gap between them. Then the axle is screwed with a nut, for which the rod must have a thread. The upper half of the mill frame must be covered with wooden slats.
https://www.youtube.com/watch?v=iXS5X3_41no
In the lower half, wooden corners are attached to the corners using glue. This is necessary for the correct combination of building parts. Using a knife, pieces of roofing tiles are cut out, which are then glued on top of the house.
Selection of materials and tools
To make my model, I will use multi-layer plywood with a thickness of 4mm. up to 12 mm.. I will also need additional materials: paint, wood screws, bearings, nails, PVC pipe, etc..
Tools – a hacksaw for wood, a jigsaw, a hammer, wire cutters, a screwdriver, an electric drill, a screwdriver, a metal ruler, a set of hole saws (crowns) for wood.
Assessing your capabilities
Before I begin to implement my idea, I need to assess my capabilities: whether I have enough knowledge, skills and abilities to carry out my plans.
| I know | I want to know (find out) | Where can I find out? |
| 1. Safety rules. 2. How to use carpentry tools. 3.How to operate a drilling machine. | 1. How to calculate the transmission mechanism and correctly assemble the structure. 2. How to correctly select the flow of water falling on the mill wheel. 3. How to beautifully design completed work | 1. In books and magazines. 2. on the Internet 3. With the technology teacher. |
Preliminary economic calculations
Having analyzed all of the above, I think that I can cope with the task.
Before I get to work, I need to look at what I have and what I need to buy. For the layout I will need :
- plywood - available in the workshop;
- self-tapping screws, hinges - need to buy;
- water pump, with switch and plug - the teacher has it;
- bearings - need to buy;
- paint - need to buy.
To buy materials you need money, but it’s a very small amount, so I decided to ask my parents.
Now you need to calculate how much money is needed for the product.
| № p/p | Name | Price for 1 piece. | Consumption | Expenses |
| 1. | Spray paint | 130 rub. | 1b | 130 rub. |
| 2. | Wood screws | 50 rub. package | 1 PC. | 50 rub. |
| 3. | Hinges | 10 rub. | 6 pcs. | 60 rub. |
| 4. | Bearings | 25 rub. | 4 things. | 100 rub. |
Total: 340 rub.
Having calculated the initial cost, we come to the conclusion that it is not high. Therefore, we can conclude that the product is justified at the initial stage from an economic point of view.
Water mill manufacturing technology
- Make a base, taking into account the reservoir.
- Sawing out the main structural elements of the mill.
- Making a water wheel using hole saws, and its assembly and installation on bearings.
- Manufacturing and installation of gutters.
- Preparing the reservoir, checking for water tightness.
- Installing and adjusting the water pump.
- Decorative design of the product.
- Assembly quality control, checking the functionality of the water mill.
How to make a water mill in the garden with your own hands
Let's begin the description of the process by repeating the recommendation about the commensurability of the size of the mill wheel and the plot - a permanent structure made of logs in a garden on six acres will look at least illogical. A working smaller copy of a real water mill will be much more interesting. First, we draw a sketch of the future structure and draw its design.
creating conditions for the mill to operate
The ideal option would be to locate the mill near a reservoir with running water. But such conditions are extremely rare, i.e. in any case, you will have to provide a difference in water level.
The easiest way is to position the mill wheel so that when it rains, waste water flows onto the blades from the drainpipe. In the rain the wheel will spin on its own. The flowing water can be directed through a gutter to the side of the beds and used for watering the plants.
To ensure the movement of the wheel in sunny weather, you will need to resort to the construction of a falling stream. To do this, install a water collector; you can use a plastic cube or bathtub, or a large barrel. Next to the container we build something like an alpine slide, at least 0.5 m high.
For work, you can use various construction waste: leftover bricks, stones, crushed stone. A hose should be installed inside the slide, one end of it should be located in the lower water collector, the other at the highest point of the slide. To camouflage the hose, beautifully overhanging stones or climbing plants can be placed above its exit point. This decor will look very natural, as if water naturally flows out from under the stones.
A pump installed in a drainage tank will ensure that water rises up the hill. The pump should be selected so that its power is sufficient to lift water to the required height. When the pump is turned on, water flows up the hose, then naturally falls down, hits the wheel blades and sets it in motion.
If the area of the site is terraced, then you can build a beautiful water cascade. For this option, you will need several trays or gutters (in accordance with the number of steps), their length should be equal to the width of the terrace steps. Drains are laid across the terraces with a slight slope. When laying, make sure that water flows from the upper gutter into the lower one. A hose is connected to the gutter located at the top, and a storage tank is installed under the lower gutter. The wheels of decorative water mills built into this cascade will look very attractive.
construction of a water mill with a house
For work, you can use a wide variety of materials, depending on the style of the house being built. By the way, it will be possible to place a pump in it to pump water from the lower reservoir to the upper reservoir.
how to make a wheel
To create it, you can use a wide variety of items: a plastic coil from a wire, a wheel from an old bicycle, a plastic wheel from a toy windmill, a piece of plastic pipe with attached blades. The main thing is compliance with the basic design principle - a round base with blades attached to it.
In the center there should be a fragment of a pipe that will fit onto an axis of the corresponding diameter. The best option is to use two identical bases for the wheel gear with blades fixed around the perimeter. The blades can be secured using screws or welding.
To install the wheel, you will need to build a support. As such, you can use a pipe rigidly fixed in the wall of the house; you can build two supports with an axis fixed between them. The wheel mounted on the axle should rotate easily.
assembly features
The installation of the water supply trough located at the top must be done in such a way that water falling on the blades causes them to move. If wooden elements were used to create the wheel, they should be treated with impregnation and coated with high-quality varnish.
build a house from scrap materials
You can build a mill house from any suitable material: pieces of brick or stone, thereby emphasizing the solidity of the structure; moreover, such a house is best placed on a foundation. For a rural landscape, a wooden house with a reed or thatched roof is suitable.
Boards, tiles, and boxes can be used. Wooden fragments used in construction should be treated with antifungal impregnations and covered with a layer of varnish - this will prolong the life of your structure. You will also need to show your imagination and come up with a way to beautifully decorate the house.
Use of hydropower in various industries
In addition to flour production, the scope of application of water mills extended to the following types of production:
- for reclamation and provision of water to crops in the fields;
- a sawmill that used water power to process wood;
- metallurgy and metal processing;
- in mining industries for processing stones or other rocks;
- in weaving and woolen manufactories;
- for lifting water from a mine, etc.
One of the most ancient examples of the use of water power is the sawmill in Hierapolis (Turkey), its mechanisms were discovered during excavations and dated back to the 6th century. n. e.
In some European countries, archaeologists have discovered the remains of old mills from the era of Ancient Rome, which were used to crush quartz containing gold mined in the mines.
The largest complex using the power of water was built, according to historical data, in the 1st century. in the south of France called Barbegal, which had 16 water wheels that powered 16 flour mills, thus providing grain for the nearby town of Alert. 4.5 tons of flour were produced here every day.
A similar mill complex on the Janiculum hill supplied supplies in the 3rd century. the city of Rome, which was appreciated by Emperor Aurelian.
Design and principle of operation of a water mill
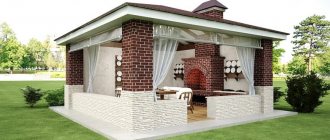
The decorative mill serves both practical and decorative purposes in the country house. It can be made from various materials, the most popular of which are stone and wood.
It is noteworthy that even broken bricks are suitable for the construction of such a building, and modern construction methods of decoration will make it possible to make it presentable.
Flowing water has always attracted people; it calms and inspires, and gives coolness in the summer. To obtain such comfortable conditions on their site, they build a mill. The building adds attractiveness and romance to the landscape; it has always been considered a mysterious place where mermaids live.
The design of a water mill, which is used as decoration, is quite simple. It consists of the following parts:
- A wheel with blades that turns the current.
- Trench for supplying water to the product. The ideal option is a mill on the bank of a stream that drives the main element. In the absence of such conditions, water is supplied to the working area from an upstream lake or using a pump.
- Axle and wheel support. A pin threaded through the element is fixed to two posts on both sides of the stream. If there is a room, the axis can be fixed to its wall on one side.
The principle of operation of a water mill is this: the flow enters the wheel from above and rotates it, flowing out from the other side. If the flow is created artificially, the liquid is supplied upward using a pump and the process is repeated again.
At the dacha, a building can perform several functions:
- Decoration of a suburban area;
- Masking of other structures that have an unsightly appearance;
- Protection of dacha communication elements from precipitation;
- Storage of tools.
Water mills built near streams are often adapted to drive various mechanisms, their choice depending on the strength of the current. The wheel is often used to generate electricity. To do this, a generator from the car is connected to the rotating element. The simplest design allows you to receive an electric current with a voltage of 12 V. This is enough to illuminate the territory of a summer cottage.
To produce high-power electric current, it is necessary to solve several problems: build a strong, massive structure that can rotate for a long time without breaking, and obtain permission from local authorities. There will also be technical difficulties - how to protect the water mill mechanism from moisture and ensure easy movement of the wheel. Such problems will not arise if you only deal with decorative projects.
Construction of mills in Rus'
In ancient Russian chronicles, mention of water wheels and mills dates back to the 9th century. At first they were used exclusively for grinding grain, for which they were nicknamed “flour” and “bread”. In 1375, Prince Podolsky Korpatovich granted the Dominican monastery with a charter the right to build a grain mill. And in 1389, such a building was given to the wife of Prince Dmitry Donskoy according to his will.
In Veliky Novgorod, a mention in a birch bark document about the construction of a mill is dated to the 14th century. Pskov Chronicles of the 16th century. they talk about the construction of such a structure on the Volkhov River, to which the entire local population was involved. A dam was built to block part of the river, but it collapsed due to heavy flooding.
On flat terrain, water mills in Russia were built with a top-flowing wheel. In the 14th-15th centuries. Whorl-shaped devices began to appear, in which the wheel was located horizontally on a vertical shaft.
Such structures were built by self-taught craftsmen without any drawings or diagrams. Moreover, they not only copied already erected structures, but each time added their own innovations to their design. Even during the time of Peter the Great, masters from European countries began to come to Russia, showing their skills and knowledge in this field.
One of Peter’s associates, the famous engineer William Genin, who built 12 large factories in the Urals, was able to ensure their operation from hydraulic power plants. Subsequently, water energy was widely used by specialists in the construction of mining and metalworking enterprises throughout Russia.
At the beginning of the 18th century, about 3 thousand manufactories operated throughout the territory, which used hydraulic installations to operate production. These were metallurgical, sawmills, paper, weaving and other enterprises.
The most famous and unique complex for providing energy to a mining and metallurgical plant was built in 1787 by engineer K. D. Frolov at the Zmeinogorsk mine, which had no analogues in the world. It included a dam, water intake structures, from which water passed through underground adits into an open channel (535 m long) to the mill, where the sawmill wheel rotated. Then the water flowed through the next underground channel to the hydraulic wheel of the machine for lifting ore from the mine, then to the third and fourth. At the end, it flowed through an adit more than 1 km long back into the river below the dam, its total path was more than 2 km, the diameter of the largest wheel was 17 m. All structures were built from local materials: clay, wood, stone and iron. The complex operated successfully for more than 100 years, but only the dam of the Zmeinogorsk mine has survived to this day.
Research in the field of hydraulics was also carried out by the famous scientist M.V. Lomonosov, who put his scientific thoughts into practice by participating in the creation of a colored glass enterprise based on the operation of a hydraulic installation with three wheels. The works of two more Russian academicians - D. Bernoulli and L. Euler - acquired worldwide significance in the use of the laws of hydrodynamics and hydraulic engineering and laid the theoretical foundation for these sciences.
Windmill decorative or functional
A windmill (wind turbine) will be an excellent decoration for a summer cottage of any size and shape, you just need to choose its size and design wisely. The dimensions of the structure vary widely; it can be a toy house a few centimeters high, decorating a flowerbed or well, or it can be a full-fledged permanent structure that performs very specific household functions.
Before designing and creating such an original decoration of the site, it is worth answering the question why a mill is needed:
- A windmill is an excellent decoration for a yard or garden. It will emphasize a special rustic style and set the vacationer in a lyrical mood;
- a medium-sized mill will help hide unsightly places in a summer cottage (sewer hatch, ventilation hood, etc.);
- You can make a doghouse in the form of a mill. Surely your pet will like such original apartments;
- a reliable “capital” building will become a favorite place for children. In such a house you can play with friends, hide from your parents, hide from the rain;
- A large and spacious windmill will be an excellent place to store garden tools. On the one hand, it will decorate the territory, on the other hand, it will save the owner from the need to build bulky sheds that spoil the appearance of the site;
- If a wooden garden mill has rotating blades, then it can protect the area from mole invasion. To do this, the mill must be placed on legs and dug 10–25 cm into the ground. As the blades rotate, vibration will be transmitted to the legs, which will drive pests far beyond the site.
Among other things, it is worth mentioning the possibility of using a homemade windmill to generate electrical energy. Of course, this is much more difficult than making a simple decorative element; it requires knowledge, calculations, and expensive equipment.
Wheels for water supply in Islamic countries
The countries of the East, where people profess the Islamic religion, are mostly areas with a very hot climate. Since ancient times, regular water supply has been very important. Aqueducts were built to supply water to cities, and to raise it from the river, mills were built, which were called “norii”.
According to historians, the first such structures were erected 5 thousand years ago in Syria and other countries. On the Orontes River, one of the deepest in the country, the construction of norias was widespread in the form of huge wheels of water mills, which scooped water with numerous blades and supplied it to the aqueduct.
A striking example of such a structure is the norias of the city of Hama, which have survived to this day, the construction of which dates back to the 13th century. They continue to work to this day, being both a decoration and a landmark of the city.