Nowadays, there are many different ways to improve the territory in a private or country house, or simply in a country house. Most owners want to make their territory beautiful, but at the same time very compact and unique. The most optimal and acceptable option for landscaping your territory is paving slabs.
Of course, laid paving slabs in your yard will bring joy and delight for many years. However, the quality of tile laying is not unimportant.
You can call a good specialist who will do this work quickly and efficiently, but you can also do this work yourself. Therefore, if you decide to improve your territory yourself, this article will help solve this problem.
Material advantages
Paving slabs are considered the most popular finishing material when arranging the territory, as well as when laying out various paths. At the same time, the tile has a number of positive characteristics due to which it is in high demand.
- does not require special skills and knowledge, so you can lay the tiles yourself without turning to specialists.
- There is a large selection of tiles of various shapes, colors and structures. All this will mainly help bring any design idea to life, while the tiles fit well on the site.
- has increased resistance to wet conditions, while the tiles are not at all afraid of water and other precipitation.
- has a long service life. The material used to make paving slabs can withstand enormous loads for decades, but the tiles will not lose their performance properties.
- ease and convenience of repair work. The main feature of repair work is that if somewhere in a certain area there is a damaged tile, then in this case there is no need to repair a large area. In this case, it is enough to remove the damaged tile and replace it with a new one; almost anyone can cope with this task.
- The material used to make any tile is highly environmentally friendly, so it will not have a harmful effect on human health, this is important.
Flaws:
- laying paving slabs has a high cost of work, although not very significant.
- It requires using quite a lot of material to lay tiles, and it will also take a lot of time.
- With complex design work, it is not always possible to do such work yourself, so here you will need the help of a professional craftsman. Services of this kind will require additional costs.
Therefore, when choosing a tile, you need to take into account all the pros and cons, think through all the nuances well, and only then make a definite choice.
What determines the choice of pattern and shape of paving slabs?
It is important to understand that the purchase and installation of this type of coating is made with the prospect of using it for more than one year, and maybe even a decade. Therefore, the choice of materials and their arrangement must be taken very carefully. In addition to taste preferences, the choice of shape and pattern of paving slabs is influenced by the following important factors:
- area and shape of the site;
- the purpose of using the future coating;
- natural component of the surrounding landscape;
- tiles or paving stones in the yard should match the overall style.
To decorate pedestrian paths, tiles with a thickness of 3-4 cm are quite suitable. If periodic movement of a passenger car is planned on the finished surface, then it is better to choose elements with a thickness of 4 to 7 cm. A thickness of more than 7 cm is suitable for any purpose.
Rough tiles with good resistance to temperature changes can be used as flooring under a canopy or on a terrace.
To improve the area around a private house, you can use a ready-made layout scheme. Or give free rein to your imagination and create an original, unique pattern that will become a real decoration of the site.
Preparation for installation
Before starting work, you need to proceed to the main stage, this is preparing the area for the future placement of the tiles. So, at the preparatory stage, the first thing you need to do is remove the turf to a depth of no more than 20 cm. Next, this space needs to be cleaned, as well as various roots of plants or trees, and stones removed.
But if the soil at the intended location for laying tiles has clayey soils, then a drainage system will need to be installed here. This is very simple to do, just build a small slope along which all the water from the coating will flow down the slope.
Next, you will need to tamp the prepared area where you plan to lay the tiles. You can, of course, make a homemade tamper from a small log and a smooth board, but it is still better to use a tamper. After this, you will need to make in-depth grooves where curbs or side stones will be installed.
Next, an important point is to make a special concrete cushion. This cushion is designed so that side stones or curbs can be installed on it. After the pillow is ready, it is necessary to lay out ready-made crushed stone or small stones. Then you can smoothly move on to the work of preparing the base.
So, at this stage you need to make a sand powder about 10 cm thick. However, many people prefer crushed stone that has a fine fraction, perhaps this is a good option, but it is most preferable to use sand.
It happens when the area where the tiles are planned to be laid has slightly heaving or wet soil, then in this case it is necessary to use special geotextiles, which must be laid in several dense layers. The next stage is adding crushed stone. In such work, it is recommended to use crushed stone with a fraction size of no more than 20 mm.
In this case, the layer of backfill on the ground should not exceed more than 20 cm. After the crushed stone is strewn on the prepared area, it must be well moistened with water, and then compacted well, preferably using a tamper.
How to put it beautifully, general rules and recommendations
Before you begin laying out, you need to create a project for the future path. To do this, you can use a special program or contact a specialist. It is important to take into account all the features of the local landscape, the location of possible communications and the route. A visual example will help you calculate the amount of materials needed.
- To avoid deformation of the coating after rain, it is necessary to organize drains to effectively drain water from the space between the elements.
- The dimensions of the selected parts must be harmoniously combined with the dimensions of the future sidewalk.
- To avoid possible dismantling, it is necessary to plan the location of future communications in advance.
- To prevent the fabric from sagging and becoming overgrown with grass, the base is first leveled and covered with a layer of special geotextile fabric.
- When combining different types of tiles, it is advisable to select elements of the same thickness.
When creating a complex composition, the layout on the diagram will help you visually evaluate the combination of elements and calculate the exact number of tiles.
Main stages
Lay the tiles calmly, without rushing, and make sure that they are laid evenly. If there are deviations in the evenness of the installation, it is necessary to correct them and ensure that the tiles are laid evenly. For example, if the tiles have fallen below the required level, then you need to add a little sand or a special mixture of sand and cement and lay the tiles.
But if the tile is higher than the required level, in this case it is necessary to use a rubber hammer designed for this purpose. It is enough to knock on the tile without applying much force. It is necessary to check the evenness of the installation using a regular building level, but of a long length.
After the tiles have been laid, they must be compacted well. Here it is necessary to use a gasoline tamper, thanks to which the surface of laying the tiles will be perfectly smooth and even.
The drainage of water from the surface of the tile is not unimportant. Therefore, during the process of laying tiles, you need to ensure that there is a slope from the central part to the edges.
At the final stage, the surface of the tile must be sprinkled with a special mixture based on cement and sand. This is done to prevent the seams between the tiles from clogging. And all excess mixture must be removed from the surface of the tile, and after that, the entire surface must be watered. Next, the mixture will harden and you can walk on the finished path.
Rolled lawn: types, lawn laying and care- Design of the porch of a private house - ideas for beautiful design in 2022 (131 photos)
Metal tile Monterrey - A beautiful and inexpensive option for arrangement (60 photos)
Drainage
Installation of a drainage system is necessary to absorb moisture, the icing of which in the winter can lead to deformation of the coating.
The crushed stone is compacted, lightly sprinkled with sand and leveled. Then a second additional layer of geotextile is laid out.
This is especially important for low-lying areas. Drainage will allow moisture to pass through, preventing it from penetrating the surface.
Installation nuances
Perhaps for some, the process of laying tiles will seem easy and quick, but this is far from what it seems. Everything is much more complicated, since there are very important points in the installation process. So, let's look at them:
- It is recommended to lay the tiles diagonally. In the process of parallel laying of tiles, a large percentage of waste appears, which greatly affects the financial component.
- To give the tiles a certain shape or borders, they need to be trimmed; for these purposes it is recommended to use a special gas cutter, but you can use a regular grinder with a special disc.
Installation of curbs
After completing the installation of the drainage system, the installation of curbs begins. They can be made of different materials - stone, wood or made of brick. Plastic piece tiles are especially popular among craftsmen.
They are distinguished by their aesthetic appearance, ease of installation and high degree of wear resistance. When choosing borders, you should take into account their harmonious combination with the main coating.
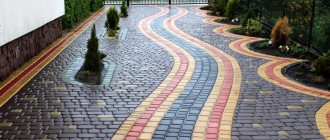
Curly elements
Any buyer of paving slabs will certainly face the problem of choice. It’s good when the client knows exactly why he came, it’s worse when there is no such understanding, but the wealth of choice makes his eyes dazzle.
The shapes of paving slabs can be different, but the most popular types are:
- Paving stones;
- Gzhelka;
- Wave;
- Honeycomb;
- Clover;
- Runo and others.
To improve the performance of tiles, manufacturers often add granite chips. In this case, granite tiles will be the best option for laying roads.
Popular forms, markings
When buying tiles in large quantities, pay attention to the characteristics that are printed on top of the package.
It states:
- size;
- thickness;
- form;
- color;
- quantity;
- total weight (sometimes).
Popular shapes:
- rhombus;
- lily;
- coil;
- antique;
- snake;
- rondo cross;
- scales;
- mosaic, etc.
Photo: variety of shapes
And also there is an abbreviated classification:
- Ш – hexagonal;
- K – square;
- F – figured;
- P – rectangular;
- D – tiled border;
- ED – decorative elements.
The markings of different manufacturers may not be the same, so it is recommended to check all the details with the seller.
So which tile should you choose?
As with everything, there is no definite answer to this question; everything depends not only and not so much on the type of tile, but on its quality. There are quite a few conscientious manufacturers of vibro-cast tiles on the market, using high-quality raw materials and observing the water-cement ratio. And the characteristics of their products are quite capable of satisfying all the requirements for paving with low loads. Another thing is that there are plenty of outright handicrafts that will fall apart after the first season, but playing Russian roulette with your own money is a thankless task. Vibropress is, in principle, produced only by large factories that provide a guarantee for their products, and there is much less chance of getting caught with it. And most importantly, the tiles must be selected according to the operating conditions. According to GOST, the thickness of sidewalk tiles is at least 50 mm; in practice, tiles from 40 mm are used, but manufacturers recommend a thickness of 60 mm. If not only pedestrian traffic is expected, but also vehicular traffic (parking, entry), according to GOST the minimum is 80 mm, in practice – 60-80 mm. Regardless of what tile will be used, how long the paving will last depends on compliance with the base preparation and installation technology.