If you are tired of the dirt in your garden or personal plot, you have thought about building a garden path. A durable and affordable option is laying paving slabs - paving stones. Have you thought about how to make a path from paving slabs with your own hands in the country or near the house? It's not entirely simple...
Even after purchasing tiles, you are left with a choice: what installation method to use, what technology to use? It is proposed to consider the option of constructing a garden, country or personal path with your own hands, completely according to the instructions and recommendations of the manufacturer of paving slabs. When choosing tiles for the path, do not forget about the fencing of the house. Beautiful fences for country houses should be in harmony with the surrounding elements.
Earlier in the article How to easily make a garden path from tiles in a dacha or plot - 5 steps with photos (do-it-yourself garden paths photo), the easiest way to independently lay paving slabs and paving stones, constructing a covering with your own hands at low cost was considered. The option presented in this article is the complete opposite: only following the rules and instructions.
Path layout and layout
Making a paving stone path begins with its layout on the ground. The approximate width of the building depends on your desire, and the exact width and length depend on the size of the tile itself.
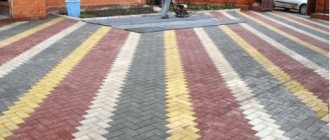
When constructing this sidewalk path, ordinary gray paving stones with dimensions of 200X100X70 mm and curb stone (sidewalk curb) with dimensions of 1000X200X80 mm were used. The total width, taking into account the curb stone, was 76 cm.
Related publications
- Floor on the terrace: wood, plastic, ceramic, paving, other tiles. Pros, cons 12/17/2021
- How to make a foundation for a path from paving slabs - paving stones: diagram, layers, implementation 09/22/2017
Required tools:
- bayonet shovel;
- shovel;
- level - 2 pcs. (2m and 1m);
- rubber hammer;
- stakes with twine;
- log for compacting earth;
- watering can (hose with water);
- leveling devices - 2 pcs.;
- container for mixing concrete;
- a brush with stiff bristles;
- Bulgarian.
When you have determined the width of your future garden path, you can move on to planning the area. Before starting the main work, clear the work area from foreign objects and dense vegetation.
Drive two pegs at the beginning of the path and two at the end. Stretch the twine between the pegs, ensuring that the tension is strong. When adjusting the height of the strings, keep in mind that the plane between the strings is the plane of your future path!
Use a building level to align both strings at the same level in two planes (lengthwise and crosswise).
The distance between the strings is equal to the width of the planned path (the width of the laid tiles and two borders) plus 15 - 20 cm (a distance from the borders of 7 - 10 cm on each side).
Excavation of excess soil
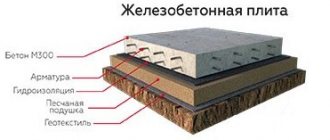
After clearing the area of the path and laying out its coordinates on the ground, we begin to remove the soil. The first question: how deep to dig? The distance between the plane of the path (stretched string) and the lower level of the removed soil consists of: a bearing layer (crushed stone) - about 15 cm, a leveling layer (sand) - 3-5 cm, and the tile itself.
For information: in this case (with a tile thickness of 7 cm) this distance is 25 - 27 cm. Do not forget that the top mark is a string, and from it we measure 25 cm in depth.
When removing soil, use both bayonet and shovel shovels. Part of the removed soil will later be used for sprinkling curb stones on the outside, part for land leveling, and part is to be removed from the site.
After excavating the soil to the required depth, it would be a good idea to walk over the entire surface of the path bed with a tamper (the most affordable option is a wide log with a cross-shaped handle).
Areas of application
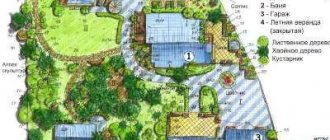
Paving stones around the house are the most common material. When landscape planning a site, places are determined: paths, sidewalks and other external areas are paved with it. The material is suitable for paving outdoors, where you need to lay out a huge, very durable and beautiful coating. The leading areas of use of paving stones are:
- in the courtyard of a private house or in a country house: areas near the house and walking paths. Paving stones are used to decorate the blind areas of houses.
- city squares and sidewalks;
- landscape gardening: walking paths and playgrounds;
- railway crossings that are subject to heavy train loads.
Granite paving stones are practical: they are installed on a suburban area with strong mechanical or chemical influences. The material is used to equip parking lots, driveways or barbecues.
Construction of the first part of the load-bearing layer - leveling
The next stage in the construction of a garden or country path is the construction of a load-bearing layer - the main part of the foundation.
First of all, we lay a leveling layer of crushed stone 5-7 cm thick, which is essentially part of the load-bearing layer of the foundation. It is on this that we will install the curb stone.
Having evenly distributed the crushed stone over the entire surface of the bed of the infield path, we must compact it. We control the level of crushed stone by measuring the distance from it to the string. It should be equal to the height of the curb stone.
At the end of compaction, sprinkle the leveling layer with sand and water. It is advisable to do this, since sand penetrates inside between the crushed stone and makes the crushed stone layer monolithic.
FAQ
There is a gap left along the edge after laying the paving stones, what should I use to fill it up?
A short distance after laying the paving stones can be sealed with glue at 45 degrees. It is advisable to do this so as not to stain the adjacent paving stones. If there is a fairly large distance of base left for laying and another row does not go there, then simply waterproof the base and bury it in the ground.
The workers rubbed the clinker paving stones by diluting the composition, and did not wash it off the surface in time. Is there anything I can do to clean the surface?
No. The paving stones will remain damaged for the entire period of its use.
Is it possible to lay steps from clinker paving stones?
Yes. Steps made of clinker paving stones are an effective element of the design of the local area. However, this work is very complex and only professionals can perform it efficiently.
A month after laying, dips appeared in places on the paving stones. Why did this happen?
If the paving stones sag, the main reason is the lack of a foundation. Incorrectly made base for paving, use of inappropriate materials for laying paving stones on a concrete base, or lack of a water drainage system.
Installation of curb stones and completion of the load-bearing layer
Now you can begin installing the curb stone - garden border. To do this, remove the previously installed pegs with strings and reinstall them closer to each other in width. Now the width between them is the width of the row of tiles laid on the tracks plus the installation gap - about 0.5 cm (in this case, 60.5 cm for the main part of the track and 80.5 for the additional one).
Strings stretched and aligned in planes are a guideline for installing a border for garden paths. The inner top edge of the curb stone is almost identical to the twine.
Add a little sand under the base of the curb if you need to raise the curb by a distance of up to 1 cm. Level the sand, pour it and compact it.
Use a heavy hammer or sledgehammer to compact the crushed stone if necessary, lowering the curb up to 1cm.
To install and secure curb stones, use concrete (crushed stone, sand, cement, water).
When placing a curb stone, use a building level to ensure its correct position. All curb stones must be in the same plane with adjacent curbs on the same branch, with adjacent curbs on a parallel branch, and stand clearly at an angle of 90 degrees to the surface of the ground.
After installing the curb stone, it is necessary to complete the installation of the load-bearing layer of the path foundation. To do this, you need to raise the height of the load-bearing layer by another 10 cm. Therefore, we add crushed stone, while tamping it layer by layer.
After compacting is completed, it is recommended to sprinkle the crushed stone with sand and water it thoroughly with a hose. The sand will settle, fill the voids in the crushed stone and make it monolithic.
Care Tips
Although granite paving stones are a durable material that is resistant to negative external factors, it consists of a natural mineral and is therefore susceptible to aging or destruction. Intensive use, weather and temperature changes, the harmful effects of microorganisms are the reasons for the loss of beauty of paths in gardens or on a site. To make the material last longer, we recommend following these rules:
- Wash the surface with water under high pressure. It will remove dust or lichens. You can use chemicals that remove green deposits and give the paving stones anti-slip properties. If lichens and moss appear on the surface or between the seams, you must not scrape them off, otherwise the structure of the material will be damaged.
- Clean heavy stains with specific detergents that are suitable for granite. To remove motor oil or grease stains, you should consult a specialist and choose a special product that will not discolor the stone.
- Impregnate - treat with a preparation against liquid dirt and water penetration. This is recommended if pavers are laid in parking lots, driveways, or grill areas. Granite remains durable and looks smooth and beautiful.
- Remove weeds from joints with herbicides. It is enough to apply the preparation with a brush or spray it with a sprayer to remove plants between the seams. It is not recommended to tear them out so as not to disturb the structure.
- Periodically fill the seams. The space between the fragments is filled with sand, which is washed away or blown out. It is necessary to add it in time so that the elements are stably fixed and do not weaken.
Installation of a leveling layer of sand
After installing the load-bearing layer of the foundation of the country path, the distance from it to the top of the curb stone (the plane of the path) should be about 10 cm (3 cm for a leveling layer of sand and 7 cm for paving stones). First you need to lay a leveling layer of sand.
In our case, the guides along which the sand layer is leveled are the curbs. We make two simple devices with different heights of the bottom bar (No. 1 - height 4 cm and No. 2 - height 6 cm).
Important: the height of the planks depends on the thickness of the tiles! If the thickness of the tile is not 7 cm, but 6 cm, then the height of each lower strip increases by 1 cm. Etc.
We scatter sand over the entire surface of the load-bearing layer of the foundation. We level it using plank No. 1, 4 cm high. We tamp the entire surface.
As a result, we obtain a relatively flat surface of the leveling layer of sand with a distance from it to the top of the curb stone of approximately 5-6 cm.
Stage 4. Filling with crushed stone and laying geotextiles
The next layer is 10 cm crushed stone. I note that gravel is not used for the construction of paths. It is round in shape, so it does not “work” as a single layer. Crushed granite, which is used for my paths, is a completely different matter. It has sharp edges that interlock. For the same reason, crushed gravel is suitable for paths (that is, the same gravel, but crushed, with torn edges).
Crushed stone of fraction 5-20 mm was purchased. If you use a larger fraction, you can avoid laying a second layer of geotextile, but get by with one geogrid. It will prevent sand from mixing with crushed stone. But in my case, there is just such a fraction, and the geotextiles have already been laid.
So, I spread the crushed stone with a wheelbarrow evenly along all the paths, and then leveled it with a modified hoe. Since at this stage the curbs were already installed, I remade the leveling rail for the hoe - I cut grooves along the ends that can be used to rest against the curbs. The grooves should be such that the bottom of the slats falls at the planned backfill level. Then, by moving the lath along the backfill, it is possible to pull out the layer and level it to the desired level.
Leveling the crushed stone layer with a lath with cut grooves
I compacted the layer with a vibrating plate.
On top of the crushed stone there is geotextile. This is already its 3rd layer, necessary to prevent mixing of the next layer (screenings) with crushed stone.
Laying the third layer of geotextile
Laying paving slabs on a paving stone path
How to lay paving stones correctly with your own hands. There are several options for choosing a starting point to begin laying tiles when constructing a structure. Where to start laying tiles? The most correct option seems to be choosing the starting point for laying the tiles depending on the important visible elements. In this case, it is the intersection of lines of movement.
Tip: the beginning of installation can also be done from the lower to the higher point, from an optically important boundary or other significant visible elements - porch, entrance, etc.
Use tool No. 2 - (height 6 cm) to create a flat surface for the leveling layer. Move the device along the curbs as if along guides, removing excess sand.
Lay the tiles starting from the center. Using a rubber hammer, press the tiles into the sand until they are level with the curb. Recess the tiles by about one centimeter or a little less. Further compaction will eliminate minor unevenness. Check the flatness of the tiles using a building level.
Continue laying paving slabs until the entire surface is completely filled with tiles. At the end of the paving stone path, if necessary, use a grinder with a diamond-coated wheel to cut the curb stone to the desired length.
Materials used
Paving stones are made from different materials:
- A natural stone. The peculiarity of this product is its high strength, wear resistance and attractive appearance. For this, marble, granite or basalt are used. The disadvantage of such paving stones will be significant weight and high cost.
- Rubber. To obtain the material, crumbs from car tires are used. The advantage of this option is the ability to absorb noise, resistance to moisture and temperature fluctuations.
- Plastics and polymer compounds. A path made of such material will be durable and anti-slip.
- Reinforced concrete. The manufacturing process of such paving stones involves vibrocompression and vibrocasting. The first option allows you to get a more durable surface with an anti-slip effect.
- Tree. Despite the aesthetic appeal of this material, it has one serious drawback - limited service life. Also, the surface of such a product must be periodically restored.
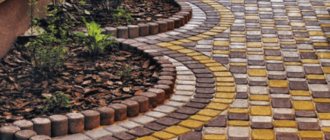
Using paving stones for laying on a winding path Source vashdvir.blogspot.com
Sealing and sealing
Once all tiles have been laid, tamp down all laid tiles using a hand tamper. Sprinkle the entire surface with dry sifted river sand and use a brush to spread it over the entire surface, rubbing the sand into the tile joints.
Next, go over the entire surface with the tamper again. Use the brush again to rub in the sand. After this, the remaining sand does not need to be removed immediately; it is recommended to leave it for a while. The sand will bind all the tiles together and make the surface of your path monolithic.
After removing the remaining sand, consider that you have completed the paving stone path in full.
General view of the finished paving stone garden path
Additional useful information:
If you are confident in the stability of the soil, it is possible to minimize the cost of materials and time during work:
- Reduce the leveling layer of crushed stone as much as possible (up to 2-3 cm);
- Reduce the load-bearing layer of crushed stone as much as possible (up to 4-6 cm), for this, in the process of excavating excess soil, leave soil in the central part to the height you need;
- Reduce the leveling layer of sand as much as possible (up to 1-2 cm).
When constructing the load-bearing layer, be sure to pay attention to high-quality compaction, layer-by-layer pouring of sand and high-quality pouring of sand.
When sealing and sealing joints between tiles, use not sifted sand, but a sand mixture (cement-sand mixtures M-150 M-200, the cost of a bag is around 100 rubles). Ideally calibrated sand and cement will help you get the job done quickly and reliably.
What it is
Granite paving stones are a stone formed from volcanic rock in the bowels of the Earth under high temperature and pressure. It is specially processed, given the required shape and cut to standard or individual customer sizes. The strength of granite is higher than that of synthetic materials, including concrete. If the latter has a compressive strength of 30 MPa, then the stone has a compressive strength of 300 MPa.
Since ancient times, the high strength of the material has attracted the attention of urban planners. Craftsmen paved roads, sidewalks, and courtyards with fragments of granite. Modern builders use timber in landscape design. The material creates a high-quality coating: densely laid fragments are held on a sand or cement-sand base.