Beautifully decorated garden paths in the country or at home They are undoubtedly pleasing to the eye and provide a certain functionality. You can choose the material and appropriate technology to create your garden path. Paving slabs in all their variety, wood, also concrete, gravel, plastic and so on in various versions - everything determines your choice. How to make a tile path in a garden, country house or plot?
If you have chosen paving slabs , then you will undoubtedly be able to lay it yourself following the proven, but expensive and costly laying technology using a gravel bed, cement-sand mortar, curbs and so on, that is, following all the strict rules of the builders. However, there is a proven simple and cheap way to lay paving slabs yourself with your own hands when creating garden paths in a country house or plot of land, which allows you to spend a minimum of effort and materials.
Preparing the tool and planning the path
And so, you have determined a place for your new garden or personal path, purchased the necessary materials for its construction, prepared all the tools and equipment and chosen a free day for work. You are ready!
List of required tools:
- bayonet shovel;
- shovel;
- level;
- rubber hammer;
- four pegs with twine;
- rake,
- log for compacting earth;
- watering can;
- a brush with stiff bristles on a long handle.
Before you start making the tile path itself, determine its length and width and plan the path directly on the ground.
Related publications
- Floor on the terrace: wood, plastic, ceramic, paving, other tiles. Pros, cons 12/17/2021
- How to make a garden path from paving stones according to all the rules 12/16/2021
When planning the width of the path, take into account the dimensions of your paving slabs. Its width should correspond to the total width of the row of tiles. To be neither narrower nor wider. Use pegs and twine to plan the path on the site.
List of required materials:
- paving slabs;
- sand.
Remove foreign objects from the area of your future path and mow the grass; it will be easier for you to continue further work. In this case, we are considering the construction of a straight garden path, so drive stakes into the corners of the path and stretch twine between them, which will serve not only as a border, but also as a level.
Technology for laying paving stones
When paving tiles, it is worth remembering one rule: paving blocks must be laid only from yourself, this way the prepared base is not disturbed. Regardless of the size of the paving stones, laying is carried out along a diagonal plane. Each shaped paving element is adjusted, this will help to avoid uneven joining seams.
It is permissible to leave gaps of no more than 2 mm between the tiles (this distance is enough for sprinkling). The laid tiles are compacted with a wooden mallet.
If the paving stones lie unevenly or fail, sand is carefully thrown in and the element is pressed.
After paving the entire area, the “swollen” tiles are leveled with the rest using a level and a rubber hammer. There are times when tiles need to be trimmed or cut to create an ornament. This “operation” is performed only after all the whole-size paving stones in the ornament have been laid. A special knife is used for cutting. If this is not the case, then a grinder is used.
Information! Paving of paving slabs is not carried out when it rains or immediately after it falls. The soil and the cushion paved on it should only be dry. In order for paving slabs to last a long time, there must be optimal air humidity when laying them.
The final and stylish touch will be added when paving the paving slabs by installing a curb, if it was not installed when arranging the base. With its help, a geometrically flat platform is created. After laying all the figured elements along the edge, a trench is dug under the curbs. Install it so that the top of the paving slab itself does not rise above the curb. The curb stone is placed on a cement mortar with a consistency of at least M100. The side of the curb is also filled with mortar, and sprinkled with a thin layer of sand on top.
It is imperative that after paving all elements, including curbs, the site is checked for evenness so that there are no holes or bulges.
If defects are found, they are eliminated. Next, all seams are covered with sand or sand-cement mixture. All excess is removed well with a broom (broom). And only after this the seams are very well moistened with water from a hose. If the sand has sagged after being moistened, be sure to top it up to strengthen the paving surface. Otherwise, under the load of adjacent tiles, the coating will begin to sag and “walk” or rise.
When using sand to sprinkle tiles, you should pay attention to it: it should not contain impurities. Otherwise, vegetation may grow in the cracks over time.
You can start walking or driving on the sidewalk only after 3-4 days. You shouldn't do this before. The solution should have time to harden and dry.
It is easy to care for paved tiles: just sweep them away from debris and wash them with a hose with water. In winter, metal scrapers and crowbars should not be used to clear a path or area - otherwise you can easily damage the surface of the paving stones. It is strictly forbidden to use salt-containing mixtures. Over time, such mixtures will destroy your coating. And no tile is “friendly” with paint, varnish and other chemicals.
Bed preparation, soil excavation, compaction
After preparing the area for the future path, you can begin to excavate excess soil. The soil is selected to a depth determined by the thickness of the tile plus 3-5 centimeters of sand cushion
If, for example, your tile is 10 cm thick, then the excavation depth will be 13-15 cm
The result is a path flush with the surrounding surface. To excavate the soil, first vertically pierce the soil with a bayonet shovel along the entire perimeter of your path, then excavate the soil directly from the area of the path itself, controlling the depth of its excavation. After excavating the bulk of the soil, clean the path bed using a shovel. Next, compact the soil in the path bed using a log.
Preparing the base for figured paving elements
If you properly prepare the base, the paths will last much longer, since there will be no subsidence of the coating, and, accordingly, the tiles will not deteriorate.
If the area was previously paved with tiles, they are unconditionally removed and at least 25 cm of soil are removed. Attention should be paid to the remaining sprouts and roots. To prevent all kinds of plants from growing from the tile joints in the future, roots and shoots are removed.
All paths and sites that are being developed should have a slight slope towards the drainage. Then atmospheric waters will not destroy the paving surface. At this stage, it is necessary to determine where the drain will be or already is.
It is important to ensure a perfectly level base for laying paving blocks.
Preparation of the paving site is carried out in different ways, taking into account the purpose of the site or path. If the path is located in the garden or leads to a gazebo, or it is a blind area around the house, then you will need one way to prepare the base. And if a parking lot for a car is equipped with paving slabs, then the preparation of the base for paving with tiles will be different.
Preparing the foundation begins with digging a shallow pit. It is impossible to accurately indicate the depth of the pit. This value depends on the materials of the layers being laid and their thickness. They work with bayonet and shovel shovels, the selected soil is taken outside the site, but not the site.
The top layer of soil is removed to a thickness of 15-20 cm, and all the turf is removed. This fertile soil is used to create vegetable or flower beds.
If the site needs to be further strengthened, the pit is deepened to 40-50 cm.
To ensure that the area freed from soil is sufficiently leveled, a hand tamper is passed over it to compact the top layer of loosened soil. If large depressions are found during excavation, they are covered with soil and must be compacted.
It is important to bring the entire surface to a single level.
These preparatory works are the same for laying paving slabs on any sites or paths. But further work on preparing the foundation differs.
First option
In this option, we will consider how to lay cushion layers for areas that will not experience serious loads - pedestrian paths in the local area, paths, recreation areas, blind areas around the house.
The following materials are placed at the bottom of the prepared pit: geotextiles, gravel or crushed stone, river sand and a mixture of sand and cement. It is worth noting that paving slabs are often laid simply on a well-compacted layer of sand.
According to this scheme, the layers of backfill are laid as follows:
- Geotextiles are laid on the ground. It will prevent plants from growing through the laid layers and paving blocks. Geotextiles also serve as reinforcement.
- The next layer is crushed stone or gravel. It is poured with a slight elevation in the center of the path or platform. Next, the gravel is leveled and rolled, but the shape of the sloping “mound” should remain. The compacted layer should be 10-15 cm. The gravel bed can be compacted with a vibrating plate.
- When the gravel is compacted, the area around the perimeter or along the future path is fenced with curbs.
The border enclosing the site is installed between the vertical section of the soil and the site. The cut is located along the path or along the perimeter of the site.
Curbs are fixed to cement mortar laid on a compacted gravel bed.
The horizontality of the curbs is measured by level, and if necessary, adjusted with a rubber hammer.
Fencing curbs can be placed on a sand embankment. In any case, the trench for laying them should be of such a depth that after paving the tiles, the curb will rise above the tiled surface of the paved area by 50-60% of its own height.
Next, a layer of sand is poured onto the crushed stone, distributed over the surface with a rake, moistened well, and then compacted. T
The thickness of the compacted sand layer should be 5-10 cm.
Sand is compacted using a manual tamper or roller. For large areas, a special tamping machine is used.
Next, prepare a dry sand-cement mixture. It is distributed on top of the sand layer, moistened and compacted well. The thickness of the sand-cement layer should be 2-4 cm.
The second option is for increased loads
This option for preparing the base is carried out when the site is intended for parking. To prevent the tile covering from sagging over time, you need a reliable and durable base. The pit in this option should have a depth of 40-50 cm.
If there are large loads on the paved paving slabs, then the base for it is made according to the following scheme:
- Sand is poured onto the prepared and compacted soil in the pit. It is moistened and compacted. The thickness of the finished sand layer should be 10-15 cm. To accurately determine the thickness of the layers, you can use a spray can to mark the value on the walls of the pit in advance. The height is measured with a tape measure and marked with spray paint along the contour of the pit.
- The second layer of medium-fraction crushed stone or gravel is laid in the same way. After leveling and compacting, the layer thickness should be 10-15 cm.
- To strengthen the base under the paving stones, a grid of reinforcement with cells of 8x8 cm or 10x10 cm is laid on the crushed stone layer. This grid can be completely replaced with metal reinforcing bars 6-8 mm thick. The rods are laid in the form of a lattice and secured with twisted wire.
The guide beacons are installed on the equipped grille.
The beacons are raised to a height equal to the thickness of the concrete screed - 10-12 cm.
The beacons are set at the building level and secured to a concrete slide.
- Concrete solution is poured under the beacons.
- While the concrete solution dries, curbs are installed around the site. If they are not in the plan or they are planned to be installed later, then formwork made of slabs or bricks is installed at the height of the screed.
- When the solution sets under the beacons, concrete is poured onto the site (from sand and cement, 3:1). The solution is distributed over the surface above the beacons and leveled using the rule. You need to fill the entire area at one time. If it is not possible to fill the entire area at once, then cover the already filled area with film. Leave the screed for 12 days to set and strengthen. To increase the strength of the concrete screed, in the first four days it is watered with water and covered with film.
- After 12 days, curbs are installed on the concrete along the perimeter of the screed. The mortar under the curbs should also set. And only then do they begin subsequent work.
Temporary beacons 2-4 cm high are installed on a flat, concreted base area. The subsequent dry sand-cement layer should be of this height. The mixture is mixed in advance and poured onto a concrete area. Then it is distributed with a shovel and rake, and then leveled according to temporary beacons using a rule.
Third option
The option of laying tiles on sand is chosen very often. The reason is obvious - the process is less labor intensive than the other two options. With this installation method, paving slabs are laid on a sand cushion.
If this paving option is chosen, then the pit is built with a depth of 20-25 cm. Along the edges of the path or along the perimeter of the pit, a trench is dug for laying curbs 10-15 cm deeper than the main pit.
Medium grade crushed stone is poured into the trench and compacted. Layer thickness – 5 cm.
- Thick concrete is laid on top of the crushed stone layer.
- The curbs are placed on the concrete solution and leveled. There is no need to wait for the mortar to set after installing the borders. You can continue working further. The height of the curb is calculated so that after paving the tiles, it rises 7-8 cm above it.
- Between the curbs, a layer of crushed stone is poured onto the bottom of the entire pit, which is leveled and compacted. The finished thickness of this layer should be 10-12 cm. A layer of crushed stone will increase the strength of the structure and also serve as its drainage. As a result, water will not stagnate under the tiles.
- Sand is poured over the crushed stone, leveled, moistened and compacted. Then its surface is leveled. The thickness of the sand layer should be 10-12 cm.
Advice! If the paving area is large, then it is better to level the compacted sand as the paving slabs are laid. Otherwise, the leveling work will have to be done twice. When part of the site is already tiled, the entire remaining surface is leveled. Further work is carried out while standing on a section of the site that is already paved, that is, the tiles are laid away from you.
If the soil in the paving area is clayey, then it is better to make a depression and drainage at the end of the trench. To ensure that atmospheric water enters the drainage system, a slight slope is made along the edges with drains: longitudinal and transverse.
Regardless of what kind of mortar the tiles will be laid, be sure to make a sand and crushed stone base. And for reliability, an additional screed is made from mortar.
First of all, at the 1st level, a crushed stone layer is laid and compacted. Next, enough sand is laid out on the compacted crushed stone so that its layer after compaction is approximately 3-4 cm.
The finished tile should protrude beyond the overall height of the site by 1-1.5 centimeters. It is recommended to lay geotextiles between sand and crushed stone. It will allow sedimentary water to flow freely, but will keep sand from sinking onto the crushed stone.
What happens when the soil is not heaving? Then use only a layer of sand, 10-15 cm thick. But the sand must be moistened. First, the sand is scattered and distributed over the site, then it is well watered and compacted after 2-4 hours. For the top layer, use a ready-made dry sand-cement mixture. The ratio of sand and cement is 3:1. The thickness of this layer should be 3-5 cm.
Laying sand cushion and tiles
After preparing the bed of the garden path, it is necessary to lay a sand cushion about 3-5 centimeters thick. After you have scattered the sand, level it using a piece of a flat board slightly narrower than the width of the path and pour it well with water, then re-level it. Fill with sand only the area that allows you to lay the tiles, located on the section of the path without sand.
Now start laying paving slabs. You can easily choose the laying pattern yourself; it also depends on the shape and size of the tiles. In this case, a random, chaotic pattern was used.
When laying tiles, use a rubber hammer and a regular liquid level. Don’t try to look for perfection and super-evenness; a slightly uneven path has its own beauty. Continue laying tiles until you have filled the entire bed of the path.
Marking for paving area
Marking the area for laying involves determining the contour of the future site or path. The marking location is marked with pegs inserted into the ground, between which a cord or nylon thread is stretched. Since the cord acts as a guide for laying tiles, it is pulled strictly according to the level. When marking, the following condition must be met:
- The area for laying figured paving elements is marked with strips 1-1.5 m wide.
Filling tile joints with sand
After laying the tiles, it is imperative to fill the existing voids in the seams between the tiles with sand. To do this, pour sand onto the path and use a brush to rub the sand between the seams. Take your time, this work is not hard, but quite long.
After finishing grouting the seams with sand, do not remove all the sand from the tiles; you will still need it, because no matter how hard you try, it is quite difficult to fill the seams completely the first time.
In principle, this the construction of a garden path for a summer house or personal plot from paving slabs . Everything is really simple and clear, even for those who will be doing this for the first time.
Important! If you want to be sure of the durability and reliability of your paving stone path, and are not afraid of hard work, read the information in the article “How to make a paving stone path according to all the rules.” Without a doubt, it will be made to last!
Perhaps such a simple approach to construction may seem too primitive to some, however, time suggests that the path is absolutely viable. And if you don’t drive a car on it, everything will be fine. And for reliability adherents, there is advice and a link to another article just above. But building a path according to the requirements and recommendations of the paving stone manufacturer is really hard work...
Gravel garden paths
The first group of garden paths are loose materials: wood chips, gravel or decomposed granite. This is the simplest and cheapest landscape material for creating garden paths. A flexible metal or stone edging (which can easily be made from local stones) adds a beautiful finish to this garden path and holds the gravel in place.
Pros: Wood chips, gravel, and stepping stones (ideal for those who like to go barefoot!) are great beginner-friendly landscaping materials for creating DIY garden paths. This is the easiest to use and least expensive material. They're soft underfoot, but durable enough to withstand heavy foot traffic or a loaded wheelbarrow. A border can greatly improve the appearance of these garden paths.
Cons: They need to be updated every 1-3 years. If you need to remove snow frequently, gravel is not the best choice. Not suitable for steep descents.
Regular gravel path
This is one of the simplest ideas that most people can do. Besides being cheap, it's easy to do since you don't have to dig very deep to achieve what you want. Cheap doesn't mean ugly. This path is charming. It is ideal for people who need a regular path.
Read here: How to make a gravel path at your dacha with your own hands
Stone gravel path
Enhance your gravel walkway by adding brick-shaped stones to each side of the walkway. This idea allows you to highlight the edges of the path to give it more space and feel. It also gently tells people on the path to stay on it.
Compressed decomposed granite (aka DG, basically super-fine gravel that looks and feels like fine sand with particles less than an inch in size) that is really comfortable to walk on. It is often used in Mediterranean and Southwestern style gardens.
Construction of a flower garden
If you still have paving slabs, you can make a small but nice flower garden to decorate the area. It is made even easier and faster than the track itself.
You can simply lay tiles on tiles without using cement mortar or tile adhesive, cover it with soil and the flower garden is ready.
If you have the time and desire, you can make a flower garden by fastening the tiles with cement-sand mortar, and you can choose, for example, white cement, then your new flower garden will be beautiful and eternal, but in this case it is recommended to prepare the base with more than 5 cm of sand.
Constructing a garden or personal path in this way is really inexpensive both in terms of time and materials. You can easily make such a path yourself with your own hands without the involvement of specialists and workers. Such a path will serve you for a long time and reliably, especially since something made by yourself is always more pleasing!
Tags
dacha path paving slabs tiling
Stone garden path
Stone paths are ideal if you want to add a more natural feel to your garden. They come in different sizes and textures, making each stone unique. Stones also stand the test of time, age well and are perfect for any garden.
Video description
Video about laying tiles on sand:
Processing of decorative tiles
The next recommendation on how to properly lay paving slabs in the courtyard of a private house or in another area is to treat individual elements with compounds that will significantly increase the performance of the material, its wear resistance, and ensure moisture and frost resistance. Hydrophobic compounds are used for treatment, which also effectively protect elements from the appearance of mold stains and improve the appearance of the decorative coating as a whole.
The tile processing process is quite lengthy. It involves dipping each element one by one into a pre-prepared composition, then drying it thoroughly and repeating the procedure. When processing tiles, it is also recommended to inspect each element for cracks or chips. There is no need to throw away damaged tiles; they are quite suitable for laying on inconspicuous surfaces.
Before installation, it is recommended to treat each of the elements with a special solution Source almaty.flagma.kz
Path made of pallets
DIY garden path ideas can be simple, inexpensive and beautiful. To illustrate, this idea is based on placing wooden pallets one after the other, leaving a small space between them. All you need to do is arrange the wooden pallets in a stable manner along the desired path. The spaces between the trays allow plants to grow and create a more natural look for the path.
How to make rubber paving slabs
Rubber tiles for arranging garden paths are made from elastic crumb rubber, which is obtained by processing used car tires. This alternative option is distinguished by its low cost and such performance qualities as water resistance, frost resistance, shock absorption and wear resistance.
For self-production, it is most convenient to use a rectangular shape and a “coil”. The technology for creating coating elements includes the following steps:
- grinding old tires to a fraction of no more than 1-4 mm;
- mixing crumb rubber with a polymer binder and coloring pigment;
- filling the mold with rubber mass and installing the pressure.
Laying rubber tiles is quite easy. You just need to properly level the base and arrange a sand base. Using the same principle, a garden path is created from plastic slabs.
Video description
The video shows the technology of laying tiles on a concrete base:
The most common option for decorative walkways is a mixture of cement and sand. This type involves laying elements on a dry base made of sand-cement mixture. To prepare it, the following proportions must be observed: 1 part cement and 5 parts sand. The optimal thickness of the base in this case should not be less than 10 cm.
When choosing this base, it is especially important to first familiarize yourself with the recommendations on how to correctly lay paving slabs. Decorative elements in this case are laid strictly on a dry surface, that is, before filling the ditches for paths with the mixture, it is important to make sure that there will be no rain for two to three days. However, immediately before laying the tiles, it is necessary to slightly moisten the mixture and compact it additionally; this measure will significantly simplify the work process.
Sand-cement base Source plitka-pol.ru
Recommendations for caring for the coating
They are quite simple:
- The path must be swept regularly and promptly cleared of debris and sand.
- In case of serious contamination, oil stains, wash with water from a hose.
- Remove snow with shovels made of any material other than metal - it spoils the integrity of the coating. You should not sprinkle salt on an icy tile; it destroys the product and forms a coating on it.
- Swelling areas of the path can be easily repaired. Therefore, it is easy to remove individual tiles, level the base and put them in place.
- To protect against moisture, you can purchase a water repellent solution.
It is worth considering that a pavement made by vibration compaction will last 100 years or more. But vibration-cast products wear out much faster and last much less.
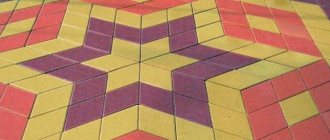
Photo: multi-colored paving stones
Required Tools
Before laying paving slabs, you should prepare in advance additional materials and tools that will be useful primarily when performing the work, for example:
- cement;
- curbs, which can be either plastic or stone;
- crushed stone, the fraction of which should not be more than 40 mm;
- geotextiles;
- shovel;
- a manual concrete mixer, however, if you don’t have one, you can do without it;
- hammers;
- sand.
As for the amount of materials required to design the paths, before carrying out the work it is necessary to carry out preliminary calculations, taking into account the characteristics of the soil, the area of the territory, and the features of operation.
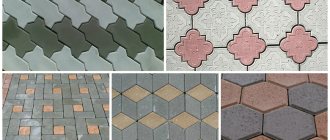
Methods for making tiles
There are 2 ways to make tiles:
- Vibration pressing . Tiles are produced using this method from semi-dry concrete, so they have the highest strength. This material is also frost and moisture resistant, but in decorative terms it is significantly inferior to products made by casting (they are not as colorful and do not have a very large selection of color palettes). This method also makes it possible to produce material of simple geometric shapes with a rough surface.
- Vibrocasting. This method refers to the classic version, when concrete is used in the production of products. When vibrating casting, manufacturers use various additives for concrete that improve the quality of the product produced. This method also allows the use of various pigments, thanks to which the products go on sale in all sorts of colors. The material made using vibration casting is distinguished by a wide range of shapes, designs, and dimensions. But it is not very resistant to negative environmental factors.
Which paving slabs are better - each dacha owner decides for himself. If cars do not enter the yard, and the decorative qualities of the product are more important, you should opt for vibration-cast products. If the owners of a private estate are more interested in the durability and practicality of the yard covering, then they should choose less bright and more austere tiles made by vibration pressing.
Manufacturing technology
To prepare products using vibration casting, the following work is carried out:
- Concrete is prepared, which is then divided into two parts. The main part of the solution remains in its original form, and pigment is added to the second part (smaller in volume).
- Next, the forms are laid out on the vibrating table (very close to each other).
- The prepared color mixture is poured into molds in a layer of several centimeters.
- The vibrator is turned on for 10 seconds so that the material is evenly distributed throughout the mold.
- Next, a gray solution without additives is poured to the very edges of the molds.
- The vibrator turns on for 10 seconds.
- Excess concrete is cut off using a metal angle along the edges of the form.
- Next, the solution is rubbed.
- Forms with concrete are laid out on pallets and covered with plastic wrap (this will prevent the material from drying out) and forms with filled tiles are left for 2 days (during this period it is not recommended to move or touch them).
- After 48 hours, the molds are heated in a water bath (about 2 minutes) to a temperature of 60 degrees Celsius.
- Then they are placed again on the vibrating table for knocking out.
- The finished material is dried for 2 days at natural temperature.
- The final step is to stack the material face to face on the pallets. To ensure that it retains its presentation well, it is recommended to cover it with plastic film.
Quantity calculation
The production of paving slabs at home does not require special skills and knowledge, but requires careful adherence to all standards and proportions. To prepare high-quality concrete for paving slabs, you need to mix cement, sand, plasticizer, crushed stone, pigment (if it is added at the mixing stage) and water.
Proportions (in volume) for preparing 1 square meter of standard tiles: 21% cement, 23% crushed stone, 56% sand, 0.7% plasticizer, 7% pigment, 7% water (of the total mass). If we take it in weight, it turns out like this: 30 kilograms of cement, 32 kilograms of crushed stone, 75 kilograms of sand, 0.05 kilograms of plasticizer, 0.7 kilograms of color and 8 liters of water.