Do you want to quickly arrange your garden, buy a lot of flowers and plant them all over the space? At this time, many of us make spontaneous purchases and bring everything we like into our garden. This is absolutely impossible to do, says landscape designer Natalia Ulyanova.
In order to avoid making a number of typical mistakes when designing a garden, you need to arm yourself with a pencil and a sheet of paper and at least roughly draw your area with the plants you want to see in it in advance. Long winter evenings are the perfect time for such an activity, and advice from an experienced specialist will help you not to miss anything.
Natalia Ulyanova is a landscape designer, a garden care specialist, and is engaged in pruning fruit trees. In the profession since 2006, he annually improves his qualifications with the best Russian and foreign landscape specialists.
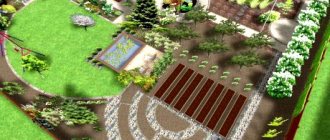
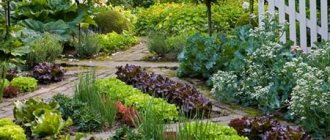
Don't plan a lawn if you want a low-maintenance garden.
Photo from the archive of Natalia Ulyanova
The lawn ranks first in terms of labor costs. It needs to be watered regularly and cut once a week, otherwise it will look unkempt. But if you have already decided that you cannot do without a lawn, then make it small in area. Do not plant plants on the lawn.
It is better to separate the flower garden from the lawn. To do this, you can use plastic or metal borders.
- 47 techniques for a low-maintenance garden from a landscape designer
With proper gardening, even minimal care will be enough to maintain its attractiveness for a long time!
Decorative design of the site
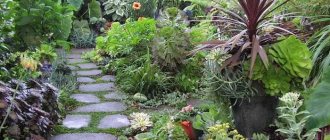
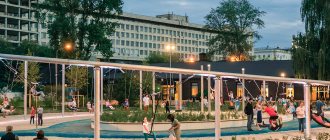
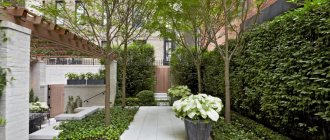
Every garden or personal plot must have at least one highlight that is unusual and original. Which will attract everyone's attention, and give you a reason to be proud and demonstrate your taste and imagination.
These can be small architectural forms (SAF), such as arches, pergolas, fountains and streams, bridges, beautiful garden paths made from original materials, unusual hedges, as well as various garden figures, including those made by yourself. There are many of them, and you can borrow some of them on the Internet.
Here are some examples:
In fact, decorative design is a very important part of landscape design and is worth devoting a separate article to. For now, I just drew your attention to this.
Do not overuse exotic plants
It will be easiest to care for plants in your own strip. But if you really want to plant something outlandish, then let it be in small quantities. In this case, it is better to allocate a separate place for plants that are uncharacteristic of your area and create the most convenient conditions for them there.
The more little things you take into account when planning your garden, the more beautiful it will be. Arm yourself with a pencil and an eraser to think through and put all your wishes on paper. And only after that go to the garden store.
Creating a concept for landscape design of a site
This stage is the most interesting, the most creative in terms of implementing your ideas, but also the most responsible. I don't want to scare you, but there is one important rule in landscape design:
When creating a landscape design concept, you need to imagine in advance what it will look like in a few years, when the trees and shrubs have fully grown, and not be guided by its appearance only at the present time.
If you do not take this circumstance into account, you will definitely face the need for transfers and alterations. For example, mature trees or shrubs will shade beds or flower beds, and so on. Therefore, you need to learn to see the landscape design being created in perspective.
And so, let's start actually creating the landscape design concept.
It is clear that I cannot give you specific advice on what and how to do on your site. This should be a figment of your own imagination. But general recommendations can be given.
At this stage, our task is to turn the remaining territory of the site into a paradise consisting of pleasant and useful things. What I mean is that you need to allocate an area on the plan both for pleasing flower beds and places of pleasant relaxation, as well as for beds and an orchard, if, of course, the area allows.
In order to do this correctly and as rationally as possible, we will need information obtained from performing a landscape analysis of the site. These are quality indicators of the soil in different zones of the site, the level of groundwater, the prevailing wind direction, the cast shadow of tall objects, and the nature of the relief. Based on this, you can determine where it is more appropriate to place the beds, where the flowers and lawn are, and where the recreation area is.
When creating a landscape design concept, you first need to identify one or two objects that will be the center of attention. They are called croques. You should “dance” from them when choosing the general design style of the site. Such an object could be a gazebo, barbecue area, fountain or pond, or alpine slide.
When choosing plantings, be it flowers or shrubs, you should also try to adhere to the general style. The same applies to the choice of colors. It is better to place nearby those plantings whose colors go well together, and not just chaotically. Flower beds, for example, are perceived much more impressive if there is some logic in the combination of colors, and not just a motley spot. Therefore, it would be more correct to create separately located compositions made up of certain well-combined colors.
If you find it difficult to choose well-matching flowers for your flower bed yourself, then use more white flowers. They go well with almost all colors.
Creating successful compositions is actually quite a complex matter and requires certain knowledge and experience, as well as taste. But everything comes with time.
In short, we can say that there are symmetrical and asymmetrical compositions. Both have their advantages. Symmetrical compositions symbolize strict lines and orderliness. Asymmetrical ones look elegant and are closer to natural nature.
When creating a garden, especially a decorative one rather than a fruit one, it is also advisable to adhere to a certain style. Such styles exist for the garden as well as for interior design. There are about ten main styles. This is a regular French style, Mediterranean, English, country style, hi-tech, modern, Japanese style. But this topic needs to be devoted to a separate article.
Regardless of the chosen style, it is advisable to locate the garden on the north side of the site in order to less shade other plantings.
Each zone you have thought out must also be plotted on a plan indicating the sizes of these zones.
You must try not to miss a single object planned on the site. Otherwise, there won’t be a convenient place for it later.
§ 7. Models of cars, figures of people and plastic lanterns.
Most often they are needed to create additional surroundings on models and dioramas. These pleasant little things improve the detail of the layout, “breathe life” and fill the miniature world you create with a positive mood.
Conclusion. We hope that we have answered your question: “How to make a layout with your own hands?” and you will immerse yourself in creativity headlong. Your works always inspire us to create new materials for models and dioramas. We know for sure that your hands are golden, your imagination is limitless, and we try to keep up and invent as many new products as possible. Let's continue to create beauty together!
§ 6. The most pleasant part is the landscaping of the layout.
Trees, spruces and bushes for dioramas.
First of all, we determine the height of the trees and fir trees, depending on the scale of the layout.
a) Vegetation can be made independently using special various powders, lumpy foliage or deciduous and coniferous mats. Steel or copper wire is most often used to make barrels. Take several pieces of wire of the required length, twist them together into a bundle approximately to the middle, and spread the rest into branches. To make the barrel more realistic, you can cover the barrel with napkins and PVA glue. This will help hide the twisted wire and imitate the structure of tree bark. Then paint the trunk brown with acrylic paints or gouache. Another way to decorate the trunk and make it more realistic is to apply quick-drying Morrison-N glue to it and sprinkle it with imitation earth that we have left after making the landscape.
• The fastest way to make a crown is with clumping foliage. Just glue the ready-made crown pieces to the tree branches with super glue and you're done!
Tip: you can make this easy-to-use material yourself by mixing loose foliage of your favorite color with an emulsion to prepare the foliage in a container. Add approximately 100 ml to one bag of such crumbly leaves. (half a bottle) of Morrison foliage glue and mix thoroughly. After mixing, let the mixture dry for about one hour. This way you will get quite elastic and at the same time fluffy lumps. You can start crowning the tree.
• There are many more ways to use loose foliage. For example, glue pieces of cotton wool to the trunk (it is better to first paint it brown), dividing it into thin transparent fibers - it will look like thin twigs. Then carefully apply Morrison-E glue to the cotton wool with a brush and sprinkle the foliage through a sieve.
b) If you value time, ready-made Morrison trees will always come to your aid when landscaping your layout. We have developed about fifty different types of trees and spruces for you and continue to expand our range.
• The “Classic” series is a favorite line of trees from two to forty-five centimeters in height, loved by both beginners and professionals.
• The Pro Series is an excellent choice for any layout. These trees are handcrafted by our highly experienced craftsmen. “Pros” look great on any layouts of various themes, be it a railway layout, dollhouse landscaping, a miniature garden, a military diorama or an architectural layout.
• Trees and spruces from the “ArchiFORM” series amazingly enliven layouts and create a sunny mood! Excellent value for money and quality. Suitable for all types of dioramas, miniatures and architectural models.
• Textile trees and Christmas trees of the Micro series are an excellent help for architectural models. With such trees you can easily plant an entire forest or improve the territory of a residential complex. These trees are definitely not afraid of anything - no moving of the layout around exhibitions and your customer’s offices. They will never crumble or leave dirt under the glass cover. Trees, by the way, can be used as shrubs. And the various shades of the Micro series combine picturesquely with each other. But their main advantage is that absolutely everyone likes these “fluffies” and the process of landscaping the layout takes just a few minutes.
• Entourage and foam balls are a real salvation for urban planning conventional layouts on small scales (1:500, 1:800, 1:1000, 1:2000). Also, landscaping on such layouts can be made from clod foliage or leaf reticulum.
• Bushes – where would we be without them? Green, red, yellow, lilac and white! Just a godsend for the layout of a blooming garden and more! These bushes will definitely become a real decoration for any miniature or diorama and will not leave anyone indifferent.
• Of course, we haven’t forgotten about coniferous trees for your masterpieces. Here you will find fluffy Realistic Spruces and Pines for your models and dioramas. They have already been appreciated by both professionals and novice modelers and modelers.
Flowers on the model and diorama.
Flower beds, flower plantings in a park or garden, as well as flowering meadows always delight the eye and create a wonderful mood.
• You can use clumping foliage to imitate flowering vegetation and shrubs. This is the easiest and most convenient way to create flowering flower beds, plant a flower hedge or plant flowers next to a fence.
• Imitation flowers in powders - a versatile fluffy material that can be used to decorate hedges, create flowering trees and bushes, or make any other flowers.
• Flower ribbons are a quick way to create flowers in the garden by planting them in rows or forming a flower bed.
• Colored powders are a “lifesaver” in cases where you need to create flowering meadows or meadows. Apply some flowers to the finished green landscape and secure with glue.
Project development
The landscape design project involves 2 main stages.
- Preparation.
- Development.
You can contact a specialist who will do the work quickly, according to the standards. But it will cost at least 10 thousand rubles, the amount depends on the size of the plot.
Professionals use precision equipment in their work, but their services are expensive
Landscape design is a complex but interesting activity; the imagination and participation of the owner are of great importance; many develop it independently, relying on the main stages of the process, ready-made work of professionals, and their advice.
When designing, normalized distances to objects are taken into account
Preparation for creating a project includes:
- accurate measurements of areas;
- analysis of existing plantings, their sanitary and decorative condition;
- studying the chemical composition of the soil;
- analysis of the general relief;
- analysis of existing communications;
- level of natural light in the area;
- degree of soil contamination.
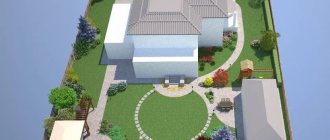
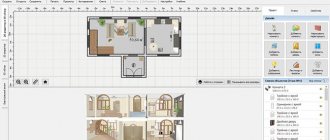
The development of a landscape design project for a site begins with the creation of a general sketch. It should be clearly visible where each zone is located.
At the second stage, a sketch is created showing the breakdown of the site into functional zones
See alsoPhoto of the garage
Briefly about the main thing
On the Internet there are many striking examples of garden interiors and garden plots. Many people believe that they can choose any of the options presented. However, it is not. Even the highest quality finished work will look different in specific areas. It's all about topographical, climatic features, and the wishes of the owner. You can create an individual interior only to order. Such a service is expensive. But you shouldn’t take ready-made ideas from the Internet in order to save money.
Never copy a finished landscape composition. Consider, study, criticize and choose the best options, mark your favorite details and use them to create your own unique design
It’s better to create a project yourself, emphasizing a few basic ideas from the examples. To do this, just learn a few simple rules and treat your work responsibly.
See alsoFacade design of a private house.
Construction stages
Arrangement of a summer cottage includes 7 stages, which should be performed in the specified order:
- drawing up a project based on the collected information;
- layout - schematic placement of key objects;
- earthworks;
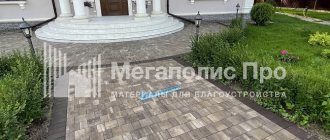
- paving paths - laying and decorating with materials;
- installation of drainage systems;
- landscaping;
- lawn planting.
The duration of the work depends on the area of the territory, the complexity of the plan and the number of workers. The exact date is announced by specialists after the project has been agreed upon with the customer.
§ 1. What to make the base from.
Anything can serve as the basis for your miniature work.
• Fiberboard, chipboard, OSB, plywood - excellent materials on which a model or diorama will last for many years and perhaps even remain as a keepsake for future generations. If you are making a small diorama for the first time, for example, for a school or kindergarten, even a kitchen cutting board will do. By the way, they now come not only in wood, but also in plastic.
• If your child was given the task “to make a model” at school, but there is not enough time and you are faced with the task of completing the task from scrap materials with the least amount of labor, then a sheet of thick cardboard (for example, from a shoe box) or a picture frame with which always includes a sheet of the same fiberboard, and the frame itself will give a more finished look to your work. Let us clarify that a cardboard base is only suitable if the product is not heavy.
• If you are thinking about how to make a model with your own hands, and not just a simple one, but with internal lighting, or its presentable appearance is very important, for example, for an exhibition, then consider the option of a ready-made model base. For you, we have prepared a whole series of the most common sizes of Euro dummy bars made from lightweight but durable materials. The bottom cover is removable, which allows you to hide wiring elements inside (wires, power supply, batteries, etc.). The upper base is covered with gray vinyl and already edged with an elegant white profile. All you have to do is create!
Where to begin?
The landscape design of a country house needs to be developed in stages. Only this approach will lead to a harmonious result. The first stage is creating a plan. It is not necessary to use newfangled programs and applications. It is enough to prepare a simple piece of paper, a pencil, and take measurements of the territory. The next stage is dividing the land into zones. It is necessary to note functional and problem areas. Potholes, hills, and sharp lowlands are considered problematic. They do not need to be leveled by excavation work. Such problems can easily be turned into advantages. You can build a small pond in the pits, and plant beautiful plants on the hills. There are a lot of similar ideas for landscape design of a country house.
Sketch out a diagram of your site on a piece of paper and mark the location of all significant objects
The simplest of them are discussed in this article. Functional areas differ in each individual case. It all depends on the personal preferences of the residents. On the territory you can build a gazebo, a summer kitchen, a place to relax on sun loungers, etc. The next stage is choosing a style direction. This is discussed in more detail in the next section.
See also: Layout of a plot of 12 acres. Scheme, options.
§ 2. Materials for making landscapes.
Landscape.
If you decide not to limit yourself to a flat surface, but to create a three-dimensional relief, for example, mountains or hills, use solid construction foam. This material has different thicknesses and can be cut perfectly with a stationery knife. So even a beginner can easily shape the landscape. A more detailed video can be viewed on our YouTube channel.
Grass for layout.
Well, what would a layout be without grass? And how not to get confused in the variety of materials if you are faced with the task of “how to make a model with your own hands” for the first time. So, grass for a layout can be of several types. You can use one or combine several or all at once, depending on the idea.
• Powders – you can use pure colors or mix them together to create a variety of new shades to add beauty to your landscape. Using them is very simple, like “one, two, three!” First of all, apply glue to the surface (it’s better not to skimp on the glue and apply a good layer about one millimeter thick), then cover it with powder, blow off the excess and wait for it to dry.
Advice: for foam plastic surfaces, use PVA glue, or better yet, special moisture-resistant acrylic glue “Morrison-E” - it will last a long time and will not absorb moisture from the air. Using solvent-based adhesives will simply corrode the foam base and your mountains may “melt.” For hard surfaces, the same “Morrison-E” or “Morrison-N” is suitable - unlike “Morrison-E” it dries faster, but contains a solvent in its composition.
• Electrostatic grass - short fibers ranging from two to five millimeters in length. It is advisable to use a special device - a flocker. In short, the flocator creates an electric field and forces each fiber to stick vertically, which very realistically imitates living blades of grass. In the absence of a flocker, you can use a soft polyethylene container with holes in the lid or sprinkle through a sieve.
Remember that you can do without a flocator, but in this case the grass fibers will not stand upright.
For you, we have prepared various shades of electrostatic grass - from withered to bright green, with a height of two to five millimeters.
• Rolled grass is an ideal solution for flat landscapes. Just glue the sheet to the base and you're done.
Tip: before gluing the grass to the base of the diorama, iron the paper side of the sheet with an iron at the minimum temperature - this will help avoid wrinkles and unevenness. You can glue the sheet using any glue designed for paper or using special sheet double-sided tape.
In our arsenal you will select the desired shade and sheet format from A4 to A1.
• Tufts of grass – something that will add a “zest”. Ready-made tufts and strips are used as a complement to the main grass cover. The strips can be cut into the required pieces and placed along the road or fence, and the bunches look great, either individually or in whole bunches on any part of the landscape.
Earth.
In addition to grass in the landscape, it is necessary to create an imitation of earth, asphalt, sand, paving stones or a rocky surface, depending on the content of the layout. Our store offers a huge collection of various materials.
• The fastest way for smooth surfaces is sheet materials. For example, imitation of asphalt or crushed stone coating in rolls. Also a variety of self-adhesive textures of various surfaces in A4 sheets.
• For those who spare no time and effort to create a layout, there is a huge assortment of volumetric textures in various scales to imitate paving stones, cobblestones and much more. These textures are created for self-painting with acrylic and enamel paints. You can paint a single color in an even layer, giving the appearance of a new coating, or add the effect of antiquity, wear, etc. dry brush painting method. You can go even further and weatherize to effectively convey dirt, dust or grime using Morrison dry pigments.
Tip: it is recommended to seal the result with a transparent matte varnish. The easiest and most reliable way to glue it to the base of the layout is with instant glue.
• If you need to display the ground on a diorama, then the already familiar powders for simulating soil, peat or loam will come to the rescue. Powders can be used alone or mixed together. It is best to glue them with the same glue that is used to imitate grass (“Morrison-E” or “Morrison-N”).
• To transfer sand, a stone embankment or create an alpine slide in the garden, use special powders with micro-pebbles of various types and fractions.
Water.
It’s not at all difficult to create a pond, lake, stream or coastline on a model.
Method number 1. Take a plastic transparent texture to imitate water and cut out an oval, an uneven blot, or whatever your heart desires. Glue blue colored paper of the same shape as the cut out piece of water onto the layout, and then glue the water surface on top by the edges. The edges can be decorated with imitation sand, micro-pebbles and tufts of grass.
Method number 2. Mark with a pencil the area where you want to make water. We cut out a recess with a stationery knife: from the edges we make a smooth descent to the center. Using acrylic or gouache paints, we paint the resulting bottom with sandy shades and add “liveness” to the bottom with pebbles and grass, which in this case imitates algae.
Tip: It is better to provide a recess for water in advance and make a suitable basis for the layout. To do this, before starting all work, glue a sheet of construction foam plastic (we talked about it in the “Landscape” section) of the required thickness, depending on the depth of the reservoir, onto the base for the layout - a recess will be cut out in it.
From a plastic imitation of water, use scissors to cut out a repeating bottom shape, allowing the edges to be about one centimeter larger. Using these edges we glue the imitation water to the layout. Along the perimeter we cover the ends of the plastic with imitation sand, pebbles and grass. Thus, you get a real three-dimensional water surface with a whole underwater world.