LATEST NEWS
Planning a vegetable garden and its design are important components of our country life, because the amount of effort spent on it and the resulting harvest will depend on the competent choice of beds, plants, and garden design.
How to properly plan a vegetable garden without hassle - read on.
In order for a vegetable garden to delight the soul and wallet of the owner, and also to be a decoration of the dacha, several fundamental problems need to be solved.
My advice before reading the article: if you want to not only work on the plot, but also relax, you first need to read the article Vegetable garden for the lazy - practical tips , and then finish reading about planning a vegetable garden and plantings, taking into account the knowledge gained.
Determining the composition of the soil
This is a very important point in the initial planning of a vegetable garden, as we must understand which vegetables and berries will grow well on our site, and for which we will need to form separate beds with imported soil or add the necessary fertilizers.
The most important soil characteristic is the pH level. The soil on your site may be acidic, neutral or alkaline. For the bulk of vegetable crops, the optimal reaction of the soil solution is within the pH range = 5.8 - 7.2.
It is best to determine the composition of the soil in a laboratory (they are available in every regional and some district centers), especially if there are not too many skills in farming. If you want to determine the composition of the soil at home, I recommend the following method: take soil in a jar and pour vinegar into a couple of tablespoons of soil. If there is a hissing sound and the earth begins to “boil” with bubbles, it has a neutral, non-acidic reaction. If nothing happens, then the soil is acidic. Signs of acidic soil include good growth of buttercups, plantain, willowweed and horsetail. Acidic soils must be deoxidized by adding lime and ash to obtain full yields.
Depending on the results obtained, you can decide which plants are best suited for growing in your soil, and which ones you will have to tinker with to achieve good yields.
MOST READ FROM PARTNERS
I want to give you a small sign to help you know what kind of soil certain plants prefer.
| Culture | Optimal pH Range |
| Onion | 6,4-7,9 |
| Beet | 6,5-7,5 |
| Cabbage | 6,2-7,5 |
| Peas | 6,2-7,5 |
| Corn | 6-7,0 |
| Carrot | 5,5-7,0 |
| Beans | 6,0-7,0 |
| Melon | 6,4-7,0 |
| Dill | 6-7 |
| Cucumber | 6,4-7,0 |
| Zucchini, squash | 6,0-7,0 |
| Radish | 5,5-7,0 |
| Tomato | 6,3-6,7 |
| Celery | 5,5-7,0 |
| Potato | 5,5-6,3 |
| Pepper | 6,3-6,7 |
| Salad | 6,0-6,5 |
| Eggplant | 6,4-6,7 |
| Beans | 6,0-6,5 |
| Sorrel | 5,0-6,0 |
| Parsley | 5,5-7,0 |
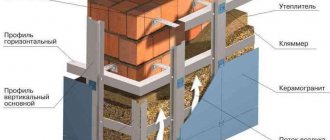
Plastic structures
Products made from polymer elements favorably emphasize the perimeter of plantings. In addition, plastic beds come in different colors and textures, so you can create a unique landscape design.
Plastic is a fairly rigid barrier, which subsequently separates the landing zone.
The plastic elements are flexible enough to give the structure any shape.
Due to the fact that plastic beds do not absorb moisture and are not affected by temperature changes and direct sunlight, they can be collected in different climatic zones.
In the courtyard
The garden plastic board used can be of different textures:
- brick;
- natural stone;
- wood texture;
- metal and much more.
It must be admitted that beds made of PVC boards are much more durable than those made of lumber. They are reliably protected from rotting.
Also, if desired, the plastic box can be moved from place to place, which cannot be done when the structure is stone, brick or iron. In fact, plastic fences are mobile structures that do not require specific maintenance.
Design diagram
In addition to the above advantages, plastic parts have the following features:
- Simple and relatively quick installation. Using plastic elements for the garden bed, you will eventually be able to assemble a box in the shortest possible time. The plastic does not need to be further processed or placed on a bonding material. You just need to create a configuration of a suitable shape, and then fill it with fertile soil.
- Polyvinyl chloride is characterized by increased wear resistance and practicality. Structures made from this material are designed for a fairly long service life. Moreover, polyvinyl chloride is a lightweight material, which makes it possible to design multi-tiered country houses. If you make beds for strawberries, tomatoes or cucumbers from polyvinyl chloride with your own hands, then this will be an excellent solution.
- A huge selection of plastic models and excellent decorative qualities. You can choose elements of different textures, which will allow you to decorate your summer cottage and give it a zest.
- Mobility. If desired, decorative composite fencing can be quickly and easily dismantled or moved. There is corresponding video material on this topic on YouTube.
- No additional care. Unlike the same wood box, a PVC border does not require special processing. Over time, it does not need to be varnished or painted, since PVC does not absorb moisture and does not deteriorate when exposed to direct sunlight.
Options for wooden borders
We choose a place for planting on the site.
This is one of the most important stages of garden planning. After all, no amount of time, effort and money will yield results if the place for the garden is chosen incorrectly.
When planning a garden, you need to consider the following rules:
1. The beds should be located from north to south to receive maximum sun during the day.
2. It is advisable to organize a vegetable garden out of the blue. If this does not work out, then choose the southern or southeastern slopes for planting.
3. The beds should be easily accessible for watering (it is advisable to be able to throw a pump into a ravine with a river - this will greatly save your costs and efforts on watering and extracting water). If you have to water them manually from a watering can, you will soon regret that you did not think through the watering system in advance.
4. For a garden you need breathable soil with drainage so that the roots of the plants receive oxygen and do not suffocate. If the site has heavy clay soils, before organizing the beds, you need to take care to add a leavening agent - sand, black soil, peat. In principle, loams are one of the most nutritious soils; you don’t need to be particularly afraid of them, the main thing is to be able to make friends with them.
5. Vegetable beds should be located away from vertical hedges and trees - then they will receive maximum sun and will not be in the shade.
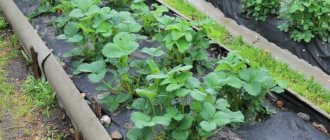
Arrangement of beds for cucumbers in open ground: photos and recommendations
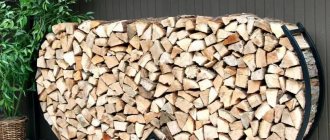
To grow cucumbers in open ground, beds are usually prepared in the fall. This should be done before the rains and temperatures drop. The planting area must be carefully dug up and saturated with organic fertilizers. Cucumbers like fertile, light soil that has a good level of air and water permeability. If the soil on the site is heavy, sawdust, peat or sand can be added to the soil to facilitate loosening.
To get a rich harvest of cucumbers, the soil for the beds must be prepared in the fall
The process of preparing a bed for cucumbers in the spring includes the procedure for disinfecting the soil. To do this, the site of the future garden is spilled with potassium permanganate. The solution must be hot and strong. In addition, soil fertility can be increased by adding chicken manure or manure. This procedure is carried out locally, that is, the fertilizer is placed directly into the trench or hole. After this, the bed is covered with a small layer of soil, where the seeds are then planted.
How to make a bed for cucumbers: agrotechnical secrets
To get a rich harvest of cucumbers from the garden, you must adhere to the basic rules:
In order to collect clean cucumbers without soil, you need to think about what you can tie long shoots to.
Cucumbers need a rich biological composition of the soil. Therefore, it is recommended to fertilize the soil with organic matter, for example, grass, humus, branches, rotted manure, and food waste. In the process of their decomposition, not only does the fertility of the soil increase, but also heat is released, warming the soil. To prevent high temperatures from damaging the root system of cucumbers, experienced summer residents advise abundant watering.
The soil where cucumbers grew must be fertilized after harvesting.
There are several ways to grow cucumbers in open ground. For these purposes, you can form a long ridge bed, a hole, dig a ditch, or build a high structure.
How to make cucumber beds in the garden with a bookmark
To form a bed with a bookmark, you will need to dig a trench. The depth of the ditch should be equal to two shovels. Then branches are laid out across and sawdust is poured in. The next layer consists of straw and garden waste. You can add autumn leaves, cardboard or newspapers, and compost. The thickness of the fertilizer layer should be within 5-7 cm. The layer is filled with warm water and covered with a mixture of compost and soil.
A bed with a bookmark can effectively serve for 5 years. In the second year of operation, you will not need to add compost to the top layer, because during the decomposition of organic components, the bed itself will produce nutrients.
Cucumber bed with bookmark
Advantages of a bed for growing cucumbers with a bookmark:
- convenient watering system;
- stagnation of water is eliminated;
- In the spring there is no need to dig up the soil, just loosen the soil.
Plants can be planted on such a nutrient basis much earlier than is customary in conventional beds. It is not recommended to use beds with filling in low-lying areas and areas where water stagnates.
Cucumbers can only be watered from below, making sure that moisture does not stagnate at the roots
Warm surface beds for cucumbers in open ground
This type of warm beds for growing cucumbers is built on the surface of prepared soil. This technology will be the best option for areas located in lowlands. In order to enhance the heating process, the bed is covered with film. As a result, a greenhouse effect is formed, which has a positive effect on the growth of cucumbers and their productivity.
Surface beds also include structures in the form of boxes made of brick, slate or boards. The bottom of these containers is filled with sand, then with wood waste. Next comes a layer of organic waste and straw. After laying each component, the contents are carefully compacted and filled with liquid manure. Finally, the bed is filled with a mixture of compost and soil.
When making warm beds for cucumbers, you should follow clear instructions so as not to oversaturate the soil with fertilizers
Cucumbers are planted in two rows. Plants are placed along the edges of the box bed, which ensures a sufficient level of illumination. If you plan to plant cucumbers in early spring, the structures can be converted into greenhouses. To do this, you will need to install plastic arcs and stretch plastic film over them. Thus, heating increases and it becomes possible to get an early harvest. Moreover, the result is completely independent of weather conditions.
Cucumbers can be planted in insulated beds earlier than in open ground.
Raised beds for cucumbers in open ground
Warm beds with a raised structure are used in cases where the site is located in a region with a cold and humid climate. Due to this, the soil is fully warmed up, allowing for early harvesting. If groundwater comes too close to the garden, the bed is raised high, due to which the plantings do not get wet in soil that is oversaturated with moisture. Stone fruit trees, whose roots are severely affected by groundwater, are planted in a similar way.
Various materials are used as borders for these structures. The most popular of them are slate and wood. In rare cases, metal is used. This type of bed can even be installed in the middle of the lawn. If you frame it in the form of paving stones or tiles, a raised vegetable garden with cucumbers will become a worthy decoration of your summer cottage.
From ordinary high beds you can build mini-greenhouses that help preserve the crop during frosts
As an alternative solution, you can build a mound on the territory that does not have a fence. You can take any length for such a bed; the optimal width is 1 m. You should not raise the ornamental garden to a height of more than 1 m. The air that remains in the voids formed between the elements of large organic matter provides good ventilation and promotes rapid heating of the soil.
To speed up the decomposition process of fertilizers, the soil is spilled with a solution saturated with special bacteria. The procedure is carried out twice a year. The first time the soil is watered with bacteria is in the spring. After treating the beds, you should wait at least a week before planting plants. The second time the soil is spilled in the fall after the crop is harvested. When the soil has already been treated with the composition, it should be loosened so that the soil is saturated with oxygen and the drug itself is evenly distributed.
We are planning the design of the beds and placement on the site.
Layout of standard beds
Take the word of the person who redid the beds - don’t be greedy. In the picture I show how NOT to make beds in width.
The most important thing is that the beds are convenient for processing. At one time, having just received a dacha and started gardening, I made a big mistake by organizing beds 1.2 m wide. with narrow passages between them. Processing them was a complete nightmare. In the spring, it was still possible to somehow pull the weeds and take care of the plants, but in July the vegetables grew and it became impossible to push through these thickets and do anything. After a few years, I had to spend a lot of effort and money to completely redesign the garden.
In order to make it convenient to cultivate the beds, you need to make them quite narrow, high and leave a wide passage between them, ideally so that a cart can pass (under the weeds, to bring fertilizer, for scoops and rakes) - this is very convenient and forgiving , If you bend down to weed and loosen, you won’t break the plant from the garden opposite with your butt.
Beds for the lazy: photos and basic information for beginning gardeners
Designing the right garden beds will solve many problems and open up new opportunities for the owner of a summer cottage:
- protection against soil erosion in the garden when there is a large amount of rainfall or watering the plants. The sides of the bed will keep the nutritious soil in place, preventing it from washing out onto the paths. In addition, the passages between the structures themselves will remain clean, no dirty puddles or streaks;
Neat garden beds will make your garden more attractive and organized.
- the possibility of forming the basis for creating a temporary greenhouse for the spring period. By installing high sides as fences, a multi-layer bed can be organized inside the structure, which can be used as a greenhouse. To do this, it is enough to install special arcs and stretch the film. The result will be a neat greenhouse house;
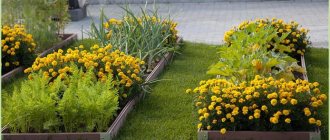
- improving the appearance of the garden due to orderly and even plantings with beautiful framing;
- creating boundaries to prevent the spread of weeds.
By planting plants correctly, you can avoid the growth of weeds in beds and paths
Making beds with your own hands from boards and other materials allows you to clearly limit the planting area, thanks to which weeds and harmful plants do not have the opportunity to spread widely. If the garden fence is dug to a greater depth, the level of protection increases and perennial weeds, which are unable to overcome this barrier, can no longer penetrate into the garden bed.
High, warm beds made from quality materials can serve their owners for many years
Types of beds in the garden: how to properly prepare for construction
Several types of beds are used to organize a vegetable garden:
- standard;
- tall;
- narrow.
Wide paths and optimal size beds will allow you to avoid stepping on the ground when working with plants
Standard beds are located on the same level as the garden; they do not go deep into the ground and do not protrude above it. At the same time, the owner of the territory can independently choose the width, length and nature of the arrangement of the beds on his summer cottage; photos of interesting design options can be seen in this article. As a rule, plantings are placed at a distance of no more than 0.5 m from each other to make the plants easier to care for. To mark the territory, it is recommended to use a rope stretched between the pegs. The use of a special garden marker is allowed.
Paths can be sown with lawn grass, but it is necessary to ensure the clear outlines of the beds
Before you start making a bed with a narrow design, you should make sure that the building area has a flat surface and a sufficient level of lighting. This type of product is characterized by increased row spacing. This parameter can sometimes reach 1 m. At the same time, the beds themselves do not exceed 0.45 m in width. The structures of narrow beds rise slightly above the soil level. The difference between the height of the garden and the surface of the plot is 0.2 m.
Many gardeners note the convenience when working with narrow beds
In the area where it is planned to build beds, you should dig up the soil and apply fertilizer. At the same time, you should not waste nutritional supplements on row spacing; you only need to treat the planting area. Dolomite flour or a special complex consisting of minerals can be used as fertilizers.
Narrow beds according to the Mittlider method, due to the large amount of light received, give a good harvest
Creating beds with your own hands from scrap materials: photos of tall structures
Any summer resident first decides what to make the garden beds from, and only then moves on to further planning and construction, since the technology for their creation depends on the physical and operational characteristics of the material. Regardless of its choice, the mechanism for manufacturing structures is almost always the same. Construction begins with the installation of the frame. The standard size of such structures is 0.9 m (width) and 1.2 m (length). After this, the product is filled with fertile soil.
Beds made from high-quality wood are more environmentally friendly compared to concrete or asbestos-cement
The designs of home-made beds from scrap materials can be created on the basis of:
- Stone or brick - products made from these materials look aesthetically pleasing, and they are characterized by a long service life. The disadvantages of stone or brick frames include their cost. In addition, the assembly procedure requires a lot of time; dismantling a stationary structure can be difficult.
- Vines are the most accessible material found in nature. Due to their flexibility, the beds can be given any shape, but the service life of such a structure is limited to a short period of time. In addition, you will need to carefully study the weaving technique and acquire a special tool for cutting branches.
- Metal - the material allows you to create lightweight portable structures that can be painted in any color. However, the cost of such a frame is high, and the work may require a welding machine and skills in handling it. Products also require anti-corrosion protection.
- Slate is a relatively inexpensive material that provides easy assembly of the structure, but requires extreme care due to its fragility.
- Raised beds or raised beds are the most efficient designs and are best suited for growing vegetable crops. The building materials for their creation are not expensive, and the soil does not need to be dug up. The width and height of the structures determine how much effort and time will be required to build them. Most often, summer residents prefer wooden beds made of boards. On the Internet you can find photos of raised beds with your own hands; such structures do not have fencing. They also fall into the category of elevated structures;
Gabion can also be used to organize a warm bed
How to arrange beds in a vegetable garden: photos and recommendations for choosing a location
Of no small importance in obtaining a rich harvest is the correct choice of location for the construction of beds and the layout of their placement. It is desirable that the area chosen for organizing a vegetable garden is flat and receives maximum sunlight throughout the day.
To make the right choice of location for organizing a vegetable garden, it is recommended to spend some time on the site and observe the distribution of light throughout the area throughout the day. In addition, special attention should be paid to the placement of trees, both on your site and on the territory of your neighbors. This is necessary in order to determine how big the shadow is and where it falls. It is worth considering that an area flooded with sun in winter may be shaded in summer, since in the warm season thick foliage appears on bushes and trees.
The best place is an area where there is sun throughout the day. It is allowed to install beds where there is shade in the morning or during the day. If the proposed construction area is dark throughout the day, you should not use this place for arranging a vegetable garden.
How best to make beds in the garden: choosing the optimal design
The design of the beds is selected at an early stage of planning, when a place for the vegetable garden has already been selected.
Each type of beds has certain advantages:
Container beds are very convenient because, if desired, they can be moved to another convenient location
- Container beds - will be beneficial in cases where site space is limited. Small, large and medium-sized pots are suitable for organizing such beds. Garlic, peppers, lettuce and herbs feel especially good in containers. Mobility is another advantage of container beds, which can be moved to any location if desired;
- open ground beds are the oldest method of growing crops that are planted directly into the ground. In such conditions, it is more difficult to get a good harvest, so the technology of joint planting of vegetables in the garden is often used.
Annual plants can be grown in large plastic bottles and placed in a convenient location for the site
Why are high beds convenient?
I can talk for a long time on this topic, but it’s better to tell you point by point how I set up raised beds, why and what I got from it.
1. I planned a vegetable garden on paper depending on the plot and the needs of the family (what we eat, what we can store and what we can’t, what we will eat and what we will buy).
MOST READ FROM PARTNERS
2. I laid out the beds and the passages between them. I made the beds 90 cm wide, 20 cm high (the size of the board for sale) and an additional 30 cm deep. The width of the aisles is 1.3 meters, I could easily carry a cart, carry a watering hose, boards for other beds - I liked it. Also, I didn’t think about how to plant plants in these beds so that some would not shade others.
3. We bought a board for the beds and put together a box with screws and corners.
4. To suit the size, we dug the ground to a depth of 30 cm, laid 2 layers of non-woven fabric inside, and nailed it to the sides of the beds with a furniture stapler. Believe it or not, I have stopped getting weeds from all the cracks. We place the non-fabric loosely, as the earth will press it tightly - it is necessary so that it does not come off.
5. Then we brought good black soil and rotted manure, we don’t have a plot, but only clay, a clay master used to work there)). I mixed the excavated soil with black soil and manure, added fertilizers and got amazing beds for vegetable crops. And I used the remains to build a vertical bed for strawberries - you will see its analogue just below.
If it were possible, I would now make beds at least 40 cm high. It would be easier to handle them, because they are 20 cm - you still have to crawl on your haunches, but it is still very comfortable.
There are many designs for high beds - slate, wood, blocks, brickwork - everything is limited by your imagination, means and time.
Below are design options for raised beds.
MOST READ FROM PARTNERS
And now I want to talk more about non-standard beds.
Layout of non-standard beds
I don’t know about you, but I’m always itching my head in search of interesting and functional solutions for the garden that will help me harvest more and make my work easier.
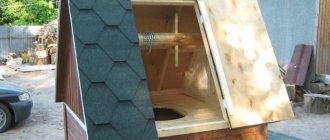
As you understand, I am lazy by nature, and therefore I strive to get the maximum with a minimum of effort. This also applies to growing strawberries. The idea is not mine, I spied it on the Internet, the photo is also not mine, since the dacha is far away now and I’m not going to go and take pictures) But the principle is exactly the same.
Here is such a wonderful bed for strawberries. At the same time, there is also a watering organization scheme, I didn’t use this, I just watered it and that’s it, without bothering, because strawberries have a very small root system, it’s not like a tomato - maybe a meter in diameter. Such a bed for strawberries will decorate any area, especially during flowering and fruiting. And it will be easy to care for strawberries, because not every slug will climb Everest for a strawberry, but will go to the neighbor’s plot)).
Well, fertilizing and watering in such a bed is also more economical and targeted; whether there are no weeds or pulling them out is easy and convenient. Plus, the plants do not shade each other and receive optimal lighting.
MOST READ FROM PARTNERS
There is also a sufficient amount of trash left on the site, such as leaky buckets, barrels and branches after pruning, a lot of weeds and mown grass.
I came up with portable beds that can be organized on any spot on your site.
After replacing the barrels, we were left with 3 ownerless, leaky 200-liter barrels and one shabby, but intact.
I put a whole barrel in a corner of the garden, dumped weeds and mown grass into it, filled them with water and let it sit for a week or two, I don’t remember. And I also covered this barrel with a lid (from a new barrel), because I realized that the smell from fermentation would be unpleasant, and there were neighbors nearby). As a result, the tincture became a wonderful green fertilizer for my plantings. Tomatoes, peppers and eggplants simply grew from it by leaps and bounds. And I sanded the top of the barrel and painted it green, painted tacky flowers on top and it delighted the eye with its appearance all season.
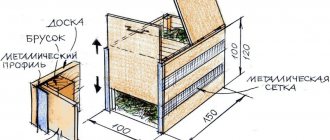
From the rest of the holey barrels I made vertical beds - all summer, autumn and even part of the spring I stuffed cuttings of branches, dry leaves, carrion apples and other waste into them. By spring, they had settled, half-decomposed, and were the first to warm up, which I used for planting.
We need to compact the resulting compost properly and sprinkle fertile soil mixed with fertilizers and decomposed manure on top. And we get a warm, well-heated bed in any convenient spot in our garden.
It is convenient to grow cucumbers and peas in a barrel; you can also grow zucchini, but they already grow under your feet without any hassle.
Look at the photos for various planting options, and take note of them - you will make compost, adapt the barrels, and harvest the crop, most importantly - no hassle. In the spring, seedlings can be covered with non-fabric and a twine tied around the barrel so that the material is not blown away by the wind, and in the fall these barrels can be easily freed from plant tops and covered with film until the next season.
It’s tricks like these that brighten up our life and keep our brains from getting sour).
Recommendations for designing beds
If little space is allocated for a vegetable garden, then the beds should be compact. For this purpose, you should use as many vertical structures as possible: vertical beds, trellises, staircase designs, decorative arches, stepped structures on which boxes with earth are located.
Option for manufacturing and designing original beds
On vertical structures such as trellises, you can grow not only climbing plants such as cucumbers and beans, but also tall tomatoes. This will make them much easier to process and harvest. By arranging the beds for a vegetable garden, you can also leave room for growing flowers. The main thing is that the crops harmonize well in height and size, without disturbing neighbors and without blocking their access to light. A flower and vegetable garden will not only produce a harvest, but will also delight you with lush flowering all summer long.
The geometry of the beds is limited only by the owner’s imagination and the available land. Recently, not only gardeners, but also gardeners are gradually moving away from square and rectangular shapes, creating triangular, diamond-shaped, round and segmented ridges. In regions with cool summers, high beds are gaining popularity (the optimal height for such structures is approximately 40 cm).
Option for designing garden beds
Their advantage is that the earth warms up better, and it is much easier to cultivate plantings in such structures. Only they have to be watered more often than standard ones located at soil level. More and more people, growing vegetables, strive not only for high yields, but also for the aesthetic appearance of plantings, combining the useful and the pleasant.
It is no longer enough for plot owners to just work on the land; they want the plantings to be originally designed, and the garden to become a place not only for work, but also for a pleasant time and relaxation, during which the growing plantings are pleasing to the eye.
Therefore, a lawn is laid out on the site for relaxation, a pleasant landscape is created, and space is left for a beautiful vegetable garden for growing “vitamins.” Vegetables can be used to create beautiful compositions, no less attractive than blooming petunias or chrysanthemums.
Design and decoration of garden beds
Just look at the cabbage family alone, among which there are plants of various shapes and colors. Yes, and salads can be attractive like a flower garden.
Crop rotation
An important point in planning your garden and plantings. If you grow the same plants in one place for a long time, the soil is depleted, those substances that are necessary for this type of plant are washed out of it and, due to their lack, it gets sick, becomes smaller, and pests also accumulate in the soil.
To avoid this, they use crop rotation or, as it is also called, crop rotation, as well as planting green manure (such as mustard, lupine), which enrich the soil with nitrogen and act as a green fertilizer. Plants feed on what their predecessors left them, so first strong plants are planted on strong soil, then medium ones, and in the third year weak ones that consume few substances. The soil is then fertilized and the crop rotation cycle begins again.
In order not to suffer, use a planting rotation sign, this will help you have an excellent harvest and a unique look for your garden every year.
| Crops planned for planting | Previous cultures | ||
| favorable | neutral | unfavorable | |
| potato | cucumber, legumes, early cabbage, cauliflower, green manure | carrots, greens, cabbage, beets | tomato, potato |
| tomato | cucumber, cauliflower, turnip, greens, green manure | onions, cabbage, beets | tomato, potato |
| early and cauliflower cabbage | early cucumber, onion, peas, beans, beans, green manure | carrots, tomato | cabbage, root vegetables, turnips, radishes |
| medium and late cabbage | cucumber, early potatoes, carrots, peas, beans, beans | carrots, tomato | cabbage, beets |
| beets | early potatoes, cucumber, greens, green manure | tomato, carrots, onions, early and cauliflower cabbage | beets, cabbage |
| pumpkin | legumes, garlic, onions, cabbages | cucumber, early potatoes, beets, greens | tomato, carrots, late cabbage |
| legumes | cabbage, onion, cucumber, early potatoes | tomato, root vegetables, green vegetables, green manure | legumes, perennial grasses (clover) |
| onion | legumes, cucumber, early potatoes, early and cauliflower cabbage, green manure | tomato, onion, late cabbage, beets | green, carrots |
| green and aromatic herbs | legumes, onion, cucumber, early and cauliflower cabbage, green manure | tomato, early potatoes, beets, greens | late cabbage, carrots |
Main features
Boards are the best option for making fences. You can buy them or use lumber already available on the farm. Before you make beds from boards, you need to decide which border option to choose for this.
The WPC board fits quite tightly to the ground during installation, leaving no visible gaps.
Moreover, the box made of wood boards perfectly retains moisture, thanks to which the plants germinate faster.
Courtyard interior
Garden fencing boards have the following features and advantages:
- acceptable price;
- ease of container assembly;
- ease of maintenance in the greenhouse;
- aesthetically attractive appearance;
- durability with proper care.
The photo shows a border made of boards.
Boxes made of boards
Combined plantings
During its life cycle, each plant releases various biologically active substances into the environment. By planting various plants and flowers nearby, you can protect them from pests and help better absorb nutrients from the soil. In addition, intensive planting of vegetables, which is part of organic farming, sharply reduces the need for watering, as the plants cover the ground with their foliage and the evaporation of moisture on a hot summer day is reduced.
I will again give a table of compatibility when planting different crops in the same bed.
When forming combined plantings, it is necessary to take into account a number of points:
1. Timing for harvesting each vegetable. You can plant onions and carrots together, but onions are harvested faster than carrots and, in addition, they have different agricultural techniques during ripening; regardless of friendship, they must be planted in different beds.
2. Plant height and lighting. When planting together, it is necessary that tall plants do not shade their short, useful counterparts.
I’ll add some lists, some things will overlap, there are also flowers here, because our garden should not only be fruitful, but also beautiful.
Compatible fits
- Broccoli - beets, sage.
- Peas - eggplant, calendula, corn, cucumber, radish, carrots.
- Pear – spruce, calendula, hemp, raspberry, tansy, tomato, dill.
- Strawberries - marigolds, borage, lettuce, beans, garlic, spinach.
- Calendula, garlic – gladioli, strawberries, roses, currants, tulips.
- Head cabbage - anise, potatoes, onions, peppermint, rosemary, chamomile, beets, celery, dill.
- Cauliflower – celery.
- Kohlrabi – onion, lettuce, beetroot, cucumber, spicy crops.
- Corn - peas, potatoes, cucumber, pumpkin, beans.
- Onions and garlic - strawberries, carrots, chamomile, beets, celery, tomato, savory.
- Raspberry – plum, apple tree, calendula.
- Carrots - peas, onions, radishes, radishes, rosemary, lettuce, tomato, sage.
- Nasturtium – most vegetables, phlox.
- Cucumber – peas, corn, sunflower, radish, beans, tomato, cabbage.
- Parsley – asparagus, tomato.
- Sunflower - cucumber.
- Radishes – peas, nasturtium, cucumber, lettuce.
- Radish - beets, spinach, carrots, parsley, tomato, pumpkin, cucumber.
- Turnips - peas.
- Salad – strawberries, carrots, cucumber, radishes.
- Beets - kohlrabi, onions, radishes, cabbage, beans, beans, lettuce.
- Celery – cabbage, onion, tomato, beans, cauliflower, leek.
- Tomato – calendula, leftover, onion, nasturtium, parsley, celery, asparagus.
- Pumpkin - corn.
- Dill, spinach – radishes, turnips, cabbage.
- Beans - cabbage, potatoes, carrots, cucumber, savory and most garden crops, except beets.
- Phlox - nasturtium.
- Apple tree - see pear.
It is good to plant red rowan in the corners of a potato field, leave a spruce among an apple orchard, limiting its roots, plant early-fruiting tomato varieties under apple trees on the south side, or scatter tomato stepsons among currant bushes. Incompatible landings
- Eggplant – other nightshade crops.
- Cherry - raspberry.
- Peas - gladioli, potatoes, onions, garlic.
- Strawberries - cabbage.
- Cabbage – strawberries, tomatoes, beans.
- Onions, garlic – peas, beans.
- Carrots - dill, parsley, celery and other umbrella plants.
- Cucumber – potatoes, zucchini, aromatic herbs.
- Pepper - beets.
- Sunflower - potato.
- Beets - beans, spinach.
- Tomato – other nightshade crops (including potatoes), cabbage.
- Pumpkin - potatoes.
- Beans - gladioli, onions, garlic, beets.
Not a single plant can tolerate the proximity of fennel and hyssop - they are planted separately.
What boards are needed for garden beds?
The neatest wooden sides are made from edged boards. However, its cost is higher than for lumber waste. A slab or unedged board will cost less. If there is timber or clapboard left after construction, this is also an excellent option.
The minimum thickness of the board for beds is 20 mm. However, if the box is long, the side walls will sag from soil pressure. For such wooden structures it is better to use boards of greater thickness - from 30 to 50 mm. In addition, they will last longer compared to thin lumber.
The minimum thickness of the board for the box is 20 mm
When the boards are available, the type of wood is not paid attention to. They use what they have. When purchasing lumber, preference is given to blanks made from hard and resinous types of wood. Such boards will last longer in the ground.
The most affordable lumber is the following types of wood:
- Oak and ash boards are expensive. However, solid wood does not disappear into the ground for a long time. The ridges will be durable and will last up to 10 years.
- Larch is very resinous. Due to this, the tree lies in the ground for many years and does not rot. For wooden fencing, this is an excellent choice.
- Cedar is a coniferous tree. The wood is similarly resinous and is well preserved in the ground. Cedar boards are affordable for summer residents.
- Pine is also resinous, but it rots quickly in the ground. Preference is given due to its low cost and ease of processing. Soft pine is easy to saw, sand, and trim with a plane.
- Acacia boards are durable and perfect for a wooden box. However, wood is difficult to process.
When constructing wooden beds for a vegetable garden with his own hands, a summer resident chooses those boards on which he is willing to spend the allocated amount.
Advice! If the bed needs to be arranged for 1-2 seasons, it is optimal to choose pine boards for a wooden box.
Irrigation system
An important factor when planning plantings and a vegetable garden, because with a watering can in your hands you can’t run around even on 6 acres.
It is necessary to think in advance about places for barrels with green fertilizers, as well as for barrels with warm water for irrigation, because everyone knows that it is impossible to water with water from a well or a well - we will kill the roots of plants with ice water.
If you have a water supply system at your dacha, from where water is supplied centrally, this is beauty, but not everyone has such happiness.
To collect water, we placed 4 barrels around the perimeter of the house, into which rainwater flowed from the roof, and also filled the barrels from the well using a pump. Then, using a mini-pump and a hose, I watered my plantings with warm water. I confess that I used cold water on the trees and shrubs, but they were not harmed by it))).
I also saw drip irrigation systems and many other different ones, but they are expensive and the plantings do not last forever. Next year I will want to plant other crops and the watering scheme will be different, so I went with a hose - in general it is fast, convenient and not too troublesome .
ACTUAL NEWS
Site articles on the topic
- Purchased soil: how to process it so as not to plant seeds in an infected mixture
- Foxglove: planting, care and propagation
- How to care for tomatoes in a greenhouse after planting?
- Unusual ways to plant potatoes or how to grow potatoes in a barrel
- Pros and cons of raised beds you need to know before installing them
You may also find the following materials useful:
- How to arrange garden beds at your dacha. Beds on the site: how to design beautifully and correctly
- By creating country crafts with your own hands, you can surround yourself with beauty and convenience.
- Rules for planting wild grapes. Wild grapes - how to plant correctly
- Do-it-yourself country crafts are exactly what is suitable for your site
- Which trimmer with battery is better?
How to properly make beds without fencing?
It would seem that everything is simpler here, but no. You must understand that the earth can “float” at any moment due to the wrong technology . Let's look at this in more detail to avoid making a mistake.
- Decide on a site in your dacha or garden.
- Distribute the soil throughout the area where the living creatures will grow.
- Carefully compact the edges so that they do not deteriorate after the first watering or rain.
- You can start planting the plant according to the principle indicated above in the previous version.
Make sure your bed is well compacted as this is the most important point in creating.
Raised bed for strawberries
When preparing raised beds for strawberries with your own hands, it is recommended to take into account the main feature of this crop. It is associated with the location of the root system closer to the soil surface. Strawberry roots grow directly on the ground, so the fertile layer should not be too thick.
Great garden option for strawberries
The internal decomposition process will prevent strawberries from freezing during severe frosts. This is possible if the raised beds for strawberries are covered with snow or special material in winter. When planting plants in a warm bed, it is convenient to grow them in it due to the least evaporation of moisture.
Installation of tall slate gardens
The slate sheets used to create the box are secured in different ways, for example, by digging. The stripes are 10 cm wider. The rules for constructing a fence using slate are similar to the method of installing a polycarbonate bed with your own hands.
There is no guarantee that the slate sheets used in the manufacture of the box will not move in the spring when the snow melts. Severely softened soil is an obstacle to the normal operation of the structure. Strengthening the structure will require a lot of time and great effort. If you build beds from pallets, this can be avoided.
Beautiful yard
Marking
Before marking the site, you should stock up on slate sheets, as well as:
- a piece of chalk or a pencil;
- tape measure;
- building level;
- rubber hammer;
- reinforcing bars or pegs.
Fencing materials
When making the box, logs, bricks, corrugated sheets or stone are used. If you build it from pallets with your own hands, red or cedar wood, this will increase the service life of the structure. The bottom inside is usually covered with a plastic or metal protective mesh to protect against rodents.
Setting up raised beds does not require the use of expensive equipment. For example, having made a box from plastic panels with your own hands, it is better to stretch a polyethylene film over it. Arcs made of metal or PVC are pre-installed. The greenhouse must have dimensions corresponding to the dimensions of the bed made of brick, corrugated board, wood, blocks or stone. This will protect the seedlings from frost and extend the harvest period.