A fencing structure can not only protect site owners from prying eyes and intruders, but also be a harmonious addition to the architectural ensemble or its highlight.
Decorative fence is installed both outside and inside the estate. There are no restrictions in the choice of materials or design ideas. Therefore, if desired, each owner is able to create such a structure to his own taste without much time or effort.
Users often search for:
- Photos of fences for a private house
- Cheap DIY fence
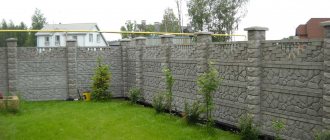
Stone fences
The most picturesque and almost eternal will be fences made of stones. Flower beds and flower beds look great framed by them. The rough stone texture emphasizes the fragility of living nature.
Stone flower bed fencing looks organic
To lay out decorative stone fencing with your own hands, in addition to tile-shaped stones, you will need a high-quality concrete mixture. The first layer is done in random order. Each subsequent row is laid in such a way that the seam has an abstract line rather than a geometrically correct one.
Decorative stone fencing along the path
Slate or polycarbonate
If, after installing the shower structure or canopy, there are excess sheets of polycarbonate or slate left in the household. They can be divided into small pieces and inserted into the ground, forming a mini-fence. Material of different colors will do. Such fragments will look very interesting in sunny weather.
Flower bed with polycarbonate slate fencing Source zelenj.ru
The slate fencing creates an interesting wavy outline around the flower bed. This material will help complete the design of an oblong, oval or round shape. For rectangular flower beds, such framing is rarely used.
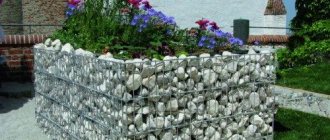
Gabion fence
If you want to have a durable and original fence design, pay attention to gabion fencing. Such a fence will not require any maintenance at all. This is an excellent alternative to expensive analogues made from natural stones. The installation process is much easier because there is no need to build a foundation. It is enough to simply concrete the pillars, which will become the basis for fastening the mesh.
Fence using gabions
The stones are placed in a mesh frame. Grid cells can be small or large. The beauty of the fence will depend on the fraction of stones filling it. Small components do not look very advantageous, but this is a matter of everyone’s taste. It happens that gabions are generally filled with simple crushed stone. To give your fence originality, you can use stones of other types in your work. Colored cobblestones will help create an ornament. And further. It is not at all necessary to make such a fence the same type. It will look more interesting in combination with other subspecies of its fellows.
When making gabions, you can combine various materials
Material selection, selection tips
Since the fence is a decorative element, it means that we are not making it for “the rest of our lives.” It should serve us for at least 5–7 years, and then we will still want to change something, because new design ideas or new flowers will appear. You need to choose the material with which you will be comfortable working. Let's look at the most common ones.
Wood is the most environmentally friendly and affordable material. Fairly easy to use. With proper preparatory treatment it can last up to 10 years.
Plastic and glass bottles are the easiest materials to work with. The downside is that plastic is not an environmentally friendly material and can release toxins into the soil. Glass bottles are easy to break and can cause injury in the future.
Options for building materials in the photo
An original fence made from thin PVC pipes. Colored plastic bottles make a fun fence.
Glass bottles are not only for storing alcohol
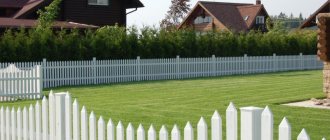
The easiest picket fence to use
Fence-fortress made of tires
Car tires last a long time, but like plastic, they emit toxins. They look pretty rough.
PVC pipe will last a long time. If you have a special soldering iron, you can simply make an original fence from it.
Pencil fence
If you are going to assemble a fence from vertical pickets, then try transforming the components into colored pencils. They can be easily shaped into both boards and logs. It is enough to cut their upper end in the form of a cone and give it the appearance of a rod. Each element can be painted in its own color. The fence will turn out bright and colorful.
Bright decorative fence made of pencils of different heights
Calculations
If the fence is installed along the entire perimeter of the site, you must first determine its corner points, drive pegs into them and pull the cord. Once you have established the exact perimeter of the fence, you can move on to planning the spans. To do this, you need to divide the length of the fence by the span. As a rule, for high decorative fences this is 1–1.5 m. Low fences can be made with smaller spans, this will make them more stable.
For example, our plot has dimensions of 4x5.5 m. We plan to make a span of 1 m. The 2 widths of the plot will consist of 8 spans. When dividing the length, 5.5 m does not give a whole number. In this case, you need to increase the length of each span by 10 cm. We get 10 spans of 1.1 m each. The increase is insignificant, but we will avoid two fragments of 0.5 m each, which will disrupt the completed appearance of the fence.
If the fence will be installed in a small fragment (for example, one span of fence), draw its exact dimensions and think over the installation method. It should have a stronger mount, since there is no connection to other parts. It will be secured only by the main pegs and will be more susceptible to the influence of strong wind and rain.
Having calculated the required number of spans, you can begin to calculate the material. Draw a span on paper, count the required number of pickets (posts, branches, planks, etc.), and then multiply by the number of spans. This way you can quite accurately calculate the required amount of material.
Vinyl fences
At first glance, such fences do not inspire much confidence. They seem too fragile, but during operation you will see the opposite. Vinyl fences will prove to be durable structures that are not afraid of loads. They will not be afraid of corrosion. They are easy to clean and wash. Vinyl is completely indifferent to weather changes. Assembling the fence is not difficult. The latter makes decorative vinyl fencing a priority for DIY assembly.
Vinyl fencing is durable and easy to clean
Weaving methods and technologies
There are a whole lot of them. The photo above shows fragments of popular techniques. Below we will look at the features of the three main methods.
Vertical
Wooden planks or branches (2-3 pieces depending on the height of the fence) are attached to the posts in a horizontal position. The slats are intertwined with rods in a vertical position. The bottom of the fence should start from the thick edge of the bars. The upper edge is fixed with wire or rope.
Horizontal
Horizontal is the classic way to create a fence. Masters also call this technique the figure eight.
Every half meter it is necessary to drive supports into the ground.
Weaving begins from the thick edge of the branch. The branch is passed between each pillar in turn. The next row must be walked on the other side of the fence. After several rows, a figure eight pattern will be noticeable.
If the rods are thin, then it is better to collect them in bundles and only then start weaving.
Chess
A variation of the horizontal method. The difference is in the use of several rods at once. Usually thin ones are selected.
The result of correct application of the technique is a pattern resembling a chessboard.
Concrete scenery
When you mention a concrete fence, a gloomy gray structure of gigantic height immediately appears before your eyes, depressing and overwhelming. If you think that you are being asked to build something similar on your site, you are mistaken. To decorate lawns and paths you will need bright elements with beautiful patterns on the outside.
Decoration for a concrete fence
Concrete parts for a cheerful fence can be cast with your own hands. For this you will need polyurethane or plastic molds. They are lubricated with vegetable oil (this is necessary so that the finished product does not stick to the mold) and filled with a concrete mixture solution. It should have the consistency of thick sour cream, so when adding water to the cement-sand mix, take this into account.
There are a large number of concrete casting molds on the market.
In the traditional recipe, 2 portions of sand are added to a portion of M 250 cement. Remember that too much sand will make the section darker. The holding time of the solution in the mold is 24 hours. After hardening, the finished element is removed. Having collected the required number of sections, you can begin installing the fence. You can paint the finished fence with pictures or simply paint the sections with different colors.
Decorative concrete fencing followed by painting
Pros and cons of braid
A wattle fence is a low fence made from intertwined twigs of plants or tree branches. Its main function is decorative.
Among the advantages of such a fence:
- Natural material is used for production.
- Doesn't require a lot of money.
- Easy to assemble yourself at home.
- Wicker sections go well with metal and plastic poles.
- The choice of different weaving techniques allows you to create unique patterns and compositions.
Among the disadvantages of a wicker fence:
- Service life does not exceed 10 years. Then the branches may begin to shrink and break. The tyn will have to be replaced with a new one.
- Does not perform a protective function. Building such a fence on the side of the street or road is not a good idea.
- If one of the rods is broken, it will be difficult to repair.
As a decorative element it will look original in the courtyard of a country house, in the village, or as an interior decoration for a country-style cafe. In addition to the fence, craftsmen can weave various crafts, baskets, flower pots (vases for flower pots), and make benches.
Unusual decorative fencing with your own hands
New life for old bottles
“If decorative fencing made with your own hands from bottles confuses you with the appearance of “bare” bottoms, then correct the situation by painting them with paint suitable for outdoor use.”
Receiving glass containers is not a relevant process today, so many people have accumulated a lot of such goods. You can’t throw them away and you don’t know what to do with them. Try building a fence out of unnecessary bottles. Anyone can create such a masterpiece. A flight of fancy will help you lay out an ornament or a fancy pattern from transparent, dark brown and green bottles. On sunny days, fireworks from sunbeams will fly off from such a fence. The stained glass effect will not disappear at night. It will appear in the headlights of passing cars.
Spectacular fence made of glowing bottles
To make your idea a success, use a few tips.
Use only thoroughly cleaned containers. Otherwise, there will be no good adhesion to the solution. Before embedding the bottles into the wall, seal their necks. This is a necessary step. It will protect against the formation of condensation during temperature changes.
Decorative fencing along the path made of bottles
Beer bottles have optimal sizes and colors. Champagne containers are non-standard in their dimensions, so they will have to find other uses, for example, to fence a flower bed or path with them.
To do this, you will need to remove the stickers from the bottles and wash them. Then fill each one with soil and close it with a stopper. Measure the length of the bottle with a tape measure and divide the result in half. This will give you the depth of the trench that needs to be made around the enclosed area. The width of the groove will be determined by the radius of the bottom. When all the preparatory stages are completed, we begin to create. Turn the first bottle upside down and lower it into the trench. We fill it with moistened soil and tamp it down. Now we place the second bottle close to the already installed part and repeat step by step everything we did with the predecessor. We do this until we have fenced the entire flower garden.
Low flower garden fencing made from buried bottles
You can use plastic containers in the same way. Here you can try to play with displacement. Between half-liter bottles, try periodically inserting one-and-a-half liter bottles. You will see that the fence being built turns out to be very interesting.
Fencing beds from buried plastic bottles
If decorative fencing made with your own hands from bottles confuses you with the appearance of “bare” bottoms, then correct the situation by painting them with paint suitable for outdoor use. You can hide their surfaces under decorated flowers cut out of plastic. This solution will look very nice.
Double tier bottle fencing
To create a multi-tiered fence, you will need to stock up on prepared bottles, a watering can, a shovel and fertile soil. First of all, let's dig a trench for the largest ring of the future flower bed. We will put a row of bottles there, strengthen them and add soil to the level of the bottoms. The second ring must be placed inside the already finished area. To do this, dig a new groove and repeat all the steps step by step. We will again add soil to the center of the resulting space.
Fencing made of bottles in several rows
This way you can make as many tiers of the flower garden as your heart desires. Narrow bottle rings should be tied together with wire. This will strengthen the walls of the fence.
Don't get carried away. A flower garden that is too large with many tiers will be inconvenient for you to care for.
Horizontal fence made of bottles
“To make decorative fencing of this type with your own hands, you will need to collect a sufficient number of bottles of the same type and find an iron barrel”
This is a more monumental structure. To make decorative fences of this type with your own hands, you will need to collect a sufficient number of bottles of the same type and find an iron barrel, which will have to be cut in half.
Horizontal fence made of bottles
We install the prepared container in the places of the planned flower beds and begin to lay out the future fencing. Using a trowel, apply the solution to the outer side of the barrel wall so that the neck of the bottle can be inserted into the resulting mound. We place subsequent elements in maximum proximity. When the first row is ready, you will need to lay the next one on top of it, but do it so that the bottoms are staggered. The actions will continue until the unsightly barrel turns into a magnificent flowerpot fence.
Tire fencing
Even if you don’t have a car and your friends aren’t car enthusiasts either, it won’t be difficult to find fencing material like old tires. You can literally get them for pennies in auto repair shops.
Tires can be used from different angles. The easiest way is to dig them vertically into the ground. It is rational to decorate the above-ground part in different colors. If desired, place a cut out animal or bird figure on each tire.
If you managed to get hold of a KAMAZ tire, then simply lay it on the ground and, filling it inside the soil, make a flowerbed in it.
Flowerbed of painted tires
You can cut and unfold the tire as long as possible and secure the resulting tape to previously dug pegs. This is done when there is not enough material, and many areas need to be fenced. The front side is also painted.
Hedge
This type of decorative fencing, planted with your own hands, is also considered an original solution for zoning a site. They are preferred for their cheapness and beauty. And indeed, you don’t really need to spend much money on creating such masterpieces, which can’t be said about strength. For a living fence, you will need bushes of plants that are well acclimatized in our conditions, preferably from the evergreen series. Shrubs are planted around the perimeter of the selected area and sometimes shaped into the most intricate shapes using pruning shears or garden shears.
Living decorative hedge
How exactly to trim the bushes will depend on the stylistic decision of the rest of the landscape. For classics, you will have to stick to strict geometric patterns of hedges, but in country, you can give it the appearance of any pets.
Hedges can be easily shaped into any shape
You will have to regularly monitor the condition of such a fence, water it, protect it from pests and try to adjust its shape in a timely manner so that it does not look like overgrowth in the center of the yard or along its perimeter.
Fence blinds
If you do not want to have close contact with your neighbors and put your life on display, then a fence of this type will be a real godsend for you. In the fencing, the span plates are installed at a certain angle. This does not prevent the penetration of light and air. For the plates you will need galvanized steel or wood. In the first case, you will have to fork out more money, but such a fence will last longer. Galvanization has a specific protective coating and will need to be painted periodically to restore its original attractiveness, but this will have to be done much less frequently than with wood.
A fence with blinds will hide the area from prying eyes
The fence of the blinds can be made blank or with gaps between the slats. In this matter, the decision is up to you.
Types of fences
Today you can purchase fences of a wide variety of types and sizes, made of plastic, wood, and metal. But I wouldn’t want to see the same one at my neighbor’s. There should be individuality in everything. Therefore, it is more interesting and easier to design and make a fence yourself, using improvised means. It doesn’t have to be large - sometimes one or two spans are enough to give a plot or flowerbed a certain charm.
Gallery of products made from scrap materials
A woven corina fence and at the same time a flower bed for different types of plants
Fence made of tall plastic bottles
Fence-flower bed made of car tires
Traditional Ukrainian wattle fence
You can combine different types of fences on one site
To make a fence, you can use a variety of materials: wire, stone, plastic or glass bottles, PVC pipe, old tires, reeds. Various elements made of wood are also suitable: vine branches, hazel branches, willow twigs, picket fences, wood cuts, wooden logs, etc. Almost everything that is on the farm.
You can increasingly see wicker fences. These are traditional wattle fences that can be easily made from pre-cut and prepared willow twigs, vine branches, hazel, raspberry, cherry branches, and reeds. Easy to make, they go well with almost any plant. With certain skills, you can build a basket fence for a flower bed. Weaving can be horizontal or vertical. For beginners, it is better to start with vertical weaving to understand how it works. If the wattle fence is made in the spring from unprocessed willow branches, it will turn out to be a hedge, since the willow takes root well and quickly.
Types of fences made of different materials in the photo
Slab fence Simple fence for zoning
Wattle goes well with hedges
You can decorate a flowerbed with such a fence
Original fence made of glass bottles Willow hedge
Vertical wattle can be very dense
Original fence made of willow twigs
Stone fence for decorating a flower bed with low-growing flowers Gabion - a fence made of mesh filled with stone
Photo gallery - decorative fencing, do it yourself
Making the foundation
A stone structure will have a significant weight, so before starting its construction we must pay due attention to arranging the foundation. We will build a fence on a continuous reinforced strip base - the best option for heavy fencing.
We make the width of the foundation approximately 15 cm larger than that of the finished fence. We choose the height of the base (the part of the base protruding above the ground) at our discretion. Builders recommend that it be no lower than 10-15 cm. We will be guided by this value during the further construction of formwork.
First step. We dig a trench about 70 cm deep.
Second step. We fill the bottom of the hole with a 5-centimeter layer of sand. We compact the pillow thoroughly.
Third step. We install the formwork. It can be assembled from boards, plywood and other suitable materials.
Foundation for a stone fence
Fourth step. We lay the reinforcing frame on the sand cushion. To strengthen the fence, 8 mm rods will be sufficient. We reinforce in 2 layers. First, we lay a mesh of reinforcement at a height of 50 mm from the sand cushion.
We fix the second mesh 50 cm below the ground level. To fasten both reinforcing layers and further strengthen the foundation, we first drive reinforcement or pipes with a diameter of about 10 mm into the ground.
Fifth step. We pour concrete. We remove the formwork after at least 2 weeks. The concrete itself will gain strength in about 1 month.
Foundation for a stone fence