A woodpile is an ideal place to store firewood in optimal conditions. In addition, neatly stacked firewood will make your property more attractive. But first, you need to choose a suitable place in advance. Today we will look at all the different options.
For long-term storage and drying of firewood, you can use a special shed or shed. Woodpiles are also used in landscape design: beautiful stacking of firewood in an original way will add a special flavor to the area.
Designer woodpile: main advantages
1. Practicality and functionality. By placing the woodpile in a convenient place, you won’t have to go far to get firewood.
2. In winter, the firewood can serve as a kind of barrier, so clearing the paths of snow will be much easier and faster.
3. A beautiful woodpile is the highlight of the landscape design of the site.
4. Such an element in the country is a great idea for some functional structure, for example, the base of a table near the barbecue.
Firewood must be protected from the weather
0
And this is true: leave the logs in the rain, and then try to light the stove with raw wood - a lot of smoke and a “fun” time are guaranteed. Therefore, we must protect our “strategic reserves” from rain and snow - at a minimum, cover the stacked woodpile with any moisture-resistant material (film, roofing felt, old slate, and so on - whatever is on the farm).
×
How to fold a woodpile?
Making a firewood rack with your own hands is not difficult. Let's consider the process of constructing the most typical structure.
Tools and materials:
- carpentry clamp for ease of work;
- hammer;
- circular saw;
- roulette;
- wood nails.
For the frame, you should determine the required number of boards:
- for the base: two boards 3 m each, 3 cm thick, 10-15 cm wide;
- for the side parts: four 1.5 m boards with the same parameters;
- one board 1 m long, thickness and width are similar to the previous ones.
After all the preparatory work, you can begin the main process.
We build a woodshed with our own hands
In this section we will describe how the woodshed was built near the house. The construction and painting took three days “without stress.”
Materials
Internal dimensions are 1.8 * 3.7 m, the height of the front pillars is 2.45 m, the rear pillars are 2.2 m. The total volume is 13 cubic meters, but a maximum of two cars are loaded - no more than 10 cubic meters. Moreover, they leave paths inside - to make it easier to take, they don’t load it to the top - not everyone in the family is tall. If the load is full, it is advisable to install additional jibs so that the weight of the firewood does not squeeze out the sheathing boards.
The frame is made of timber - racks, the lower and upper trim are made of 100*100 mm timber. The timber is pre-impregnated with used machine oil. Everything was assembled end-to-end, with nails, and reinforced with corners on screws. For the supports, standard small foundation blocks 200*200*600 mm were purchased in the amount of 6 pieces.
Construction step by step
The beginning of the construction of the firewood shed is standard - leveling the site and aligning the blocks. If the soils are viscous (clay loams, black soil), it is better to make a sand and gravel bed. Dig small pits 20-25 cm deep, pour and compact crushed stone, and place blocks on top.
Leveling the site is the first step in building a woodshed
Two layers of roofing material are laid on the blocks, timber is laid on top. The harness does not connect with the support in any way. If you wish, you can drill holes and hammer in the studs.
First, we laid out the beams of the lower frame and fastened them with nails (80*3 mm). Then screws were screwed into the corners. The next step is installing the racks. They are placed in the corners and above the intermediate support. The rear pillars are shorter than the front ones - so that there is a roof slope. They, too, were first placed vertically (checked with a plumb line), and hammered in obliquely with nails - two on each side. Then they secured them with corners on screws - two per rack. If there are concerns, you can also screw/nail the plates to each rack from the outside.
The racks are attached to the bottom frame beam
The entrance to the woodshed is located in the center. Because of this, the racks are offset and not installed above the support block. As a result, there is a slight deflection. To eliminate it, place four blocks in the first row, taking into account that the middle will be occupied by the entrance. Especially if there are doors: they place a significant load on the racks, so they need support.
In front, the intermediate posts are not above the support
Once the posts are in place, it's time to assemble the roof. First I nailed the side boards at the top. They are installed on the same level with the upper trim of the rear, shorter part (seen in the photo below). They and the rafters are made of 50*100 mm boards, the lathing is made of 30*100 mm boards.
Corrugated sheets were used as roofing material, and the boards were laid flat under it. The roof overhangs are about 35 cm, the side projections are about the same. The size of the roof was selected so that there were no scraps: exactly four sheets were used.
Roofing felt is laid under the corrugated sheet to prevent condensation from dripping onto the firewood: the costs are small, but there are benefits. Ruberoid began to be laid from below, laid along the overhang. The next one goes in 10 cm. It turns out that the drop that fell at the top simply flows down without getting inside.
This is what a woodshed with a finished roof looks like
The next step is to lay the floor. It was made from a 100*40 mm board. They were laid with gaps of 2-3 cm. Next, the wall sheathing was nailed. It was decided to make a gap equal to the width of the board (100 mm). The boards were nailed down, two on each edge. The structure turned out to be well ventilated, however, with a side wind it gets heavily clogged with snow.
Do-it-yourself woodcutter is almost ready
The last stage is painting. Here, take any composition for wood with bio-protective properties: so that the bugs eat less. In this version it is painted with BioTex, rosewood color.
Ready for use after painting
That's it, the woodshed is built. You can repeat this: nothing complicated. The complexity of carpentry work is at the level of high school students. The most complex components are the roof, but it is made very simply.
See the video for another construction option.
Site selection
When choosing a place to install a firewood rack, a concrete base would be preferable. If there is none, you can lay out a brick platform. This will prevent the boards from rotting, which could occur if they come into contact with the ground. Next is the turn of folding the frame.
Frame assembly and woodpile laying technology
For the frame, a meter board is cut into 4 equal parts of 25 cm each, which will serve as cross members. At this stage, the frame structure is assembled, followed by the laying of material. The service life and degree of its stability will depend on the proper filling of the woodpile.
Important! Try to lay out the logs as closely as possible to each other, while at the bottom there should be the most even and long products. Loose laying will manifest itself over time, because after the firewood dries out, it decreases in volume and forms voids, and as a result, the structure may collapse.
The maximum permissible height of the woodpile is 1.5 m. Lumber can be stacked on top with a height of no more than 20 cm. During the work, ensure the strength and stability of the structure. If you notice that the logs are deforming the frame, you should not risk it - it is better to remove the excess boards.
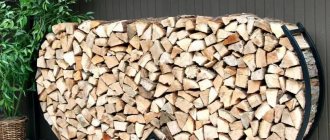
Basic methods of storing firewood
- on open air;
- in a special storage;
- under a canopy.
When choosing a particular storage option for products, several factors should be taken into account: type of wood, desired degree of drying, type of area, duration of storage.
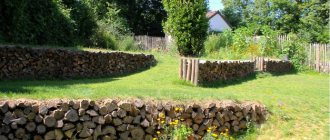
Woodpile for firewood: laying methods
The most common option for storing logs is laying them outdoors. There are several types of structures:
- single row straight;
- two-row or more;
- round;
- straight along the wall of the house.
Regardless of the type of construction, general rules must be followed:
1. Laying necessarily requires a previously prepared site (base). It can be brick, wood or concrete.
2. The top of the woodpile is covered with an additional protective layer made of hay, bark, synthetic materials and other structures. But this coating should not interfere with ventilation.
3. Make sure that the place for the woodpile is easily ventilated and is not exposed to direct sunlight, but at the same time, its complete absence is also undesirable.
4. Don’t forget to use additional reinforcements for the structure (sticks, stakes, tree branches).
5. It is important to ensure a convenient approach to the firewood shed without any obstacles, as well as fire safety measures.
If you do not have sufficient experience in stacking firewood, you should not build a large structure; it is still better to start with a small woodpile. By doing this correctly, you will not only preserve the quality of the firewood, but also add an aesthetic touch to your site.
Under the stairs
0
If the space under the stairs allows, you can put a full-fledged woodpile there. It’s very convenient and practical: the firewood is protected from the weather and is always at hand, so you don’t have to go far to get it. In fact, this is the same idea of storing firewood near the wall of the house, but there are no problems with protection from rain and snow.
0
And even if there is not enough space, you should not completely abandon the idea - a small “handy” supply will always come in handy.
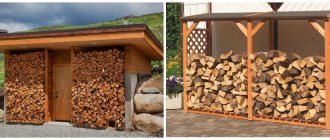
Log shed: harmony in details
A canopy is an important part of a woodpile to preserve its quality characteristics as much as possible. The main function of the canopy is to provide natural ventilation and protect the logs from precipitation. Metal, slate, boards, brick, polyethylene, etc. can be used as a material for a canopy. But the most optimal, according to experienced summer residents, is wood. Its advantages are as follows:
- durability;
- efficiency;
- ease of use;
- aesthetic appearance;
- ease of transportation;
- possibility of quick assembly and disassembly;
- does not require laying a foundation.
The main requirement when constructing a firewood shed is a sufficient level of drying of the material used.
Setting the level is the most important part of the work when erecting a canopy. If you treat this issue negligently, the structure will quickly become unusable.
Recently, polycarbonate products have become especially popular. The material itself is inexpensive and has good quality characteristics. Therefore, it is often used to erect a woodpile canopy.
Types of wood burners
The parameters of the woodshed and its appearance are determined by the amount of firewood intended for use throughout the season. The simplest version for DIY assembly is a canopy with a floor and three walls . The floor here is slightly raised above the ground. This design is positioned separately on the site or attached to a utility block, bathhouse or house.
This type of firewood can be made strong and reliable with your own hands by using strong logs. Its roof is created without complex techniques: the slate rests on the floor beams.
The roof can be made more complex if desired. For example, do it with two slopes.
Options for simple but convenient canopies:
A more complex but effective polycarbonate option:
Options for decorative solutions for a gable roof of a free-standing woodshed:
Free-standing firewood racks with internal decorative elements; they are simply inserted when stacking firewood:
A design with a twist - convex side walls.
Miniature wood burners can easily replace a bedside table, stand, stool, bench, or wall decor element.
Options for beautiful firewood laying:
Place for firewood, if the supply is small, can also be provided in original places:
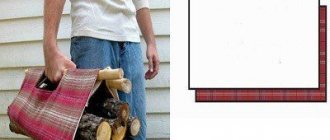
Lumberjack “string bag”:
Non-standard wood options:
Small woodsheds. Pros: portability and ease of manufacture.
From concrete trays:
Closed firewood
This design can be used for short-term or long-term storage of logs. For example, some owners of suburban areas are building a separate extension within the house, garage or barn.
It’s quite easy to build a woodpile yourself, but unlike a purchased finished product, this design has a lot of advantages. A competent approach from the practical and aesthetic side guarantees the desired result, and a wide selection of ready-made solutions and materials will make the task much easier.
Ready-made woodsheds - a simple construction solution
Today on the building materials market you can purchase ready-made woodsheds of all types and designs. This is the best solution for those who do not have free time for construction or simply do not want to engage in the construction of structures. On sale there is a luxurious firewood shed made of timber, which looks like a gazebo, and an exclusive hand-made forged firewood shed, and a structure made of polymers. The choice is large in a variety of shapes, models and colors.
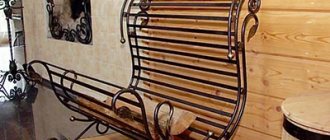
Metal grate woodshed
Choose the one that suits your yard design and fits your budget.
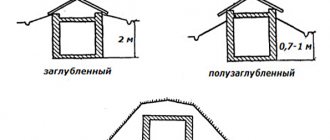
A thoughtful place for firewood when building a house - a built-in woodshed