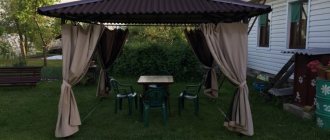
How to turn an ordinary local area into an integral landscape composition? It’s relatively simple: you need to competently work with small architectural forms. These can range from a pergola to a small sculpture, but few things add as much charm to a garden as a wooden bridge. Even if there is no lake or shallow ravine on the site where the bridge will be used for its intended purpose, it’s okay - you can fill a dry stream of pebbles, dig a ditch or throw a bridge over a flower bed.
Making a classic garden bridge with your own hands is not at all difficult. We have prepared three simple projects that even a beginner can handle. You can choose either a straight wooden bridge, where there are no curved cuts and everything is as simple as possible, or one of two arched structures, the manufacture of which, however, is also not complicated.
These projects don't require a lot of lumber; moreover, most of the elements can be made from leftover boards or other scrap materials, such as pallets. The same applies to tools: to perform sawing and assembly, a jigsaw and a screwdriver will be enough. We will talk about choosing suitable wood, proper protection from moisture and other important nuances below. So let's get started!
Why do you need a decorative bridge?
The thematic design is intended to serve as decor. But if there is a pond on the landscape area, then the bridge already serves as a crossing.
Moreover, the decorative design of the structure does not fade into the background, because you always want to walk along the charming bridge.
The main thing is that the crossing corresponds to the landscape or at least its individual fragments.
Take, for example, the path that stretches to and from the bridge. If it is paved with crushed stone, gravel or pebbles, then we know a building material that is certainly suitable for building a bridge.
On the other hand, the path can be supplemented with forged lanterns, which when constructing a crossing only expands the choice of building materials - stone or forging.
There are times when, when building a thematic structure, it is necessary to change the landscape design completely. But this only simplifies the project, because “dry” construction lasts faster than building a bridge over a river.
Although the latter is usually not wide, and this gives a reason to use a ready-made one, i.e. one-piece design.
The latter is predominantly a wooden bridge, which is quite light in weight compared to its analogues. But stone and forged structures must be assembled on site, which is very difficult.
How to protect the bridge from moisture and rotting
The issue of protection is paramount. Otherwise, the bridge will become unusable within a few years, since wooden structures are not only used year-round in the open air, but are also installed directly on the ground, through which soil moisture is intensely recharged.
Choosing wood for outdoor structures and methods of protection
It’s logical to start the conversation about moisture protection with the right choice of wood. Species with high resistance to decay include oak, larch, and ash. More exotic options include cypress or IP (iron tree). Despite all the obvious advantages, these breeds have one significant drawback - the price. Therefore, in practice, most people use inexpensive and affordable pine to make outdoor structures.
You can get maximum durability from this simple breed. The best option is to use pine lumber that has undergone industrial antiseptic treatment under pressure in an autoclave. Even better (albeit more expensive) is to buy thermally modified wood; as a compromise, it can only be used for those elements that are in direct contact with the ground. Finally, the cheapest protection option is to independently treat lumber with antiseptics.
Read more about treating wood against moisture and rot in this article.
Structural moisture protection
In addition to the antiseptic treatment of the garden bridge, it is important to pay attention to constructive methods of protection. We took into account the main ones above: these are drainage gaps for the outflow of water from the flooring and the use of thick two-inch boards for the sidewalls , which actively absorb soil moisture and begin to rot first. Additionally, we recommend installing the bridge in such a way as to prevent direct contact with the ground . The structure can be raised on bricks or mounted on low metal corners concreted in the ground.
Where is the best place to install a bridge on the site?
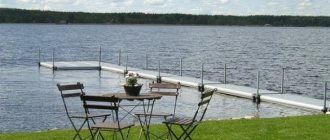
In landscape design, a bridge is a vertical element that beneficially changes the perception of the territory. It adds visual relief to the site and makes the landscape more interesting. The bridge can be thrown over a dry stream, flowerbed or ditch. It is also always appropriate for them to simply connect garden paths in the country. If there is a lake, stream or alpine hill with a pond on the territory, the choice of location is obvious.
In a small area, it is better to install the bridge on the periphery: then the area will visually appear larger. On spacious properties, this vertical element is used to place accents, for example, to emphasize the most beautiful place in the garden. It can also be used to separate different zones of a large garden.
Decorative bridge - actual construction
If a thematic crossing is built according to the art of engineering, then it will serve for many years, regardless of its category and external influence.
The construction of the bridge obliges:
- Drain the pond to make the upcoming event easier;
- Install a reliable foundation in the form of concrete supports on different banks of the same stream (the optimal distance between the supports and the reservoir is 0.5 m);
- Lay the load-bearing span on supports so that its two ends are at the same level relative to each other and the ground;
- Finish the installed frame with plank or stone flooring (for heavy stone it is better to use a durable metal span);
- Install steps and railings, if desired, complete the latter with lamps or other accessories.
The bridge may be rounded or curved, partially or completely.
In the first case, it is enough to use the appropriate railings, while the second option requires resorting to one of the following techniques:
- Installation of flexible span in advance;
- Complementing the foundation and span with different fragments.
Separate ready-made structures can be made in a workshop or purchased, and then freely installed above a pond. In particular, we are talking about wooden bridges.
Sometimes one single piece of cloth is enough to pave the way through the spring. But it is better to resort to this method if the reservoir is large, if it is a pond.
Then there should be several canvases and they can all stand on stones or boards, like the bridges near the pier. However, in Japan they like to build such structures in a zigzag.
Arched bridge for the garden and cottage
The second version of the project is a bridge with an arched base and curved railings. It looks more elegant and resembles garden forms in traditional Japanese style. What is important, the “humpbacked” design provides not only greater aesthetics, but also increased strength. Otherwise, this garden bridge is made according to the same principles as the first project.
General detailing and step-by-step assembly
Drawing with dimensions in mm
Marking and cutting curved parts
Start by making two arched sides (A). The initial blanks used here are 50x300 mm boards, slightly more than 2500 mm long.
Creating curved parts requires some skill. Half the success here depends on applying even and symmetrical markings. This may seem like a difficult task, but we will share some tricks that will make life easier in this matter and help you avoid mistakes.
There is a simple trick for creating perfectly straight curved markings. Drive two small nails into each end of the board, then, using them as anchor points, bend a flexible piece of wood or long slat between them to create a guide for drawing a straight arc. Repeat a similar operation to draw the upper curve.
Having made the first side panel and carefully sanded the edges, it is used as a template for cutting out the second part. Make markings for the railing (E) in a similar way.
Base assembly
According to the dimensions indicated in the photo, prepare four transverse strips (B) and assemble them together with the ready-made sidewalls. The tie can be made using self-tapping screws (by drilling through part A into B), but for greater reliability we would recommend using metal corners.
Based on the given dimensions, prepare 16 boards for flooring (C). Bevel the first and last panels at a 45° angle. Using pre-drilled holes, secure each board with self-tapping screws, leaving 1.5 cm protrusions on the sides. The first panel is mounted with a slight overhang in front. Also, do not forget to leave 4-5 mm gaps between each plank. Despite the “humpbacked” design, which itself will ensure the outflow of water, additional drainage is very important here.
Manufacturing and installation of railings
Prepare six support posts (D) 660 mm long from 100x100 timber. Next, make cutouts in the overhangs of the flooring, and then install the posts according to the same principle as described in the first project (with flush-mounted bolts).
Cut two railings (E) to the dimensions shown using the technique we described at the beginning. Round the ends of the parts and complete the assembly of the garden bridge by securing the railings to the supports with self-tapping screws or bolts.
If you want a more professional appearance, we recommend rounding all visible edges of the wood pieces. This can be done with a sander, an edge router, or by hand using one of these homemade sanding blocks.
Decorative bridge - current styles
A wooden bridge for a garden is good because it is easy to process and paint.
Through appropriate thematic design activities, you can set different style directions:
- Medieval;
- Asiatic;
- Romantic;
- Minimalism.
The first option welcomes wrought iron railings framed in the shape of Easter eggs.
In Asian style, bridges are usually red, red-black, red-white.
Romantic style - Gothic forging with flowers or white lathing. In the case of minimalism, railing posts can be abandoned.
The late Middle Ages are also characterized by stone passes with or without forging. If you complete such a design with painting or stucco, it will become romantic.
Another simple bridge style is exotic. Its crossing is assembled from a tension rope and a boardwalk. The tension occurs due to two pairs of piles installed on different banks of the canal. Then boards are attached to the ropes.
This structure can sag and wobble, so it should be placed above the established norm by default and supplemented with railings. For the latter, a special patterned braided rope is used.
Bridge construction work on a garden plot
To make the flooring you will need a frame, and you can make it yourself from wood in two ways: by installing the boards on edge or by laying them flat. The first option will require less lumber, but the span will most likely be straight, since bending the board along the plane is a long and difficult task. The maximum that can be done is to give it a slight bend by cutting off part of the edge along an arc. It is much easier to build wooden humpbacked bridges for a summer house from planks placed flat, so we will go this route, considering various assembly possibilities.
To fly through a narrow ditch, two boards with overall dimensions of 3x18x200 centimeters will be enough for the frame. They are connected to each other by thinner crossbars, nailed to the bottom at the ends, as substrates. However, you can connect the foundation logs with two beams; they will also serve as “supports” for the bridge. If the flooring needs to be thrown over a long distance, under the load-bearing boards, along the outer edge of the frame, it is advisable to fill the beams of the appropriate length, with a cross-section of at least 10x10, and only then attach the cross members.
Next, we begin to form the ledges. To do this, we lay shorter boards of the same 3-centimeter thickness directly along the load-bearing joists of the frame at an equal distance from the ends. Thus, if your frame is 3 meters long and you want the steps to be 40 centimeters wide, the next board should be 0.8 meters shorter than the base. If you want higher steps, use 10x10 timber instead of the boards that form them (including load-bearing ones), this will only make the bridge stronger and more durable. True, it will be more difficult to put together such a frame, and, most likely, you will have to use metal plates from the inside of the frame to reliably connect the beams.
Decorative bridge - decorative component
Having figured out the question of how to make a bridge at the dacha, it’s time to start decorating it. And here designers recommend resorting to the following decorative elements:
- Large boulders - placed mainly on the water near one edge of the bridge;
- Colored pebbles - designed to decorate both thresholds of the structure;
- Lamps – should be presented in a minimum quantity and correspond to the size of the crossing so as not to visually load it;
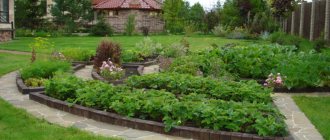
- Flowerbed - organized so that the bridge serves as a background for the flowers (the color of the inflorescences is matched to the color of the structure).
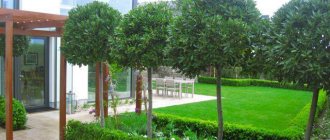
Next to the bridge, a single tree looks quite harmonious - thuja, cherry, maple. If the first one is relevant at any time of the year, then cherry is good in the spring, and maple is good in the fall.
Photo gallery
We invite you to look at a selection of photos with beautiful ideas for decorative garden bridges made of wood and metal:
forest house
The next craft will not take much time. A variety of materials are suitable for production. We will tell you how to make a craft house from natural materials.
To start building a house, we need:
- wood sticks (it’s better to collect more);
- cone;
- stand for the house (use thick cardboard or wooden plank);
- plasticine;
- universal glue;
- cotton wool;
- a sheet of cardboard of any color;
- Styrofoam.
You can get started:
- Let's prepare the chopsticks. If you have collected large branches, you need to trim them. The length of each stick should be about ten centimeters.
- We determine the location based on where the house will be located. It is advisable to carry out construction work immediately on ready-made material. We take four sticks. We secure them together using plasticine at each corner.
- Let's move on to the second row. We attach one branch to each side and secure it with plasticine. We continue to add branches until we get the desired height of the walls of the future house.
- Now we need to make windows and doors. Take a light-colored stick and carefully remove the bark from it with a knife. It is the bark that will be needed for decorative windows. Cut the material like this. To make long pieces.
- Give the cut bark the same size. We cut off the excess. Using glue, we form windows and doors on the house. The main work has been done.
- Let's do the roof. Take cardboard and cut it in half. We fold the resulting pieces and cut out triangles.
- We repeat the same action with the second part of the cardboard. We glue the pieces together and get a roof. We decorate it with a pipe made of a twig and plasticine.
The house is ready, but this type of craft made from natural materials for kindergarten can be further decorated. For example, you can make a fence from the remaining branches.
It is constructed according to the same instructions as the house:
- We attach each individual stick to the base using plasticine;
- add layers to the required height.
To keep the house from being empty, let’s move Leshy into it:
- take a pine cone and add sticks to it in place of arms and legs;
- You can also use a stick as a spout;
- Let's decorate Leshy with a hat, it can be made into the tops of an acorn;
- We make Leshy's eyes from plasticine.
We will decorate the area near the house with a snow-covered tree. It's easy to do. Take several branches and wrap them with thread at the base. Treat the branches of our tree with glue and sprinkle with foam balls. All that remains is to create a winter environment. To do this, glue cotton wool to the roof of the house and lay it out across the clearing.
The product is ready. These children's crafts from natural materials can be created without effort and expense. Children will really enjoy the activity, so invite them to participate in the creativity too.
Kinds
There are a large number of varieties of garden bridges, but most often they are divided into two categories:
- functional;
- decorative.
Functional structures are used for their intended purpose - for transitions from one zone to another. In this case, the zones are separated by waterways.
Decorative bridges for the garden, photo
Decorative bridges, like functional ones, are also usually built over bodies of water: canals, streams, ponds. You can design a bridge that approaches the pond or slightly “enters” it. Here, a lot depends on the imagination of the site owner or landscape design specialist.
But, as noted above, the presence of a water artery is an optional requirement for creating bridges.
The difference between decorative structures and functional ones is that they are smaller in size and do not move around them. They are installed solely for decorative purposes.
But in terms of their design purpose and the impression they make, decorative structures are practically no different from large bridges.
Bridges in the garden, photo
Such structures can be installed over small streams or in any picturesque corner of the site.
Important!
If you have made a choice in favor of a functional bridge, when creating it, pay attention to both aesthetic and operational parameters. The crossing should be not only beautiful, but also durable, capable of withstanding significant loads. Do not neglect such points as the safety and reliability of the structure.