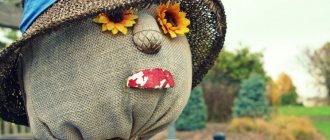
It has long been customary in Rus' to say goodbye to winter on Maslenitsa Week. They organize entertainment events, arts and crafts fairs, and bake pancakes. The main heroine of the holiday is a self-made effigy of Maslenitsa. It is made from various materials, but most often from straw. They dress the stuffed animal in bright outfits made of fabric with patterns and colors.
A circle is placed in the hands or on the head of Maslenitsa, symbolizing the sun and the imminent arrival of spring
How to make a stuffed animal for Maslenitsa 2020 with your own hands: 30 great ideas
Greetings to all!
Maslenitsa week is approaching and, as everyone knows, there will soon be a performance dedicated to seeing off winter. And how can we spend the winter without the main character, and I mean the scarecrow of Maslenitsa. Every year she appears in the winter spaces, she is made from different materials, but in most cases from straw, and then wrapped in a bright painted beautiful fabric, the result is such a big funny girl that looks like a doll or a grandmother.
Usually on this day there is a fair, where, of course, according to tradition, the most important dish is pancakes, so tasty and lacy that you will simply lick your fingers, because it is always more fun in the cold, and even with company. You can also see all kinds of exhibitions with various handicrafts made by yourself.
At the very end of the holiday, it is burned at the stake and at the same time they welcome spring, which means the sun will burn brighter and the birds will sing loudly.
Suitable dimensions and installation location
Before making a garden scarecrow with your own hands, experts advise assessing the size of the garden or vegetable garden. The height and width of the future structure depends on this. Birds do not react to “structures” that are difficult to notice among vegetation. A scarecrow that is too narrow resembles a young tree, so birds can settle in it.
As for the proportions of the stuffed animal, it should resemble an adult who has:
- hands;
- legs;
- torso;
- head;
- hat;
- hair.
However, the appearance and size of the scarecrow are not a guarantee of success. After all, many monuments installed in parks have become a common transit point for birds. An equally important factor is the size of the protected area. If the garden is compact, one scarecrow is enough. A large garden will require several structures.
The scarecrow is installed at the border of the garden or in its center.
How to make a Maslenitsa scarecrow with your own hands from straw?
Everyone knows that in Rus' such toys were made from simple material like straw; this is the most common type, and in our time too). Using this simple diagram with a description, you can easily decorate the upcoming celebration, which can even take place at school or kindergarten.
This Maslenitsa effigy turns out to be very large, it looks like a girl or a symbol of a female image.
Of course, they burned large huge scarecrows on bonfires, sang songs, but the children could make small creations themselves, also from straw.
They are such beauties).
Often straw was hidden under any activity or unnecessary things, or work was generally done without it.
In my opinion, it looks more like a scarecrow).
Therefore, of course, make from what you have at hand, choose your favorite option.
Moreover, when there is somewhere to look and see all the step-by-step steps of making the work:
The result turns out beautiful and you will agree that such a craft is not difficult to do. Any scarecrow made of straw can be hidden with any openwork or multi-colored material.
Or do you still prefer the usual option, then at least decorate it with a satin ribbon.
Here's another step-by-step instruction from the bast.
It turned out quite modern and very impressive.
Scarecrow made using papier-mâché technique
Materials:
- PVA glue and “Moment”;
- old newspapers or paper towels;
- cross for the base;
- dye;
- food foil;
- clothing and headdress for decoration.
The papier-mâché technique allows you to create any shape, but it takes time for the layers to dry. This work is quite painstaking.
The top final layers can be made of paper. PVA glue is diluted 2 times with water. The newspaper is crushed, dipped in a glue solution and squeezed out. Next, the foil body is carefully pasted over, forming the desired shape and volume as if from plasticine. Every 2-3 layers must be dried until completely dry.
At the very least, even today the garden scarecrow remains one of the effective, albeit short-term, means of protection against annoying birds that pose a threat to the harvest. To be honest, for a scarecrow to actually “work”, it also needs to rumble and move in the wind. However, the decorative effect is also worth something. If you don’t want to be considered incompetent, create a crop protector yourself. In this article you will find a description of the main details and step-by-step instructions for creating a scarecrow for your dacha, as well as many ideas and photos of how you can make an unusual garden scarecrow with your own hands.
As a rule, a garden scarecrow performs 2 functions or roles at once:
- scaring away birds;
- decoration for the garden plot.
Indeed, if you want to have a well-groomed garden, not spoiled by feathered pests, let your garden scarecrow instill fear only in the birds, and not in your neighbors. Therefore, in any case, it should complement, “revive” and decorate the area, or rather be terribly unpleasant, scary for birds and unusual for people. Although a garden scarecrow most often looks rather untidy, rags are not at all a necessary attribute in the fight against very cunning garden pests.
In short, a garden scarecrow should really become a real decoration for your dacha, and it doesn’t matter whether you have a need to protect your crops. And in fact, why not do it just like that - for beauty and to give more aesthetics to your garden plot
One way or another, for a garden scarecrow to really scare away birds, it should look a certain way:
- its dimensions must correspond to human ones;
- the appearance should be bright and noticeable;
- it should stand near the protected volume.
Making a Maslenitsa doll for a holiday at school for an exhibition
In one of my articles, I have already shared with you a master class of such a craft from an ordinary plastic bottle and cotton pads, I hope you really liked that doll, if you want to make the same one, follow the link.
Or make such a miracle worker for meeting spring from a tree branch, which will look like a slingshot, approximately 26 cm long.
Or this one, which one did you like best?
Schoolchildren and preschoolers can come up with anything, this is an idea for an exhibition, do you like it?
Or else, children usually make drawings and pictures depicting symbols of the upcoming holiday.
This can be done using pencils.
Or markers, or, of course, paints.
Schools also decorate the hall for this event.
Posters and stand newspapers are made.
Where did the Maslenitsa doll come from?
Nowadays there is hardly a person who has never heard of Maslenitsa. But many do not know that Maslenitsa was originally a pagan holiday. Subsequently, it, like many other pagan beliefs and traditions, took root in Christian culture.
On the day of the spring solstice, the equinox, the Slavs said goodbye to winter and welcomed spring. They burned the image of Morena, personifying death and cold, at the stake, baked round cakes, ate, drank, had fist fights - in general, had fun.
Pancakes on Maslenitsa are not just food, but an attempt to attract happiness. Delicious cakes symbolized the sun, which our ancestors worshiped.
Anyone who has heard of Maslenitsa knows about the tradition of burning an effigy. It was made from what was at hand - wood, straw, old clothes. The latter was used to give the life-size doll facial features. The celebration of Maslenitsa ended on Sunday. It was then that the doll was burned, and the week’s idleness came to an end.
It is curious that in those days they made two dolls for Maslenitsa. This is a little-known fact, but soon after the big doll, a small one appeared. The Slavs called her the Daughter of Maslenitsa or simply homemade Maslenitsa. She didn't look the least bit like a scarecrow! No more than an elbow tall, dressed up like a girl of marriageable age, the doll was placed in a prominent place in the house, remaining there until the next spring.
What is needed for work
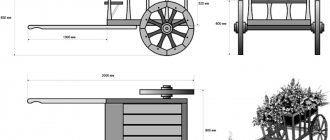
- You should immediately determine where the figure will be installed, and it is likely that it will be portable. In this case, we immediately think about a light frame so that the scarecrow can be moved periodically, installing it either in the garden, then behind the house, near seedlings in a greenhouse. Next, you should definitely decide what size the scarecrow will be and what mood it will be in will be completed, because it is important for us to scare the birds, and maybe robbers, but not our grandparents and small children. The design of the figure and finishing can be done at a professional level or from improvised means - a set of bars and fittings, wire and bags, old clothes and even tin cans and bags.
Decor for the garden and cottage: the best ideas
Why do they burn an effigy on Maslenitsa?
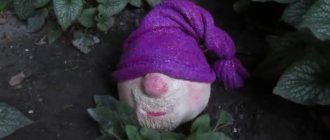
Burning an effigy on Maslenitsa is not just a folk pastime. This action carries a sacred meaning. The face of winter was hidden in the image of a straw doll. The Slavs specifically tried to make it scary in order to convey the severity of the passing cold weather. But at the same time, the stuffed animal was given funny, cute features - they did this in order to show that winter is ending and the long-awaited spring is coming to replace it.
Before the doll began to burn, anyone could take out their anger on it. The anger that had accumulated over the year resulted in punches, kicks and even poking with pins. People imagined that this was an enemy, freed their emotions, thereby saying goodbye to any grievances.
Maslenitsa among the Slavs was a little different from modern celebrations. Nowadays people often forget about the tradition of throwing old things into the fire next to a burning doll: unnecessary, broken things, torn clothes. In this way, our ancestors tried to cleanse the house of negative energy.
Variety in execution
Many gardeners start by burying the frame in the ground, but you can first make a complete scarecrow, and then secure it. There may be several accommodation options. It all depends on the preferences and tastes of the dacha owners. You can not only fix the scarecrow in the ground, but also give it a sitting position in some chair.
However, stuffed animals can be made not only cute and kind, but also scary. In this case, inspiration can be drawn from various science fiction films and literary works. In the garden there may be a place for the devil from old Russian folk tales and creatures from modern folklore. Heroes of your favorite cartoons like Shrek and other characters can also take their rightful place in the country house.
Horror movie lovers will also find suitable ideas for themselves. Skeletons and other monsters will instill fear in the birds, who will certainly forget the way to the “feeder” for a long time.
How to make a Maslenitsa scarecrow with your own hands
Saying goodbye to winter without burning an effigy is like New Year without a Christmas tree. No one will judge you for breaking traditions, but, you must admit, the atmosphere will not be the same.
We are used to going in search of a beautiful Christmas tree on the eve of the holiday, but, unfortunately, no one sells stuffed animals for Maslenitsa. Do you want a real holiday, with singing and dancing, burning effigy and eating pancakes? You'll have to try yourself.
Don't worry if you've never done this. We will tell you how to make a stuffed animal, and you can ask your mother or grandmother for the recipe.
Making a straw man
1. Making the base. What we need at this stage: two bars, nails, a hammer. One bar is longer, it should be wider, the other is shorter, narrower. Build a cross from the blanks by placing the smaller piece of wood perpendicular to the larger one.
2. Form the torso. This is where straw comes in handy. We wrap it around the workpiece, not forgetting to fluff the straw at the bottom (to make a skirt later). Use twine to form hands.
3. Make a stuffed head. Let's make a head out of a bag. We stuff it with straw, tie it, and then attach it to the body. Well, isn't it so difficult?
4. Dress up. For clothes you will need two types of fabric - white, which we will wrap around our hands in the form of a shirt, and colored. We wrap the colored one at the bottom, like a skirt or sundress. Choose a bright color, always with a pattern.
5. Draw a face for the stuffed animal. This is not a mandatory stage, but if you want, you can draw eyes, red lips, and rosy cheeks on the doll.
6. Braid your hair. We turn again to the supplies of material set aside for sewing. Look carefully for yellow or light brown fabric. Cut it into long strips and braid it. Attach to the doll's head. The doll is ready for the holiday!
There are no special rules or superstitions regarding burning a doll. You can use a candle or lighter, pour gasoline on the scarecrow, or wait for the wood to burn. The main thing is to follow safety precautions and then during Maslenitsa festivities you won’t have to call the fire department.
Intimidating factors and stylish outfit
The scarecrow on the dacha plot is not a bright doll of enormous size. The design should resemble a formidable and aggressive man with outstretched arms.
In addition, it is complemented by cunning techniques that include a number of factors:
- richly bright colors;
- moving elements;
- loud beeps.
To imitate movement, light fabrics are used that flutter under the pressure of the wind. An artificial “alarm” is made from metal bells. They are attached to the so-called garden clothing.
The idea for creating an original stuffed animal can be taken from the cartoon “The Wizard of the Emerald City”.
There is an established stereotype of how to make a scarecrow for the dacha from scrap items. Most often he is dressed up in old rags. As a result, it looks dull and does not fulfill its key role. However, the 21st century makes its own adjustments to country life. Therefore, the modern scarecrow looks fashionable and stylish. It is bright clothing that plays a key role in protecting the garden or garden.
What does the Maslenitsa doll symbolize?
If the scarecrow on Maslenitsa symbolized winter, illnesses and failures to which the people said goodbye, then the homemade doll had a different task. She is closer to the spring Bird of Joy than to her winter “namesake”.
The meaning of the doll was as follows:
- maintaining home peace and comfort;
- protection from the evil eye, damage;
- attracting good luck.
The small doll was made a few days before the holiday or right during it. Traditionally, women worked on the amulet (sometimes involving children as assistants); men were not trusted with this task.
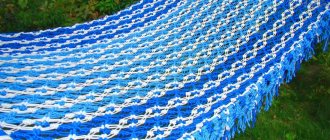
Blue Scarecrow
Many ornithologists claim that birds are scared by the color blue. We can take their word for it and take this advice:
- We make the base of the scarecrow;
- We find old things in the bins, sheets, scarves, anything, blue;
- Making the scarecrow's head. You can take a 5 liter bottle. You can paint it with blue paint, if available, or cover it with blue fabric. We supplement the head with “hair” from video tapes, the longer the better;
- We unravel the blue fabric into wide flaps and tie it to the base as often as possible. Can be supplemented with blue plastic bags.
Our blue scarecrow is ready! Tags: Landscaping
Maslenitsa protective doll made of fabric
In order for the amulet to bring happiness and prosperity to your home, keeping these benefits in your family for a whole year, it must be made correctly.
When buying a Maslenitsa doll made of fabric, you cannot be sure that the master did not think about anything unpleasant while working. But this is not a reason to refuse to buy baby dolls from souvenir shops!
To cleanse the doll of negativity, you will need: the doll itself, the waning moon, a candle.
At midnight, light candles in the dark. Having placed the doll on the table, pass the candle around it an odd number of times. If anxiety suddenly appears, continue the ritual until you feel this feeling disappear.
Not only harmful energies can hinder the operation of the amulet, but also violation of manufacturing rules. They used to be very strictly observed, but nowadays traditions are often ignored. We'll tell you what you need to pay attention to.
Rules for making a talisman doll
Homemade Maslenitsa doll, what you need to know:
- There should be nothing artificial among the materials used to make the doll. Only natural fabrics and threads.
- Dull and dark colors have never been used to create amulets. This doll is no exception.
- Unlike the life-size doll, its smaller copy does not have a face. The Slavs did not paint faces on rag dolls. It was believed that if the doll's face turned out to be similar to one of the family members, it could attract trouble. Evil spirits can inhabit dolls and harm others.
- Previously, needles and threads were not used in the manufacture of reels. The fabric was torn by hand, and the needle was replaced with thread. It was the thread that wound the elements of the figure into a single image.
Modern realities have adjusted many rituals and traditions, including this one. Now needlewomen use sharp objects when working on the amulet. But even here there are limitations. Needle-scissors take part only in the initial stage, when the blanks are made. After this, the instruments are put away on the table.
Master class: DIY Maslenitsa doll
- wooden deck (height 12 cm, diameter 4 cm);
- horned stick (20 cm high);
- thick white thread;
- yellow or red thread (for the belt);
- trimmings of linen fabric (30x20 cm, 20x20 cm);
- filler (a bunch of natural threads);
- colored fabric for shirt sleeves (two pieces 15x10);
- colored fabric for the shirt itself (a piece of 30x20 cm);
- plain fabric for poneva (15x15 cm);
- a piece of bright fabric for an apron (strip 15x7 cm);
- bright fabric for a scarf (25x25x35 cm);
- a small circle of patterned fabric (double-sided);
- cardboard.
The preparations are on the table, my hands are itching to start. But first, don’t forget to close the door to the room, kick the cat out and warn everyone at home so as not to distract you. After all, you will have to work on the doll in one sitting. The Slavs believed that if this process was interrupted, the amulet would turn out weak and would not be able to protect or attract good luck.
Step-by-step instruction
- Place the slingshot on the wooden block exactly in the middle. Her horns should stick out from above. Secure the twig tightly with thread.
- Add filler to the fabric prepared for creating the doll's head, and then tie the material with thread to form a ball with drooping ends.
- Wrap the second piece of the same material around the future body of the doll.
- Attach the head to the body. There is nowhere to hide the ends, and even if we did this, it would be impossible to connect the two parts. Spread the ends down onto the deck and tie them with thread.
- Fold the pieces of fabric for the sleeves so that the wrong side is on top. Hook the roll onto the end of a wooden arm. Glue them together with thread. Lower the matter down.
- Repeat this step again, making the second hand. Using the same principle, we make the main part of the shirt. To prevent the shirt fabric from unraveling, you need to fasten it with a thread under the chest.
- We attach the poneva and the belt in the same way. First the poneva, then the belt, one by one applying the wrong side to the doll. Pull it up, tie the thread and lower it.
- We make a headdress, and after that we attach a belt to the waist. Hide the ends of the scarf so that they don’t stick out in all directions.
- We glue two small circles of fabric onto the cardboard on both sides, and then give it to the figure. This element will symbolize the attributes of the holiday - the sun and their smaller copies - pancakes.
Homemade Maslenitsa is ready! Place the doll in the red corner and go get ready for the upcoming holiday.
How to make a scarecrow for Maslenitsa from straw with your own hands
The simplest and most traditional material for making a young lady (a stuffed animal is always associated with the female gender) is straw. This is explained by the fact that it ignites and burns very well, and in the old days everyone always had supplies of straw.
Another main feature is the scarecrow’s bright outfit. And by the way, it used to be a custom to first transport the doll throughout the village, and only then burn it.
We will need: twigs, straw, threads, fabric, felt-tip pens.
Manufacturing process:
- Place the sticks on top of each other, making a cross and tie them at the junction.
- You can make the head from straw or from fabric or paper. Be sure to draw a bright face on it. And tie a scarf.
- Make the body from straw and decorate it with clothes from various rags.
- Finally, saturate the product with water and saltpeter, then dry the craft.
And here are a couple more schemes for making a stuffed animal:
- Connected two sticks, secured the straw and decorated with clothes
- Option with braided arms
- Using straw and thick threads
- Step-by-step photo instructions
Along with the burning of “Madame Maslenitsa”, unnecessary things are also burned.
Types of frame and other structural elements
When deciding to make an installation that frightens birds, craftsmen with equal success install a wooden or metal base - a frame - in the garden.
The wooden structure is assembled from strong beams of different lengths; they can be replaced with cuttings from shovels. The blanks are fixed crosswise using two nails driven into the center (one fastener is not enough, otherwise the stuffed animal will wobble). You can also use a rope to connect the cuttings by tying a complex knot. In this case, to make a scarecrow, they take another long beam or handle, equipping it with a hanger on top - these are the shoulders; the workpiece is connected with nails to a cross-shaped base.
The metal frame is made from a profile by welding; this technique allows you to create a figure with realistic human outlines - you can bend your arms or legs, give an intricate or threatening pose.
Master class paper Maslenitsa stuffed animals
In our modern times, of course, it is not easy for city dwellers to find straw. And then plain paper comes to the rescue. These products are great to make with children, they are very simple and bright.
We will need: paper of different colors, threads, bright ribbons, a roll of toilet paper, newspaper and markers.
Manufacturing process:
- Take the threads and connect two strips of cardboard to form a cross.
- Wrap it in toilet paper.
- Cut out a dress from white paper, fold it in half and cut out the neckline.
- Put a frame on the dress, secure it with thread, or better yet, with tape at the waist.
- Take paper of a different color and make an apron.
- Cut out a scarf from cardboard and put it on your head.
- Draw the face.
Here are some other crafts you can do with children in kindergarten and elementary school:
- Option to work from corrugated paper and cotton pads:
Spectacular scarecrow for the garden
For the project you will need black fabric, polystyrene foam and wooden slats. Synthetic winterizer is used as the main filler. The paws are made from children's breeches, on which yellow socks are put on. The head is obtained from a nylon stocking.
In addition, additional materials are prepared:
- tow;
- glue;
- marker;
- threads;
- leg-split;
- willow shoots.
First of all, connect the slats to form a T-shaped frame. A square measuring 0.5 m is cut out of black material. A hole is made in the center. The edges are cut into strips 5 cm long. The resulting workpiece is bent into a triangle and placed on a wooden structure. To add volume, the “torso” is filled with padding polyester. The wings are made of tow, painted black. The head is obtained from a nylon stocking. The beak and eyes are cut out of foam plastic. The knee socks are filled with padding polyester and Karkusha's paws are sewn to them.
The resulting effigy is seated on a frame decorated with willow shoots. All elements are firmly attached to a wooden base and installed in the garden. Tin cans are used as a sound signal. They will sway even with a slight breeze. The original design will be useful to those who protect their lands from crows.
As you can see, creating a huge doll for the garden is not so difficult. Those who have succeeded give good advice. For example, they tell you what you can use to make a stuffed animal for your summer cottage. How to choose a stylish suit for him and style his facial expression. Every home has high-quality material for creating a garden scarecrow. The main thing is to boldly take on the job.
Making a souvenir from a broom
And the simplest way to make our craft is considered to be using a broom. After all, all you need is to take a ready-made broom and dress it up. Here, look how beautiful it is.
- Make the braid from a thin broom, and the body itself from a voluminous one
- If you still have fragments from the broom, then put them together and make a small doll like this
- Take the broom as a base and use cotton wool and fabric to give it a shape
And be sure to watch the video on how to make such a souvenir. An excellent option for burning stuffed animals in the country.
How to create a proper and aesthetic scarecrow
They say that the birds have become wiser and are no longer afraid of stuffed animals. The ancient people believed that the scarecrow was made not only to scare people away. It served to protect the fruits and the entire house. Some peoples worshiped the scarecrow. For them, it was a deity with mystical powers that gave health and helped garden crops to germinate faster.
At first glance, the idea is crazy, but you can check it. Make your own stuffed animal and believe that it can hear your thoughts. Also use decorations that symbolize your requests. It could be a floral wreath symbolizing beauty, or a fruit rim symbolizing fertility.
Make two stuffed animals and attract love into your home. All ideas are just your fantasies and inventions. Whatever one may say, magical power is not able to protect the harvest from feathered cunning creatures.
If you decide to install a structure following its intended purpose, then you need to know what birds are afraid of. Try to make all the details that can help and protect the harvest. What are birds afraid of?
- Bright blue color.
- They act wary if they hear loud noises.
- They fly away at the sight of moving objects.
- They freeze at the shiny elements.
The blue palette scares the birds. The color is too bright for them, because you don’t see it very often in nature. When choosing an outfit for a scarecrow, avoid light and pastel colors and choose something aggressively blue.
Most people bring old things to their dacha. A garden dweller must constantly make loud noises. Tie rustling details or bells to your clothes. Believe me, even with a small gust of wind the elements will ring frighteningly.
Using CDs and New Year's rain, add sparkle to the monster. In sunny weather, the details will reveal themselves and the birds will fly away. In our article you can look at a photo of a scarecrow in the garden and choose one of the ideas.
DIY scarecrow for Maslenitsa for school
Now I offer you a photo selection of what you can do for a school competition. I don’t know how it is now, but in my school years there were fairs where openwork pancakes were sold and shows of amulets were held.
- Here's a cute option made from straw, fabric and threads
- Cardboard blank, decorate with a broom and draw a bright face
- Another option using a broom and cloth
- Bright craft made from cardboard, colored paper and fabric
- Or you can make this option from fabric and foam rubber
- Symbolic dolls with the sun in their hands
- Crocheted stuffed animal decorated with ribbons and fabric
Fun scarecrow in the garden
The scarecrow does not have to be with a scary face or in a threatening pose; it can also be the figure of a working man, tired and sitting on a chair or bench. We present to you an interesting option, the creation of which requires only imagination, a little time and old things.
In just an hour we create an old grandfather in glasses and a hat, in a work uniform and with a garden tool. It looks far from gloomy, but can easily scare away birds, while making you smile.